首先来看一下Timer类
例子如下:
 1 package cn.concurrent.executor;
 2
 3 import java.util.Timer;
 4 import java.util.TimerTask;
 5
 6 /**
 7  * Created by spark on 17-9-25.
 8  */
 9 public class TestTimer {
10
11
12     static class Reminder {
13         Timer timer;
14
15         public Reminder(int sec) {
16             timer = new Timer();
17             timer.schedule(new TimerTask() {
18                 @Override
19                 public void run() {
20                     System.out.println("this is Timer.");
21                     timer.cancel();
22                 }
23             }, sec * 1000);
24         }
25     }
26
27     public static void main(String[] args) {
28         System.out.println("------------------");
29         new Reminder(5);
30         System.out.println("。。。。。。。。。。");
31     }
32 }
运行结果如下:
------------------
..................
this is timer.

Process finished with exit code 0
运行后,前2行很快就会输出,第三行5秒后出现。
从这个例子可以看出一个典型的利用timer执行计划任务的过程如下:
- new一个TimerTask的子类,重写run方法来指定具体的任务
- new一个Timer类,Timer.schedule(TimerTask),来运行具体的定时任务。
- 调用相关调度方法执行计划。这个例子调用的是schedule方法。
- 任务完成,结束线程。这个例子是调用cancel方法结束线程。
JDK源码来看一下:
 1     public void schedule(TimerTask var1, long var2) {
 2         if(var2 < 0L) {
 3             throw new IllegalArgumentException("Negative delay.");
 4         } else {
 5             this.sched(var1, System.currentTimeMillis() + var2, 0L);
 6         }
 7     }
 8
 9     public void schedule(TimerTask var1, Date var2) {
10         this.sched(var1, var2.getTime(), 0L);
11     }
12
13     public void schedule(TimerTask var1, long var2, long var4) {
14         if(var2 < 0L) {
15             throw new IllegalArgumentException("Negative delay.");
16         } else if(var4 <= 0L) {
17             throw new IllegalArgumentException("Non-positive period.");
18         } else {
19             this.sched(var1, System.currentTimeMillis() + var2, -var4);
20         }
21     }
22
23     public void schedule(TimerTask var1, Date var2, long var3) {
24         if(var3 <= 0L) {
25             throw new IllegalArgumentException("Non-positive period.");
26         } else {
27             this.sched(var1, var2.getTime(), -var3);
28         }
29     }
30
31     public void scheduleAtFixedRate(TimerTask var1, long var2, long var4) {
32         if(var2 < 0L) {
33             throw new IllegalArgumentException("Negative delay.");
34         } else if(var4 <= 0L) {
35             throw new IllegalArgumentException("Non-positive period.");
36         } else {
37             this.sched(var1, System.currentTimeMillis() + var2, var4);
38         }
39     }
40
41     public void scheduleAtFixedRate(TimerTask var1, Date var2, long var3) {
42         if(var3 <= 0L) {
43             throw new IllegalArgumentException("Non-positive period.");
44         } else {
45             this.sched(var1, var2.getTime(), var3);
46         }
47     }
48
49     private void sched(TimerTask var1, long var2, long var4) {
50         if(var2 < 0L) {
51             throw new IllegalArgumentException("Illegal execution time.");
52         } else {
53             if(Math.abs(var4) > 4611686018427387903L) {
54                 var4 >>= 1;
55             }
56
57             TaskQueue var6 = this.queue;
58             synchronized(this.queue) {
59                 if(!this.thread.newTasksMayBeScheduled) {
60                     throw new IllegalStateException("Timer already cancelled.");
61                 } else {
62                     Object var7 = var1.lock;
63                     synchronized(var1.lock) {
64                         if(var1.state != 0) {
65                             throw new IllegalStateException("Task already scheduled or cancelled");
66                         }
67
68                         var1.nextExecutionTime = var2;
69                         var1.period = var4;
70                         var1.state = 1;
71                     }
72
73                     this.queue.add(var1);
74                     if(this.queue.getMin() == var1) {
75                         this.queue.notify();
76                     }
77
78                 }
79             }
80         }
81     }
核心方法是 sched(),最终会把任务放入一个TaskQueue的队列中,然后来执行。
默认情况下,创建的timer线程会一直执行,主要有下面四种方式来终止timer线程:
- 调用timer的cancle方法
- 把timer线程设置成daemon线程,(new Timer(true)创建daemon线程),在jvm里,如果所有用户线程结束,那么守护线程也会被终止,不过这种方法一般不用。
- 当所有任务执行结束后,删除对应timer对象的引用,线程也会被终止。
- 调用System.exit方法终止程序
代码如下:
1 public void cancel() {
2         TaskQueue var1 = this.queue;
3         synchronized(this.queue) {
4             this.thread.newTasksMayBeScheduled = false;
5             this.queue.clear();
6             this.queue.notify();
7         }
8     }
没有显式的线程stop方法,而是调用了queue的clear方法和queue的notify方法,clear是个自定义方法,notify是Objec自带的方法,很明显是去唤醒wait方法的。
1 void clear() {
2         for(int var1 = 1; var1 <= this.size; ++var1) {
3             this.queue[var1] = null;
4         }
5
6         this.size = 0;
7     }
原理是清空正个队列(底层是一个数列)。
看一下Timer的构造器:
 1 public Timer(String var1) {
 2         this.queue = new TaskQueue();
 3         this.thread = new TimerThread(this.queue);
 4         this.threadReaper = new Object() {
 5             protected void finalize() throws Throwable {
 6                 synchronized(Timer.this.queue) {
 7                     Timer.this.thread.newTasksMayBeScheduled = false;
 8                     Timer.this.queue.notify();
 9                 }
10             }
11         };
12         this.thread.setName(var1);
13         this.thread.start();
14     }
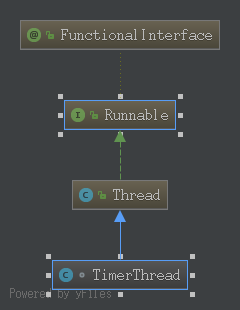
里面维护一个线程,然后看一下这个线程,如下:

继承Thread类,重写run()方法,看看run()方法的逻辑:
 1  public void run() {
 2         boolean var9 = false;
 3
 4         try {
 5             var9 = true;
 6             this.mainLoop();
 7             var9 = false;
 8         } finally {
 9             if(var9) {
10                 TaskQueue var4 = this.queue;
11                 synchronized(this.queue) {
12                     this.newTasksMayBeScheduled = false;
13                     this.queue.clear();
14                 }
15             }
16         }
17
18         TaskQueue var1 = this.queue;
19         synchronized(this.queue) {
20             this.newTasksMayBeScheduled = false;
21             this.queue.clear();
22         }
23     }
看到调用了一个方法mainLoop();其他的操作都是初始化TaskQueue,并清空TaskQueue.
看一下mainLoop()方法。如下:
 1 private void mainLoop() {
 2         while(true) {
 3             while(true) {
 4                 try {
 5                     TaskQueue var3 = this.queue;
 6                     TimerTask var1;
 7                     boolean var2;
 8                     synchronized(this.queue) {
 9                         while(this.queue.isEmpty() && this.newTasksMayBeScheduled) {
10                             this.queue.wait();
11                         }
12
13                         if(this.queue.isEmpty()) {
14                             return;
15                         }
16
17                         var1 = this.queue.getMin();
18                         Object var8 = var1.lock;
19                         long var4;
20                         long var6;
21                         synchronized(var1.lock) {
22                             if(var1.state == 3) {
23                                 this.queue.removeMin();
24                                 continue;
25                             }
26
27                             var4 = System.currentTimeMillis();
28                             var6 = var1.nextExecutionTime;
29                             if(var2 = var6 <= var4) {
30                                 if(var1.period == 0L) {
31                                     this.queue.removeMin();
32                                     var1.state = 2;
33                                 } else {
34                                     this.queue.rescheduleMin(var1.period < 0L?var4 - var1.period:var6 + var1.period);
35                                 }
36                             }
37                         }
38
39                         if(!var2) {
40                             this.queue.wait(var6 - var4);
41                         }
42                     }
43
44                     if(var2) {
45                         var1.run();
46                     }
47                 } catch (InterruptedException var13) {
48                     ;
49                 }
50             }
51         }
52     }
可以看到wait方法,之前的notify就是通知到这个wait,然后clear方法在notify之前做了清空数组的操作,所以会break,线程执行结束,退出。
schedule VS. scheduleAtFixedRate
这两个方法都是任务调度方法,他们之间区别是,schedule会保证任务的间隔是按照定义的period参数严格执行的,如果某一次调度时间比较长,那么后面的时间会顺延,保证调度间隔都是period,而scheduleAtFixedRate是严格按照调度时间来的,如果某次调度时间太长了,那么会通过缩短间隔的方式保证下一次调度在预定时间执行。举个栗子:你每个3秒调度一次,那么正常就是0,3,6,9s这样的时间,如果第二次调度花了2s的时间,如果是schedule,就会变成0,3+2,8,11这样的时间,保证间隔,而scheduleAtFixedRate就会变成0,3+2,6,9,压缩间隔,保证调度时间。