一、django rest的Authentication用户认证配置
REST_FRAMEWORK = {
    'DEFAULT_AUTHENTICATION_CLASSES': [
        'rest_framework.authentication.BasicAuthentication',
        'rest_framework.authentication.SessionAuthentication',
        'rest_framework.authentication.TokenAuthentication',
        'rest_framework_simplejwt.authentication.JWTAuthentication',
    ],
系统提供四种基本认证,其他的可以自己定制,或者使用第三方
参考:https://www.cnblogs.com/lyq-biu/p/9625917.html
1、BasicAuthentication
一般用于测试,根据用户的用户名和密码烟瘴,通过后,BasicAuthentication提供以下凭据:
.request.user将是一个Django User实例。
.request.auth会的None。
2、TokenAuthentication
基于令牌的简单HTTP身份验证方案。令牌认证适用于客户端 - 服务器设置,例如本机桌面和移动客户端。
使用TokenAuthentication,需在INSTALLED_APPS设置中另外包含app
        INSTALLED_APPS = (
                ...
              'rest_framework.authtoken'
              )
注意:确保manage.py migrate在更改设置后运行。该rest_framework.authtoken应用程序提供Django数据库迁移。
3、 SessionAuthentication
使用Django的默认会话后端进行身份验证。会话身份验证适用于与您的网站在同一会话上下文中运行的AJAX客户端。
如果成功通过身份验证,请SessionAuthentication提供以下凭据。
request.user将是一个Django User实例。
request.auth会的None。
4、 RemoteUserAuthenticationdjango
参考 django server之间通过remote user 相互调用 和 django server之间通过remote user 相互调用
二、认证(authentication)、授权(permission)应用效果实例
1、认证必须与授权配合使用,只认证,系统根本不做限制。必须授权限制才生效
取消授权,正常提取数据
class UserListView(generics.ListAPIView):
    authentication_classes = [BasicAuthentication,SessionAuthentication, TokenAuthentication]
    #permission_classes = [IsAuthenticated]
    queryset = models.CustomUser.objects.all()
    serializer_class = serializers.UserSerializer

2、加上授权,用BasicAuthentication 去认证,
class UserListView(generics.ListAPIView):
    authentication_classes = [BasicAuthentication,SessionAuthentication, TokenAuthentication]
    permission_classes = [IsAuthenticated]
    queryset = models.CustomUser.objects.all()
    serializer_class = serializers.UserSerializer
访问的时候,html弹出输入用户名密码的窗体。

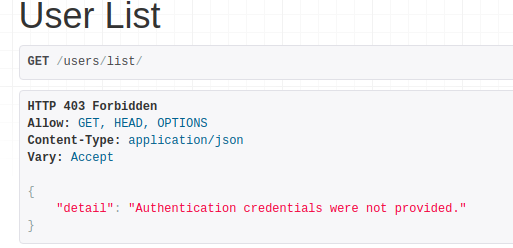
3、加上授权,用BasicAuthentication以外的去认证,则出现未授权提醒,但不弹出窗体
SessionAuthentication是和BasicAuthentication配合使用的,用basic弹出窗体,输入用户密码后,session会认证有效。
class UserListView(generics.ListAPIView):
    authentication_classes = [SessionAuthentication, TokenAuthentication,BasicAuthentication]
    permission_classes = [IsAuthenticated]
    queryset = models.CustomUser.objects.all()
    serializer_class = serializers.UserSerializer

三、django rest的权限与认证分析
1、APIView的调度入口
APIView的dispath(self, request, *args, **kwargs)

2、调度的所有任务(看认证,看权限,看访问品读)
  dispath方法内 self.initial(request, *args, **kwargs) 进入三大认证
    # 认证组件:校验用户 - 游客、合法用户、非法用户
    # 游客:代表校验通过,直接进入下一步校验(权限校验)
    # 合法用户:代表校验通过,将用户存储在request.user中,再进入下一步校验(权限校验)
    # 非法用户:代表校验失败,抛出异常,返回403权限异常结果
    self.perform_authentication(request)

    # 权限组件:校验用户权限 - 必须登录、所有用户、登录读写游客只读、自定义用户角色
    # 认证通过:可以进入下一步校验(频率认证)
    # 认证失败:抛出异常,返回403权限异常结果
    self.check_permissions(request)

    # 频率组件:限制视图接口被访问的频率次数 - 限制的条件(IP、id、唯一键)、频率周期时间(s、m、h)、频率的次数(3/s)
    # 没有达到限次:正常访问接口
    # 达到限次:限制时间内不能访问,限制时间达到后,可以重新访问
    self.check_throttles(request)
3、 认证组件(authenticatication)
在view中设置,只对该view有效,在setting.py中设置,对所有view有效。 两处都设置,view的设置有效
    Request类的 方法属性 user 的get方法 => self._authenticate() 完成认证

    认证的细则:
    # 做认证
    def _authenticate(self):
        # 遍历拿到一个个认证器,进行认证
        # self.authenticators配置的一堆认证类产生的认证类对象组成的 list
        for authenticator in self.authenticators:
            try:
                # 认证器(对象)调用认证方法authenticate(认证类对象self, request请求对象)
                # 返回值:登陆的用户与认证的信息组成的 tuple
                # 该方法被try包裹,代表该方法会抛异常,抛异常就代表认证失败
                user_auth_tuple = authenticator.authenticate(self)
            except exceptions.APIException:
                self._not_authenticated()
                raise

            # 返回值的处理
            if user_auth_tuple is not None:
                self._authenticator = authenticator
                # 如何有返回值,就将 登陆用户 与 登陆认证 分别保存到 request.user、request.auth
                self.user, self.auth = user_auth_tuple
                return
        # 如果返回值user_auth_tuple为空,代表认证通过,但是没有 登陆用户 与 登陆认证信息,代表游客
        self._not_authenticated()

4、权限组件(permissions)
在view中设置,只对该view有效,在setting.py中设置,对所有view有效。 两处都设置,view的设置有效

    self.check_permissions(request)
    认证细则:
    def check_permissions(self, request):
        # 遍历权 限对象列表得到一个个权限对象(权限器),进行权限认证
        for permission in self.get_permissions():
            # 权限类一定有一个has_permission权限方法,用来做权限认证的
            # 参数:权限对象self、请求对象request、视图类对象
            # 返回值:有权限返回True,无权限返回False
            if not permission.has_permission(request, self):
                self.permission_denied(
                    request, message=getattr(permission, 'message', None)
                )

5、自定义认证类

```python
"""
1) 创建继承BaseAuthentication的认证类
2) 实现authenticate方法
3) 实现体根据认证规则 确定游客、非法用户、合法用户
4) 进行全局或局部配置

认证规则
i.没有认证信息返回None(游客)
ii.有认证信息认证失败抛异常(非法用户)
iii.有认证信息认证成功返回用户与认证信息元组(合法用户)
"""
```

7、自定义认证举例: utils/authentications.py

```python
# 自定义认证类

# 1)继承BaseAuthentication类
# 2)重新authenticate(self, request)方法,自定义认证规则
# 3)认证规则基于的条件:
#       没有认证信息返回None(游客)
#       有认证信息认证失败抛异常(非法用户)
#       有认证信息认证成功返回用户与认证信息元组(合法用户)
# 4)完全视图类的全局(settings文件中)或局部(确切的视图类)配置
from rest_framework.authentication import BaseAuthentication
from rest_framework.exceptions import AuthenticationFailed
from . import models
class MyAuthentication(BaseAuthentication):
    """
    同前台请求头拿认证信息auth(获取认证的字段要与前台约定)
    没有auth是游客,返回None
    有auth进行校验
        失败是非法用户,抛出异常
        成功是合法用户,返回 (用户, 认证信息)
    """
    def authenticate(self, request):
        # 前台在请求头携带认证信息,
        #       且默认规范用 Authorization 字段携带认证信息,
        #       后台固定在请求对象的META字段中 HTTP_AUTHORIZATION 获取
        auth = request.META.get('HTTP_AUTHORIZATION', None)

        # 处理游客
        if auth is None:
            return None

        # 设置一下认证字段小规则(两段式):"auth 认证字符串"
        auth_list = auth.split()

        # 校验合法还是非法用户
        if not (len(auth_list) == 2 and auth_list[0].lower() == 'auth'):
            raise AuthenticationFailed('认证信息有误,非法用户')

        # 合法的用户还需要从auth_list[1]中解析出来
        # 注:假设一种情况,信息为abc.123.xyz,就可以解析出admin用户;实际开发,该逻辑一定是校验用户的正常逻辑
        if auth_list[1] != 'abc.123.xyz':  # 校验失败
            raise AuthenticationFailed('用户校验失败,非法用户')

        user = models.User.objects.filter(username='admin').first()

        if not user:
            raise AuthenticationFailed('用户数据有误,非法用户')
        return (user, None)
```


7、 系统权限类,共以下四种


1)AllowAny:
    认证规则全部返还True:return True
        游客与登陆用户都有所有权限

2) IsAuthenticated:
    认证规则必须有登陆的合法用户:return bool(request.user and request.user.is_authenticated)
        游客没有任何权限,登陆用户才有权限

3) IsAdminUser:
    认证规则必须是后台管理用户:return bool(request.user and request.user.is_staff)
        游客没有任何权限,登陆用户才有权限

4) IsAuthenticatedOrReadOnly
    认证规则必须是只读请求或是合法用户:
        return bool(
            request.method in SAFE_METHODS or
            request.user and
            request.user.is_authenticated
        )
        游客只读,合法用户无限制
"""

在view中,只对本view有效
# api/views.py
from rest_framework.permissions import IsAuthenticated
class TestAuthenticatedAPIView(APIView):
    permission_classes = [IsAuthenticated]
    def get(self, request, *args, **kwargs):
        return APIResponse(0, 'test 登录才能访问的接口 ok')


# 因为默认全局setting.py配置的权限类是AllowAny,对全局有效
# settings.py
REST_FRAMEWORK = {
    # 权限类配置
    'DEFAULT_PERMISSION_CLASSES': [
        'rest_framework.permissions.AllowAny',
    ],
}


8、自定义权限类
参考:https://sunscrapers.com/blog/django-rest-framework-login-and-authentication/


1) 创建继承BasePermission的权限类
2) 实现has_permission方法
3) 实现体根据权限规则 确定有无权限
4) 进行全局或局部配置

认证规则
i.满足设置的用户条件,代表有权限,返回True
ii.不满足设置的用户条件,代表有权限,返回False
"""
```


9、自定义权限实例 # utils/permissions.py
from rest_framework.permissions import BasePermission
from django.contrib.auth.models import Group
class MyPermission(BasePermission):
    def has_permission(self, request, view):
        # 只读接口判断
        r1 = request.method in ('GET', 'HEAD', 'OPTIONS')
        # group为有权限的分组
        group = Group.objects.filter(name='管理员').first()
        # groups为当前用户所属的所有分组
        groups = request.user.groups.all()
        r2 = group and groups
        r3 = group in groups
        # 读接口大家都有权限,写接口必须为指定分组下的登陆用户
        return r1 or (r2 and r3)


# 游客只读,登录用户只读,只有登录用户属于 管理员 分组,才可以增删改
from utils.permissions import MyPermission
class TestAdminOrReadOnlyAPIView(APIView):
    permission_classes = [MyPermission]
    # 所有用户都可以访问
    def get(self, request, *args, **kwargs):
        return APIResponse(0, '自定义读 OK')
    # 必须是 自定义“管理员”分组 下的用户
    def post(self, request, *args, **kwargs):
        return APIResponse(0, '自定义写 OK')