SpringBoot2.X整合Redis
这篇笔记主要整理SpringBoot中对Redis的整合,包括缓存的配置,以及序列化的配置,这里SpringBoot的版本为2.1.6.RELEASE
pom文件中需要添加如下依赖
<dependency>
            <groupId>org.springframework.boot</groupId>
            <artifactId>spring-boot-starter-web</artifactId>
        </dependency>
        <!-- Spring Data Redis的启动器 -->
        <dependency>
            <groupId>org.springframework.boot</groupId>
            <artifactId>spring-boot-starter-data-redis</artifactId>
        </dependency>
        <dependency>
            <groupId>org.springframework.boot</groupId>
            <artifactId>spring-boot-starter-test</artifactId>
        </dependency>

        <!--Lettuce pool 缓存连接池-->
        <dependency>
            <groupId>org.apache.commons</groupId>
            <artifactId>commons-pool2</artifactId>
        </dependency>
application.yml
spring:
  redis:
    port: 6379
    host: 127.0.0.1
    database: 0
    password:
    lettuce:
      pool:
        #最大连接数
        max-active: 8
        #最大阻塞等待时间(负数表示没限制)
        max-wait: -1
        #最大空闲
        max-idle: 8
        #最小空闲
        min-idle: 0
      #连接超时时间
      timeout: 10000
Jedis和Lettuce的区别在哪?
1、Jedis 是直连模式,在多个线程间共享一个 Jedis 实例时是线程不安全的,每个线程都去拿自己的 Jedis 实例,当连接数量增多时,物理连接成本就较高了。
2、Lettuce的连接是基于Netty的,连接实例可以在多个线程间共享,如果你不知道Netty也没事,大致意思就是一个多线程的应用可以使用同一个连接实例,而不用担心并发线程的数量。通过异步的方式可以让我们更好地利用系统资源。
自定义Redis配置类
package com.ysh.config;

import com.fasterxml.jackson.annotation.JsonAutoDetect;
import com.fasterxml.jackson.annotation.PropertyAccessor;
import com.fasterxml.jackson.databind.ObjectMapper;
import org.springframework.boot.autoconfigure.condition.ConditionalOnClass;
import org.springframework.boot.autoconfigure.data.redis.RedisProperties;
import org.springframework.boot.context.properties.EnableConfigurationProperties;
import org.springframework.cache.CacheManager;
import org.springframework.cache.annotation.CachingConfigurerSupport;
import org.springframework.cache.annotation.EnableCaching;
import org.springframework.cache.interceptor.KeyGenerator;
import org.springframework.cache.interceptor.SimpleKeyGenerator;
import org.springframework.context.annotation.Bean;
import org.springframework.context.annotation.Configuration;
import org.springframework.data.redis.cache.RedisCacheConfiguration;
import org.springframework.data.redis.cache.RedisCacheManager;
import org.springframework.data.redis.connection.RedisConnectionFactory;
import org.springframework.data.redis.connection.lettuce.LettuceConnectionFactory;
import org.springframework.data.redis.core.RedisOperations;
import org.springframework.data.redis.core.RedisTemplate;
import org.springframework.data.redis.core.StringRedisTemplate;
import org.springframework.data.redis.serializer.*;


import java.nio.charset.Charset;


import java.lang.reflect.Method;
import java.time.Duration;
import java.util.HashMap;
import java.util.HashSet;
import java.util.Map;
import java.util.Set;


/**
 *
 * @description: redis 缓存配置类
 * @author: Ysh
 * @create: 2021-03-04
 **/
@Configuration
@EnableCaching
public class RedisConfig extends CachingConfigurerSupport {


    /**
     * json序列化
     * @return
     */
    @Bean
    public RedisSerializer<Object> jackson2JsonRedisSerializer() {
        //使用Jackson2JsonRedisSerializer来序列化和反序列化redis的value值
        Jackson2JsonRedisSerializer serializer = new Jackson2JsonRedisSerializer(Object.class);

        ObjectMapper mapper = new ObjectMapper();
        mapper.setVisibility(PropertyAccessor.ALL, JsonAutoDetect.Visibility.ANY);
        mapper.enableDefaultTyping(ObjectMapper.DefaultTyping.NON_FINAL);
        serializer.setObjectMapper(mapper);
        return serializer;
    }

    @Bean
    public RedisTemplate<String, Object> redisTemplate(LettuceConnectionFactory lettuceConnectionFactory) {
        //StringRedisTemplate的构造方法中默认设置了stringSerializer
        RedisTemplate<String, Object> template = new RedisTemplate<>();
        //set key serializer
        StringRedisSerializer stringRedisSerializer = new StringRedisSerializer();
        template.setKeySerializer(stringRedisSerializer);
        template.setHashKeySerializer(stringRedisSerializer);


        //set value serializer
        template.setDefaultSerializer(jackson2JsonRedisSerializer());

        template.setConnectionFactory(lettuceConnectionFactory);
        template.afterPropertiesSet();
        return template;
    }

    @Bean
    public StringRedisTemplate stringRedisTemplate(LettuceConnectionFactory lettuceConnectionFactory) {
        StringRedisTemplate template = new StringRedisTemplate();
        template.setConnectionFactory(lettuceConnectionFactory);
        return template;
    }
    /**
     * 在使用@Cacheable时,如果不指定key,则使用找个默认的key生成器生成的key
     *
     */
    @Override
    @Bean
    public KeyGenerator keyGenerator() {
        return new SimpleKeyGenerator() {

            @Override
            public Object generate(Object target, Method method, Object... params) {
                StringBuilder sb = new StringBuilder();
                sb.append(target.getClass().getName());
                sb.append(".").append(method.getName());

                StringBuilder paramsSb = new StringBuilder();
                for (Object param : params) {
                    // 如果不指定,默认生成包含到键值中
                    if (param != null) {
                        paramsSb.append(param.toString());
                    }
                }

                if (paramsSb.length() > 0) {
                    sb.append("_").append(paramsSb);
                }
                return sb.toString();
            }

        };

    }

    /**
     * 管理缓存
     *
     * @param lettuceConnectionFactory
     * @return
     */
    //缓存管理器
    @Bean
    public CacheManager cacheManager(LettuceConnectionFactory lettuceConnectionFactory) {
        // 生成一个默认配置,通过config对象即可对缓存进行自定义配置
        RedisCacheConfiguration config = RedisCacheConfiguration.defaultCacheConfig();

        // 设置缓存的默认过期时间,也是使用Duration设置,参数单位为分钟
        config = config.entryTtl(Duration.ofMinutes(5))
                // 设置 key为string序列化
                .serializeKeysWith(RedisSerializationContext.SerializationPair.fromSerializer(new StringRedisSerializer()))
                // 设置value为json序列化
                .serializeValuesWith(RedisSerializationContext.SerializationPair.fromSerializer(jackson2JsonRedisSerializer() ))
                // 不缓存空值
                .disableCachingNullValues();

        // 设置一个初始化的缓存空间set集合
        Set<String> cacheNames = new HashSet<>();
        cacheNames.add("user");

        // 对每个缓存空间应用不同的配置
        Map<String, RedisCacheConfiguration> configMap = new HashMap<>();
        configMap.put("user", config);

        // 使用自定义的缓存配置初始化一个cacheManager
        RedisCacheManager cacheManager = RedisCacheManager.builder(lettuceConnectionFactory)
                // 一定要先调用该方法设置初始化的缓存名,再初始化相关的配置
                .initialCacheNames(cacheNames)
                .withInitialCacheConfigurations(configMap)
                .build();
        return cacheManager;
    }
}
缓存注解说明
Spring 在使用缓存注解前,需要配置缓存管理器,缓存管理器将提供一些重要的信息,如缓存类型、超时时间等。 Spring 可以支持多种缓存的使用,因此它存在多种缓存处理器,并提供了缓存处理器的接口 CacheManager 和与之相关的类。
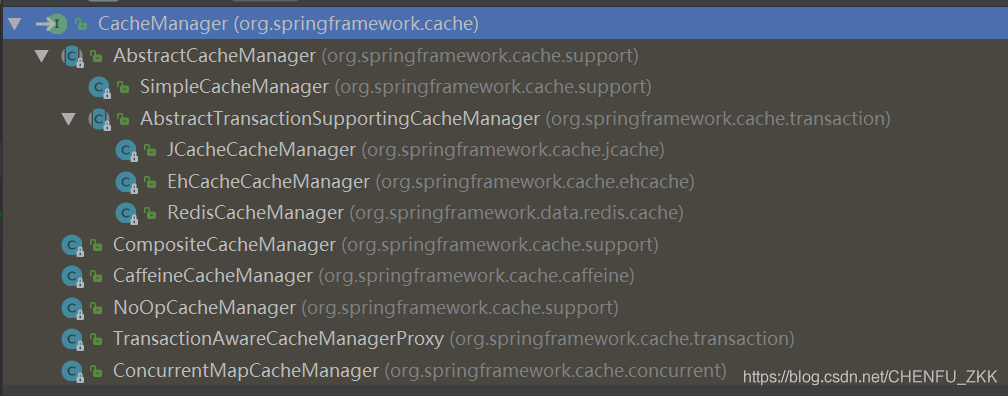
从图中可以看到, Spring 可以支持多种缓存管理机制,而整合 Redis,主要就是以使用类 RedisCacheManager 为主。 在 Spring Boot的 starter 机制中,允许我们通过配置文件生成缓存管理器。
在项目的配置文件中加入如下配置
#配置redis缓存管理器
#缓存类型,在默认的情况下,spring会自动根据上下文检索
spring.cache.type=redis
spring.cache.cache-names=redisCache,hashCache

#是否允许redis缓存空值
spring.cache.redis.cache-null-values=true
#redis的键前缀
spring.cache.redis.key-prefix=
#缓存超时时间戳,配置为0则不设置超时时间
spring.cache.redis.time-to-live=6000ms
#是否启用redis的键前缀
spring.cache.redis.use-key-prefix=false
配置参数解析
spring.cache.type
spring.cache.type配置的是缓存类型,这里配置为Redis,Spring Boot就会自动生成RedisCacheManager对象。spring.cache.cache-names
spring.cache.cache-names配置的是缓存名称,多个名称可以使用逗号分隔,以便于缓存注解的引用。
当然,我们已经在上面的配置类中配置好了相关的缓存配置,所以不用在application.yml中进行配置,系统会自动覆盖默认的配置。
最后为了使用缓存管理器,需要在 Spring Boot 的配置文件中加入驱动缓存的注解@EnableCaching,这样就可以驱动 Spring 缓存机制工作了。
常用的缓存注解
@Cacheable
使用了此注解的方法会将返回值放到缓存数据库中
参数解析
-
value
存到缓存中的空间名字,如果同一个模块,建议这个模块下的value值是同一个 -
key
给存储的值起个名称,在查询时如果缓存中有名称相同的,那么则直接从缓存中将数据返回。命名规则一般是:"固定值" 或key = "#sellerid"(可变化的值) ,如果该方法没有参数,key要省略,会自动生成key,前提是配置了key的生成策略 -
condition
里面填写表达式,true表示进行缓存,false表示不进行缓存,表达式格式一般为:
"#sellerid.length > 10"
@CacheEvict
表示通过定义的键移除缓存,一般定义在增删改方法上
参数解析
-
value同上
-
key同上
-
allEntriesallEntries = false清空对应的value空间里面的所有值,allEntries = true默认值,删除key对应的值,建议改为false,因为实际业务中,会有查询全部的操作,也会有根据ID查询的,如果删除了某一条信息,那么要删除哪个key对应的值呢?所以还是改为false,全部删除,等查询的时候,再存最新的。
@CachePut
每次执行都会执行方法,无论缓存里是否有值,同时使用新的返回值的替换缓存中的值。这里不同于@Cacheable:@Cacheable如果缓存没有值,从则执行方法并缓存数据,如果缓存有值,则从缓存中获取值
@CacheConfig
@CacheConfig: 类级别的注解:如果我们在此注解中定义value,则此类中的所有方法上 @Cacheable的value默认都是此值。当然@Cacheable也可以重定义value的值
使用lettuce连接池搭建Redis集群
spring:
  redis:
    timeout: 6000ms # 连接超时时长(毫秒)
    password:
    cluster:
      max-redirects: 3  # 获取失败 最大重定向次数
      nodes:
        - 127.0.0.1:6380
        - 127.0.0.1.236:6381
        - 127.0.0.1.236:6382
        - 127.0.0.1.244:6383
        - 127.0.0.1.244:6384
        - 127.0.0.1.244:6385
    lettuce:
      pool:
        max-active: 1000  #连接池最大连接数(使用负值表示没有限制)
        max-idle: 10 # 连接池中的最大空闲连接
        min-idle: 5 # 连接池中的最小空闲连接
        max-wait: -1 # 连接池最大阻塞等待时间(使用负值表示没有限制)