开发前的分析
1.技能前提
JSP JSTL EL JS/JQUERY
Servlet JavaBean
JDBC(后期再用mybatis,这样体会更深) MYSQL
2.需求分析和模块划分
(1)基本功能
1 接收发送指令
2 根据指令自动回复对应的功能
(2)模块划分
1 回复内容维护
2 回复内容列表3 对话功能
4 回复内容删除
开发:JSP+Servlet+JDBC
new -> web project -> 输入project name为MicroMessage
step1:确认程序能跑起来
(1)ListServlet
 1  package com.imooc.servlet;
 2
 3  /**
 4  * 列表页面初始化控制
 5  */
 6  public class ListServlet extends httpServlet {
 7     @Override
 8     protected void doGet(HttpServletRequest req, HttpServletResponse resp)
 9       throws ServletException, IOExcepiton{
10      req.getRequestDispatcher("/WEB-INF/jsp/back/list.jsp").forward(req,resp);
11      }
12
13     @Override
14     protected void doPost(HttpServletRequest req, HttpServletResponse resp)
15       throws ServletException, IOExcepiton{
16          this.doGet(req,resp);
17      }
18  }
(2)web.xml中加入servlet的配置
1 <servlet>
2      <servlet-name>ListServlet</servlet-name>
3     <servllet-class>com.imooc.Servlet.ListServlet</servlet-class>
4 </servlet>
5  <servlet-mapping>
6      <servlet-name>ListServlet</servlet-name>
7     <url-pattern>/List.action</url-pattern>
8 </servlet-mapping>
(3)/WEB-INF/jsp/back/list.jsp
注意jsp文件放在WEB-INF下,这样必须经过后台才能访问到jsp。
如果放在WebRoot下(和WEB-INF平级)是能够被直接访问到的,除非设置了jsp拦截。
另外,关于jsp中如何使用项目的根目录:
1 <%
2 String path = request.getContextPath();
3 Sring basePath = request.getScheme()+"://"+request.getServiceName+":"+request.getServicePort()+path+"/"
4 %>
(4)/WebRoot/resources/css|images
在jsp文件中引用css:
1 <head>
2     <meta .../>
3     <title ../>
4     <link href="<%= basePath =%>css/all.css" rel="stylesheet" type="text/css"/>
5 </head>
(5)运行代码
访问路径:localhost:8080/MicroMessage/List.action 。可以成功显示静态页面。
step2:从数据库中取数据
(1)建表
1 数据库名:micro_message。
2 表名:message
3 账号:root
4 密码:root
(2)创建JavaBean
 1 package com.imooc.bean;
 2
 3 /**
 4 *与消息表对应的实体类
 5 */
 6 public class Message{
 7     private String id;
 8     private String command;
 9     private String description;
10     private String content;
11     //getter和setter略。
12 }
(3)Servlet中增加读取数据的代码
 1 package com.imooc.servlet;
 2
 3  /**
 4  * 列表页面初始化控制
 5  */
 6  public class ListServlet extends httpServlet {
 7     @Override
 8     protected void doGet(HttpServletRequest req, HttpServletResponse resp)
 9       throws ServletException, IOExcepiton{
10         try{
11         Class.forName("com.mysql.jdbc.Driver");
12         Connection conn = DriverManager.getConnection("jdbc:mysql://127.0.0.1:3306/micro_message","root","root");
13         String sql = "select ID,COMMAND,DESCRIPTION,CONTENT from MESSAGE"; //这里不要写select *
14         PreparedStatement statement = conn.prepareStatement(sql);16         ResultSet rs = statement.executeQuery();
17         List<Message> messageList = new ArrayList<Message>();
18         while(rs.next()){
19           Message message = new Message();
20           messageList.add(message);
21           message.setId(rs.getString("ID"));
22           message.setCommand(rs.getString("COMMAND"));
23           message.setDescription(rs.getString("DESCRIPTION"));
24           message.setContent(rs.getString("CONTENT"));
25         }
26         req.setAttribute("messageList",messageList);
27     }catch(ClassNotFoundException e){
28         e.printStackTrace();
29     }catch(SQLException e){
30          e.printStackTrace();
31     }
32      req.getRequestDispatcher(“/WEB-INF/jsp/back/list.jsp”).forward(req,resp);
33      }
34
35     @Override
36     protected void doPost(HttpServletRequest req, HttpServletResponse resp)
37       throws ServletException, IOExcepiton{
38          this.doGet(req,resp);
39      }
40  }
(4)list.jsp中获取值
这里用到了jstl(c:forEach,c:if),所以要加上库:<%@ taglib prefix=“c” uri=“http://java.sun.com/jsp/jstl/core” %>。其中的uri可以从/META-INF/c.tld中复制。c.tld有一个<uri>标签,值就是http://java.sun.com/jsp/jstl/core。
另外,这里还加上了偶数行有背景色的效果。因为status从0开始,所以实际上是表格的基数行。
1 <%@ taglib prefix=“c” uri=“http://java.sun.com/jsp/jstl/core”%> 2 <c:forEach items=“${messageList}” var=“message” varStatus=“status”> 3 4 <tr <c:if test=“${status.index%2!=0}”> style='background-color:#ECF6EE;’ </c:if> > 5 > 6 <td><input type=“checkbox”/></td> 7 <td>${status.index+1}</td> 8 <td>${message.command}</td> 9 <td>${message.description}</td> 10 <td> 11 <a href=‘#’>修改</a> 12 <a href=‘#’>删除</a> 13 </td> 14 </tr> 15 </c:forEach>
(5)运行
重启项目(注意Servlet的生命周期,只实例化一次,所以必须要重启才能生效。但是debug模式下eclipse会为servlet重新加载)访问地址***,可以看到查出来的数据,和背景色效果。
step3:加查询条件command和description
(1)在jsp中添加action,并为查询框的input命名
 1 <form action="<%= basePath =%>List.action" id="mainForm" method="post">
 2 ...
 3     <td>
 4         <input name="command" type="text" class="allInput" value=""/>
 5     </td>
 6     <td>
 7         <input name="description" type="text" class="allInput" value=""/>
 8     </td>
 9 ..
10 </form>
(2)ListServlet中处理查询参数
 2         req.setCharacterEncoding(“UTF-8"); //不加这句的话,在查询框里输入中文,下面getParameter得到的值会是乱码
 3         String command = req.getParameter("command");//和jsp中查询框input的name匹配
 4         String description = req.getParameter("description");
 4         try{
 5           Class.forName("com.mysql.jdbc.Driver");
 6           Connection conn = DriverManager.getConnection("jdbc:mysql://127.0.0.1:3306/micro_message","root","root");
 7           StringBuilder sql = new StringBuilder(“select ID,COMMAND,DESCRIPTION,CONTENT from MESSAGE where 1==1");
 8           List<String> paramList = new ArrayList<String>();
 9           if(command != null && !"".equals(command.trim())){
10             sql.append(" and COMMAND=?"); //注意这里有个空格,否则拼接完成后有语法错误。
11           }
12           if(description != null && !"".equals(description.trim())){
13             sql.append(“ and DESCRIPTION like '%'?'%'”);//mysql的模糊查询格式
14           }
15           PreparedStatement statement = conn.prepareStatement(sql.toString());
16           for(int i=0; i<paramList.size();i++){
17             statement.setString(i+1,paramList.get(i)); //sql中?的位置从1开始
18           }
19           statement.executeQuery();
20         ...
21         }
(3)让查询框中的参数保留
前面运行后,可以发现,当在查询框中输入值进行查询后,查询框中的值会消失。是因为这里的value为""。
1 <input name="description" type="text" class="allInput" value=""/>
首先要将参数的值保存在req中,这样jsp中才能拿到值。
1 req.setCharacterEncoding(“UTF-8");
2 String command = req.getParameter(“command”);
3 String description = req.getParameter(description);
4
5 req.setAttribute("command",command);
6 req.setAttribute("description", description);
7 try{
8   Class.forName(“com.mysql.jdbc.Driver”);
9   Connection conn = DriverManager.getConnection(“jdbc:mysql://127.0.0.1:3306/micro_message”,”root”,”root”);
10   ...
11 }
然后将jsp中input的value设置为req中的属性值。
1 <input name="description" type="text" class="allInput" value="${description}"/>
重构:在进行下一步开发前整理代码
可以看到前面的代码,注释少,内容都放在一个方法里。所以需要对代码进行重构。根据功能进行层次划分。
step1:dao层
 1 package com.immoc.dao;
 2 /**
 3 *和message表相关的数据库操作
 4 */
 5 public class MessageDao{
 6     public List<Message> queryMessageList(String command,String description){
 7        List<Message> messageList = new ArrayList<Message>();
 8        try{
 9             Class.forName("com.mysql.jdbc.Driver");
10              ...
11              while(){...}
23          }catch(ClassNotFoundException e){
24              e.printStackTrace();
25          }catch(SQLException e){
26               e.printStackTrace();
27          }
28          return meesageList;
29     }
29 }
step2:service层
 1 package com.immoc.service
 2 /**
 3 *列表相关的业务功能
 4 */
 5 public class ListService{
 6     public List<Message> queryMessageList(String command, String description){
 7         MessageDao messageDao = new MessageDao();
 8         return messageDao.queryMessageList(command,description);
 9     }
10 }
step3: Servlet
 1 package com.imooc.servlet;
 2
 3  /**
 4  * 列表页面初始化控制
 5  */
 6  public class ListServlet extends httpServlet {
 7     @Override
 8     protected void doGet(HttpServletRequest req, HttpServletResponse resp)
 9       throws ServletException, IOExcepiton{
 10         //接受页面的值
 10         req.setCharacterEncoding("UTF-8");
 11         String command = req.getParameter("command");
 12         String description = req.getParameter("description”);
 13         //向页面传值
 14         req.setAttribute("command",command);
 15         req.setAttribute("description", description);
 15         //查询消息列表并传给页面
 16         ListService listService = new ListService();
 17         req.setAttribute("messageList”,listService.queryMessageList(command,description));
 18         //向页面跳转
 18         req.getRequestDispatcher(“/WEB-INF/jsp/back/list.jsp”).forward(req,resp);
 19      }
 20  ...
 21  }
step4:运行测试。
mybatis
step1:下载mybatis
注意:mybatis-**-SNAPSHOT是正在开发的版本,不要下载使用。下载mybatis-**.zip后,也下载一下mybatis的source code。因为source code里有一个test文件夹,里面是一些演示代码,会有帮助。
下载完成后,将mybatis-**.jar放至项目的lib目录下。
step2:mybatis的主配置文件
从source code中拷贝文件:src estjavaorgapacheibatissubmittedcomplex_propertyConfiguration.xml 放到项目中。
 1 <configuration>
 2 <environments>
 3     <environment>
 4         <transactionManager type=“JDBC”>
 5              <property name=“” value=“”/>
 6         </transactionManager>
 7         <dataSource type=“UNPOOLED”>
 8             <property name=“driver” value=“com.mysql.jdbc.Driver”/>
 9             <property name=“url” value=“adbc:mysql://127.0.0.1:3306/micro_message”/>
10             <property name=“username” value=“root”/>
11             <property name=“password” value=“root”/>
12         </dataSource>
13     </environment>
14 </enviroments>
15 ...
16 </configuration>
step3:读取mybatis的配置文件
1.几个问题
Dao层的真实需求?
对象能与数据库交互;能执行sql语句。
mybatis如何像dao层提供需求的?
通过SqlSession。
SqlSession的作用?
1 向SQL语句传入参数
2 执行SQL语句
3 获取执行SQL语句的结果
4 事务的控制
如何获得SqlSession?
1 通过配置文件获取数据库连接相关信息
2 通过配置信息构建SqlSessionFactory
3 通过SqlSessionFactory打开数据库会话(SqlSession就是一次与数据库交互的会话)
2.db层(真正与数据库交互的层)
 1 package com.imooc.db;
 2
 3 /**
 4 *访问数据库类
 5 */
 6 public class DBAcess{
 7     public SqlSession getSqlSession() throws IOException{
 8         //通过配置文件获取数据库连接信息
 9         Resources.getResourceAsReader(“com/imooc/config/Configuration.xml”);//src是根路径
10         //通过配置信息构建SqlSessionFactory
11         SqlSessionFactoryBuilder sqlSessionFactoryBuilder = SqlSessionFactoryBuilder().build(reader);
13         //通过SqlSessionFactory打开一个数据库会话
14         SqlSession sqlSession = SqlSessionFactory.openSession();
15         return sqlSession;
16     }
17 }
3.增加mybatis的映射文件
(1)在mybatis的主配置文件里加载映射文件Message.xml
1 <configuration>
2 ...
3 <mappers>
4     <!—-同样从src下开始算起—->
5     <mapper resource=“com/imooc/config/sqlxml/Message.xml”/>
6 </mappers>
7 </configuration>
(2)Message.xml

命名空间:必须有,否则读取配置文件会报错。
<select/update/delete id=" "> 中id的值在同一个namespace下同一个标签下必须唯一。
<resultMap type="" id=""> 中:
type的值为对应的JavaBean,必须填写全路径或者定义的别名。id的值为<select/update/delete resultMap="">中resultMap的值,表明是与哪个sql语句相对应的resultMap。
<resultMap>的子标签中:
<id column"">中填写的是主键的字段名。<result column="">填写的是普通的列名。property中填写的是JavaBean中属性名。
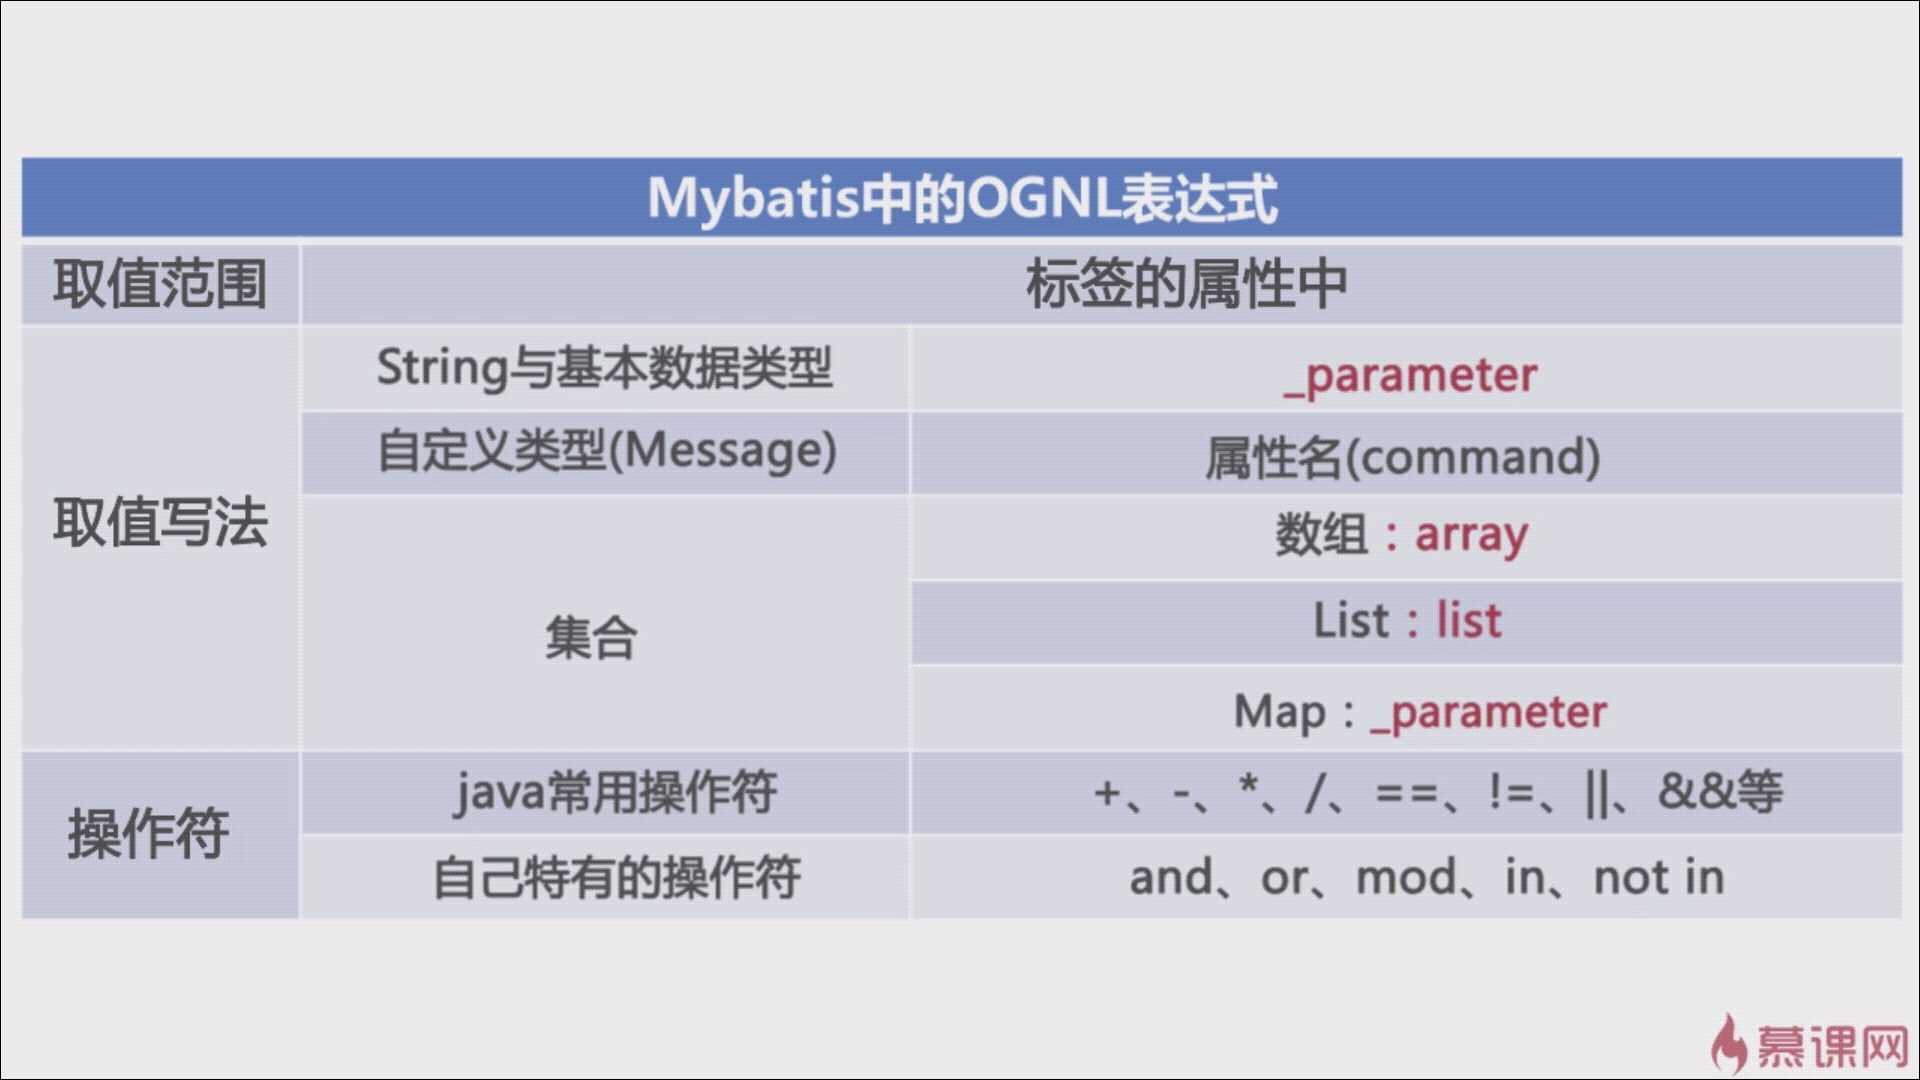
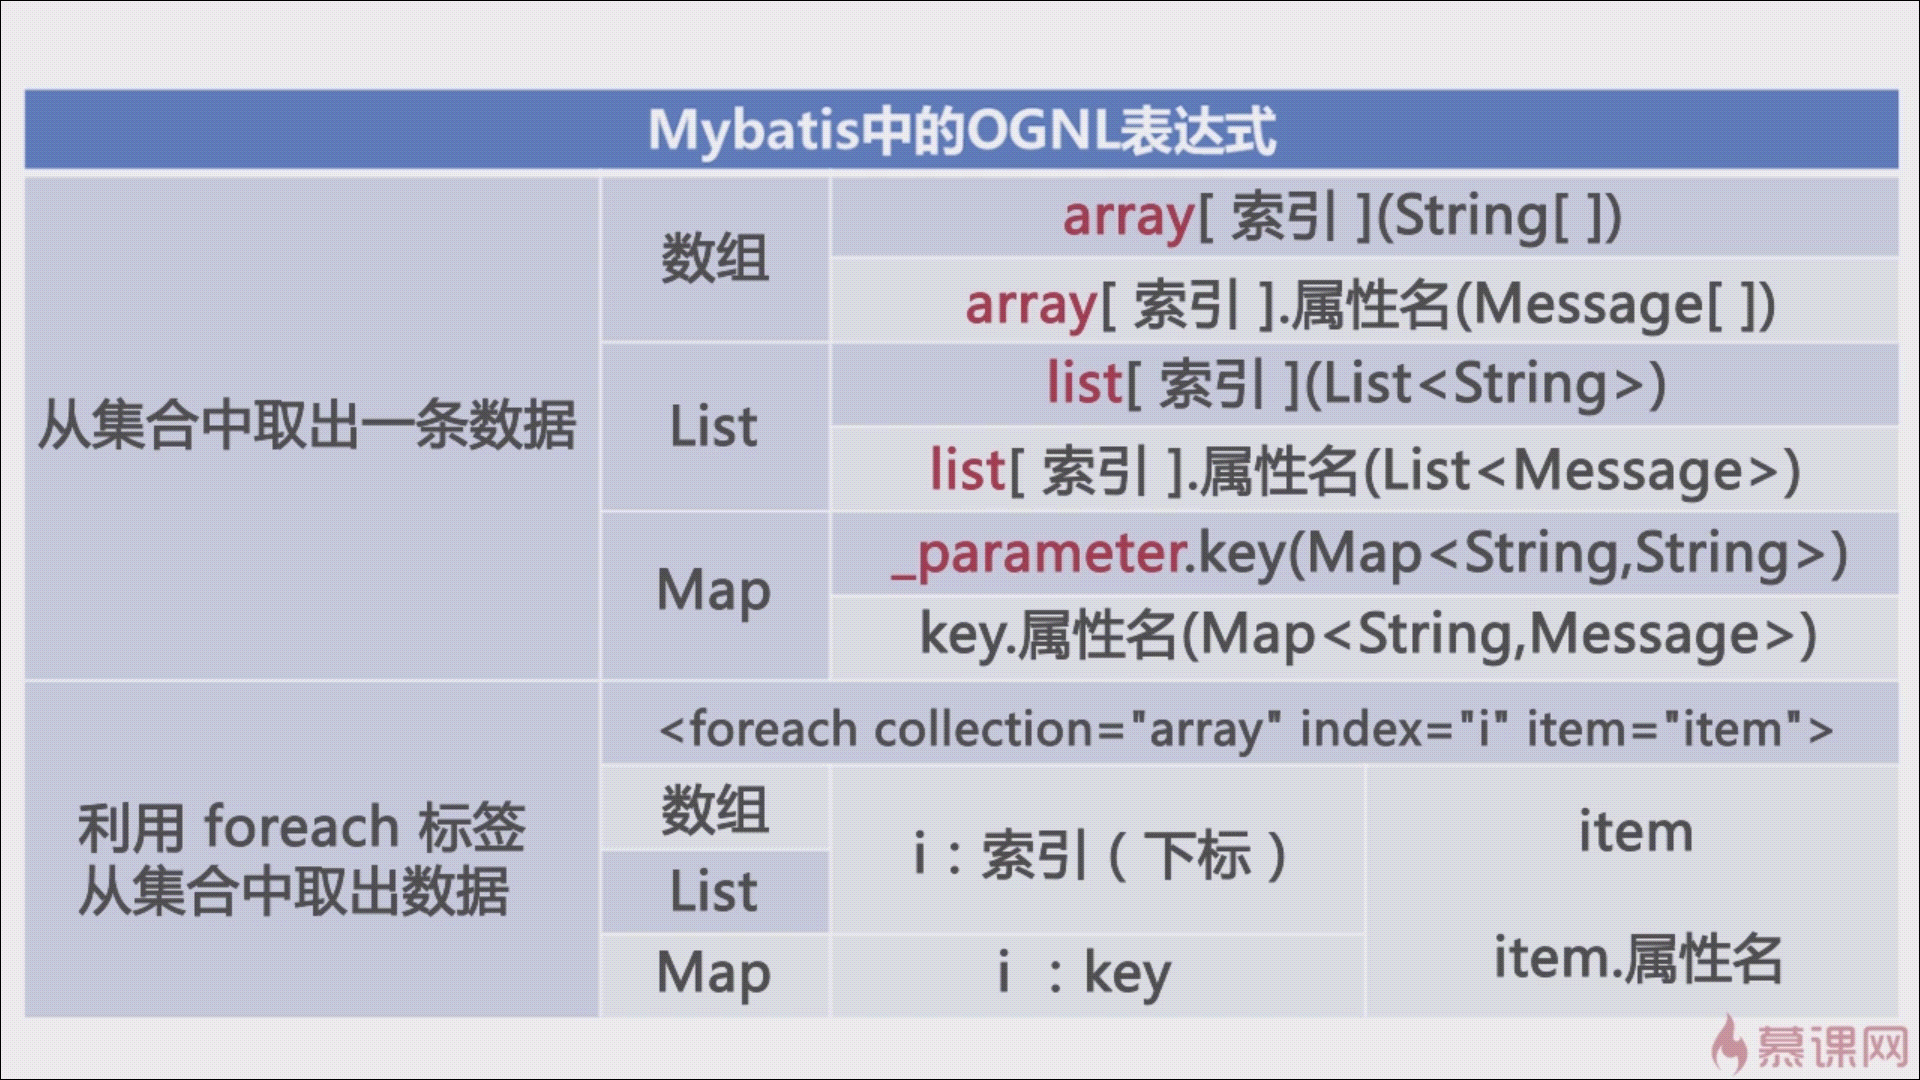
(3)mybatis的OGNL
上面的<if test=""> </if>等是OGNL表达式。不是mybatis专有的。但是在mybatis里有特性?(这句话不确定)
(ps:前面jsp文件中的<c:if>是EL表达式。)
step4:修改dao层代码
 1 public class MessageDao{
 2     public List<Messag> queryMessageList(String command,String description){
 3     List<Message> messageList = new ArrayList<Message>();
 4     DBAccess dbAccess = new DBAccess();
 5         SqlSession sqlSession = null;
 6     try{
 7         sqlSession = dbAccess.getSqlSession();
 8         Message message = new Message();
 9         message.setCommand(command);
10         message.setDescription(description);
11         messageList = sqlSession.selectList(“Message.queryMessageList”,message); //Message.xml中的sql语句的namespase.id
12     }catch(IOException e){
13         e.printStackTrace();
14     }finally{
15         if(sqlSession != null){
16             sqlSession.close();
17         }
18     }
19     return messageList;
19 }