一.python中的GIL(Global Interpreter Lock)
详情:https://www.cnblogs.com/SuKiWX/p/8804974.html
介绍:
GIL:全局解释器锁(Cpython中才有,Jpython没有,pypy是去gil的);
cpython:pyhon中的一个线程对应C语言中的一个线程;
gil使得同一个时刻只有一个线程在一个cpu上执行字节码,无法将多个线程映射到多cpu上;
gil在一些情况下会释放,是结合字节码和时间片释放(Python2和Python3有差别),gil在遇到io操作的时候会主动释放
#gil会释放,最后的结果不定,释放的位置不定
import threading
total=1
def add():
    global total
    for i in range(1000000):
        total+=1

def decs():
    global total
    for i in range(1000000):
        total-=1

thread1=threading.Thread(target=add)
thread2=threading.Thread(target=decs)
thread1.start()
thread2.start()
thread1.join()
thread2.join()
print(total)
注:
Python GIL其实是功能和性能之间权衡后的产物,它尤其存在的合理性,也有较难改变的客观因素。从本分的分析中,我们可以做以下一些简单的总结:
-
-
-
- 因为GIL的存在,只有IO Bound场景下得多线程会得到较好的性能
- 如果对并行计算性能较高的程序可以考虑把核心部分也成C模块,或者索性用其他语言实现
- GIL在较长一段时间内将会继续存在,但是会不断对其进行改进
-
-
二.python多线程编程
1.利用Thread实例实现多线程:
这里子线程默认为非守护线程(主线程运行完,子线程不会退出,继续运行完)
# 对于io操作,多线程和多进程性能差别不大
# 通过Thread实例化

import time
import threading
def get_detail_html(url):
    print('我获取详情内容了')
    time.sleep(2)
    print('我获取内容完了')
def get_detail_url(url):
    print('我获取url了')
    time.sleep(2)
    print('我获取url完了')
if __name__=='__main__':
    thread1=threading.Thread(target=get_detail_html,args=('',))
    thread2=threading.Thread(target=get_detail_url,args=('',))
    start_time=time.time()
    thread1.start()
    thread2.start()
    #时间非常小,是运行代码的时间差,而不是2秒
    #这样运行一共有三个线程,主线程和其他两个子线程(thread1,thread2),而且是并行的,子线程启动后,主线程仍然往下运行,因此时间不是2秒
    #守护线程(主线程退出,子线程就会kill掉)
    print('last time:{}'.format(time.time()-start_time))


共三个进程,主线程和两个子线程
2.守护线程:(主线程退出,子线程就会被kill掉)
import time
import threading
def get_detail_html(url):
    print('我获取详情内容了')
    time.sleep(4)
    print('我获取内容完了')
def get_detail_url(url):
    print('我获取url了')
    time.sleep(2)
    print('我获取url完了')
if __name__=='__main__':
    thread1=threading.Thread(target=get_detail_html,args=('',))
    thread2=threading.Thread(target=get_detail_url,args=('',))
    #将线程1设置成守护线程(主线程退出,该线程就会被kill掉),但会等线程2运行完(非守护线程)
    thread1.setDaemon(True)
    start_time=time.time()
    thread1.start()
    thread2.start()
    print('last time:{}'.format(time.time()-start_time))

线程1未运行完退出
3.join():等某个子线程执行完在继续执行主线程代码:
import time
import threading
def get_detail_html(url):
    print('我获取详情内容了')
    time.sleep(4)
    print('我获取内容完了')
def get_detail_url(url):
    print('我获取url了')
    time.sleep(2)
    print('我获取url完了')
if __name__=='__main__':
    thread1=threading.Thread(target=get_detail_html,args=('',))
    thread2=threading.Thread(target=get_detail_url,args=('',))
    start_time=time.time()
    thread1.start()
    thread2.start()
    #等待两个线程执行完
    thread1.join()
    thread2.join()
    print('last time:{}'.format(time.time()-start_time))

执行时间是线程最大时间(并发执行)
4.继承Thread实现多线程(代码较复杂时):
import time
import threading
class GetDetailHtml(threading.Thread):
    def __init__(self, name):
        super().__init__(name=name)
    def run(self):
        print('我获取详情内容了')
        time.sleep(4)
        print('我获取内容完了')

class GetDetailUrl(threading.Thread):
    def __init__(self,name):
        super().__init__(name=name)
    def run(self):
        print('我获取url了')
        time.sleep(2)
        print('我获取url完了')
if __name__=='__main__':
    thread1=GetDetailHtml('get_detail_html')
    thread2=GetDetailUrl('get_detail_url')
    start_time=time.time()
    thread1.start()
    thread2.start()
    #等待两个线程执行完
    thread1.join()
    thread2.join()
    print('last time:{}'.format(time.time()-start_time))
三.线程间通信-Queue
1.线程通信方式——共享变量:(全局变量或参数等)
注:共享变量的方式是线程不安全的操作(不推荐)


 1 import time
 2 import threading
 3 url_lists = []
 4 def get_detail_html():
 5     #可以单独放在某一个文件管理(注意引入时要引用文件)
 6     global url_lists
 7     url_lists=url_lists
 8     while True:
 9         if len(url_lists):
10             url=url_lists.pop()
11             print('我获取详情内容了')
12             time.sleep(4)
13             print('我获取内容完了')
14 def get_detail_url(url_lists):
15     while True:
16         print('我获取url了')
17         time.sleep(2)
18         for i in range(20):
19             url_lists.append('url'+str(i))
20         print('我获取url完了')
21 if __name__ == '__main__':
22     thread_url=threading.Thread(target=get_detail_url,args=(url_lists,))
23     thread_url.start()
24     #开启十个线程爬取详情
25     for i in range(10):
26         thread_html=threading.Thread(target=get_detail_html,)
27         thread_html.start()
2.通过queue的方式进行线程同步:
注:是线程安全的(Queue本身就是线程安全的【使用了线程锁的机制】,使用了双端队列,deque)
Queue中的方法:qsize()查看对列大小,empty()判断队列是否为空,full()判断队列是否满,满了的话put方法就会阻塞,等待有空位加入,put()将数据放入队列,默认是阻塞的(block参数,可以设置成非阻塞,还有timeout等待时间),get()从队列取数据

 1 import time
 2 import threading
 3 from queue import Queue
 4 url_lists = []
 5 def get_detail_html(queue):
 6     while True:
 7         url=queue.get()
 8         print('我获取详情内容了')
 9         time.sleep(4)
10         print('我获取内容完了')
11 def get_detail_url(queue):
12     while True:
13         print('我获取url了')
14         time.sleep(2)
15         for i in range(20):
16             queue.put('url'+str(i))
17         print('我获取url完了')
18 if __name__ == '__main__':
19     #设置队列最大值1000,过大对内存会有很大影响
20     urls_queue=Queue(maxsize=1000)
21     thread_url=threading.Thread(target=get_detail_url,args=(urls_queue,))
22     thread_url.start()
23     #开启十个线程爬取详情
24     for i in range(10):
25         thread_html=threading.Thread(target=get_detail_html,args=(urls_queue,))
26         thread_html.start()
27     #执行该方法才能执行退出,和join成对出现
28     urls_queue.task_done()
29     urls_queue.join()
四. 线程同步(Lock、RLock、Semaphores、Condition)
问题:如例一中的问题,最后的结果不正确且不稳定,是因为在字节码运行时,线程随时可能跳转,导致赋值不正确,因此需要一个锁,让某段代码运行时,另一代码段不运行
1.Lock:锁住的代码段都只能有一个代码段运行
获取(acquire)和释放(release)锁都需要时间:因此用锁会影响性能;还有可能引起死锁(互相等待,A和B都需要a,b两个资源,A获取了a,B获取了B,A等待b,B等待a或则未释放锁再次获取);
产生死锁的四个条件:互斥条件;不剥夺条件;请求和保持条件;循环等待条件
 1 import threading
 2 from threading import Lock
 3 total=1
 4 lock=Lock()
 5 def add():
 6     global total
 7     for i in range(1000000):
 8         #获取锁
 9         lock.acquire()
10         total+=1
11         #释放锁,释放后其他才能获取
12         lock.release()
13
14 def decs():
15     global total
16     for i in range(1000000):
17         lock.acquire()
18         total-=1
19         lock.release()
20 thread1=threading.Thread(target=add)
21 thread2=threading.Thread(target=decs)
22 thread1.start()
23 thread2.start()
24 thread1.join()
25 thread2.join()
26 print(total)
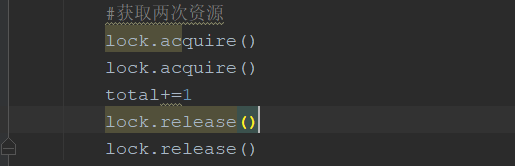
2.RLock(可重入的锁):在一个线程中可以,可以连续多次acquire(获取资源),一定要注意acquire的次数要和release的次数一致
3.Condition:条件变量(用于复杂的线程间同步)
3.1使用锁进行先后对话:发现先启动的线程把话先说完(第一个线程启动后运行完,第二个线程还没有启动,或者还未切换到另一个线程)
View Code3.2通过condition实现:
(通过调用with方法(实际是__enter__魔法函数),也可以使用acquire()方法【如self.conf.acquire()】,但记得一定要release()之后才能调用其他函数【wait(),notify()】,还有注意线程启动顺序【先接收方先启动,否则接收不到】),Condition有两层锁,一把地层锁,会在线程调用了wait()方法时释放,上面的锁会在每次调用wait()时分配一把锁并放入到condition的等待队列中,等待notify()方法的唤醒
Condition重要函数:acquire(),release()【都调用了Lock的acquire,release】,wait()【允许等待某个通知在操作,会获取一把锁并把Condition中的锁释放掉】,notify()【发送通知,释放锁】
 1 import threading
 2
 3
 4
 5 class LYQ1(threading.Thread):
 6     def __init__(self, cond):
 7         super().__init__(name="LYQ1")
 8         self.cond = cond
 9
10     def run(self):
11         with self.cond:
12             print('LYQ1:你好,我是{}'.format(self.name))
13             #输出后发出通知
14             self.cond.notify()
15             self.cond.wait()
16             print('LYQ1:哈哈')
17             self.cond.notify()
18             self.cond.wait()
19             print('LYQ1:嘿嘿')
20             self.cond.notify()
21
22
23 class LYQ2(threading.Thread):
24     def __init__(self, cond):
25         super().__init__(name="LYQ2")
26         self.cond = cond
27
28     def run(self):
29         with self.cond:
30             #等待通知
31             self.cond.wait()
32             print('LYQ2:你好,我是{}'.format(self.name))
33             self.cond.notify()
34             self.cond.wait()
35             print('LYQ2:好的'.format(self.name))
36             self.cond.notify()
37             self.cond.wait()
38             print('LYQ2:好久不见')
39             self.cond.notify()
40
41
42 if __name__ == "__main__":
43     cond = threading.Condition()
44     lyq1 = LYQ1(cond=cond)
45     lyq2 = LYQ2(cond=cond)
46     #注意启动顺序,如果先启动lyq1,发送通知确没有接收(lyq2还没有启动)
47     lyq2.start()
48     lyq1.start()
49     '''
50     输出:
51     LYQ1:你好,我是LYQ1
52     LYQ2:你好,我是LYQ2
53     LYQ1:哈哈
54     LYQ2:好的
55     LYQ1:嘿嘿
56     LYQ2:好久不见'''
4.Semaphores:(有一个参数value可以控制线程(并发数),调用acquire方法value就会减一,如果减少到为0就会阻塞在那儿等待有空位,调用release()value就会加一)【线程数量过多会影响切换线程的效率】
Semaphores内部实质是用Condition完成的,Queue实质也是;
用来控制进入数量的锁(如文件写一般只能一个线程,读可以允许同时多个线程读。)
 1 # 控制线程的数量
 2 from threading import Semaphore
 3 import threading
 4 import time
 5
 6
 7 class UrlProducer(threading.Thread):
 8     def __init__(self, sem):
 9         super().__init__()
10         self.sem = sem
11
12     def run(self):
13         for i in range(20):
14             #调用acquire方法,Semaphore中的value就会减一(value),如果为0就阻塞在这儿
15             self.sem.acquire()
16             html_get = HtmlGet('url' + str(i),sem)
17             html_get.start()
18
19
20 class HtmlGet(threading.Thread):
21     def __init__(self, url,sem):
22         super().__init__()
23         self.url = url
24         self.sem=sem
25
26     def run(self):
27         time.sleep(2)
28         print('获取网页成功')
29         #调用release方法,Semaphore中的value就会加一(value)
30         self.sem.release()
31
32
33 if __name__ == '__main__':
34     #允许并发的个数
35     sem=Semaphore(3)
36     urlproducer = UrlProducer(sem)
37     urlproducer.start()
五.concurrent线程池编码
1.为什么需要线程池:
提供了数量控制,获取线程的状态及返回值;当一个线程完成的时候主线程能立即知道;futures能让多线程和多进程编码接口一致
2.ThreadPoolExecutor中重要函数:
submit():通过submit函数提交执行的函数到线程池,立即返回值(不会阻塞);
done():done()判断某个任务是否执行成功;
result():获取返回值;
cance():取消某个任务(还未执行,执行中不能取消);
wait()让主线程阻塞等待子线程完成,可以添加参数等待多长时间就不等待了
3.获取已经完成的任务:
as_completed() [from concurrent.futures import ThreadPoolExecutor,as_completed];
map(属于ThreadPoolExecutor)
 1 #as_completed会将成功的url的返回值yield出去
 2 from concurrent.futures import ThreadPoolExecutor,as_completed,wait
 3 import time
 4 def get_html(times):
 5     time.sleep(times)
 6     print('get success {}'.format(times))
 7     return times
 8
 9 excutor=ThreadPoolExecutor(max_workers=2)
10 # #通过submit函数提交执行的函数到线程池,立即返回值(不会阻塞)
11 # ret1=excutor.submit(get_html,(3))
12 # #done()判断函数是否执行成功
13 # print(ret1.done())
14 # print(ret1.cancel())
15 # ret2=excutor.submit(get_html,(2))
16 # print(ret2.done())
17 # #result()获取返回值
18 # print(ret1.result())
19 urls=[2,3,4]
20 #获取已经完成的任务
21 all_task=[excutor.submit(get_html,(url)) for url in urls]
22 #wait(让主线程阻塞等待子线程完成),可以
23 wait(all_task,return_when='FIRST_COMPLETED')
24 print('haha')
25 # for future in as_completed(all_task):
26 #     data=future.result()
27 #     print(data)
28 # for data in excutor.map(get_html,urls):
29 #     print(data)
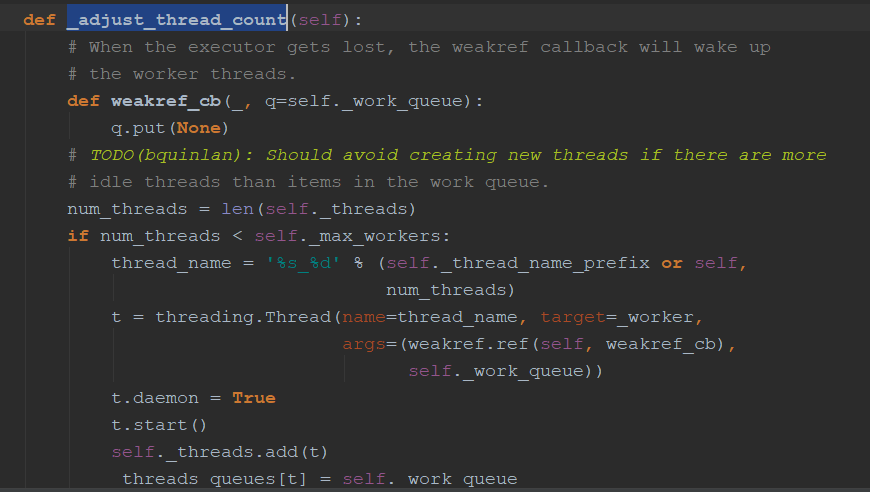
4:ThreadPoolExecutor源码简介:
submit方法会加一把锁,创建Future,然后放入WorkItem(执行单元),将执行单元放入执行队列中,_adjust_thread_count()会比较启动得线程数量和最大线程数量,如果小于就会启动一个线程放入_threads里面,_threads里面执行的是_worker()函数,参数为work_que,获取WorkItem,然后调用里面的run()方法,将值设置到future中去。


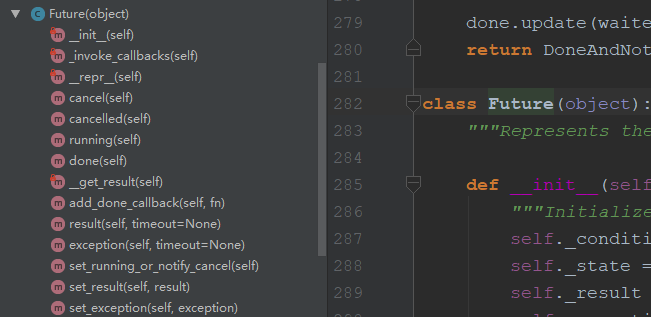
Future中的方法,cancel(),done()等等都是判断状态,result()是会阻塞的,调用Condition()
六.多进程编程-multiprocessing
1.和多线程对比:
·1.1多进程开销大,多线程开销小;
1.2耗CPU的操作,多进程编程比多线程编程好很多,对于IO操作来说,使用多线程操作比多进程好(线程切换比进程切换性能高)
2.例:
1.1对于耗CPU的操作(多进程优于多线程):
 1 from concurrent.futures import ThreadPoolExecutor,ProcessPoolExecutor,as_completed
 2 import time
 3
 4 def fib(n):
 5     if n<=2:
 6         return 1
 7     return fib(n-2)+fib(n-1)
 8 if __name__=='__main__':
 9     #代码要放在这里面,不然可能抛异常
10     with ThreadPoolExecutor(3) as excutor:
11         start_time=time.time()
12         all_task=[excutor.submit(fib,num) for num in range(25,40)]
13         for future in as_completed(all_task):
14             data=future.result()
15             print('结果:'+str(data))
16         print('多线程所需时间:'+str(time.time()-start_time))
17     '''
18     多线程所需时间:72.10901117324829
19     '''
20
21     with ProcessPoolExecutor(3) as excutor:
22         start_time=time.time()
23         all_task=[excutor.submit(fib,num) for num in range(25,40)]
24         for future in as_completed(all_task):
25             data=future.result()
26             print('结果:'+str(data))
27         print('多进程所需时间:'+str(time.time()-start_time))
28     '''
29     多进程所需时间:43.14996862411499
30     '''
1.2对于IO操作,多线程由于多进程:
 1 from concurrent.futures import ThreadPoolExecutor,ProcessPoolExecutor,as_completed
 2 import time
 3
 4 def random_sleep(n):
 5     time.sleep(n)
 6     return n
 7 if __name__=='__main__':
 8     #代码要放在这里面,不然可能抛异常
 9     with ThreadPoolExecutor(3) as excutor:
10         start_time=time.time()
11         all_task=[excutor.submit(random_sleep,num) for num in [2]*30]
12         for future in as_completed(all_task):
13             data=future.result()
14             print('休息:'+str(data)+'秒')
15         print('多线程所需时间:'+str(time.time()-start_time))
16     '''
17     多线程所需时间:20.010841131210327
18     '''
19
20     with ProcessPoolExecutor(3) as excutor:
21         start_time=time.time()
22         all_task=[excutor.submit(random_sleep,num) for num in [2]*30]
23         for future in as_completed(all_task):
24             data=future.result()
25             print('休息:'+str(data)+'秒')
26         print('多进程所需时间:'+str(time.time()-start_time))
27     '''
28     20.755817651748657
29     '''
3.进程有趣的例子:
 1 import os
 2 import time
 3 #fork只能用于Linux/Unix
 4 #进程间数据是隔离的,每个进程都有完整的数据,fork()会将父进程代码复制一遍在运行(fork后的代码)
 5 pid=os.fork()
 6 print('LYQ')
 7 if pid==0:
 8     print('子进程:{},父进程:{}'.format(os.getpid(),os.getppid()))
 9 else:
10     print('我是父进程:{}'.format(pid))
11     #暂停两秒,父进程还没有退出,子进程可以运行完,父进程退出就可以kill掉子进程
12     #不暂停的话,父进程退出,子进程仍然在运行,输出
13     time.sleep(2)
14 '''
15 暂停的输出:
16 LYQ
17 我是父进程:8587
18 LYQ
19 子进程:8587,父进程:8578
20
21 不暂停的输出:
22 LYQ
23 我是父进程:8587
24 [root@izwz97n253zzwjtudbqt5uz ~]# LYQ
25 子进程:8587,父进程:1
26 '''
4.multiprocessing:(比ProcessPoolExecutor更底层【基于multiprocessing实现】,推荐ProcessPoolExecutor更好的设计,和ThreadPoolExecutor相似):
 1 import time
 2 import multiprocessing
 3 def get_html(n):
 4     time.sleep(n)
 5     print('sub_process success')
 6     return n
 7
 8 if __name__=='__main__':
 9     process=multiprocessing.Process(target=get_html,args=(1,))
10     #获取进程号,没有start之前为None
11     print(process.pid)
12     process.start()
13     print(process.pid)
14     process.join()
15     print('main_process  success')
5进程池:
 1 ......
 2 pool=multiprocessing.Pool(3)
 3     #异步提交任务
 4    #  result=pool.apply_async(get_html,args=(2,))
 5    # #关闭不在进入进程池
 6    #  pool.close()
 7    #  pool.join()
 8    #  print(result.get())
 9    #和执行顺序一样
10    for result in pool.imap(get_html,[1,5,3]):
11        print('{} sleep success'.format(result))
12    #和先后完成顺序一样
13    for result in pool.imap_unordered(get_html, [1, 5, 3]):
14        print('{} sleep success'.format(result))
七.进程间通信
1.共享全局变量在多进程中不适用(会把数据复制到子进程中,数据是独立的,修改也不会影响),quue中的Queue也不行,需要做一些处理
 1 from multiprocessing import Queue,Process
 2 import time
 3 def producer(queue):
 4      queue.put('a')
 5      time.sleep(2)
 6
 7 def consumer(queue):
 8     time.sleep(2)
 9     data=queue.get()
10     print(data)
11
12 if __name__=='__main__':
13     queue=Queue(10)
14     pro_producer=Process(target=producer,args=(queue,))
15     pro_consumer=Process(target=consumer,args=(queue,))
16     pro_producer.start()
17     pro_consumer.start()
18     pro_producer.join()
19     pro_consumer.join()
2.multiprocessing中的Queue不能用于进程池(需要用到manager):
queue=Manager().Queue(10)
1 from queue import Queue——>用于多线程
2 from multiprocessing import Queue——>用于非进程池的多进程通信
3 from multiprocessing import Manager——>manager.Queue()用于进程池通信
3.通过Pipe进行进程间通信(管道),pipe只能适用于两个进程 ,Pipe性能高于queue
 1 from multiprocessing import Pipe
 2 import time
 3 def producer(pipe):
 4      pipe.send('a')
 5      time.sleep(2)
 6
 7 def consumer(pipe):
 8     time.sleep(2)
 9     data=pipe.recv()
10     print(data)
11
12 if __name__=='__main__':
13     #通过Pipe进行进程间通信(管道),pipe只能适用于两个进程
14     recv_pipe,send_pipe=Pipe()
15     queue=Manager().Queue(10)
16     pro_producer=Process(target=producer,args=(send_pipe,))
17     pro_consumer=Process(target=consumer,args=(recv_pipe,))
18     pro_producer.start()
19     pro_consumer.start()
20     pro_producer.join()
21     pro_consumer.join()
4.进程间共享内存(Manager):
 1 from multiprocessing import Manager,Process
 2
 3 def add_data(pro_dict, key, value):
 4     pro_dict[key] = value
 5
 6 if __name__=='__main__':
 7     #常用的类型都有
 8
 9     process_dict=Manager().dict()
10     fir=Process(target=add_data,args=(process_dict,'name1','LYQ1'))
11     sed = Process(target=add_data, args=(process_dict, 'name2', 'LYQ2'))
12     fir.start()
13     sed.start()
14     fir.join()
15     sed.join()
16     print(process_dict)