node 事件机制
一 三种定时器
NodeJS中有三种类型的定时器:超时时间、时间间隔、即时定时器
1.超时时间:setTimeout(callback,delayMilliSeconds,[args])方法,如:
setTimeout(myFunc,1000);
setTimeout函数返回一个定时器对象的ID,可以在delayMilliSeconds到期前的任何时候把此ID传递给clearTimeOut()来取消时间函数。
var myTimeout=setTimeout(myFunc,1000);
...
clearTimeOut(myTimeout);
2.时间间隔
var myInterval=setInterval(myFunc,1000);
...
clearInterval(myInterval);
3.即时器立即执行工作
即时计时器用来在I/O事件的回调函数开始执行后,但任何超时时间或时间间隔事件被执行之前,立即执行。
var myImmediate=setImmediate(myFunc,1000);
...
clearImmediate(myImmediate);
二 事件发射器和监听器
1.NodeJS事件模型的工作原理。
NodeJS不是在各个线程为每个请求执行所有的工作,它是把工作添加到事件队列中,然后有一个单独的线程运行一个事件循环把这个工作提取出来。事件循环抓取事件队列中最上面的条目,执行它,然后抓取下一个条目。当执行到长期运行或有阻塞I/O的代码时,它不是直接调用该函数,而是把函数虽同一个要在此函数完成后执行的回调函数一起添加到事件队列中。当NodeJS事件队列中的所有事件都被执行完成时,nodejs应用程序终止。
Node.js中,所有异步的I/O操作,在完成的时候都会发送一个事件到事件队列中。
Node.js中的许多对象也都会分发事件,比如:net.Server 对象会在每次有新链接时分发一个事件;fs.readStream 对象会在文件被打开的时候分发一个事件等等,所有这些产生事件的对象都是event.EventEmitter(事件监听/发射器)的实例。我们可以通过“ require('events') ”来访问该模块。
阻塞I/O停止当前线程的执行并等待一个回应,直到收到回应才能继续。nodejs使用事件回调来避免对阻塞I/O的等待。事件回调的关键就是事件轮询。
2.注册并发射自定义node.js事件
事件使用一个EventEmitter对象来发出,这个对象包含在events模块中,emit(eventName,[args])函数触发eventName事件,包括所提供的任何参数。
var EventEmitter = require('events').EventEmitter;     // 引入事件模块
var event = new EventEmitter();     // 实例化事件模块
// 注册事件(customer_event)
event.on('customer_event', function() {
    console.log('customer_event has be occured : ' + new Date());
});
setInterval(function() {
event.emit('customer_event');     // 发射(触发)事件
}, 500);
使用EventEmitter对象的on注册事件,然后使用对象的emit发射事件。
3.EventEmitter介绍
events模块只提供了一个对象:events.EventEmitter。EventEmitter的核心就是事件发射与事件监听器功能的封装。
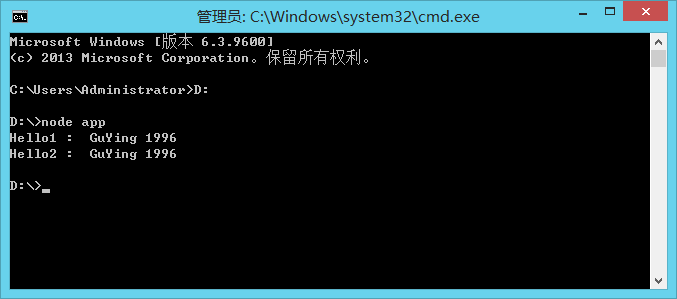
var EventEmitter = require('events').EventEmitter;     // 引入事件模块
var event = new EventEmitter();     // 实例化事件模块
// 注册事件(sayHello)
event.on('sayHello', function(param1, param2) {
    console.log('Hello1 : ', param1, param2);
});

// 再次注册事件(sayHello)
event.on('sayHello', function(param1, param2) {
    console.log('Hello2 : ', param1, param2);
});
event.emit('sayHello', 'GuYing', '1996');     // 发射(触发)事件(sayHello)
注意到sayHello这个事件注册了两次。
EventEmitter的每一个事件都是由一个事件名和若干个参数组成。事件名是一个字符串,通常表达一定的语义。对于每个事件,EventEmitter支持若干个事件监听器。当事件发射时,注册到这个事件的事件监听器被依次调用,事件参数作为回调函数参数传递。
运行结果中可以看到两个事件监听器回调函数被先后调用。 这就是EventEmitter最简单的用法。
EventEmitter常用的API:
EventEmitter.on(event,listener)、emitter.addListener(event,listener)为指定事件注册一个监听器,接受一个字符串event和一个回调函数listener。
EventEmitter.once(event, listener) 为指定事件注册一个单次监听器,即监听器最多只会触发一次,触发后立刻解除该监听器。
EventEmitter.emit(event, [arg1], [arg2], [...]) 发射 event 事件,传递若干可选参数到事件监听器的参数表。
EventEmitter.removeListener(event, listener) 移除指定事件的某个监听器,listener必须是该事件已经注册过的监听器。
emitter.listeners(event) 返回这个事件的监听函数的数组
emitter.setMaxListeners(n) 设置这个emitter实例的最大事件监听数,默认是10个,设置0为不限制
emitter.removeAllListeners(event) 删除所有对这个事件的监听函数
举个简单的例子:
UserBean.js
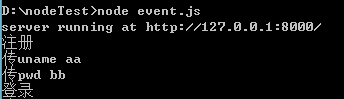
var events=require('events');
var http=require('http');
function UserBean(){
    //实例化事件模型
    this.eventEmit=new events.EventEmitter();
    this.zhuce=function(req,res){
        console.log('注册');
        req['uname']='aa';
        req['pwd']='bb';
        //触发事件
        this.eventEmit.emit('zhuceSuccess','aa','bb');
    },
    this.login=function(req,res){
        console.log('登录');
        res.write('用户名:'+req['uname']);
        res.write('密码:'+req['pwd']);
        res.write("登录");
    }
}
module.exports=UserBean;
event.js
var http=require('http');
var UserBean=require('./UserBean');
http.createServer(function(request,response){
    response.writeHead(200,{'Content-Type':'text/html;charset=utf-8'});
    if(request.url!=='favicon.ico'){
        user=new UserBean();
        user.eventEmit.once('zhuceSuccess',function(uname,pwd){
            response.write('注册成功');
            console.log('传uname '+uname);
            console.log('传pwd '+pwd);
            user.login(request,response);
            response.end();
        });
        user.zhuce(request,response);
    }
}).listen(8000);
console.log('server running at http://127.0.0.1:8000/');

4.error事件
EventEmitter 定义了一个特殊的事件 error,它包含了"错误"的语义,我们在遇到 异常的时候通常会发射 error 事件。
当 error 被发射时,EventEmitter 规定如果没有响应的监听器,Node.js 会把它当作异常,退出程序并打印调用栈。
我们一般要为会发射 error 事件的对象设置监听器,避免遇到错误后整个程序崩溃。例如:
var events=require('events');
var myEvent = new events.EventEmitter();
myEvent.emit('error', new Error('whoops!'));
运行时会显示以下错误:

但是如果这么写就可以正确报错:
var events=require('events');
myEvent.on('error', (err) => {
    console.log('whoops! there was an error');
});
myEvent.emit('error', new Error('whoops!'));

5.注意
大多数时候我们不会直接使用 EventEmitter,而是在对象中继承它。包括 fs、net、 http 在内的,只要是支持事件响应的核心模块都是 EventEmitter 的子类。
为什么要这样做呢?原因有两点:
1)具有某个实体功能的对象实现事件符合语义, 事件的监听和发射应该是一个对象的方法。
2)JavaScript 的对象机制是基于原型的,支持 部分多重继承,继承 EventEmitter 不会打乱对象原有的继承关系。
Events(事件)模块是Node.js的核心,许多其他模块用它来围绕着事件架构功能。由于Node.js运行在单一的线程中,任何同步代码都是阻塞的,所以如果有长时间运行的代码的话事件循环便会被阻塞。为了有效地使用Node.js编写代码,必须仔细思考自己的变成风格并遵循一些简单的规则。
那么,如何将事件添加到你的javascript对象中呢?首先需要通过在对象实例中调用events.EventEmitter.call(this)来在对象中继承EventEmitter功能,还需要把events.EventEmitter.prototype添加到对象的原型中,如:
function myObj(){
    Events.EventEmitter.call(this);
}
myObj.prototype._proto_=evnets.EventEmitter.prototype;
然后从对象实例中发出事件:
var newObj=new myObj();
newObj.emit('someEvent');
举个简单的例子:
var events = require('events');
function Account() {
    this.balance = 0;
    events.EventEmitter.call(this);
    this.deposit = function(amount){
        this.balance += amount;
        this.emit('balanceChanged');
    };
    this.withdraw = function(amount){
        this.balance -= amount;
        this.emit('balanceChanged');
    };
}
Account.prototype.__proto__ = events.EventEmitter.prototype;
function displayBalance(){
    console.log("Account balance: $%d", this.balance);
}
function checkOverdraw(){
    if (this.balance < 0){
        console.log("Account overdrawn!!!");
    }
}
function checkGoal(acc, goal){
    if (acc.balance > goal){
        console.log("Goal Achieved!!!");
    }
}
var account = new Account();
account.on("balanceChanged", displayBalance);
account.on("balanceChanged", checkOverdraw);
account.on("balanceChanged", function(){
    checkGoal(this, 1000);
});
account.deposit(220);
account.deposit(320);
account.deposit(600);
account.withdraw(1200);
