部署分片服务器
1.分片
为了突破单点数据库服务器的I/O能力限制,对数据库存储进行水平扩展,严格地说,每一个服务器或者实例或者复制集就是一个分片。
2.优势
提供类似现行增·长架构
提高数据可用性
提高大型数据库查询服务器性能
3.什么时候需要分片
单点数据库服务器存储成为瓶颈
单点数据库服务器的性能成为瓶颈
大型应用分散数据库已充分利用内存
4.简单配置
1台路由实例(端口27017)
1台配置实例(端口37017)
2台shard实例(端口47017,47018)

5.搭建mongodb分片集群。
mongodb目前最新的版本是3.4。3.4版本不在支持x86 32位的系统。
1》安装:
准备3台机器,分别是mongodb1,mongodb2,mongodb3.在创建repo的文件,以便后续进行yum安装:
环境:centos6.5 192.168.10.11 mongodb1
centos6.5 192.168.10.12 mongodb2
centos6.5 192.168.10.13 mongodb3
在三台服务器上分别创建yum的repos的文件,以便后续进行yum安装。也可以源码方式安装
[root@localhost ~]# cd /etc/yum.repos.d/
[root@localhost yum.repos.d]# ls
a bak CentOS-Base.repo.bak mongodb-org-3.4.repo
[root@localhost yum.repos.d]# vim mongodb-org-3.4.repo
[mongodb-org-3.4]
name=MongodbRepository
baseurl=https://repo.mongodb.org/yum/redhat/$releasever/mongodb-org/3.4/x86_64/
gpgcheck=1
enabled=1
gpgkey=https://www.mongodb.org/static/pgp/server-3.4.asc
[root@localhost yum.repos.d]# yum -y install mongodb-org
注,安装的时候可能会报错:
[root@mongodb2mongodb]# sudo yum install -y mongodb-org
Loadedplugins: refresh-packagekit, security
Existinglock /var/run/yum.pid: anothercopyis runningas pid 2389.
Anotherappis currentlyholdingtheyumlock; waitingfor itto exit...
Theotherapplicationis: PackageKit
Memory : 151 M RSS (461 MBVSZ)
Started: SatFeb 18 23:48:39 2017 - 42:48 ago
State : Sleeping, pid: 2389
Anotherappis currentlyholdingtheyumlock; waitingfor itto exit...
Theotherapplicationis: PackageKit
Memory : 151 M RSS (461 MBVSZ)
Started: SatFeb 18 23:48:39 2017 - 42:50 ago
State : Sleeping, pid: 2389
^C
Exitingonusercancel.
kill掉hold住yum lock的进程即可:
在三台服务器上别分建立如下目录:
[root@localhost ~]# tree /data/
/data/
└── mongodbtest
├── config
│ ├── data
│ └── log
├── mongos
│ └── log
├── shard1
│ ├── data
│ └── log
├── shard2
│ ├── data
│ └── log
└── shard3
├── data
└── log
15 directories, 0 files
因为mongos是不存储数据的,所以mongos不需要data目录。
端口设定:
mongos为20000,configserver为21000,shard1为22001,shard2为22002,shard3为22003
自定义路径:
[root@localhost ~]# vim /etc/profile
export PATH=$PATH:/usr/local/mongodb/bin
[root@localhost ~]# source /etc/profile
[root@localhost ~]# echo $PATH
/usr/local/sbin:/usr/local/bin:/sbin:/bin:/usr/sbin:/usr/bin:/root/bin:/usr/local/mongodb/bin:/usr/local/mongodb/bin(使用源码包方式可以自定义路径)
(一)config server 的配置
1.在每一台服务器上别分启动config server(后台运行)
[root@localhost ~]# mongod --configsvr --replSet cfgReplSet --dbpath /data/mongodbtest/config/data --port 21000 --logpath /data/mongodbtest/config/log/config.log --fork
about to fork child process, waiting until server is ready for connections.
forked process: 1981
child process started successfully, parent exiting
[root@localhost ~]# ps -ef | grep mongod
mongod 955 1 1 09:57 ? 00:00:15 /usr/bin/mongod -f /etc/mongod.conf
root 1420 1 15 10:21 ? 00:00:01 mongod --configsvr --replSet cfgReplSet --dbpath /data/mongodbtest/config/data/ --port 21000 --logpath /data/mongodbtest/config/log/config.log --fork
root 1458 1380 0 10:21 pts/0 00:00:00 grep mongod
2.配置config server 为replica set。连接到任意一台config server
[root@localhost ~]# mongo --host 192.168.10.11 --port 21000
MongoDB shell version v3.4.3
connecting to: mongodb://192.168.10.11:21000/
MongoDB server version: 3.4.3
Welcome to the MongoDB shell.
For interactive help, type "help".
For more comprehensive documentation, see
http://docs.mongodb.org/
Questions? Try the support group
http://groups.google.com/group/mongodb-user
Server has startup warnings:
2017-03-29T21:18:54.891+0800 I STORAGE [initandlisten]
2017-03-29T21:18:54.891+0800 I STORAGE [initandlisten] ** WARNING: Using the XFS filesystem is strongly recommended with the WiredTiger storage engine
2017-03-29T21:18:54.891+0800 I STORAGE [initandlisten] ** See http://dochub.mongodb.org/core/prodnotes-filesystem
2017-03-29T21:18:55.139+0800 I CONTROL [initandlisten]
2017-03-29T21:18:55.139+0800 I CONTROL [initandlisten] ** WARNING: Access control is not enabled for the database.
2017-03-29T21:18:55.139+0800 I CONTROL [initandlisten] ** Read and write access to data and configuration is unrestricted.
2017-03-29T21:18:55.139+0800 I CONTROL [initandlisten] ** WARNING: You are running this process as the root user, which is not recommended.
2017-03-29T21:18:55.139+0800 I CONTROL [initandlisten]
configsvr>
3.创建副本集
在刚才连上的那台config server 上配置
> rs.initiate({_id:"cfgReplSet",configsvr:true,members:[{_id:0,host:"192.168.10.11:21000"},{_id:1,host:"192.168.10.12:21000"},{_id:2,host:"192.168.10.13:21000"}]})
{ "ok" : 1 }
4.在每一台服务器上别分启动分片及副本集。(后台运行)
4.1》在每一台服务器分别以副本集的方式启动分片1
[root@localhost mongodb]# mongod --shardsvr --replSet shard1ReplSet --port 22001 --dbpath /data/mongodbtest/shard1/data --logpath /data/mongodbtest/shard1/log/shard1.log --fork --nojournal
about to fork child process, waiting until server is ready for connections.
forked process: 2576
child process started successfully, parent exiting
4.2》连接任意一台分片服务器
[root@localhost mongodb]# mongo --host 192.168.10.11 --port 22001
MongoDB shell version v3.4.2
connecting to: mongodb://192.168.10.11:22001/
MongoDB server version: 3.4.2
Server has startup warnings:
2016-05-29T22:56:44.167+0800 I STORAGE [initandlisten]
2016-05-29T22:56:44.167+0800 I STORAGE [initandlisten] ** WARNING: Using the XFS filesystem is strongly recommended with the WiredTiger storage engine
2016-05-29T22:56:44.167+0800 I STORAGE [initandlisten] ** See http://dochub.mongodb.org/core/prodnotes-filesystem
2016-05-29T22:56:44.518+0800 I CONTROL [initandlisten]
2016-05-29T22:56:44.518+0800 I CONTROL [initandlisten] ** WARNING: Access control is not enabled for the database.
2016-05-29T22:56:44.518+0800 I CONTROL [initandlisten] ** Read and write access to data and configuration is unrestricted.
2016-05-29T22:56:44.518+0800 I CONTROL [initandlisten] ** WARNING: You are running this process as the root user, which is not recommended.
2016-05-29T22:56:44.518+0800 I CONTROL [initandlisten]
>
4.3》创建副本集,并初始化
shard1ReplSet:OTHER> use admin
switched to db admin
> rs.initiate({_id:"shard1ReplSet",members:[{_id:0,host:"192.168.10.11:22001"},{_id:1,host:"192.168.10.12:22001"},{_id:2,host:"192.168.10.13:22001"}]})
{ "ok" : 1 }
同样操作shard2 shard3,执行如下操作
[root@localhost ~]# mongod --shardsvr --replSet shard2ReplSet --port 22002 --dbpath /data/mongodbtest/shard2/data --logpath /data/mongodbtest/shard2/log/shard2.log --fork --nojournal
about to fork child process, waiting until server is ready for connections.
forked process: 2724
child process started successfully, parent exiting
[root@localhost ~]# mongod --shardsvr --replSet shard3ReplSet --port 22003 --dbpath /data/mongodbtest/shard3/data --logpath /data/mongodbtest/shard3/log/shard3.log --fork --nojournal
about to fork child process, waiting until server is ready for connections.
forked process: 2744
child process started successfully, parent exiting
5.选择一台服务器,启动mongos路由服务器
[root@localhost ~]# mongos --configdb cfgReplSet/192.168.10.11:21000,192.168.10.12:21000,192.168.10.13:21000 --port 20000 --logpath /data/mongodbtest/mongos/log/mongos.log --fork
about to fork child process, waiting until server is ready for connections.
forked process: 2764
child process started successfully, parent exiting
登陆路由服务客户端
[root@localhost ~]# mongo --host 192.168.10.12 --port 20000
MongoDB shell version v3.4.2
connecting to: mongodb://192.168.10.12:20000/
MongoDB server version: 3.4.2
Server has startup warnings:
2016-09-29T15:56:55.359+0800 I CONTROL [main]
2016-09-29T15:56:55.359+0800 I CONTROL [main] ** WARNING: Access control is not enabled for the database.
2016-09-29T15:56:55.359+0800 I CONTROL [main] ** Read and write access to data and configuration is unrestricted.
2016-09-29T15:56:55.359+0800 I CONTROL [main] ** WARNING: You are running this process as the root user, which is not recommended.
2016-09-29T15:56:55.359+0800 I CONTROL [main]
mongos>
添加分片到集群
mongos> sh.addShard("shard1ReplSet/192.168.10.11:22001,192.168.10.12:22001,192.168.10.13:22001")
{ "shardAdded" : "shard1ReplSet", "ok" : 1 }
依次添加shard2 shard3
mongos> sh.addShard("shard1ReplSet/192.168.10.11:22002,192.168.10.12:22002,192.168.10.13:22002")
{ "shardAdded" : "shard1ReplSet", "ok" : 1 }
mongos> sh.addShard("shard1ReplSet/192.168.10.11:22003,192.168.10.12:22003,192.168.10.13:22003")
{ "shardAdded" : "shard1ReplSet", "ok" : 1 }
6、Enable Sharding for a Database
mongos> sh.enableSharding("test")
{ "ok" : 1 }
7、Shard a Collection
mongos> sh.shardCollection("test.Log", { id: 1})
{ "collectionsharded" : "test.Log", "ok" : 1 }
8、测试并设置hashed策略
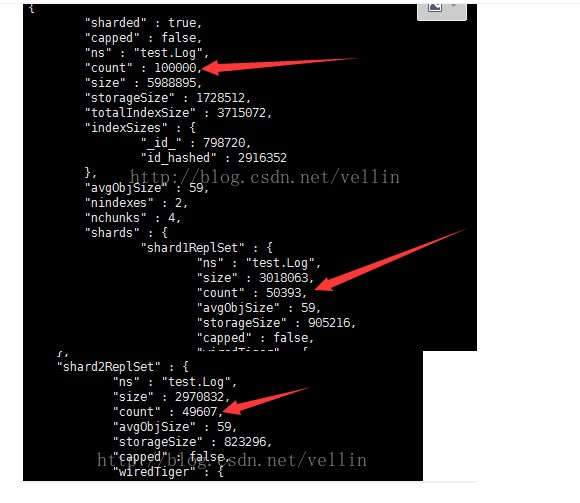
修改sharding 可以的策略为hashed,可以让分片保存的数据基本均衡
mongos> sh.shardCollection("test.Log",{id:"hashed"})
{ "collectionsharded" : "test.Log", "ok" : 1 }
mongos> for (var i = 1; i <= 10000; i++){
... db.Log.save({id:i,"message":"message"+i});
... }
WriteResult({ "nInserted" : 1 })
mongos> db.Log.drop() //删除db.Log库的方法
true
mongos> db.Log.stats() //数量基本平均分配到分片上了
