android学习2
Table of Contents
1 动手编写android程序
上一节(android学习1)我们简单了解了android 这次我们渐进编写一个能交互的例 子,进一步探索adoroid程序结构。
- 上一节的程序是系统生成的,界面(layout.activity_main.xml)内只有一个TextView控 件(textView1),内容是是静态字符串"Hello world!",定义在values.Strigs.xml中。 菜单(menu.activity_main.xml)只有一个MenuItem(menu_setting),title是 "Settings",定义在values.Strigs.xml中。
- 这一节我们在此基础上增加一个Button控件(button1),一个EditText控件 (editText1),一个MenuItem(item1)。程序要达到以下目的:
- 按下button1,用editText1内容更新textView1
- 按下menusetting,弹出对话框
- 按下item1,退出程序
- 首先在layout.activitymain.xml设计界面添加所需的控件,操作和windows下一样, 位置大小都可以调整,我们设计完的界面和xml代码:
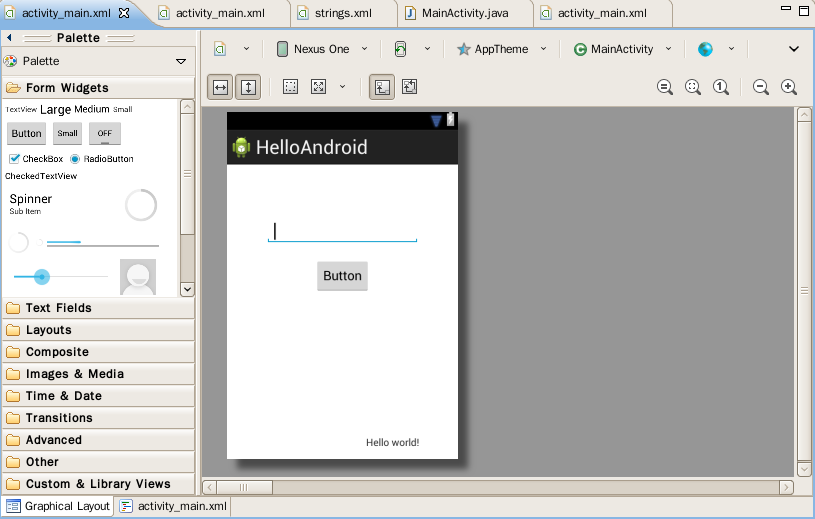
<RelativeLayout xmlns:android="http://schemas.android.com/apk/res/android"
    xmlns:tools="http://schemas.android.com/tools"
    android:layout_width="match_parent"
    android:layout_height="match_parent"
    tools:context=".MainActivity" >

    <TextView
        android:id="@+id/textView1"
        android:layout_width="wrap_content"
        android:layout_height="wrap_content"
        android:layout_alignParentBottom="true"
        android:layout_alignRight="@+id/editText1"
        android:layout_marginBottom="14dp"
        android:text="@string/hello_world" />

    <EditText
        android:id="@+id/editText1"
        android:layout_width="wrap_content"
        android:layout_height="wrap_content"
        android:layout_alignParentTop="true"
        android:layout_centerHorizontal="true"
        android:layout_marginTop="74dp"
        android:ems="10"
        android:inputType="text" >

        <requestFocus />
    </EditText>

    <Button
        android:id="@+id/button1"
        android:layout_width="wrap_content"
        android:layout_height="wrap_content"
        android:layout_below="@+id/editText1"
        android:layout_centerHorizontal="true"
        android:layout_marginTop="19dp"
        android:text="@string/button_name" />

</RelativeLayout>
- 在menu.activitymain.xml设计界面添加一个MenuItem(item1),title填写 @string/sayhello;修改values.strings.xml,界面和菜单显示改成如下:
<?xml version="1.0" encoding="utf-8"?>
<resources>

    <string name="app_name">我们的第一个android程序</string>
    <string name="hello_world">Hello world!</string>
    <string name="menu_settings">退出</string>
    <string name="button_name">确定</string>
    <string name="say_hello">打招呼</string>

</resources>
- 目前,我们的所有控件和菜单都添加好了,系统自动会更新R.java资源信息文件,给程 序提供调用,R.java程序中id类中是所有控件(5个),layout类中是所有界面 (1个),menu类中是所有菜单(1个),string下是所有定义字符串(5个)
/* AUTO-GENERATED FILE.  DO NOT MODIFY.
 *
 * This class was automatically generated by the
 * aapt tool from the resource data it found.  It
 * should not be modified by hand.
 */

package com.example.helloandroid;

public final class R {
    public static final class attr {
    }
    public static final class drawable {
        public static final int ic_launcher=0x7f020000;
    }
    public static final class id {
        public static final int button1=0x7f070002;
        public static final int editText1=0x7f070001;
        public static final int item1=0x7f070004;
        public static final int menu_settings=0x7f070003;
        public static final int textView1=0x7f070000;
    }
    public static final class layout {
        public static final int activity_main=0x7f030000;
    }
    public static final class menu {
        public static final int activity_main=0x7f060000;
    }
    public static final class string {
        public static final int app_name=0x7f040000;
        public static final int button_name=0x7f040003;
        public static final int hello_world=0x7f040001;
        public static final int menu_settings=0x7f040002;
        public static final int say_hello=0x7f040004;
    }
    public static final class style {
        /**
        Base application theme, dependent on API level. This theme is replaced
        by AppBaseTheme from res/values-vXX/styles.xml on newer devices.


            Theme customizations available in newer API levels can go in
            res/values-vXX/styles.xml, while customizations related to
            backward-compatibility can go here.


        Base application theme for API 11+. This theme completely replaces
        AppBaseTheme from res/values/styles.xml on API 11+ devices.

 API 11 theme customizations can go here.

        Base application theme for API 14+. This theme completely replaces
        AppBaseTheme from BOTH res/values/styles.xml and
        res/values-v11/styles.xml on API 14+ devices.

 API 14 theme customizations can go here.
         */
        public static final int AppBaseTheme=0x7f050000;
        /**  Application theme.
 All customizations that are NOT specific to a particular API-level can go here.
         */
        public static final int AppTheme=0x7f050001;
    }
}
- 现在我们开始写代码,先实现第一个功能,"按下button1,用editText1内容更新 textView1",程序类只有一个,打开MainActivity.java,目前只有两个方法,onCreate用 于显示界面,onCreateOptionsMenu用于显示菜单。我们需要给button1添加clicked回调 方法,在android用 android.widget.Button.setOnClickListener,setOnClickListener方法是Button继承 自android.view.View,setOnClickListener方法参数是一个接口 android.view.View.OnClickListener,其中只有一个onClick方法,这里定义Button按 下后执行的动作,我们需要编写一个实现View.OnClickListener接口的内嵌类 BtnClickListener;在BtnClickListener.onClick方法中需要从R类中提取控件。
package com.example.helloandroid;

import android.os.Bundle;
import android.app.Activity;
import android.app.AlertDialog;
import android.app.AlertDialog.Builder;
import android.view.Menu;
import android.view.MenuItem;
import android.view.View;
import android.widget.Button;
import android.widget.EditText;
import android.widget.TextView;

public class MainActivity extends Activity {

  class BtnClickListener implements View.OnClickListener
  {
    @Override
    public void onClick(View v) {
      // TODO Auto-generated method stub
      EditText edt = (EditText)findViewById(R.id.editText1);
      TextView txt = (TextView)findViewById(R.id.textView1);
      txt.setText("你好 android "+edt.getText());
    }
  }

  @Override
  protected void onCreate(Bundle savedInstanceState) {
    super.onCreate(savedInstanceState);
    setContentView(R.layout.activity_main);
    Button btn = (Button)findViewById(R.id.button1);
    btn.setOnClickListener(new BtnClickListener());
  }

  @Override
  public boolean onCreateOptionsMenu(Menu menu) {
    // Inflate the menu; this adds items to the action bar if it is present.
    getMenuInflater().inflate(R.menu.activity_main, menu);
    return true;
  }
}
- 如果使用匿名内嵌类,程序会更简洁,但可读性会差一些,下面是使用匿名内嵌类的版 本,运行一下程序,哈,我们实现了第一个功能。
package com.example.helloandroid;

import ...

public class MainActivity extends Activity {
  @Override
  protected void onCreate(Bundle savedInstanceState) {
    super.onCreate(savedInstanceState);
    setContentView(R.layout.activity_main);
    Button btn = (Button)findViewById(R.id.button1);
    btn.setOnClickListener(new View.OnClickListener() {
      @Override
      public void onClick(View v) {
        // TODO Auto-generated method stub
        EditText edt = (EditText)findViewById(R.id.editText1);
        TextView txt = (TextView)findViewById(R.id.textView1);
        txt.setText(getString(R.string.msg_dia)+edt.getText());
      }
    });
  }

  @Override
  public boolean onCreateOptionsMenu(Menu menu) {
    // Inflate the menu; this adds items to the action bar if it is present.
    getMenuInflater().inflate(R.menu.activity_main, menu);
    return true;
  }
}
- 现在我们实现第二个功能"按下menusetting,弹出对话框",要响应按下菜单,需要在 MainActivity.java中实现onOptionsItemSelected方法,在onOptionsItemSelected方法 中,定义弹出式对话框(android.app.AlertDialog.Builder)对象,现在点击菜单"打招呼", 就弹出对话框"你好 android"
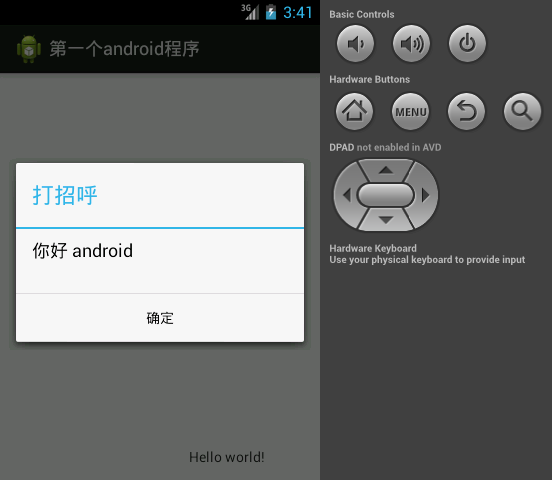
...
  @Override
  public boolean onOptionsItemSelected(MenuItem item)
  {
    super.onOptionsItemSelected(item);
    AlertDialog.Builder builder = new Builder(MainActivity.this);
    builder.setMessage("你好 android");
    builder.setTitle("打招呼");
    builder.setPositiveButton("确定", null);
    builder.create().show();
    return true;
  }
...
- 最后一个功能"按下item1,退出程序",还是在onOptionsItemSelected方法中,用 finish方法就退出程序;但是现在有两个菜单项的点击都在onOptionsItemSelected方 法中响应,需要区分出是哪个菜单项的点击,区分的方是比较菜单项的title,见程序:
@Override
public boolean onOptionsItemSelected(MenuItem item)
{
  super.onOptionsItemSelected(item);
  String title1 = item.getTitle().toString();

  if  (title1.equals(getString(R.string.menu_settings)))
  {
    finish();
    return true;
  }
  AlertDialog.Builder builder = new Builder(MainActivity.this);
  builder.setMessage("你好 android");
  builder.setTitle("打招呼");
  builder.setPositiveButton("确定", null);
  builder.create().show();
  return true;
}
- 至此,一个简单但可操作的程序就完成了,以下是最终MainActivity.java代码:
package com.example.helloandroid;

import android.os.Bundle;
import android.app.Activity;
import android.app.AlertDialog;
import android.app.AlertDialog.Builder;
import android.view.Menu;
import android.view.MenuItem;
import android.view.View;
import android.widget.Button;
import android.widget.EditText;
import android.widget.TextView;

public class MainActivity extends Activity {
  @Override
  protected void onCreate(Bundle savedInstanceState) {
    super.onCreate(savedInstanceState);
    setContentView(R.layout.activity_main);
    Button btn = (Button)findViewById(R.id.button1);
    btn.setOnClickListener(new View.OnClickListener() {
      @Override
      public void onClick(View v) {
        // TODO Auto-generated method stub
        EditText edt = (EditText)findViewById(R.id.editText1);
        TextView txt = (TextView)findViewById(R.id.textView1);
        txt.setText(getString(R.string.msg_dia)+edt.getText());
      }
    });
  }

  @Override
  public boolean onCreateOptionsMenu(Menu menu) {
    // Inflate the menu; this adds items to the action bar if it is present.
    getMenuInflater().inflate(R.menu.activity_main, menu);
    return true;
  }

  @Override
  public boolean onOptionsItemSelected(MenuItem item)
  {
    super.onOptionsItemSelected(item);
    String title1 = item.getTitle().toString();

    if  (title1.equals(getString(R.string.menu_settings)))
    {
      finish();
      return true;
    }
    AlertDialog.Builder builder = new Builder(MainActivity.this);
    builder.setMessage("你好 android");
    builder.setTitle("打招呼");
    builder.setPositiveButton("确定", null);
    builder.create().show();
    return true;
  }
}
2 小结
- android所有信息都在R.java中,包括控件,界面,菜单,字符串,取得控件的方法 是:findViewById(R.id.*),取得字符串的方法是:findViewById(R.string.*)
- Button的点击响应用setOnClickListener定义回调函数,参数是View.onClickListener 接口,可以用内嵌函数或匿名内嵌函数,用匿名内嵌函数代码简洁,但可读性不好
- 响应菜单项的方法是onOptionsItemSelected,也是继承自Activity,要在 onOptionsItemSelected方法中区分不同的菜单项,可比较菜单项的title
- 定义弹出式对话框用AlertDialog.Builder,对话框中增加按钮用setPositiveButton方 法