示例一:spring 基本
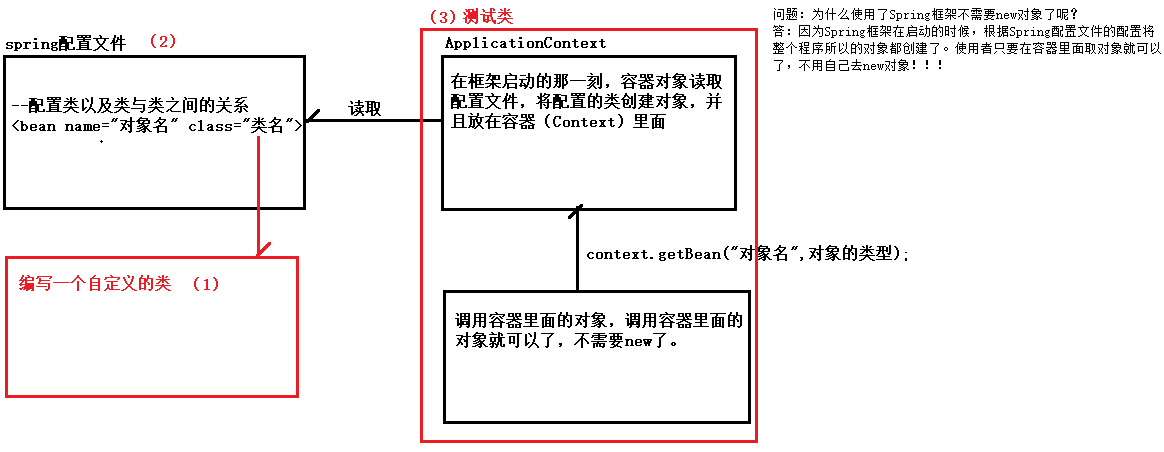
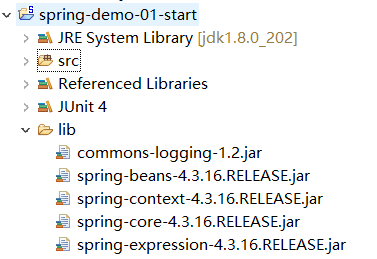
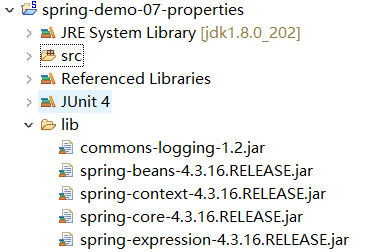
① 创建项目并导入包
② 创建一个实体类 HelloWorldService.java
1 package cn.mgy.service;
2
3 public class HelloWorldService {
4     public void say() {
5         System.out.println("--你好世界--");
6     }
7 }
③ 创建一个配置类 applicationContent.xml
1 <?xml version="1.0" encoding="UTF-8"?>
2 <beans xmlns="http://www.springframework.org/schema/beans"
3     xmlns:xsi="http://www.w3.org/2001/XMLSchema-instance"
4     xsi:schemaLocation="http://www.springframework.org/schema/beans http://www.springframework.org/schema/beans/spring-beans.xsd">
5
6     <!-- <bean>标签:用于声明一个类,在启动 Spring 框架的时候根据该配置的类创建对象到spring容器里面 -->
7     <bean name="helloWorldService" class="cn.mgy.service.HelloWorldService"></bean>
8 </beans>
④ 创建一个测试类 HelloWorldServiceTest.java
 1 package cn.mgy.test;
 2
 3 import org.junit.Test;
 4 import org.springframework.beans.BeansException;
 5 import org.springframework.context.support.ClassPathXmlApplicationContext;
 6
 7 import cn.mgy.service.HelloWorldService;
 8
 9 public class HelloWorldServiceTest {
10
11     @Test
12     public void say() {
13         try {
14             // 创建一个 ApplicationContext 对象,根据 xml 配置创建一个对象
15             // 直接读取 Spring 的 src 目录下配置文件的子类是 ClassPathXmlApplicationContext
16             ClassPathXmlApplicationContext context = new ClassPathXmlApplicationContext("applicationContent.xml");
17             HelloWorldService helloWorldService = context.getBean("helloWorldService",HelloWorldService.class);
18             // 调用方法
19             helloWorldService.say();
20             // 结束程序,可以关闭容器
21             context.close();
22         } catch (BeansException e) {
23             e.printStackTrace();
24         }
25     }
26 }
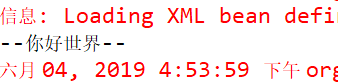
⑤ 运行结果

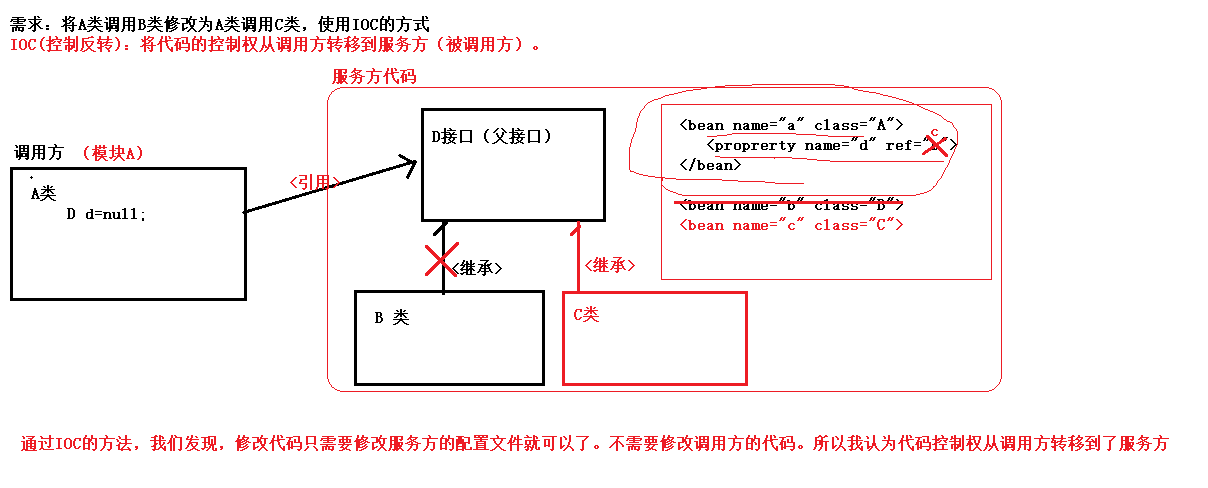
示例二 :控制反转(IoC)
① 创建项目并导入包
② 创建一个接口 CustomerService.java
1 package cn.mgy.service;
2
3 public interface CustomerService {
4     /**
5      * 保存方法
6      */
7     void save();
8 }
③ 创建两个实现接口的类 CustomerServiceImpl1.java 和 CustomerServiceImpl2.java
 1 package cn.mgy.service.impl;
 2
 3 import cn.mgy.service.CustomerService;
 4
 5 public class CustomerServiceImpl1 implements CustomerService {
 6
 7     @Override
 8     public void save() {
 9         System.out.println("--保存客户-CustomerServiceImpl1--");
10     }
11
12 }
 1 package cn.mgy.service.impl;
 2
 3 import cn.mgy.service.CustomerService;
 4
 5 public class CustomerServiceImpl2 implements CustomerService {
 6
 7     @Override
 8     public void save() {
 9         System.out.println("--保存客户-CustomerServiceImpl2--");
10     }
11
12 }
④ 创建一个调用方的类 CustomerClient.java
 1 package cn.mgy.client;
 2
 3 import cn.mgy.service.CustomerService;
 4
 5 public class CustomerClient {
 6
 7     // 1、声明一个父接口的引用
 8     private CustomerService customerService;
 9
10     // 2、使用 set 方法注入对象,我们将通过方法注入的对象的方式称为依赖注入
11     public void setCustomerService(CustomerService customerService) {
12         this.customerService = customerService;
13     }
14
15     public void login() {
16         // 调用服务端的方法
17         customerService.save();
18     }
19 }
⑤ 创建配置文件 applicationContent.xml
 1 <?xml version="1.0" encoding="UTF-8"?>
 2 <beans xmlns="http://www.springframework.org/schema/beans"
 3     xmlns:xsi="http://www.w3.org/2001/XMLSchema-instance"
 4     xsi:schemaLocation="http://www.springframework.org/schema/beans http://www.springframework.org/schema/beans/spring-beans.xsd">
 5
 6     <!-- <bean>标签:用于声明一个类,在启动 Spring 框架的时候根据该配置的类创建对象到spring容器里面 -->
 7     <!-- <bean name="customerServiceImpl" class="cn.mgy.service.impl.CustomerServiceImpl1"></bean> -->
 8     <!--
 9         CustomerServiceImpl1 修改为 CustomerServiceImpl2 的配置
10      -->
11     <bean name="customerServiceImpl" class="cn.mgy.service.impl.CustomerServiceImpl2"></bean>
12     <bean name="customerClient" class="cn.mgy.client.CustomerClient">
13         <!--
14             对应  set 方法关联的对象 customerService
15                 name:关联对应的 set 方法,关联规则:xxx 对应 setXxx(); 如:customerService() 对应 setCustomerService()
16                 ref:指向容器中的对象
17          -->
18          <property name="customerService" ref="customerServiceImpl"></property>
19     </bean>
20 </beans>
⑥ 创建一个测试类 ClientTest.java
 1 package cn.mgy.test;
 2
 3 import org.junit.Test;
 4 import org.springframework.context.support.ClassPathXmlApplicationContext;
 5
 6 import cn.mgy.client.CustomerClient;
 7
 8 public class ClientTest {
 9
10     @Test
11     public void save() {
12         ClassPathXmlApplicationContext context = new ClassPathXmlApplicationContext("applicationContent.xml");
13         CustomerClient customerClient = context.getBean("customerClient",CustomerClient.class);
14         // 调用方法
15         customerClient.login();
16         // 关闭容器
17         context.close();
18     }
19 }
⑦ 测试结果

示例三:通过 set 方法实现依赖注入
① 创建项目并导入包
② 创建一个带 set 方法的类 CustomerService.java
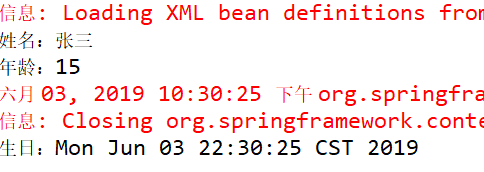
 1 package cn.mgy.service;
 2
 3 import import java.util.Date;
 4
 5 public class CustomerService {
 6
 7     private int age;
 8     private String name;
 9     private Date birthDate;
10
11     public void setAge(int age) {
12         this.age = age;
13     }
14
15     public void setName(String name) {
16         this.name = name;
17     }
18
19     public void setBirthDate(Date birthDate) {
20         this.birthDate = birthDate;
21     }
22
23     public void reigster() {
24         System.out.println("姓名:"+name);
25         System.out.println("年龄:"+age);
26         System.out.println("生日:"+birthDate);
27     }
28 }
③ 创建配置文件 applicationContent.xml
 1 <?xml version="1.0" encoding="UTF-8"?>
 2 <beans xmlns="http://www.springframework.org/schema/beans"
 3     xmlns:xsi="http://www.w3.org/2001/XMLSchema-instance"
 4     xsi:schemaLocation="http://www.springframework.org/schema/beans http://www.springframework.org/schema/beans/spring-beans.xsd">
 5
 6     <bean name="now" class="java.util.Date"></bean>
 7     <bean name="customerService" class="cn.mgy.service.CustomerService">
 8         <!-- 一个 property 标签匹配一个 set 方法  -->
 9         <!--
10             只要是标量类型,可以使用 value 设置,
11             注意:所谓的标量类型就是基础数据类型(以及包装类)+ String 类型
12             如果非标量类型,必须使用 ref 引用对象
13          -->
14          <property name="name" value="张三" />
15          <property name="age" value="15" />
16          <property name="birthDate" ref="now" />
17     </bean>
18 </beans>
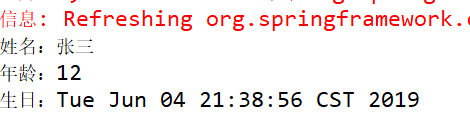
④ 创建一个测试类
 1 package cn.mgy.test;
 2
 3 import org.junit.Test;
 4 import org.springframework.context.support.ClassPathXmlApplicationContext;
 5
 6 import cn.mgy.service.CustomerService;
 7
 8 public class ClientTest {
 9
10     @Test
11     public void test() {
12         ClassPathXmlApplicationContext context = new ClassPathXmlApplicationContext("applicationContent.xml");
13         CustomerService customerService = context.getBean("customerService",CustomerService.class);
14         // 调用方法
15         customerService.reigster();
16         // 关闭容器
17         context.close();
18     }
19 }
⑤ 测试结果

示例四:通过构造方法进行依赖注入
① 创建一个项目并导入包
② 创建一个带构造方法的类 CustomerService.java
 1 package cn.mgy.service;
 2
 3 import java.util.Date;
 4
 5 public class CustomerService {
 6
 7     private String name;
 8     private int age;
 9     private Date birthDate;
10
11     /**
12      * 声明一个有参数的构造方法
13      * @param age
14      * @param name
15      * @param birthDate
16      */
17     public CustomerService( String name, int age,Date birthDate) {
18         super();
19         this.name = name;
20         this.age = age;
21         this.birthDate = birthDate;
22     }
23
24     public void reigster() {
25         System.out.println("姓名:"+name);
26         System.out.println("年龄:"+age);
27         System.out.println("生日:"+birthDate);
28     }
29 }
③ 创建配置文件 applicationContent.xml
 1 <?xml version="1.0" encoding="UTF-8"?>
 2 <beans xmlns="http://www.springframework.org/schema/beans"
 3     xmlns:xsi="http://www.w3.org/2001/XMLSchema-instance"
 4     xsi:schemaLocation="http://www.springframework.org/schema/beans http://www.springframework.org/schema/beans/spring-beans.xsd">
 5
 6     <bean name="now" class="java.util.Date"></bean>
 7     <bean name="customerService" class="cn.mgy.service.CustomerService">
 8         <!--
 9             构造函数每一个参数:对应一个 constructor-arg 标签
10             name:指定参数名
11             value:指定注入的值
12             ref:指定引用的对象
13             index:指定参数的位置
14             type:指定参数的数据类型,默认使用参数声明的类型[可以忽略]
15          -->
16          <constructor-arg name="name" type="java.lang.String" value="张三" />
17          <constructor-arg name="age" value="15" />
18          <constructor-arg name="birthDate" ref="now" />
19
20          <!-- 通过位置指定参数 -->
21          <!-- <constructor-arg index="0" type="java.lang.String" value="张三" />
22          <constructor-arg index="1" value="15" />
23          <constructor-arg index="2" ref="now" /> -->
24     </bean>
25 </beans>
④ 创建一个测试类
 1 package cn.mgy.test;
 2
 3 import org.junit.Test;
 4 import org.springframework.beans.BeansException;
 5 import org.springframework.context.support.ClassPathXmlApplicationContext;
 6
 7 import cn.mgy.service.CustomerService;
 8
 9 public class ClientTest {
10
11     @Test
12     public void test() {
13         try {
14             ClassPathXmlApplicationContext context = new ClassPathXmlApplicationContext("applicationContent.xml");
15             CustomerService customerService = context.getBean("customerService",CustomerService.class);
16             // 调用方法
17             customerService.reigster();
18             // 关闭容器
19             context.close();
20         } catch (BeansException e) {
21             // TODO Auto-generated catch block
22             e.printStackTrace();
23         }
24     }
25 }
⑤ 测试结果
示例五:通过 p 标签实现依赖注入
① 创建项目并导入包
② 创建一个带 set 方法的类 CustomerService.java
 1 package cn.mgy.service;
 2
 3 import java.util.Date;
 4
 5 public class CustomerService {
 6
 7     private int age;
 8     private String name;
 9     private Date birthDate;
10
11     public void setAge(int age) {
12         this.age = age;
13     }
14
15     public void setName(String name) {
16         this.name = name;
17     }
18
19     public void setBirthDate(Date birthDate) {
20         this.birthDate = birthDate;
21     }
22
23     public void reigster() {
24         System.out.println("姓名:"+name);
25         System.out.println("年龄:"+age);
26         System.out.println("生日:"+birthDate);
27     }
28 }
③ 创建配置文件 applicationContent.xml
1 <?xml version="1.0" encoding="UTF-8"?>
2 <beans xmlns="http://www.springframework.org/schema/beans"
3     xmlns:xsi="http://www.w3.org/2001/XMLSchema-instance"
4     xmlns:p="http://www.springframework.org/schema/p"
5     xsi:schemaLocation="http://www.springframework.org/schema/beans http://www.springframework.org/schema/beans/spring-beans.xsd">
6     <bean name="now" class="java.util.Date"></bean>
7     <bean name="customerService" class="cn.mgy.service.CustomerService" p:name="张三" p:age="15" p:birthDate-ref="now"></bean>
8 </beans>
④ 创建一个测试类
 1 package cn.mgy.test;
 2
 3 import org.junit.Test;
 4 import org.springframework.beans.BeansException;
 5 import org.springframework.context.support.ClassPathXmlApplicationContext;
 6
 7 import cn.mgy.service.CustomerService;
 8
 9 public class ClientTest {
10
11     @Test
12     public void test() {
13         try {
14             ClassPathXmlApplicationContext context = new ClassPathXmlApplicationContext("applicationContent.xml");
15             CustomerService customerService = context.getBean("customerService",CustomerService.class);
16             // 调用方法
17             customerService.reigster();
18             // 关闭容器
19             context.close();
20         } catch (BeansException e) {
21             // TODO Auto-generated catch block
22             e.printStackTrace();
23         }
24     }
25 }
⑤ 测试结果

示例六:注入集合数据
① 创建一个项目并导入包
② 创建一个带 set 方法的类 CustomerService.java
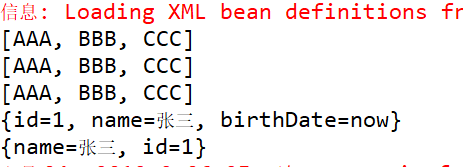
 1 package cn.mgy.service;
 2
 3 import java.util.Arrays;
 4 import java.util.List;
 5 import java.util.Map;
 6 import java.util.Properties;
 7 import java.util.Set;
 8
 9 public class CustomerService {
10
11     private String[] myStrs;
12     private List<String> myList;
13     private Set<String> mySet;
14     private Map<String, Object> myMap;
15     private Properties myProperties;
16
17     public void setMyStrs(String[] myStrs) {
18         this.myStrs = myStrs;
19     }
20
21     public void setMyList(List<String> myList) {
22         this.myList = myList;
23     }
24
25     public void setMySet(Set<String> mySet) {
26         this.mySet = mySet;
27     }
28
29     public void setMyMap(Map<String, Object> myMap) {
30         this.myMap = myMap;
31     }
32
33     public void setMyProperties(Properties myProperties) {
34         this.myProperties = myProperties;
35     }
36
37     public void reigster() {
38         System.out.println(Arrays.toString(myStrs));
39         System.out.println(myList);
40         System.out.println(mySet);
41         System.out.println(myMap);
42         System.out.println(myProperties);
43     }
44 }
③ 创建配置文件 applicationContent.xml
 1 <?xml version="1.0" encoding="UTF-8"?>
 2 <beans xmlns="http://www.springframework.org/schema/beans"
 3     xmlns:xsi="http://www.w3.org/2001/XMLSchema-instance"
 4     xmlns:p="http://www.springframework.org/schema/p"
 5     xsi:schemaLocation="http://www.springframework.org/schema/beans http://www.springframework.org/schema/beans/spring-beans.xsd">
 6     <bean name="now" class="java.util.Date" />
 7     <bean name="customerService" class="cn.mgy.service.CustomerService">
 8         <property name="myStrs">
 9             <array>
10                 <value>AAA</value>
11                 <value>BBB</value>
12                 <value>CCC</value>
13             </array>
14         </property>
15         <property name="mySet">
16             <set>
17                 <value>AAA</value>
18                 <value>BBB</value>
19                 <value>CCC</value>
20             </set>
21         </property>
22         <property name="myList">
23             <list>
24                 <value>AAA</value>
25                 <value>BBB</value>
26                 <value>CCC</value>
27             </list>
28         </property>
29         <property name="myMap">
30             <map>
31                 <entry key="id" value="1" />
32                 <entry key="name" value="张三" />
33                 <entry key="birthDate" value="now" />
34             </map>
35         </property>
36         <property name="myProperties">
37             <props>
38                 <prop key="id">1</prop>
39                 <prop key="name">张三</prop>
40             </props>
41         </property>
42     </bean>
43 </beans>
④ 创建一个测试类
 1 package cn.mgy.test;
 2
 3 import org.junit.Test;
 4 import org.springframework.beans.BeansException;
 5 import org.springframework.context.support.ClassPathXmlApplicationContext;
 6
 7 import cn.mgy.service.CustomerService;
 8
 9 public class ClientTest {
10
11     @Test
12     public void test() {
13         try {
14             ClassPathXmlApplicationContext context = new ClassPathXmlApplicationContext("applicationContent.xml");
15             CustomerService customerService = context.getBean("customerService",CustomerService.class);
16             // 调用方法
17             customerService.reigster();
18             // 关闭容器
19             context.close();
20         } catch (BeansException e) {
21             // TODO Auto-generated catch block
22             e.printStackTrace();
23         }
24     }
25 }
⑤ 测试结果
示例七:通过Properties文件的Key获得对应的值
① 创建一个项目并导入包
② 创建一个带 set 方法的类 CustomerService.java
 1 package cn.mgy.service;
 2
 3 import java.util.Date;
 4
 5 public class CustomerService {
 6
 7     private int age;
 8     private String name;
 9     private Date birthDate;
10
11     public void setAge(int age) {
12         this.age = age;
13     }
14
15     public void setName(String name) {
16         this.name = name;
17     }
18
19     public void setBirthDate(Date birthDate) {
20         this.birthDate = birthDate;
21     }
22
23     public void reigster() {
24         System.out.println("姓名:"+name);
25         System.out.println("年龄:"+age);
26         System.out.println("生日:"+birthDate);
27     }
28 }
③ 创建 properties 文件 sys.properties
customer.name = 张三
customer.age = 20
④ 创建配置文件 applicationContent.xml
 1 <?xml version="1.0" encoding="UTF-8"?>
 2 <beans xmlns="http://www.springframework.org/schema/beans"
 3     xmlns:xsi="http://www.w3.org/2001/XMLSchema-instance"
 4     xsi:schemaLocation="http://www.springframework.org/schema/beans http://www.springframework.org/schema/beans/spring-beans.xsd">
 5
 6     <!-- 指定 Properties 配置文件的路径 -->
 7     <bean class="org.springframework.context.support.PropertySourcesPlaceholderConfigurer">
 8         <property name="locations" value="classpath:sys.properties" />
 9         <property name="fileEncoding" value="UTF-8" />
10     </bean>
11
12     <bean name="now" class="java.util.Date"></bean>
13     <bean name="customerService" class="cn.mgy.service.CustomerService">
14         <!-- 一个 property 标签匹配一个 set 方法  -->
15         <!--
16             只要是标量类型,可以使用 value 设置,
17             注意:所谓的标量类型就是基础数据类型(以及包装类)+ String 类型
18             如果非标量类型,必须使用 ref 引用对象
19          -->
20          <property name="name" value="${customer.name}" />
21          <property name="age" value="${customer.age}" />
22          <property name="birthDate" ref="now" />
23     </bean>
24 </beans>
⑤ 创建一个测试类
 1 package cn.mgy.test;
 2
 3 import org.junit.Test;
 4 import org.springframework.beans.BeansException;
 5 import org.springframework.context.support.ClassPathXmlApplicationContext;
 6
 7 import cn.mgy.service.CustomerService;
 8
 9 public class ClientTest {
10
11     @Test
12     public void test() {
13         try {
14             ClassPathXmlApplicationContext context = new ClassPathXmlApplicationContext("applicationContent.xml");
15             CustomerService customerService = context.getBean("customerService",CustomerService.class);
16             // 调用方法
17             customerService.reigster();
18             // 关闭容器
19             context.close();
20         } catch (BeansException e) {
21             // TODO Auto-generated catch block
22             e.printStackTrace();
23         }
24     }
25 }
⑥ 测试结果

示例八:基于注解的Spring开始
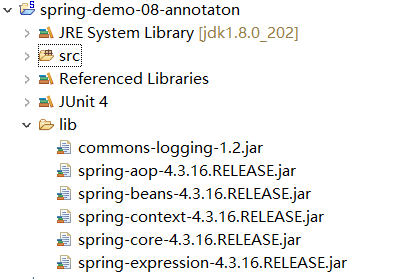
① 创建一个项目并导入包
② 创建配置文件 applicationContent.xml
 1 <?xml version="1.0" encoding="UTF-8"?>
 2 <beans xmlns="http://www.springframework.org/schema/beans"
 3     xmlns:xsi="http://www.w3.org/2001/XMLSchema-instance"
 4     xmlns:context="http://www.springframework.org/schema/context"
 5     xsi:schemaLocation="http://www.springframework.org/schema/beans http://www.springframework.org/schema/beans/spring-beans.xsd
 6         http://www.springframework.org/schema/context http://www.springframework.org/schema/context/spring-context-4.3.xsd">
 7
 8     <!-- 声明扫描包以及子包的类。如果发现有组件注解的类,就创建对象,并加入到容器 -->
 9     <context:component-scan base-package="cn.mgy" />
10 </beans>
③ 创建一个类 CustomerService.java
 1 package cn.mgy.service;
 2
 3 import org.springframework.stereotype.Service;
 4
 5 // 1、使用注解配置,需要将启动就创建对象的类标注为组件类
 6 @Service
 7 public class HelloWorldService {
 8     public void say() {
 9         System.out.println("--你好世界--");
10     }
11 }
④ 创建一个测试类
 1 package cn.mgy.test;
 2
 3 import org.junit.Test;
 4 import org.springframework.beans.BeansException;
 5 import org.springframework.context.support.ClassPathXmlApplicationContext;
 6
 7 import cn.mgy.service.HelloWorldService;
 8
 9 public class HelloWorldServiceTest {
10
11     @Test
12     public void say() {
13         try {
14             // 创建一个 ApplicationContext 对象,根据 xml 配置创建一个对象
15             // 直接读取 Spring 的 src 目录下配置文件的子类是 ClassPathXmlApplicationContext
16             ClassPathXmlApplicationContext context = new ClassPathXmlApplicationContext("applicationContent.xml");
17             HelloWorldService helloWorldService = context.getBean("helloWorldService",HelloWorldService.class);
18             // 调用方法
19             helloWorldService.say();
20             // 结束程序,可以关闭容器
21             context.close();
22         } catch (BeansException e) {
23             e.printStackTrace();
24         }
25     }
26 }
⑤ 测试结果
示例九:Spring 基本注解的使用
① 创建一个项目并导入包

② 创建一个实体类 User.java
 1 package cn.mgy.pojo;
 2
 3 public class User {
 4     private Long userId;//BIGINT(20) NOT NULL AUTO_INCREMENT,
 5     private String userName;//VARCHAR(100) NULL DEFAULT NULL,
 6     private String userPwd;//VARCHAR(100) NULL DEFAULT NULL,
 7     private String userSex;//CHAR(2) NULL DEFAULT NULL,
 8     private Integer userAge;//INT(3) NULL DEFAULT NULL,
 9     private String userBirth;//DATE NULL DEFAULT NULL,
10     public Long getUserId() {
11         return userId;
12     }
13     public void setUserId(Long userId) {
14         this.userId = userId;
15     }
16     public String getUserName() {
17         return userName;
18     }
19     public void setUserName(String userName) {
20         this.userName = userName;
21     }
22     public String getUserPwd() {
23         return userPwd;
24     }
25     public void setUserPwd(String userPwd) {
26         this.userPwd = userPwd;
27     }
28     public String getUserSex() {
29         return userSex;
30     }
31     public void setUserSex(String userSex) {
32         this.userSex = userSex;
33     }
34     public Integer getUserAge() {
35         return userAge;
36     }
37     public void setUserAge(Integer userAge) {
38         this.userAge = userAge;
39     }
40     public String getUserBirth() {
41         return userBirth;
42     }
43     public void setUserBirth(String userBirth) {
44         this.userBirth = userBirth;
45     }
46 }
③ 创建连接数据库的四要素文件 db.properties
#连接数据库的四要素
db.driverName = org.gjt.mm.mysql.Driver
db.url = jdbc:mysql://localhost:3306/test
db.userName = root
db.password = root
④ 创建配置文件 applicationContent.xml
 1 <?xml version="1.0" encoding="UTF-8"?>
 2 <beans xmlns="http://www.springframework.org/schema/beans"
 3     xmlns:xsi="http://www.w3.org/2001/XMLSchema-instance"
 4     xmlns:context="http://www.springframework.org/schema/context"
 5     xsi:schemaLocation="http://www.springframework.org/schema/beans http://www.springframework.org/schema/beans/spring-beans.xsd
 6         http://www.springframework.org/schema/context http://www.springframework.org/schema/context/spring-context-4.3.xsd">
 7
 8     <!-- 指定 Properties 配置文件的路径 -->
 9     <bean class="org.springframework.context.support.PropertySourcesPlaceholderConfigurer">
10         <property name="locations" value="classpath:db.properties" />
11         <property name="fileEncoding" value="UTF-8" />
12     </bean>
13
14     <!-- 声明扫描包以及子包的类。如果发现有组件注解的类,就创建对象,并加入到容器 -->
15     <context:component-scan base-package="cn.mgy" />
16
17 </beans>
⑤ 创建持久层的接口 UserDao.java 与实现类 UserDaoImpl.java
 1 package cn.mgy.dao;
 2
 3 import cn.mgy.pojo.User;
 4
 5 public interface UserDao {
 6     /**
 7      * 插入一条数据
 8      * @param user
 9      * @return
10      */
11     int insert(User user);
12 }
 1 package cn.mgy.dao.impl;
 2
 3 import java.sql.Connection;
 4 import java.sql.DriverManager;
 5 import java.sql.PreparedStatement;
 6
 7 import org.springframework.beans.factory.annotation.Value;
 8 import org.springframework.stereotype.Repository;
 9
10 import cn.mgy.dao.UserDao;
11 import cn.mgy.pojo.User;
12
13 // @Repository:用于声明持久层的组件注解
14 @Repository
15 public class UserDaoImpl implements UserDao {
16
17     // @Value 注解:注入基本数据类型和String类型的数据
18     @Value(value="${db.driverName}")
19     private String driver;
20     @Value(value="${db.url}")
21     private String url;
22     @Value(value="${db.userName}")
23     private String userName;
24     @Value(value="${db.password}")
25     private String password;
26
27     @Override
28     public int insert(User user) {
29         try {
30             Class.forName(driver);
31             Connection conn = DriverManager.getConnection(url, userName, password);
32             String sql = "INSERT INTO t_user(user_name, user_pwd, user_sex, user_age) VALUES (?, ?, ?, ?)";
33             PreparedStatement prepareStatement = conn.prepareStatement(sql);
34             prepareStatement.setString(1, user.getUserName());
35             prepareStatement.setString(2, user.getUserPwd());
36             prepareStatement.setString(3, user.getUserSex());
37             prepareStatement.setInt(4, user.getUserAge());
38             int i = prepareStatement.executeUpdate();
39             return i;
40         } catch (Exception e) {
41             e.printStackTrace();
42         }
43
44         return 0;
45     }
46
47 }
⑥ 创建服务层接口 UserService.java 与实现类 UserServiceImpl.java
 1 package cn.mgy.service;
 2
 3 import cn.mgy.pojo.User;
 4
 5 public interface UserService {
 6
 7     /**
 8      * 保存用户
 9      */
10     int save(User user);
11 }
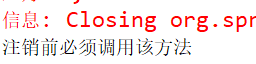
 1 package cn.mgy.service.impl;
 2
 3 import javax.annotation.PostConstruct;
 4 import javax.annotation.PreDestroy;
 5
 6 import org.springframework.beans.factory.annotation.Autowired;
 7 import org.springframework.beans.factory.annotation.Qualifier;
 8 import org.springframework.context.annotation.Scope;
 9 import org.springframework.stereotype.Service;
10
11 import cn.mgy.dao.UserDao;
12 import cn.mgy.pojo.User;
13 import cn.mgy.service.UserService;
14
15 // @Service:用于声明服务层的组件注解
16 @Service
17 // @Scope 注解:指定 bean 的作用范围
18 // 属性:value 指定范围的值
19 // 取值: singleton:单例
20 //           对象出生:当程序加载配置文件创建容器时,创建
21 //           对象活着:只要容器还在,一直活着
22 //           对象死亡:应用停止,容器销毁,对象死亡
23 //      prototype:原型(多例)
24 //           对象出生:当程序加载配置文件创建容器时,创建
25 //           对象活着:只要对象被使用,一直活着
26 //           对象死亡:对象长时间不用,会被Java垃圾回收机制回收
27
28 //      request:web项目中,Spring将创建的对象放在request作用域中
29 //      session:web项目中,Spring将创建的对象放在session作用域中
30 @Scope(value="singleton")
31 public class UserServiceImpl implements UserService {
32
33     // @Autowired 注解:用于给引用注入容器的对象
34     // @Qualifier 注解:用于指定注入的对象名,使用 @Autowired 注入对象时,
35     // @Autowired 没有指定对象的属性,只能通过 @Qualifier 字段指定容器中的对象名
36     // 也可以使用 @Resource 注解代替为 @Resource(name="userDao")
37     @Autowired
38     @Qualifier(value="userDaoImpl")
39     private UserDao userDao;
40
41     @Override
42     public int save(User user) {
43         int i = userDao.insert(user);
44         if (i > 0) {
45             return i;
46         } else {
47             return 0;
48         }
49     }
50
51     // @PostConstruct 注解等同于 <bean init-method="">:用于指定初始化方法
52     // 对象初始化方法
53     @PostConstruct
54     public void init() {
55         System.out.println("初始化必须调用该方法");
56     }
57
58     // @PreDestroy 注解等同于 <bean destroy-method="">:用于指定销毁方法
59     // 对象注销前,必须调用的方法
60     @PreDestroy
61     public void destroy() {
62         System.out.println("注销前必须调用该方法");
63     }
64 }
⑦ 创建表示层类 UserController.java
 1 package cn.mgy.controller;
 2
 3 import org.springframework.beans.factory.annotation.Autowired;
 4 import org.springframework.stereotype.Controller;
 5
 6 import cn.mgy.pojo.User;
 7 import cn.mgy.service.UserService;
 8
 9 // 表示层使用 @Controller
10 // 如果组件注解不声明对象名,就使用默认命名法
11 // 所谓默认命名就是将类的首字母小写作为类的对象名
12 // 组件注解
13     // 属性 value:作用用于指定该类对象的自定义对象名
14 @Controller(value="userController")
15 public class UserController {
16
17     // @Autowired 注解:用于给引用注入容器的对象
18     @Autowired
19     private UserService userService;
20
21     public void save() {
22         User user = new User();
23         user.setUserName("李四");
24         user.setUserPwd("12345");
25         user.setUserSex("男");
26         user.setUserAge(18);
27         if (userService.save(user)>0) {
28             System.out.println("--保存用户成功--");
29         } else {
30             System.out.println("--保存用户失败--");
31         }
32     }
33 }
⑧ 创建一个测试类 UserTest.java
 1 package cn.mgy.test;
 2
 3 import org.junit.Test;
 4 import org.springframework.beans.BeansException;
 5 import org.springframework.context.support.ClassPathXmlApplicationContext;
 6
 7 import cn.mgy.controller.UserController;
 8
 9 public class UserTest {
10
11     @Test
12     public void test() {
13         try {
14             ClassPathXmlApplicationContext context = new ClassPathXmlApplicationContext("applicationContent.xml");
15             UserController userController = context.getBean("userController",UserController.class);
16             // 调用方法
17             userController.save();
18             // 关闭容器
19             context.close();
20         } catch (BeansException e) {
21             // TODO Auto-generated catch block
22             e.printStackTrace();
23         }
24     }
25 }
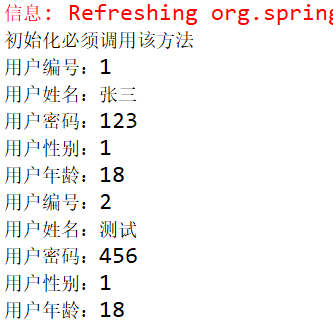
⑨ 运行结果

示例十:Spring 纯注解的操作
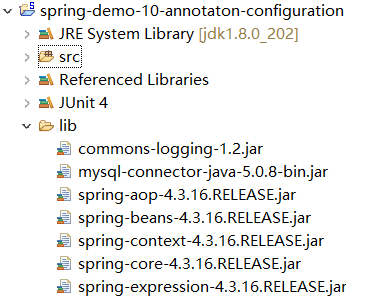
① 创建一个项目并导入包
② 创建一个连接数据库的四要素文件 db.properties
#连接数据库的四要素
db.driverName = org.gjt.mm.mysql.Driver
db.url = jdbc:mysql://localhost:3306/test
db.userName = root
db.password = root
③ 创建一个配置类 BeanConfig.java
 1 package cn.mgy.config;
 2
 3 import org.springframework.context.annotation.ComponentScan;
 4 import org.springframework.context.annotation.Configuration;
 5 import org.springframework.context.annotation.PropertySource;
 6 // @Configuration 配置类注解,在纯注解配置中,类加了该注解,就意味着该类是 Sping 的配置类。
 7 // 该类的功能就是用于代替原来的 XML 配置文件
 8 // 作用:用于指定当前类是一个 spring 配置类,当创建容器时会从该类上加载注解。
 9 // 获取容器时需要使用 AnnotationConfigApplicationContext(有 @Configuration 注解的类.class)
10 @Configuration
11 // @ComponentScan 注解:用于指定 spring 在初始化容器时扫描的包。作用和在 spring 的 xml 配置文件中的:
12 // <context:component-scan base-package="cn.mgy"/>是一样的
13 @ComponentScan(basePackages= {"cn.mgy"})
14 // @PropertySource 注解:用于加载 .properties 文件中的配置。
15 // 属性:value[]:用于指定 properties 文件的位置
16 @PropertySource(encoding="UTF-8",value= {"classpath:db.properties"})
17 public class BeanConfig {
18
19 }
④ 创建持久层的接口 UserDao.java 和实现类 UserDaoImpl.java
 1 package cn.mgy.dao;
 2
 3 import java.util.List;
 4
 5 import cn.mgy.pojo.User;
 6
 7 public interface UserDao {
 8     /**
 9      * 查询所有用户
10      * @return
11      */
12     List<User> selectAllUser();
13 }
 1 package cn.mgy.dao.impl;
 2
 3 import java.sql.Connection;
 4 import java.sql.DriverManager;
 5 import java.sql.PreparedStatement;
 6 import java.sql.ResultSet;
 7 import java.util.ArrayList;
 8 import java.util.List;
 9
10 import org.springframework.beans.factory.annotation.Value;
11 import org.springframework.stereotype.Repository;
12
13 import cn.mgy.dao.UserDao;
14 import cn.mgy.pojo.User;
15
16 // @Repository:用于声明持久层的组件注解
17 @Repository
18 public class UserDaoImpl implements UserDao {
19
20     // @Value 注解:注入基本数据类型和String类型的数据
21     @Value(value="${db.driverName}")
22     private String driver;
23     @Value(value="${db.url}")
24     private String url;
25     @Value(value="${db.userName}")
26     private String userName;
27     @Value(value="${db.password}")
28     private String password;
29
30     @Override
31     public List<User> selectAllUser() {
32         try {
33             Class.forName(driver);
34             Connection conn = DriverManager.getConnection(url, userName, password);
35             String sql = "SELECT * FROM t_user";
36             PreparedStatement prepareStatement = conn.prepareStatement(sql);
37             ResultSet resultSet = prepareStatement.executeQuery();
38             List<User> users = new ArrayList<>();
39             while(resultSet.next()) {
40                 User user = new User();
41                 user.setUserId(resultSet.getLong(1));
42                 user.setUserName(resultSet.getString(2));
43                 user.setUserPwd(resultSet.getString(3));
44                 user.setUserSex(resultSet.getString(4));
45                 user.setUserAge(resultSet.getInt(5));
46                 users.add(user);
47             }
48             return users;
49         } catch (Exception e) {
50             e.printStackTrace();
51         }
52         return null;
53     }
54
55 }
⑤ 创建服务层的接口 UserService.java 与实现类 UserServiceImpl.java
 1 package cn.mgy.service;
 2
 3 import java.util.List;
 4
 5 import cn.mgy.pojo.User;
 6
 7 public interface UserService {
 8
 9     /**
10      * 查询所有用户
11      * @return
12      */
13     List<User> selectAllUser();
14 }
 1 package cn.mgy.service.impl;
 2
 3 import java.util.List;
 4
 5 import javax.annotation.PostConstruct;
 6 import javax.annotation.PreDestroy;
 7
 8 import org.springframework.beans.factory.annotation.Autowired;
 9 import org.springframework.beans.factory.annotation.Qualifier;
10 import org.springframework.context.annotation.Scope;
11 import org.springframework.stereotype.Service;
12
13 import cn.mgy.dao.UserDao;
14 import cn.mgy.pojo.User;
15 import cn.mgy.service.UserService;
16
17 // @Service:用于声明服务层的组件注解
18 @Service
19 // @Scope 注解:指定 bean 的作用范围
20 // 属性:value 指定范围的值
21 // 取值: singleton:单例
22 //           对象出生:当程序加载配置文件创建容器时,创建
23 //           对象活着:只要容器还在,一直活着
24 //           对象死亡:应用停止,容器销毁,对象死亡
25 //      prototype:原型(多例)
26 //           对象出生:当程序加载配置文件创建容器时,创建
27 //           对象活着:只要对象被使用,一直活着
28 //           对象死亡:对象长时间不用,会被Java垃圾回收机制回收
29
30 //      request:web项目中,Spring将创建的对象放在request作用域中
31 //      session:web项目中,Spring将创建的对象放在session作用域中
32 @Scope(value="singleton")
33 public class UserServiceImpl implements UserService {
34
35     // @Autowired 注解:用于给引用注入容器的对象
36     // @Qualifier 注解:用于指定注入的对象名,使用 @Autowired 注入对象时,
37     // @Autowired 没有指定对象的属性,只能通过 @Qualifier 字段指定容器中的对象名
38     // 也可以使用 @Resource 注解代替为 @Resource(name="userDao")
39     @Autowired
40     @Qualifier(value="userDaoImpl")
41     private UserDao userDao;
42
43     @Override
44     public List<User> selectAllUser() {
45         List<User> selectAllUser = userDao.selectAllUser();
46         if (selectAllUser != null) {
47             return selectAllUser;
48         } else {
49             return null;
50         }
51     }
52
53     // @PostConstruct 注解等同于 <bean init-method="">:用于指定初始化方法
54     // 对象初始化方法
55     @PostConstruct
56     public void init() {
57         System.out.println("初始化必须调用该方法");
58     }
59
60     // @PreDestroy 注解等同于 <bean destroy-method="">:用于指定销毁方法
61     // 对象注销前,必须调用的方法
62     @PreDestroy
63     public void destroy() {
64         System.out.println("注销前必须调用该方法");
65     }
66 }
⑥ 创建表示层的类 UserController.java
 1 package cn.mgy.controller;
 2
 3 import java.util.List;
 4
 5 import javax.annotation.Resource;
 6
 7 import org.springframework.stereotype.Controller;
 8
 9 import cn.mgy.pojo.User;
10 import cn.mgy.service.UserService;
11
12 @Controller
13 public class UserController {
14
15     @Resource(name="userServiceImpl")
16     private UserService userService;
17
18     public void selectAllUser() {
19         List<User> allUser = userService.selectAllUser();
20         if (allUser != null) {
21             for (User user : allUser) {
22                 System.out.println("用户编号:"+user.getUserId());
23                 System.out.println("用户姓名:"+user.getUserName());
24                 System.out.println("用户密码:"+user.getUserPwd());
25                 System.out.println("用户性别:"+user.getUserSex());
26                 System.out.println("用户年龄:"+user.getUserAge());
27             }
28         } else {
29             System.err.println("查询出错");
30         }
31     }
32 }
⑦ 创建一个测试类 UserTest.java
 1 package cn.mgy.test;
 2
 3 import org.junit.Test;
 4 import org.springframework.beans.BeansException;
 5 import org.springframework.context.annotation.AnnotationConfigApplicationContext;
 6
 7 import cn.mgy.config.BeanConfig;
 8 import cn.mgy.controller.UserController;
 9
10 public class UserTest {
11
12     @Test
13     public void selectAllUser() {
14         try {
15             // 注意:读取注解配置类的容器类为 AnnotationConfigApplicationContext
16             AnnotationConfigApplicationContext context = new AnnotationConfigApplicationContext(BeanConfig.class);
17             UserController userController = context.getBean("userController",UserController.class);
18             userController.selectAllUser();
19             context.close();
20         } catch (BeansException e) {
21             e.printStackTrace();
22         }
23     }
24 }
⑧ 运行结果
示例十一:Spring 整合 Junit
① 创建一个项目并导入包

② 创建一个带 set 方法的类 CustomerService.java
 1 package cn.mgy.service;
 2
 3 import java.util.Date;
 4
 5 public class CustomerService {
 6
 7     private int age;
 8     private String name;
 9     private Date birthDate;
10
11     public void setAge(int age) {
12         this.age = age;
13     }
14
15     public void setName(String name) {
16         this.name = name;
17     }
18
19     public void setBirthDate(Date birthDate) {
20         this.birthDate = birthDate;
21     }
22
23     public void reigster() {
24         System.out.println("姓名:"+name);
25         System.out.println("年龄:"+age);
26         System.out.println("生日:"+birthDate);
27     }
28 }
③ 创建配置文件 applicationContent.xml
 1 <?xml version="1.0" encoding="UTF-8"?>
 2 <beans xmlns="http://www.springframework.org/schema/beans"
 3     xmlns:xsi="http://www.w3.org/2001/XMLSchema-instance"
 4     xsi:schemaLocation="http://www.springframework.org/schema/beans http://www.springframework.org/schema/beans/spring-beans.xsd">
 5
 6     <bean name="now" class="java.util.Date"></bean>
 7     <bean name="customerService" class="cn.mgy.service.CustomerService">
 8         <!-- 一个 property 标签匹配一个 set 方法  -->
 9         <!--
10             只要是标量类型,可以使用 value 设置,
11             注意:所谓的标量类型就是基础数据类型(以及包装类)+ String 类型
12             如果非标量类型,必须使用 ref 引用对象
13          -->
14          <property name="name" value="张三" />
15          <property name="age" value="15" />
16          <property name="birthDate" ref="now" />
17     </bean>
18 </beans>
④ 创建一个测试类
 1 package cn.mgy.test;
 2
 3 import org.junit.Test;
 4 import org.junit.runner.RunWith;
 5 import org.springframework.beans.factory.annotation.Autowired;
 6 import org.springframework.test.context.ContextConfiguration;
 7 import org.springframework.test.context.junit4.SpringJUnit4ClassRunner;
 8
 9 import cn.mgy.service.CustomerService;
10
11 // 指定 Junit 测试之前,加入 Spring 框架启动的逻辑代码
12 @RunWith(SpringJUnit4ClassRunner.class)
13 // 指定 Spring 启动必须的配置文件
14 // 注意:配置文件通过 locations 指定
15 @ContextConfiguration(locations="classpath:applicationContent.xml")
16 public class CustomerServiceTest {
17
18     // 获得 Spring 容器中的对象
19     @Autowired
20     private CustomerService customerService;
21
22     @Test
23     public void reigster() {
24         try {
25             customerService.reigster();
26         } catch (Exception e) {
27             e.printStackTrace();
28         }
29     }
30 }
⑤ 测试结果
示例十二:基于纯注解的 Spring 整合 Junit
① 创建一个项目并导入包
② 创建一个配置类 BeanConfig.java
 1 package cn.mgy.config;
 2
 3 import java.util.Date;
 4
 5 import org.springframework.context.annotation.Bean;
 6 import org.springframework.context.annotation.ComponentScan;
 7 import org.springframework.context.annotation.Configuration;
 8
 9 @Configuration
10 @ComponentScan("cn.mgy")
11 public class BeanConfig {
12
13     @Bean
14     public Date now() {
15         return new Date();
16     }
17 }
③ 创建一个类 CustomerService.java
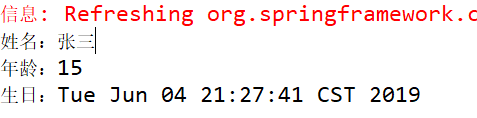
 1 package cn.mgy.service;
 2
 3 import java.util.Date;
 4
 5 import org.springframework.beans.factory.annotation.Autowired;
 6 import org.springframework.beans.factory.annotation.Qualifier;
 7 import org.springframework.beans.factory.annotation.Value;
 8 import org.springframework.stereotype.Service;
 9
10 @Service
11 public class CustomerService {
12
13     @Value("12")
14     private int age;
15     @Value("张三")
16     private String name;
17     @Autowired
18     @Qualifier("now")
19     private Date birthDate;
20
21     public void setAge(int age) {
22         this.age = age;
23     }
24
25     public void setName(String name) {
26         this.name = name;
27     }
28
29     public void setBirthDate(Date birthDate) {
30         this.birthDate = birthDate;
31     }
32
33     public void reigster() {
34         System.out.println("姓名:"+name);
35         System.out.println("年龄:"+age);
36         System.out.println("生日:"+birthDate);
37     }
38 }
④ 创建一个测试类
 1 package cn.mgy.test;
 2
 3 import org.junit.Test;
 4 import org.junit.runner.RunWith;
 5 import org.springframework.beans.factory.annotation.Autowired;
 6 import org.springframework.test.context.ContextConfiguration;
 7 import org.springframework.test.context.junit4.SpringJUnit4ClassRunner;
 8
 9 import cn.mgy.config.BeanConfig;
10 import cn.mgy.service.CustomerService;
11
12 // 指定 Junit 测试之前,加入 Spring 框架启动的逻辑代码
13 @RunWith(SpringJUnit4ClassRunner.class)
14 // 指定 Spring 启动必须的配置文件
15 // 注意:配置类通过 classes 指定
16 @ContextConfiguration(classes=BeanConfig.class)
17 public class CustomerServiceTest {
18
19     // 获得 Spring 容器中的对象
20     @Autowired
21     private CustomerService customerService;
22
23     @Test
24     public void reigster() {
25         try {
26             customerService.reigster();
27         } catch (Exception e) {
28             e.printStackTrace();
29         }
30     }
31 }
⑤ 测试结果
示例十三:动态代理模式
说明:
很久之前,工厂是小作坊。客户是直接和工厂老板见面,购买商品的。
随着时间的推移,工厂慢慢做大了。工厂的产品统一通过经销商代理出售了,这个时候客户需要购买工厂的商品,只能通过经销商购买。我们通过以下的代码来演示该流程。

① 创建一个项目

② 创建商品接口 IProduct.java 和商品实现类 Product.java
 1 package cn.mgy.proxy;
 2
 3 /**
 4  * 工厂生产的商品
 5  * 要求有零售价和批发价
 6  * @author Administrator
 7  *
 8  */
 9 public interface IProduct {
10
11     // 1、零售价
12     void sale(float money);
13
14     // 2、批发价
15     void wholesale(float money);
16 }
 1 package cn.mgy.proxy;
 2
 3 public class Product implements IProduct {
 4
 5     @Override
 6     public void sale(float money) {
 7         System.out.println("零售价:"+money);
 8     }
 9
10     @Override
11     public void wholesale(float money) {
12         System.out.println("批发价:"+money);
13     }
14
15 }
③ 创建一个代理商类
 1 package cn.mgy.proxy;
 2
 3 import java.lang.reflect.InvocationHandler;
 4 import java.lang.reflect.Method;
 5 import java.lang.reflect.Proxy;
 6
 7 public class Franchiser implements InvocationHandler {
 8
 9     private Object source;
10
11     /**
12      * 创建代理对象,必须传入源对象
13      * @param source
14      * @return
15      */
16     public Object createProxy(Object source) {
17         this.source = source;
18         // 通过 Proxy 创建代理对象,需要 interfaces
19         Class<?>[] interfaces = source.getClass().getInterfaces();
20         // 通过 Proxy 创建代理对象,需要 classLoader
21         ClassLoader classLoader = source.getClass().getClassLoader();
22         /**
23          * 通过 Proxy 创建代理对象
24          * newProxyInstance
25          * Proxy 的 newProxyInstance 负责给被代理对象创建代理对象
26          * 参数1:ClassLoader(告诉 JVM 到什么地方寻找该类)
27          * 参数2:Class[](一个接口数组,实现该类实现的所有接口)
28          * 参数3:代理处理类(实现了 InvocationHandler 接口的对象都是代理处理类)
29          * 传入 this或Franchiser 就是一个实现了 InvocationHandler 接口的类
30          */
31         // 由 Proxy 生产出来的代理对象 objProxy,继承了被代理类的方法,实现了被代理类的接口,
32         // 并由代理处理类执行代理逻辑
33         return Proxy.newProxyInstance(classLoader, interfaces, this);
34     }
35
36     /**
37      * 参数:
38      * 1、proxy 代理对象的引用。不一定每次都用得到
39      * 2、method 当前执行的方法对象
40      * 3、args 执行方法所需的参数
41      * 返回值:当前执行方法的返回值
42      */
43     @Override
44     public Object invoke(Object proxy, Method method, Object[] args) throws Throwable {
45         System.out.println(proxy.getClass());
46         // 获得方法名
47         String name = method.getName();
48         // 方法的第一个参数
49         Float money = (Float)args[0];
50         Object invoke = null;
51         if (name.equals("sale")) {
52             if (money >= 3.0f) {
53                 // 反射的 method.invoke(...) 方法,表示真正执行
54                 invoke = method.invoke(source, money);
55             } else {
56                 System.out.println("--零售没有货,对不起--");
57             }
58         }
59         if (name.equals("wholesale")) {
60             if (money >= 2.0f) {
61                 invoke = method.invoke(source, money);
62             } else {
63                 System.out.println("--批发没有货,对不起--");
64             }
65         }
66         return invoke;
67     }
68
69 }
④ 创建一个客户类调用
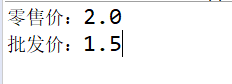
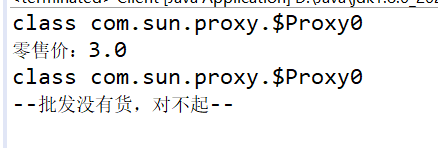
 1 package cn.mgy.proxy;
 2
 3 public class Client {
 4
 5     public static void main(String[] args) {
 6         // 1、没有经销商的情况
 7         //IProduct product = new Product();
 8         // 被客户压价
 9         //product.sale(2.0f);
10         //product.wholesale(1.5f);
11
12         // 2、只能通过代理商获得商品
13         IProduct product = new Product();
14         // 创建一个代理商的对象
15         Franchiser franchiser = new Franchiser();
16         IProduct proxyProduct = (IProduct)franchiser.createProxy(product);
17         proxyProduct.sale(3.0f);
18         proxyProduct.wholesale(1.5f);
19     }
20 }
⑤ 测试结果
没有代理商的测试结果:
有代理商的测试结果:
示例十四:基于 XML 配置 AOP
说明:
AOP 相关术语:
Joinpoint(连接点):所谓连接点是指那些被拦截到的点。在spring中,这些点指的是方法,因为spring只支持方法类型的连接点。
---就是根据规则,可以指定拦截的方法,我们将每一个被拦截的方法称为连接点。
Pointcut(切入点):所谓的切入点,就是拦截方法设置的规则
--所谓切入点是指我们要对哪些Joinpoint进行拦截的定义。
Advice(通知/增强,场景:在之前拦截,还是方法执行后拦截呢?):就是可以设置在方法之前拦截或者方法执行之后拦截或者方法出异常后拦截,或者方法之前和之后都拦截。我们将这些拦截场景称为通知
--所谓通知是指拦截到Joinpoint之后所要做的事情就是通知。
通知的类型:前置通知,后置通知,异常通知,最终通知,环绕通知。
Aspect(切面):所谓的切面就是我们的拦截处理类。
是切入点和通知(引介)的结合。
切入点表达式说明:
execution(表达式):
表达式语法:execution([修饰符] 返回值类型 包名.类名.方法名(参数))
写法说明:
全匹配方式:
public void cn.mgy.service.impl.StudentServiceImpl.reigster()
访问修饰符可以省略:
void cn.mgy.service.impl.StudentServiceImpl.reigster()
返回值可以使用 * 号,表示任意返回值:
* cn.mgy.service.impl.StudentServiceImpl.reigster()
包名可以使用 * 号,表示任意包,但是有几级包,需要写几个 * :
* *.*.*.*.StudentServiceImpl.reigster()
使用 .. 来表示当前包及其子包:
* cn..StudentServiceImpl.reigster()
类名可以使用 * 号,表示任意类:
* cn..*.reigster()
方法名可以使用 * 号,表示任意方法:
* cn..*.*()
参数列表可以使用 *,表示参数可以是任意数据类型,但是必须要有参数:
* cn..*.*(*)
参数列表可以使用 .. 表示有无参数均可,有参数可以是任意类型:
* cn..*.*(..)
全通配方式:
* *..*.*(..)
* :通配的是任意的字符串
.. :如果通配包的时候,就是匹配包以及其子包的类,如果通配是方法参数,就是不限定任何参数
常用标签说明:
<aop:config>:用于声明开始 aop 的配置
<aop:aspect>:用于配置切面
属性:
id:给切面提供一个唯一标识
ref:引用配置好的通知类 bean 的 id
<aop:pointcut>:用于配置切入点表达式
属性:
expression:用于定义切入点表达式
id:用于给切入点表达式提供一个唯一标识
<aop:before>:用于配置前置通知
属性:
method:指定通知中方法的名称
pointcut:定义切入点表达式
pointcut-ref:指定切入点表达式的引用
<aop:after-returning>:用于配置后置通知,如果出了异常一定不会调用切面的方法
属性:
method:指定通知中方法的名称
pointcut:定义切入点表达式
pointcut-ref:指定切入点表达式的引用
<aop:after-throwing>:用于配置异常通知,只有出了异常才会调用切面对应的方法
属性:
method:指定通知中方法的名称
pointcut:定义切入点表达式
pointcut-ref:指定切入点表达式的引用
<aop:after>:用于配置最终通知,不管出不出异常,都会调用的切面的方法
属性:
method:指定通知中方法的名称
pointcut:定义切入点表达式
pointcut-ref:指定切入点表达式的引用
<aop:around>:用于配置环绕通知
属性:
method:指定通知中方法的名称
pointcut:定义切入点表达式
pointcut-ref:指定切入点表达式的引用
① 创建一个项目并导入包
② 编写业务层的接口 StudentService.java 和类 StudentServiceImpl.java
 1 package cn.mgy.service;
 2
 3 public interface StudentService {
 4
 5     /**
 6      * 学生注册
 7      */
 8     void reigster();
 9
10     /**
11      * 学生登录
12      */
13     void login();
14
15     /**
16      * 学生注销
17      */
18     void undo();
19 }
 1 package cn.mgy.service.impl;
 2
 3 import cn.mgy.service.StudentService;
 4
 5 public class StudentServiceImpl implements StudentService {
 6
 7     @Override
 8     public void reigster() {
 9         System.out.println("--学生注册--");
10     }
11
12     @Override
13     public void login() {
14         System.out.println("--学生登录--");
15     }
16
17     @Override
18     public void undo() {
19         System.out.println("--学生注销--");
20     }
21
22 }
③ 编写一个切面类 Aop.java
 1 package cn.mgy.aop;
 2
 3 import org.aspectj.lang.ProceedingJoinPoint;
 4
 5 public class Aop {
 6
 7     public void before() {
 8         System.out.println("--before-方法执行之前--");
 9     }
10
11     public void after() {
12         System.out.println("--after-方法执行之后--");
13     }
14
15     // around 需要一个 ProceedingJoinPoint 对象指定方法调用之前之后
16     public void around(ProceedingJoinPoint point) {
17         System.out.println("--around 在方法之前执行--");
18         try {
19             // 调用拦截方法的逻辑代码
20             point.proceed();
21         } catch (Throwable e) {
22             e.printStackTrace();
23         }
24         System.out.println("--around 在方法之后执行--");
25     }
26
27     public void afterThrowing() {
28         System.out.println("--afterThrowing 出了异常后执行--");
29     }
30
31     public void afterReturning() {
32         System.out.println("--afterReturning 方法执行成功之后--");
33     }
34 }
④ 编写配置文件 applicationContent.xml
 1 <?xml version="1.0" encoding="UTF-8"?>
 2 <beans xmlns="http://www.springframework.org/schema/beans"
 3     xmlns:xsi="http://www.w3.org/2001/XMLSchema-instance"
 4     xmlns:aop="http://www.springframework.org/schema/aop"
 5     xsi:schemaLocation="http://www.springframework.org/schema/beans http://www.springframework.org/schema/beans/spring-beans.xsd
 6         http://www.springframework.org/schema/aop http://www.springframework.org/schema/aop/spring-aop-4.3.xsd">
 7
 8     <bean name="studentServiceImpl" class="cn.mgy.service.impl.StudentServiceImpl"></bean>
 9
10     <!-- aop 配置 -->
11     <!-- 创建 AOP到对象容器 -->
12     <bean name="aop" class="cn.mgy.aop.Aop" />
13     <!-- aop:config:用于设置 AOP 拦截的根标签 -->
14     <aop:config>
15         <!-- aop:aspect 标签:指定 AOP 的切面,以及拦截规则对应的方法 -->
16         <aop:aspect id="aop-aspect" ref="aop">
17             <!-- 拦截的方法必须不出异常,才在方法执行之后加入切面逻辑代码 -->
18             <aop:after-returning method="afterReturning" pointcut="execution(* cn.mgy.service.impl.StudentServiceImpl.*())"/>
19             <!-- 拦截的方法必须出了异常,才在方法执行之后加入切面逻辑代码 -->
20             <aop:after-throwing method="afterThrowing" pointcut="execution(* cn.mgy.service.impl.StudentServiceImpl.*())"/>
21             <!-- 拦截的方法不管有没有异常,都可以实现在拦截方法之前和之后分别加入不同的逻辑代码 -->
22             <aop:around method="around" pointcut="execution(* cn.mgy.service.impl.StudentServiceImpl.*())"/>
23             <!-- 拦截的方法不管有没有异常,都可以实现在拦截方法之前加入切面的逻辑代码 -->
24             <aop:before method="before" pointcut="execution(* cn.mgy.service.impl.StudentServiceImpl.*())"/>
25             <!-- 拦截的方法不管有没有异常,都可以实现在拦截方法之后加入切面的逻辑代码 -->
26             <aop:after method="after" pointcut="execution(* cn.mgy.service.impl.StudentServiceImpl.*())"/>
27         </aop:aspect>
28     </aop:config>
29 </beans>
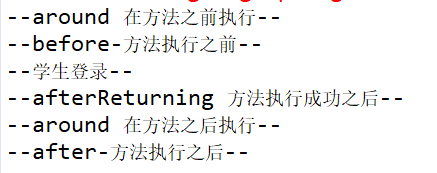
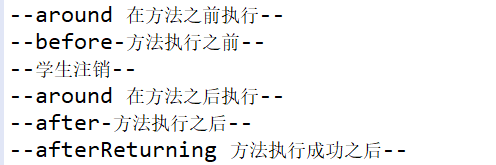
⑤ 编写一个测试类 StudentServiceTest.java
 1 package cn.mgy.test;
 2
 3 import org.junit.Test;
 4 import org.junit.runner.RunWith;
 5 import org.springframework.beans.factory.annotation.Autowired;
 6 import org.springframework.test.context.ContextConfiguration;
 7 import org.springframework.test.context.junit4.SpringJUnit4ClassRunner;
 8
 9 import cn.mgy.service.StudentService;
10
11 // 指定 Junit 测试之前,加入 Spring 框架启动的逻辑代码
12 @RunWith(SpringJUnit4ClassRunner.class)
13 // 指定 Spring 启动必须的配置文件
14 @ContextConfiguration(locations="classpath:applicationContent.xml")
15 public class StudentServiceTest {
16
17     // 获得 spring 容器中的对象
18     @Autowired
19     private StudentService studentService;
20
21     @Test
22     public void reigster() {
23         studentService.reigster();
24     }
25
26     @Test
27     public void login() {
28         studentService.login();
29     }
30
31     @Test
32     public void undo() {
33         studentService.undo();
34     }
35 }
⑥ 测试结果


示例十五:基于注解配置 AOP
常用注解说明:
@Aspect:把当前类声明为切面类
@Before:把当前方法看成是前置通知
属性:
value:用于指定切入点表达式,还可以指定切入点表达式的引用
@AfterReturning:把当前方法看成是后置通知。报异常,就不执行
属性:
value:用于指定切入点表达式,还可以指定切入点表达式的应用
@AfterThrowing:把当前方法看成是异常通知。只有报异常才执行
属性:
value:用于指定切入点表达式,还可以指定切入点表达式的引用
@After:把当前方法看成是最终通知。不管报不报异常都执行
属性:
value:用于指定切入点表达式,还可以指定切入点表达式的引用
@Around:把当前方法看成是环绕通知
属性:
value:用于指定切入点表达式,还可以指定切入点表达式的引用
@Poincut:指定切入点表达式
属性:
value:指定表达式的内容
① 创建一个项目并导入包
② 编写业务层的接口 StudentService.java 和类 StudentServiceImpl.java
 1 package cn.mgy.service;
 2
 3 public interface StudentService {
 4
 5     /**
 6      * 学生注册
 7      */
 8     void reigster();
 9
10     /**
11      * 学生登录
12      */
13     void login();
14
15     /**
16      * 学生注销
17      */
18     void undo();
19 }
 1 package cn.mgy.service.impl;
 2
 3 import org.springframework.stereotype.Service;
 4
 5 import cn.mgy.service.StudentService;
 6
 7 @Service
 8 public class StudentServiceImpl implements StudentService {
 9
10     @Override
11     public void reigster() {
12         System.out.println("--学生注册--");
13     }
14
15     @Override
16     public void login() {
17         System.out.println("--学生登录--");
18     }
19
20     @Override
21     public void undo() {
22         System.out.println("--学生注销--");
23     }
24
25 }
③ 编写一个切面类 Aop.java
 1 package cn.mgy.aop;
 2
 3 import org.aspectj.lang.ProceedingJoinPoint;
 4 import org.aspectj.lang.annotation.After;
 5 import org.aspectj.lang.annotation.AfterReturning;
 6 import org.aspectj.lang.annotation.AfterThrowing;
 7 import org.aspectj.lang.annotation.Around;
 8 import org.aspectj.lang.annotation.Aspect;
 9 import org.aspectj.lang.annotation.Before;
10 import org.springframework.stereotype.Component;
11
12 // 必须使用组件注解将切面类的对象注入带 Spring 容器中
13 @Component
14 // 必须声明该类为一个切面类
15 @Aspect
16 public class Aop {
17
18     @Before(value="execution(* cn.mgy.service.impl.StudentServiceImpl.*())")
19     public void before() {
20         System.out.println("--before-方法执行之前--");
21     }
22
23     @After(value="execution(* cn.mgy.service.impl.StudentServiceImpl.*())")
24     public void after() {
25         System.out.println("--after-方法执行之后--");
26     }
27
28     // around 需要一个 ProceedingJoinPoint 对象指定方法调用之前之后
29     @Around(value="execution(* cn.mgy.service.impl.StudentServiceImpl.*())")
30     public void around(ProceedingJoinPoint point) {
31         System.out.println("--around 在方法之前执行--");
32         try {
33             // 调用拦截方法的逻辑代码
34             point.proceed();
35         } catch (Throwable e) {
36             e.printStackTrace();
37         }
38         System.out.println("--around 在方法之后执行--");
39     }
40
41     @AfterThrowing(value="execution(* cn.mgy.service.impl.StudentServiceImpl.*())")
42     public void afterThrowing() {
43         System.out.println("--afterThrowing 出了异常后执行--");
44     }
45
46     @AfterReturning(value="execution(* cn.mgy.service.impl.StudentServiceImpl.*())")
47     public void afterReturning() {
48         System.out.println("--afterReturning 方法执行成功之后--");
49     }
50 }
④ 编写配置文件 applicationContent.xml
 1 <?xml version="1.0" encoding="UTF-8"?>
 2 <beans xmlns="http://www.springframework.org/schema/beans"
 3     xmlns:xsi="http://www.w3.org/2001/XMLSchema-instance"
 4     xmlns:aop="http://www.springframework.org/schema/aop"
 5     xmlns:context="http://www.springframework.org/schema/context"
 6     xsi:schemaLocation="http://www.springframework.org/schema/beans http://www.springframework.org/schema/beans/spring-beans.xsd
 7         http://www.springframework.org/schema/context http://www.springframework.org/schema/context/spring-context-4.3.xsd
 8         http://www.springframework.org/schema/aop http://www.springframework.org/schema/aop/spring-aop-4.3.xsd">
 9
10     <!-- 配置扫描器 -->
11     <context:component-scan base-package="cn.mgy" />
12     <!-- 使用注解配置 aop 使配置的配置自动注入 aop -->
13     <aop:aspectj-autoproxy />
14
15 </beans>
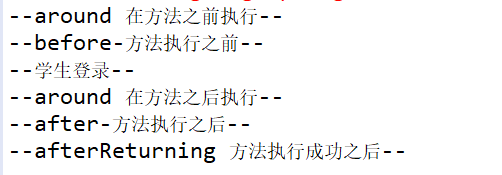
⑤ 创建一个测试类 StudentServiceTest.java
 1 package cn.mgy.test;
 2
 3 import org.junit.Test;
 4 import org.junit.runner.RunWith;
 5 import org.springframework.beans.factory.annotation.Autowired;
 6 import org.springframework.test.context.ContextConfiguration;
 7 import org.springframework.test.context.junit4.SpringJUnit4ClassRunner;
 8
 9 import cn.mgy.service.StudentService;
10
11 // 指定 Junit 测试之前,加入 Spring 框架启动的逻辑代码
12 @RunWith(SpringJUnit4ClassRunner.class)
13 // 指定 Spring 启动必须的配置文件
14 @ContextConfiguration(locations="classpath:applicationContent.xml")
15 public class StudentServiceTest {
16
17     // 获得 spring 容器中的对象
18     @Autowired
19     private StudentService studentService;
20
21     @Test
22     public void reigster() {
23         studentService.reigster();
24     }
25
26     @Test
27     public void login() {
28         studentService.login();
29     }
30
31     @Test
32     public void undo() {
33         studentService.undo();
34     }
35 }
⑥ 测试结果:

如果想完全基于注解的话,可以把配置文件 applicationContent.xml 修改为一个配置类 SpringConfiguration.java
 1 package cn.mgy.config;
 2
 3 import org.springframework.context.annotation.ComponentScan;
 4 import org.springframework.context.annotation.Configuration;
 5 import org.springframework.context.annotation.EnableAspectJAutoProxy;
 6
 7 @Configuration
 8 @ComponentScan(basePackages="cn.mgy")
 9 @EnableAspectJAutoProxy
10 public class SpringConfiguration {
11
12 }
然后把测试类修改为:
 1 package cn.mgy.test;
 2
 3 import org.junit.Test;
 4 import org.junit.runner.RunWith;
 5 import org.springframework.beans.factory.annotation.Autowired;
 6 import org.springframework.test.context.ContextConfiguration;
 7 import org.springframework.test.context.junit4.SpringJUnit4ClassRunner;
 8
 9 import cn.mgy.config.SpringConfiguration;
10 import cn.mgy.service.StudentService;
11
12 // 指定 Junit 测试之前,加入 Spring 框架启动的逻辑代码
13 @RunWith(SpringJUnit4ClassRunner.class)
14 // 指定 Spring 启动必须的配置文件
15 @ContextConfiguration(classes=SpringConfiguration.class)
16 public class StudentServiceTest {
17
18     // 获得 spring 容器中的对象
19     @Autowired
20     private StudentService studentService;
21
22     @Test
23     public void reigster() {
24         studentService.reigster();
25     }
26
27     @Test
28     public void login() {
29         studentService.login();
30     }
31
32     @Test
33     public void undo() {
34         studentService.undo();
35     }
36 }
示例十六:定时调度任务
说明:所谓定时任务,就是根据设置的任务规则(就是时间规则),触发一个动作(方法)。
需求:每十秒,输出一个 HelloWorld
cron 表达式详解:
cron 表达式是一个字符串,字符串以 5 或 6 个空格隔开,分为 6 或 7 个域,每一个域代表一个含义,cron 有如下两种语法格式:
(1)Seconds Minutes Hours DayofMonth Month DayofWeek Year
(2)Seconds Minutes Hours DayofMonth Month DayofWeek
cron 从左到右(用空格隔开):秒 分 小时 月份中的日期 月份 星期中的日期 年份
各字段的含义:
| 字段 | 允许值 | 允许的特殊字符 |
| 秒(Seconds) | 0~59 的整数 | , - * / 四个字符 |
| 分(Minutes) | 0~59 的整数 | , - * / 四个字符 |
| 小时(Hours) | 0~23 的整数 | , - * / 四个字符 |
| 日期(DayofMonth) | 1~31 的整数(但是需要考虑你所选月份的天数) | , - * / L W C ? 八个字符 |
| 月份(Month) | 1~12 的整数或者 JAN-DEC | , - * / 四个字符 |
| 星期(DayofWeek) | 1~7 的整数或者 SUN-SAT (SUN=1) | , - * / L W C ? 八个字符 |
| 年(可选,留空)(Year) | 1970~2099 | , - * / 四个字符 |
注意事项:
每一个域不仅可以使用数字,还可以使用特殊字符,它们的含义是:
* :表示匹配该域的任意值。假如在Minutes域使用*, 即表示每分钟都会触发事件。
? :只能用在DayofMonth和DayofWeek两个域。它也匹配域的任意值,但实际不会。因为DayofMonth和DayofWeek会相互影响。例如想在每月的20日触发调度,不管20日到底是星期几,则只能使用如下写法: 13 13 15 20 * ?, 其中最后一位只能用?,而不能使用*,如果使用*表示不管星期几都会触发,实际上并不是这样。
- :表示范围。例如在Minutes域使用5-20,表示从5分到20分钟每分钟触发一次
/ :表示起始时间开始触发,然后每隔固定时间触发一次。例如在Minutes域使用5/20,则意味着5分钟触发一次,而25,45等分别触发一次.
, :表示列出枚举值。例如:在Minutes域使用5,20,则意味着在5和20分每分钟触发一次。
L :表示最后,只能出现在DayofWeek和DayofMonth域。如果在DayofWeek域使用5L,意味着在最后的一个星期四触发。
W : 表示有效工作日(周一到周五),只能出现在DayofMonth域,系统将在离指定日期的最近的有效工作日触发事件。例如:在 DayofMonth使用5W,如果5日是星期六,则将在最近的工作日:星期五,即4日触发。如果5日是星期天,则在6日(周一)触发;如果5日在星期一到星期五中的一天,则就在5日触发。另外一点,W的最近寻找不会跨过月份 。
LW : 这两个字符可以连用,表示在某个月最后一个工作日,即最后一个星期五。
# : 用于确定每个月第几个星期几,只能出现在DayofMonth域。例如在4#2,表示某月的第二个星期三。
常用表达式例子
0 0 2 1 * ? * 表示在每月的1日的凌晨2点调整任务
0 15 10 ? * MON-FRI 表示周一到周五每天上午10:15执行作业
0 15 10 ? 6L 2002-2006 表示2002-2006年的每个月的最后一个星期五上午10:15执行作
0 0 10,14,16 * * ? 每天上午10点,下午2点,4点
0 0/30 9-17 * * ? 朝九晚五工作时间内每半小时
0 0 12 ? * WED 表示每个星期三中午12点
0 0 12 * * ? 每天中午12点触发
0 15 10 ? * * 每天上午10:15触发
0 15 10 * * ? 每天上午10:15触发
0 15 10 * * ? * 每天上午10:15触发
0 15 10 * * ? 2005 2005年的每天上午10:15触发
0 * 14 * * ? 在每天下午2点到下午2:59期间的每1分钟触发
0 0/5 14 * * ? 在每天下午2点到下午2:55期间的每5分钟触发
0 0/5 14,18 * * ? 在每天下午2点到2:55期间和下午6点到6:55期间的每5分钟触发
0 0-5 14 * * ? 在每天下午2点到下午2:05期间的每1分钟触发
0 10,44 14 ? 3 WED 每年三月的星期三的下午2:10和2:44触发
0 15 10 ? * MON-FRI 周一至周五的上午10:15触发
0 15 10 15 * ? 每月15日上午10:15触发
0 15 10 L * ? 每月最后一日的上午10:15触发
0 15 10 ? * 6L 每月的最后一个星期五上午10:15触发
0 15 10 ? * 6L 2002-2005 2002年至2005年的每月的最后一个星期五上午10:15触发
0 15 10 ? * 6#3 每月的第三个星期五上午10:15触发
注:
有些子表达式能包含一些范围或列表
例如:子表达式(天(星期))可以为 “MON-FRI”,“MON,WED,FRI”,“MON-WED,SAT”
“*”字符代表所有可能的值
因此,“*”在子表达式(月)里表示每个月的含义,“*”在子表达式(天(星期))表示星期的每一天
“/”字符用来指定数值的增量
例如:在子表达式(分钟)里的“0/15”表示从第0分钟开始,每15分钟
在子表达式(分钟)里的“3/20”表示从第3分钟开始,每20分钟(它和“3,23,43”)的含义一样
“?”字符仅被用于天(月)和天(星期)两个子表达式,表示不指定值
当2个子表达式其中之一被指定了值以后,为了避免冲突,需要将另一个子表达式的值设为“?”
“L” 字符仅被用于天(月)和天(星期)两个子表达式,它是单词“last”的缩写
但是它在两个子表达式里的含义是不同的。
在天(月)子表达式中,“L”表示一个月的最后一天
在天(星期)自表达式中,“L”表示一个星期的最后一天,也就是SAT
如果在“L”前有具体的内容,它就具有其他的含义了
例如:“6L”表示这个月的倒数第6天,“FRIL”表示这个月的最一个星期五
注意:在使用“L”参数时,不要指定列表或范围,因为这会导致问题
① 创建一个项目并导入包

② 编写一个任务类 MyTask.java
1 package cn.mgy.task;
2
3 public class MyTask {
4
5     public void task() {
6         System.out.println("--HelloWorld--");
7     }
8 }
③ 创建配置文件 taskconfig.xml
 1 <?xml version="1.0" encoding="UTF-8"?>
 2 <beans xmlns="http://www.springframework.org/schema/beans"
 3     xmlns:xsi="http://www.w3.org/2001/XMLSchema-instance"
 4     xmlns:task="http://www.springframework.org/schema/task"
 5     xmlns:context="http://www.springframework.org/schema/context"
 6     xsi:schemaLocation="http://www.springframework.org/schema/task http://www.springframework.org/schema/task/spring-task-4.3.xsd
 7         http://www.springframework.org/schema/beans http://www.springframework.org/schema/beans/spring-beans.xsd
 8         http://www.springframework.org/schema/context http://www.springframework.org/schema/context/spring-context-4.3.xsd">
 9
10     <!-- 将任务加入到容器 -->
11     <bean name="myTask" class="cn.mgy.task.MyTask" />
12
13     <!-- 配置定时任务 -->
14     <task:scheduled-tasks>
15         <task:scheduled ref="myTask" method="task" cron="*/10 * * * * ?"/>
16     </task:scheduled-tasks>
17
18 </beans>
④ 创建一个测试类
 1 package cn.mgy.test;
 2
 3 import org.junit.Test;
 4 import org.junit.runner.RunWith;
 5 import org.springframework.test.context.ContextConfiguration;
 6 import org.springframework.test.context.junit4.SpringJUnit4ClassRunner;
 7
 8 @RunWith(SpringJUnit4ClassRunner.class)
 9 @ContextConfiguration(locations="classpath:taskconfig.xml")
10 public class TaskTest {
11
12     @Test
13     public void task() {
14         // 保持程序不结束
15         while(true) {}
16     }
17 }
⑤ 测试结果
每隔十秒会发一个 HelloWorld

也可以修改为纯注解,修改如下:
修改任务类 MyTask.java
 1 package cn.mgy.task;
 2
 3 import org.springframework.scheduling.annotation.Async;
 4 import org.springframework.scheduling.annotation.Scheduled;
 5 import org.springframework.stereotype.Component;
 6
 7 @Component
 8 @Async
 9 public class MyTask {
10
11     @Scheduled(cron="*/10 * * * * ?")
12     public void task() {
13         System.out.println("--HelloWorld--");
14     }
15 }
修改配置文件 taskconfig.xml 为配置类 TaskConfig.java
 1 package cn.mgy.config;
 2
 3 import org.springframework.context.annotation.ComponentScan;
 4 import org.springframework.context.annotation.Configuration;
 5 import org.springframework.scheduling.annotation.EnableAsync;
 6 import org.springframework.scheduling.annotation.EnableScheduling;
 7
 8 @Configuration
 9 @ComponentScan(basePackages="cn.mgy")
10 @EnableAsync
11 @EnableScheduling
12 public class TaskConfig {
13
14 }
修改测试类:
 1 package cn.mgy.test;
 2
 3 import org.junit.Test;
 4 import org.junit.runner.RunWith;
 5 import org.springframework.test.context.ContextConfiguration;
 6 import org.springframework.test.context.junit4.SpringJUnit4ClassRunner;
 7
 8 import cn.mgy.config.TaskConfig;
 9
10 @RunWith(SpringJUnit4ClassRunner.class)
11 @ContextConfiguration(classes=TaskConfig.class)
12 public class TaskTest {
13
14     @Test
15     public void task() {
16         // 保持程序不结束
17         while(true) {}
18     }
19 }
示例十七:邮件发送
准备工作:
打开邮箱的 POP3、SMTP

注意:通过关闭、再打开 POP3/SMTP 服务,获得认证密码
① 创建一个项目并导入包
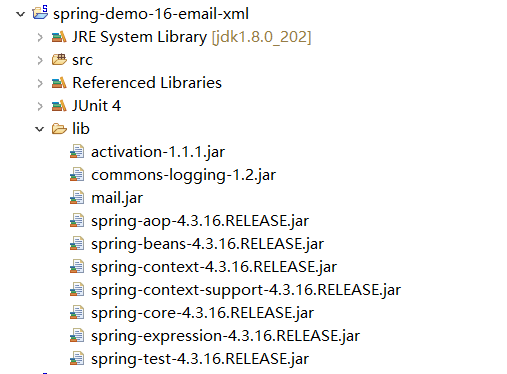
② 配置邮件发送文件 emailconfig.xml
 1 <?xml version="1.0" encoding="UTF-8"?>
 2 <beans xmlns="http://www.springframework.org/schema/beans"
 3     xmlns:xsi="http://www.w3.org/2001/XMLSchema-instance"
 4     xmlns:context="http://www.springframework.org/schema/context"
 5     xsi:schemaLocation="http://www.springframework.org/schema/beans http://www.springframework.org/schema/beans/spring-beans.xsd
 6         http://www.springframework.org/schema/context http://www.springframework.org/schema/context/spring-context-4.3.xsd">
 7
 8     <!-- 配置扫描器 -->
 9     <context:component-scan base-package="cn.mgy" />
10
11     <!-- 配置邮件发送类 -->
12     <bean name="mailSender" class="org.springframework.mail.javamail.JavaMailSenderImpl">
13         <!-- 指定邮件编码 -->
14         <property name="defaultEncoding" value="UTF-8" />
15         <!-- 指定邮件服务器 -->
16         <property name="host" value="smtp.qq.com" />
17         <!-- 指定发送人的邮箱 -->
18         <property name="username" value="3237647332@qq.com" />
19         <!-- 指定发送人的密码(该密码为POP3/SMTP服务获得认证的密码) -->
20         <property name="password" value="esgetgwsloycdaeg" />
21         <!-- 指定发送的邮箱服务器是需要认证的 -->
22         <property name="javaMailProperties">
23             <value>
24                 mail.smtp.auth=true
25             </value>
26         </property>
27     </bean>
28
29 </beans>
③ 创建一个类设置邮件发送内容
 1 package cn.mgy.service;
 2
 3 import java.util.Date;
 4
 5 import org.springframework.beans.factory.annotation.Autowired;
 6 import org.springframework.mail.MailSender;
 7 import org.springframework.mail.SimpleMailMessage;
 8 import org.springframework.stereotype.Service;
 9
10 @Service
11 public class MailService {
12
13     @Autowired
14     private MailSender mailSender;
15
16     /**
17      * 发送邮件
18      */
19     public void send() {
20         SimpleMailMessage message = new SimpleMailMessage();
21         message.setTo("maiguangyu6868@126.com");
22         message.setText("你好,光玉");
23         message.setSubject("问好");
24         message.setFrom("3237647332@qq.com");
25         message.setSentDate(new Date());
26
27         mailSender.send(message);
28     }
29 }
④ 发送测试类
 1 package cn.mgy.test;
 2
 3 import org.junit.Test;
 4 import org.junit.runner.RunWith;
 5 import org.springframework.beans.factory.annotation.Autowired;
 6 import org.springframework.test.context.ContextConfiguration;
 7 import org.springframework.test.context.junit4.SpringJUnit4ClassRunner;
 8
 9 import cn.mgy.service.MailService;
10
11 @RunWith(SpringJUnit4ClassRunner.class)
12 @ContextConfiguration(locations="classpath:emailconfig.xml")
13 public class MailServiceTest {
14
15     @Autowired
16     private MailService mailService;
17
18     @Test
19     public void send() {
20         try {
21             mailService.send();
22         } catch (Exception e) {
23             e.printStackTrace();
24         }
25     }
26 }
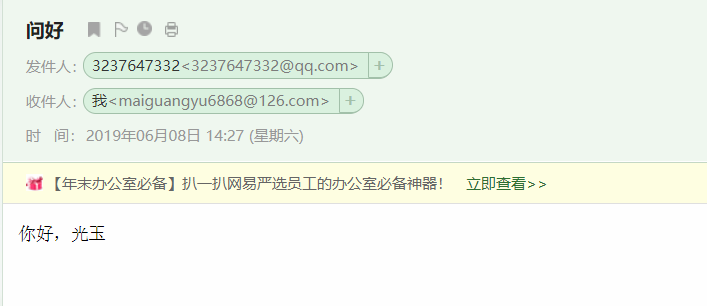
⑤ 测试结果(打开163邮箱查看)
示例十八:JdbcTemplate 类操作数据库
数据库:

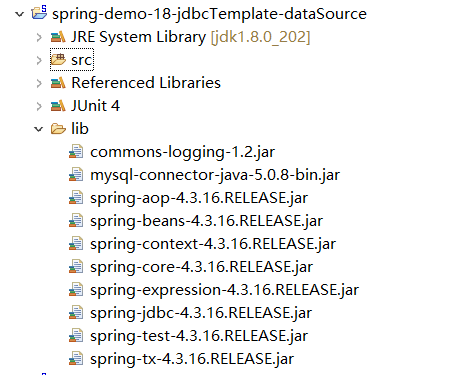
① 创建一个项目并导入包
② 创建一个实体类 Student.java
 1 package cn.mgy.pojo;
 2
 3 import java.util.Date;
 4
 5 public class Student {
 6
 7     private Integer studentId;// INT(20) NOT NULL AUTO_INCREMENT,
 8     private String studentName;// VARCHAR(50) NULL DEFAULT NULL,
 9     private String studentPwd;// VARCHAR(50) NULL DEFAULT NULL,
10     private Integer studentStatus;// INT(11) NULL DEFAULT NULL,
11     private Date createDate;// DATE NULL DEFAULT NULL,
12     private String studentAccount;// VARCHAR(50) NULL DEFAULT NULL,
13
14
15     @Override
16     public String toString() {
17         return "Student [studentId=" + studentId + ", studentName=" + studentName + ", studentPwd=" + studentPwd
18                 + ", studentStatus=" + studentStatus + ", createDate=" + createDate + ", studentAccount="
19                 + studentAccount + "]";
20     }
21
22     public Integer getStudentId() {
23         return studentId;
24     }
25
26     public void setStudentId(Integer studentId) {
27         this.studentId = studentId;
28     }
29
30     public String getStudentName() {
31         return studentName;
32     }
33
34     public void setStudentName(String studentName) {
35         this.studentName = studentName;
36     }
37
38     public String getStudentPwd() {
39         return studentPwd;
40     }
41
42     public void setStudentPwd(String studentPwd) {
43         this.studentPwd = studentPwd;
44     }
45
46     public Integer getStudentStatus() {
47         return studentStatus;
48     }
49
50     public void setStudentStatus(Integer studentStatus) {
51         this.studentStatus = studentStatus;
52     }
53
54     public Date getCreateDate() {
55         return createDate;
56     }
57
58     public void setCreateDate(Date createDate) {
59         this.createDate = createDate;
60     }
61
62     public String getStudentAccount() {
63         return studentAccount;
64     }
65
66     public void setStudentAccount(String studentAccount) {
67         this.studentAccount = studentAccount;
68     }
69 }
③ 创建配置文件 spring-data.xml
 1 <?xml version="1.0" encoding="UTF-8"?>
 2 <beans xmlns="http://www.springframework.org/schema/beans"
 3     xmlns:xsi="http://www.w3.org/2001/XMLSchema-instance"
 4     xmlns:jdbc="http://www.springframework.org/schema/jdbc"
 5     xmlns:tx="http://www.springframework.org/schema/tx"
 6     xsi:schemaLocation="http://www.springframework.org/schema/beans http://www.springframework.org/schema/beans/spring-beans.xsd
 7         http://www.springframework.org/schema/jdbc http://www.springframework.org/schema/jdbc/spring-jdbc-4.3.xsd
 8         http://www.springframework.org/schema/tx http://www.springframework.org/schema/tx/spring-tx-4.3.xsd">
 9
10     <!-- 配置 spring jdbc 内置数据源 -->
11     <bean name="dataSource" class="org.springframework.jdbc.datasource.DriverManagerDataSource">
12         <!-- 四要素 -->
13         <property name="driverClassName" value="org.gjt.mm.mysql.Driver" />
14         <property name="url" value="jdbc:mysql://localhost:3306/test" />
15         <property name="username" value="root" />
16         <property name="password" value="root" />
17     </bean>
18
19     <!-- 配置 JdbcTemplate -->
20     <bean id="jdbcTemplate" class="org.springframework.jdbc.core.JdbcTemplate" >
21         <!-- 指定数据源 -->
22         <property name="dataSource" ref="dataSource" />
23     </bean>
24
25 </beans>
④ 创建一个测试类
  1 package cn.mgy.test;
  2
  3 import java.sql.ResultSet;
  4 import java.sql.SQLException;
  5 import java.util.ArrayList;
  6 import java.util.Date;
  7 import java.util.List;
  8 import java.util.Map;
  9
 10 import javax.sql.DataSource;
 11
 12 import org.junit.Test;
 13 import org.junit.runner.RunWith;
 14 import org.springframework.beans.factory.annotation.Autowired;
 15 import org.springframework.dao.DataAccessException;
 16 import org.springframework.jdbc.core.JdbcTemplate;
 17 import org.springframework.jdbc.core.ResultSetExtractor;
 18 import org.springframework.test.context.ContextConfiguration;
 19 import org.springframework.test.context.junit4.SpringJUnit4ClassRunner;
 20
 21 import cn.mgy.pojo.Student;
 22
 23 @RunWith(SpringJUnit4ClassRunner.class)
 24 @ContextConfiguration(locations="classpath:spring-data.xml")
 25 public class JdbcTemplateTest {
 26
 27     @Autowired
 28     private DataSource dataSource;
 29
 30     @Autowired
 31     private JdbcTemplate jdbcTemplate;
 32
 33     /**
 34      * 测试数据源是否连接成功
 35      */
 36     @Test
 37     public void dataSource() {
 38         try {
 39             System.out.println(dataSource.getConnection());
 40         } catch (SQLException e) {
 41             e.printStackTrace();
 42         }
 43     }
 44
 45     /**
 46      * 测试 jdbcTemplate 对象是否存在
 47      */
 48     @Test
 49     public void jdbcTemplate() {
 50         System.out.println(jdbcTemplate);
 51     }
 52
 53     /**
 54      * 测试 jdbcTemplate 插入数据
 55      */
 56     @Test
 57     public void insert() {
 58         int update = jdbcTemplate.update("INSERT INTO tb_student(student_name, student_pwd, student_status, create_date, student_account) VALUES (?, ?, ?, ?, ?)", new Object[]{"李四","123456",1,new Date(),"lisi"});
 59         if (update>0) {
 60             System.out.println("数据插入成功");
 61         } else {
 62             System.out.println("数据插入失败");
 63         }
 64     }
 65
 66     /**
 67      * 测试 jdbcTemplate 删除数据
 68      */
 69     @Test
 70     public void delete() {
 71         int update = jdbcTemplate.update("DELETE FROM tb_student WHERE student_id=?", 1);
 72         if (update>0) {
 73             System.out.println("删除数据成功");
 74         } else {
 75             System.out.println("删除数据失败");
 76         }
 77     }
 78
 79     /**
 80      * 测试 jdbcTemplate 更新数据
 81      */
 82     @Test
 83     public void update() {
 84         int update = jdbcTemplate.update("UPDATE tb_student SET student_name=?, student_pwd=? WHERE student_id=?", new Object[] {"刘亦菲","1314","2"});
 85         if (update>0) {
 86             System.out.println("数据更新成功");
 87         } else {
 88             System.out.println("数据更新失败");
 89         }
 90     }
 91
 92     /**
 93      * 测试 jdbcTemplate 查询所有数据返回 List
 94      */
 95     @Test
 96     public void findAll() {
 97         List<Map<String, Object>> students = jdbcTemplate.queryForList("SELECT * FROM tb_student");
 98         for (Map<String, Object> student : students) {
 99             System.out.println("学生名:"+student.get("student_name"));
100         }
101     }
102
103     /**
104      * 测试 jdbcTemplate 查询返回一个 Map
105      */
106     @Test
107     public void getByMap() {
108         Map<String, Object> entity = jdbcTemplate.queryForMap("SELECT * FROM tb_student WHERE student_id=?", 2);
109         System.out.println("学生名:"+entity.get("student_name"));
110     }
111
112     /**
113      * 测试 jdbcTemplate 查询返回一个 JavaBean
114      */
115     @Test
116     public void getByEntity() {
117
118         ResultSetExtractor<Student> rowMapper = new ResultSetExtractor<Student>() {
119
120             @Override
121             public Student extractData(ResultSet rs) throws SQLException, DataAccessException {
122                 Student student = new Student();
123                 if (rs.next()) {
124                     student.setStudentId(rs.getInt("student_id"));
125                     student.setStudentName(rs.getString("student_name"));
126                     student.setStudentPwd(rs.getString("student_pwd"));
127                     student.setStudentStatus(rs.getInt("student_status"));
128                     student.setStudentAccount(rs.getString("student_account"));
129                     student.setCreateDate(rs.getDate("create_date"));
130                 }
131                 return student;
132             }
133
134         };
135
136         Student student = jdbcTemplate.query("SELECT * FROM tb_student WHERE student_id=?", new Object[] {2}, rowMapper);
137         System.out.println(student);
138     }
139
140     /**
141      * 测试 jdbcTemplate 查询返回一个 JavaBean 元素的 List
142      */
143     @Test
144     public void getByEntityList() {
145         ResultSetExtractor<List<Student>> rowMapper = new ResultSetExtractor<List<Student>>() {
146
147             @Override
148             public List<Student> extractData(ResultSet rs) throws SQLException, DataAccessException {
149                 List<Student> students = new ArrayList<>();
150                 while (rs.next()) {
151                     Student student = new Student();
152                     student.setStudentId(rs.getInt("student_id"));
153                     student.setStudentName(rs.getString("student_name"));
154                     student.setStudentPwd(rs.getString("student_pwd"));
155                     student.setStudentStatus(rs.getInt("student_status"));
156                     student.setStudentAccount(rs.getString("student_account"));
157                     student.setCreateDate(rs.getDate("create_date"));
158                     students.add(student);
159                 }
160                 return students;
161             }
162         };
163
164         List<Student> students = jdbcTemplate.query("SELECT * FROM tb_student", rowMapper);
165         for (Student student : students) {
166             System.out.println(student);
167         }
168     }
169 }
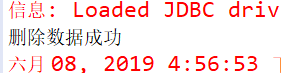
⑤ 测试结果
数据库连接测试:

jdbcTemplate 的测试:

jdbcTemplate 对数据操作的测试:


示例十九:基于 XML 实现事务代理(声明式事务)
Spring 中事务控制的 API 介绍:
Spring 所有事务代理类都是基于 PlatformTransactionManager 接口的实现。此接口是 Spring 的事务管理器,它里面提供了我们常用的操作事务的方法,如下代码片段:
PlatformTransactionManager 包括以下三个操作:
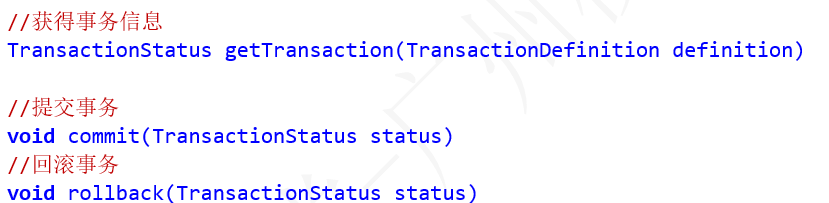
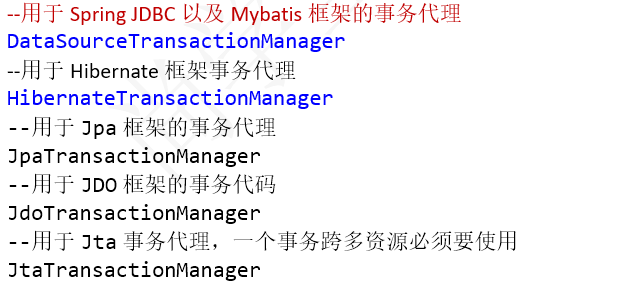
我们在开发中都是使用它的实现类,如下:
TransactionDefinition 源码:
 1 public interface TransactionDefinition {
 2      //事务的传播行为
 3     int PROPAGATION_REQUIRED = 0;
 4     int PROPAGATION_SUPPORTS = 1;
 5     int PROPAGATION_MANDATORY = 2;
 6     int PROPAGATION_REQUIRES_NEW = 3;
 7     int PROPAGATION_NOT_SUPPORTED = 4;
 8     int PROPAGATION_NEVER = 5;
 9     int PROPAGATION_NESTED = 6;
10     //事务的隔离级别
11     int ISOLATION_DEFAULT = -1;
12     int ISOLATION_READ_UNCOMMITTED = Connection.TRANSACTION_READ_UNCOMMITTED;
13     int ISOLATION_READ_COMMITTED = Connection.TRANSACTION_READ_COMMITTED;
14     int ISOLATION_REPEATABLE_READ = Connection.TRANSACTION_REPEATABLE_READ;
15     int ISOLATION_SERIALIZABLE = Connection.TRANSACTION_SERIALIZABLE;
16     int TIMEOUT_DEFAULT = -1;
17     //获得事务信息
18     int getPropagationBehavior();
19     int getIsolationLevel();
20     int getTimeout();
21     boolean isReadOnly();
22     String getName();
23 }
说明:
TransactionDefinition是事务定义接口,该接口注意定义了:事务的传播行为,事务的隔离级别,获得事务信息的方法。
事务传播行为:
问题:事务的传播行为是什么?
答:我们的业务程序,是通过方法调用另一个方法的。所谓的Spring事务的传播行为,就是指将上一个方法定义的事务处理,是否传递到下一个方法的几种情况。
问题:为什么会出现事务的传播行为?
答:原因是因为在处理业务的时候,一条线程有可能出现多个事务处理对象!!事务的传播行为就是用于描述,出现多个事务对象的时候,它们的关系是怎样的!!
REQUIRED : 如果当前没有事务,就新建一个事务,如果已经存在一个事务中,加入到这个事务中。一般的选择(默认值)99%
SUPPORTS : 支持当前事务,如果当前没有事务,就以非事务方式执行(没有事务)
MANDATORY:使用当前的事务,如果当前没有事务,就抛出异常
REQUERS_NEW : 新建事务,如果当前在事务中,把当前事务挂起。
//查询的时候配置
NOT_SUPPORTED : 以非事务方式执行操作,如果当前存在事务,就把当前事务挂起
//查询的时候配置
NEVER : 以非事务方式运行,如果当前存在事务,抛出异常
NESTED : 如果当前存在事务,则在嵌套事务内执行。如果当前没有事务,则执行REQUIRED类似的操作。
就是:出现多个事务(操作)时,通过事务的传播行为来设置事务与事务之间的存在关系。
事务隔离级别:
所谓的事务隔离级别就是,同一个数据库出现多个不同的线程操作(事务)。每个事务之间的关系就是事务隔离级别。
MySQL查询数据库当前的隔离级别的语句为:select @@tx_isolation;
ISOLATION_DEFAULT:默认隔离级别,由数据库本身决定以下四种中的某一种。
根据现实情况,事务隔离级别有四个。
根据四个隔离级别,可能会出现,脏读,不可重复读,幻读
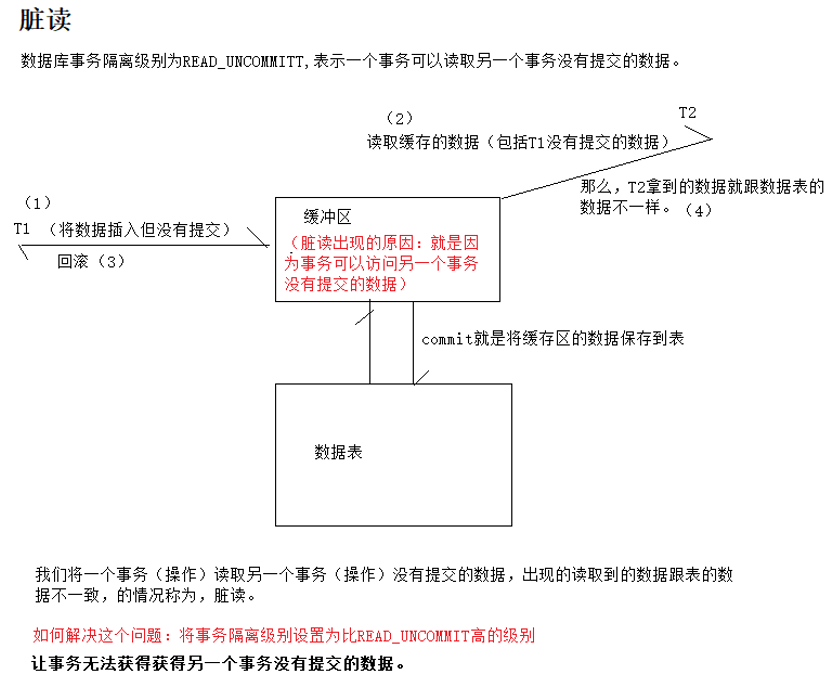
ISOLATION_READ_UNCOMMITTED:可以读另一个事务未提交的数据(一个事务操作时,另一个事务可以查询,也可以提交,还可以读取别的事务没有提交的数据)
ISOLATION_READ_COMMITTED :只能读已提交的数据,(解决脏读问题,ORACLE默认)(一个事务操作(增删改)时,另一个事务可以查询,也可以提交,但是不能读取别的是没有提交的数据)
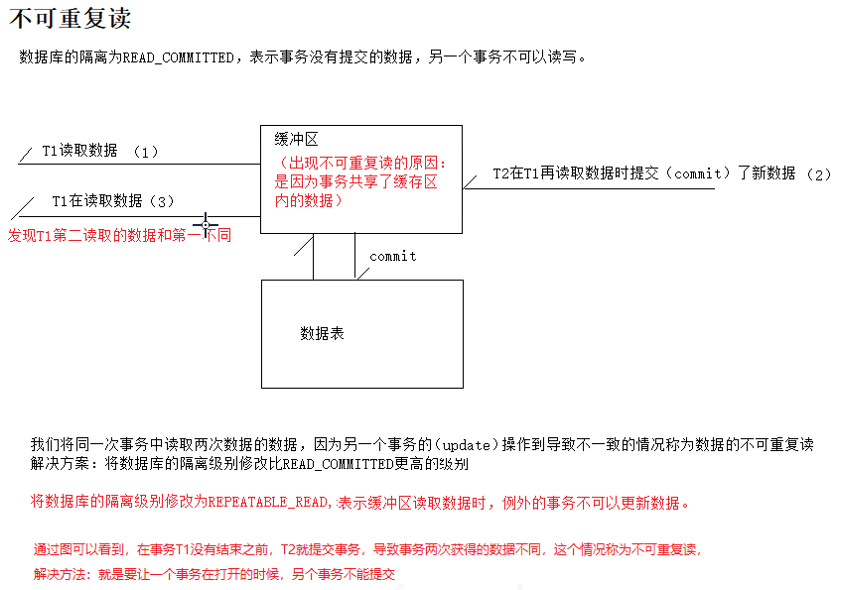
ISOLATION_REPEATABLE_READ:是否读取其他事务提交修改后的数据,解决不可以重复读问题(MySQL默认)(在一个事务操作时,另外一个事务不能提交,但是可以查询,适合!!!)
ISOLATION_SERIALIZABLE:是否读取其他提交增加后的数据,解决幻读问题(在一个事务操作时,例外一个事务不能提交,也不能查询)
首要条件:要把数据库的用户名这个字段改为唯一
① 创建一个项目并导入包

② 编写一个 Student 实体类
 1 package cn.mgy.pojo;
 2
 3 import java.util.Date;
 4
 5 public class Student {
 6
 7     private Integer studentId;// INT(20) NOT NULL AUTO_INCREMENT,
 8     private String studentName;// VARCHAR(50) NULL DEFAULT NULL,
 9     private String studentPwd;// VARCHAR(50) NULL DEFAULT NULL,
10     private Integer studentStatus;// INT(11) NULL DEFAULT NULL,
11     private Date createDate;// DATE NULL DEFAULT NULL,
12     private String studentAccount;// VARCHAR(50) NULL DEFAULT NULL,
13
14
15     @Override
16     public String toString() {
17         return "Student [studentId=" + studentId + ", studentName=" + studentName + ", studentPwd=" + studentPwd
18                 + ", studentStatus=" + studentStatus + ", createDate=" + createDate + ", studentAccount="
19                 + studentAccount + "]";
20     }
21
22     public Integer getStudentId() {
23         return studentId;
24     }
25
26     public void setStudentId(Integer studentId) {
27         this.studentId = studentId;
28     }
29
30     public String getStudentName() {
31         return studentName;
32     }
33
34     public void setStudentName(String studentName) {
35         this.studentName = studentName;
36     }
37
38     public String getStudentPwd() {
39         return studentPwd;
40     }
41
42     public void setStudentPwd(String studentPwd) {
43         this.studentPwd = studentPwd;
44     }
45
46     public Integer getStudentStatus() {
47         return studentStatus;
48     }
49
50     public void setStudentStatus(Integer studentStatus) {
51         this.studentStatus = studentStatus;
52     }
53
54     public Date getCreateDate() {
55         return createDate;
56     }
57
58     public void setCreateDate(Date createDate) {
59         this.createDate = createDate;
60     }
61
62     public String getStudentAccount() {
63         return studentAccount;
64     }
65
66     public void setStudentAccount(String studentAccount) {
67         this.studentAccount = studentAccount;
68     }
69 }
③ 编写持久层接口 StudentDao.java 和实现类 StudentDaoImpl.java
1 package cn.mgy.dao;
2
3 import cn.mgy.pojo.Student;
4
5 public interface StudentDao {
6
7     int insert(Student student);
8 }
 1 package cn.mgy.dao.impl;
 2
 3 import java.util.Date;
 4
 5 import org.springframework.jdbc.core.JdbcTemplate;
 6
 7 import cn.mgy.dao.StudentDao;
 8 import cn.mgy.pojo.Student;
 9
10 /**
11  * 使用 Spring Jdbc 子框架操作数据库
12  * @author Administrator
13  *
14  */
15 public class StudentDaoImpl implements StudentDao {
16
17     private JdbcTemplate jdbcTemplate;
18
19     public void setJdbcTemplate(JdbcTemplate jdbcTemplate) {
20         this.jdbcTemplate = jdbcTemplate;
21     }
22
23     @Override
24     public int insert(Student student) {
25         int count = jdbcTemplate.update("INSERT INTO tb_student(student_name, student_pwd, student_status, create_date, student_account) VALUES (?, ?, ?, ?, ?)", new Object[]{student.getStudentName(),student.getStudentPwd(),student.getStudentStatus(),new Date(),student.getStudentAccount()});
26         return count;
27     }
28
29 }
④ 编写业务层处理代码
 1 package cn.mgy.service;
 2
 3 import cn.mgy.dao.StudentDao;
 4 import cn.mgy.pojo.Student;
 5
 6 public class StudentService {
 7
 8     private StudentDao studentDao;
 9
10     public void setStudentDao(StudentDao studentDao) {
11         this.studentDao = studentDao;
12     }
13
14     /**
15      * 通过配置事务代理,要不全部成功要不全部失败
16      * 注意:事务代理是通过处理异常抛出来实现事务代理的,所以必须不能在该方法捕捉异常
17      * 如果捕捉了异常,事务代理失效
18      * @param student
19      */
20     public void save(Student student){
21         // 通过插入两条数据,到时将数据库的 student_name 设置为唯一的来判断事务是否生效
22         int insert = studentDao.insert(student);
23         if (insert>0) {
24             System.out.println("插入数据成功");
25         } else {
26             System.out.println("插入数据失败");
27         }
28         int insert2 = studentDao.insert(student);
29         if (insert2>0) {
30             System.out.println("插入数据成功");
31         } else {
32             System.out.println("插入数据失败");
33         }
34     }
35 }
⑤ 编写控制层代码
 1 package cn.mgy.controller;
 2
 3 import cn.mgy.pojo.Student;
 4 import cn.mgy.service.StudentService;
 5
 6 public class StudentController {
 7
 8     private StudentService studentService;
 9
10     public void setStudentService(StudentService studentService) {
11         this.studentService = studentService;
12     }
13
14     public void save() {
15         // 封装数据
16         Student student = new Student();
17         student.setStudentName("张天爱");
18         student.setStudentPwd("12345");
19         student.setStudentStatus(0);
20         student.setStudentAccount("zhangtianai");
21         studentService.save(student);
22     }
23 }
⑥ 编写配置文件
 1 <?xml version="1.0" encoding="UTF-8"?>
 2 <beans xmlns="http://www.springframework.org/schema/beans"
 3     xmlns:xsi="http://www.w3.org/2001/XMLSchema-instance"
 4     xmlns:jdbc="http://www.springframework.org/schema/jdbc"
 5     xmlns:tx="http://www.springframework.org/schema/tx"
 6     xmlns:aop="http://www.springframework.org/schema/aop"
 7     xsi:schemaLocation="http://www.springframework.org/schema/jdbc http://www.springframework.org/schema/jdbc/spring-jdbc-4.3.xsd
 8         http://www.springframework.org/schema/beans http://www.springframework.org/schema/beans/spring-beans.xsd
 9         http://www.springframework.org/schema/aop http://www.springframework.org/schema/aop/spring-aop-4.3.xsd
10         http://www.springframework.org/schema/tx http://www.springframework.org/schema/tx/spring-tx-4.3.xsd">
11
12     <!-- 配置数据源 -->
13     <bean name="dataSource" class="org.apache.commons.dbcp2.BasicDataSource">
14         <!-- 四要素 -->
15         <property name="driverClassName" value="org.gjt.mm.mysql.Driver" />
16         <property name="url" value="jdbc:mysql://localhost:3306/test" />
17         <property name="username" value="root" />
18         <property name="password" value="root" />
19         <!-- 指定初始连接数 -->
20         <property name="initialSize" value="2" />
21         <!-- 指定最大连接数 -->
22         <property name="maxIdle" value="10" />
23     </bean>
24
25     <!-- 配置 JdbcTemplate -->
26     <bean id="jdbcTemplate" class="org.springframework.jdbc.core.JdbcTemplate" >
27         <!-- 指定数据源 -->
28         <property name="dataSource" ref="dataSource" />
29     </bean>
30
31     <!-- 事务代理 -->
32     <bean id="tm" class="org.springframework.jdbc.datasource.DataSourceTransactionManager">
33         <property name="dataSource" ref="dataSource" />
34     </bean>
35
36     <!-- 配置事务代理规则 -->
37     <tx:advice id="txAdvice" transaction-manager="tm">
38         <tx:attributes>
39             <!-- save方法,事务拦截 -->
40             <tx:method name="save*" propagation="REQUIRED" isolation="DEFAULT"/>
41             <tx:method name="update*" propagation="REQUIRED" isolation="DEFAULT"/>
42             <tx:method name="delete*" propagation="REQUIRED" isolation="DEFAULT"/>
43             <!-- 查询方法使用只读事务 -->
44             <tx:method name="find*" read-only="true"/>
45             <tx:method name="get*" read-only="true"/>
46         </tx:attributes>
47     </tx:advice>
48
49     <!-- AOP 拦截事务 -->
50     <aop:config>
51         <aop:pointcut expression="execution(* cn.mgy.service.StudentService.save(..))" id="aop-pointcut"/>
52         <aop:advisor advice-ref="txAdvice" pointcut-ref="aop-pointcut"/>
53     </aop:config>
54
55     <bean id="studentDao" class="cn.mgy.dao.impl.StudentDaoImpl">
56         <property name="jdbcTemplate" ref="jdbcTemplate" />
57     </bean>
58
59     <bean id="studentService" class="cn.mgy.service.StudentService">
60         <property name="studentDao" ref="studentDao" />
61     </bean>
62
63     <bean id="studentController" class="cn.mgy.controller.StudentController">
64         <property name="studentService" ref="studentService" />
65     </bean>
66 </beans>
⑦ 编写测试代码
 1 package cn.mgy.test;
 2
 3 import org.junit.Test;
 4 import org.junit.runner.RunWith;
 5 import org.springframework.beans.factory.annotation.Autowired;
 6 import org.springframework.test.context.ContextConfiguration;
 7 import org.springframework.test.context.junit4.SpringJUnit4ClassRunner;
 8
 9 import cn.mgy.controller.StudentController;
10
11 @RunWith(SpringJUnit4ClassRunner.class)
12 @ContextConfiguration(locations="classpath:spring-data.xml")
13 public class StudentControllerTest {
14
15     @Autowired
16     private StudentController studentController;
17
18     @Test
19     public void save() {
20         try {
21             studentController.save();
22         } catch (Exception e) {
23             e.printStackTrace();
24         }
25     }
26 }
⑧ 测试结果
出错: PreparedStatementCallback; SQL [INSERT INTO tb_student(student_name, student_pwd, student_status, create_date, student_account) VALUES (?, ?, ?, ?, ?)]; Duplicate entry '张天爱' for key 'student_name'; nested exception is com.mysql.jdbc.exceptions.jdbc4.MySQLIntegrityConstraintViolationException: Duplicate entry '张天爱' for key 'student_name'


示例二十:基于注解实现事务代理(编程式事务)
① 创建一个项目并导入依赖的 jar 包

② 编写配置文件
 1 <?xml version="1.0" encoding="UTF-8"?>
 2 <beans xmlns="http://www.springframework.org/schema/beans"
 3     xmlns:xsi="http://www.w3.org/2001/XMLSchema-instance"
 4     xmlns:jdbc="http://www.springframework.org/schema/jdbc"
 5     xmlns:tx="http://www.springframework.org/schema/tx"
 6     xmlns:aop="http://www.springframework.org/schema/aop"
 7     xmlns:context="http://www.springframework.org/schema/context"
 8     xsi:schemaLocation="http://www.springframework.org/schema/jdbc http://www.springframework.org/schema/jdbc/spring-jdbc-4.3.xsd
 9         http://www.springframework.org/schema/beans http://www.springframework.org/schema/beans/spring-beans.xsd
10         http://www.springframework.org/schema/context http://www.springframework.org/schema/context/spring-context-4.3.xsd
11         http://www.springframework.org/schema/aop http://www.springframework.org/schema/aop/spring-aop-4.3.xsd
12         http://www.springframework.org/schema/tx http://www.springframework.org/schema/tx/spring-tx-4.3.xsd">
13
14     <!-- 扫描注解的对象到 Spring 容器 -->
15     <context:component-scan base-package="cn.mgy" />
16
17     <!-- 配置数据源 -->
18     <bean name="dataSource" class="org.apache.commons.dbcp2.BasicDataSource">
19         <!-- 四要素 -->
20         <property name="driverClassName" value="org.gjt.mm.mysql.Driver" />
21         <property name="url" value="jdbc:mysql://localhost:3306/test" />
22         <property name="username" value="root" />
23         <property name="password" value="root" />
24         <!-- 指定初始连接数 -->
25         <property name="initialSize" value="2" />
26         <!-- 指定最大连接数 -->
27         <property name="maxIdle" value="10" />
28     </bean>
29
30     <!-- 配置 JdbcTemplate -->
31     <bean id="jdbcTemplate" class="org.springframework.jdbc.core.JdbcTemplate" >
32         <!-- 指定数据源 -->
33         <property name="dataSource" ref="dataSource" />
34     </bean>
35
36     <!-- 事务代理 -->
37     <bean id="tm" class="org.springframework.jdbc.datasource.DataSourceTransactionManager">
38         <property name="dataSource" ref="dataSource" />
39     </bean>
40
41     <!-- 支持使用注解配置事务代理 -->
42     <tx:annotation-driven transaction-manager="tm"/>
43 </beans>
③ 编写持久层接口和实现类
1 package cn.mgy.dao;
2
3 import cn.mgy.pojo.Student;
4
5 public interface StudentDao {
6
7     int insert(Student student);
8 }
 1 package cn.mgy.dao.impl;
 2
 3 import java.util.Date;
 4
 5 import org.springframework.beans.factory.annotation.Autowired;
 6 import org.springframework.jdbc.core.JdbcTemplate;
 7 import org.springframework.stereotype.Repository;
 8
 9 import cn.mgy.dao.StudentDao;
10 import cn.mgy.pojo.Student;
11
12 /**
13  * 使用 Spring Jdbc 子框架操作数据库
14  * @author Administrator
15  *
16  */
17 @Repository
18 public class StudentDaoImpl implements StudentDao {
19
20     @Autowired
21     private JdbcTemplate jdbcTemplate;
22
23     @Override
24     public int insert(Student student) {
25         int count = jdbcTemplate.update("INSERT INTO tb_student(student_name, student_pwd, student_status, create_date, student_account) VALUES (?, ?, ?, ?, ?)", new Object[]{student.getStudentName(),student.getStudentPwd(),student.getStudentStatus(),new Date(),student.getStudentAccount()});
26         return count;
27     }
28
29 }
④ 编写业务层类
 1 package cn.mgy.service;
 2
 3 import org.springframework.beans.factory.annotation.Autowired;
 4 import org.springframework.stereotype.Service;
 5 import org.springframework.transaction.annotation.Isolation;
 6 import org.springframework.transaction.annotation.Propagation;
 7 import org.springframework.transaction.annotation.Transactional;
 8
 9 import cn.mgy.dao.StudentDao;
10 import cn.mgy.pojo.Student;
11
12 @Service
13 public class StudentService {
14
15     @Autowired
16     private StudentDao studentDao;
17
18     /**
19      * 通过配置事务代理,要不全部成功要不全部失败
20      * 注意:事务代理是通过处理异常抛出来实现事务代理的,所以必须不能在该方法捕捉异常
21      * 如果捕捉了异常,事务代理失效
22      * @param student
23      */
24     @Transactional(isolation=Isolation.DEFAULT,propagation=Propagation.REQUIRED)
25     public void save(Student student){
26         // 通过插入两条数据,到时将数据库的 student_name 设置为唯一的来判断事务是否生效
27         int insert = studentDao.insert(student);
28         if (insert>0) {
29             System.out.println("插入数据成功");
30         } else {
31             System.out.println("插入数据失败");
32         }
33         int insert2 = studentDao.insert(student);
34         if (insert2>0) {
35             System.out.println("插入数据成功");
36         } else {
37             System.out.println("插入数据失败");
38         }
39     }
40 }
⑤ 编写控制层类
 1 package cn.mgy.controller;
 2
 3 import org.springframework.beans.factory.annotation.Autowired;
 4 import org.springframework.stereotype.Controller;
 5
 6 import cn.mgy.pojo.Student;
 7 import cn.mgy.service.StudentService;
 8
 9 @Controller
10 public class StudentController {
11
12     @Autowired
13     private StudentService studentService;
14
15     public void save() {
16         // 封装数据
17         Student student = new Student();
18         student.setStudentName("张天爱");
19         student.setStudentPwd("12345");
20         student.setStudentStatus(0);
21         student.setStudentAccount("zhangtianai");
22         studentService.save(student);
23     }
24 }
⑥ 编写测试类
 1 package cn.mgy.test;
 2
 3 import org.junit.Test;
 4 import org.junit.runner.RunWith;
 5 import org.springframework.beans.factory.annotation.Autowired;
 6 import org.springframework.test.context.ContextConfiguration;
 7 import org.springframework.test.context.junit4.SpringJUnit4ClassRunner;
 8
 9 import cn.mgy.controller.StudentController;
10
11 @RunWith(SpringJUnit4ClassRunner.class)
12 @ContextConfiguration(locations="classpath:spring-data.xml")
13 public class StudentControllerTest {
14
15     @Autowired
16     private StudentController studentController;
17
18     @Test
19     public void save() {
20         try {
21             studentController.save();
22         } catch (Exception e) {
23             e.printStackTrace();
24         }
25     }
26 }
⑦ 测试结果

如果想使用完全注解,可以把配置文件修改为配置类:
 1 package cn.mgy.config;
 2
 3 import javax.sql.DataSource;
 4
 5 import org.apache.commons.dbcp2.BasicDataSource;
 6 import org.springframework.context.annotation.Bean;
 7 import org.springframework.context.annotation.ComponentScan;
 8 import org.springframework.context.annotation.Configuration;
 9 import org.springframework.jdbc.core.JdbcTemplate;
10 import org.springframework.jdbc.datasource.DataSourceTransactionManager;
11 import org.springframework.transaction.annotation.EnableTransactionManagement;
12
13 @Configuration
14 // 表示启用支持注解的事务代理  <tx:annotation-driven transaction-manager="tm" />
15 @EnableTransactionManagement
16 // 表示支持扫描组件 <context:component-scan base-package="cn.mgy" />
17 @ComponentScan(basePackages="cn.mgy")
18 public class DataConfig {
19
20     /**
21      * 获得数据库连接池
22      * @return
23      */
24     @Bean(name="dataSource")
25     public DataSource getDataSource() {
26         BasicDataSource dataSource = new BasicDataSource();
27         dataSource.setDriverClassName("org.gjt.mm.mysql.Driver");
28         dataSource.setUrl("jdbc:mysql://localhost:3306/test");
29         dataSource.setUsername("root");
30         dataSource.setPassword("root");
31         dataSource.setInitialSize(2);
32         dataSource.setMaxIdle(10);
33         return dataSource;
34     }
35
36     /**
37      * 获得 JdbcTemplate
38      * @return
39      */
40     @Bean(name="jdbcTemplate")
41     public JdbcTemplate geJdbcTemplate() {
42         JdbcTemplate jdbcTemplate = new JdbcTemplate();
43         // 必须指定 jdbcTemplate 的数据源
44         jdbcTemplate.setDataSource(getDataSource());
45         return jdbcTemplate;
46     }
47
48     @Bean
49     public DataSourceTransactionManager getDataSourceTransactionManager() {
50         DataSourceTransactionManager tm = new DataSourceTransactionManager();
51         // 一定要指定事务代理的数据源
52         tm.setDataSource(getDataSource());
53         return tm;
54     }
55 }
测试类修改为:
 1 package cn.mgy.test;
 2
 3 import org.junit.Test;
 4 import org.junit.runner.RunWith;
 5 import org.springframework.beans.factory.annotation.Autowired;
 6 import org.springframework.test.context.ContextConfiguration;
 7 import org.springframework.test.context.junit4.SpringJUnit4ClassRunner;
 8
 9 import cn.mgy.config.DataConfig;
10 import cn.mgy.controller.StudentController;
11
12 @RunWith(SpringJUnit4ClassRunner.class)
13 @ContextConfiguration(classes=DataConfig.class)
14 public class StudentControllerTest {
15
16     @Autowired
17     private StudentController studentController;
18
19     @Test
20     public void save() {
21         try {
22             studentController.save();
23         } catch (Exception e) {
24             e.printStackTrace();
25         }
26     }
27 }
示例二十 一:SpringMVC 配置流程---基于 XML 的配置
为什么要学习SpringMVC?
SpringMVC 不仅实现了 MVC 的模式,它还是一个框架,所以提供了一些功能:
(1)支持直接一个方法对应一个请求
(2)支持数据的自动封装
(3)自动支持上传组件
(4)自动支持 JSON 的转成
...
SpringMVC 配置流程图:

概念说明:
(1)核心控制器:因为 SpringMVC 为了实现一个请求对应一个方法的功能,所以必须要有一个 Web 组件来拦截所有的请求。这个拦截并处理所有请求的 Web 组件称为核心控制器。
(2)业务控制器(Controller):在 SpringMVC 经过核心控制器跳转到一个处理自身需求业务的普通类,这个类称为业务控制器。
配置流程图说明:
(1)我们必须在网站的入口(web.xml,WEB描述符)配置一个核心控制器,拦截所有的请求
(2)核心控制器通过加载 Spring 配置文件,获得请求路径对应业务控制的方法
(3)业务控制器的方法返回一个 ModelAndView 的对象给核心控制器
(4)核心控制器根据业务控制器再加载配置的视图解释器跳转到对应的返回视图
① 创建一个 web 项目并导入依赖的 jar 包

② 创建一个请求的发送界面 index.jsp
 1 <%@ page language="java" contentType="text/html; charset=UTF-8"
 2     pageEncoding="UTF-8"%>
 3 <!DOCTYPE html PUBLIC "-//W3C//DTD HTML 4.01 Transitional//EN" "http://www.w3.org/TR/html4/loose.dtd">
 4 <html>
 5 <head>
 6 <meta http-equiv="Content-Type" content="text/html; charset=UTF-8">
 7 <title>开始界面</title>
 8 </head>
 9 <body>
10     <a href="${pageContext.request.contextPath }/say.mvc">say hello</a>
11 </body>
12 </html>
③ 在 web.xml 配置核心控制器 web.xml
 1 <?xml version="1.0" encoding="UTF-8"?>
 2 <web-app version="3.1"
 3     xmlns="http://xmlns.jcp.org/xml/ns/javaee"
 4     xmlns:xml="http://www.w3.org/XML/1998/namespace"
 5     xmlns:xsi="http://www.w3.org/2001/XMLSchema-instance"
 6     xsi:schemaLocation="http://xmlns.jcp.org/xml/ns/javaee http://xmlns.jcp.org/xml/ns/javaee/web-app_3_1.xsd ">
 7
 8     <!-- 配置过滤器 -->
 9     <filter>
10         <filter-name>characterEncodingFilter</filter-name>
11         <filter-class>org.springframework.web.filter.CharacterEncodingFilter</filter-class>
12         <!-- 配置过滤器编码 -->
13         <init-param>
14             <param-name>encoding</param-name>
15             <param-value>UTF-8</param-value>
16         </init-param>
17     </filter>
18     <filter-mapping>
19         <filter-name>characterEncodingFilter</filter-name>
20         <url-pattern>/*</url-pattern>
21     </filter-mapping>
22
23     <!-- 配置核心控制器 -->
24     <servlet>
25         <servlet-name>dispatcherServlet</servlet-name>
26         <servlet-class>org.springframework.web.servlet.DispatcherServlet</servlet-class>
27     </servlet>
28     <servlet-mapping>
29         <servlet-name>dispatcherServlet</servlet-name>
30         <url-pattern>*.mvc</url-pattern>
31     </servlet-mapping>
32 </web-app>
④ 创建一个业务控制器 HelloController.java
 1 package cn.mgy.controller;
 2
 3 import javax.servlet.http.HttpServletRequest;
 4 import javax.servlet.http.HttpServletResponse;
 5
 6 import org.springframework.web.servlet.ModelAndView;
 7 import org.springframework.web.servlet.mvc.multiaction.MultiActionController;
 8
 9 /**
10  * 业务控制器必须继承一个类 MultiActionController 或它的父类
11  * @author Administrator
12  *
13  */
14 @SuppressWarnings("deprecation")
15 public class HelloController extends MultiActionController {
16
17     /**
18      * 执行方法的参数是固定 HttpServletRequest request, HttpServletResponse response
19      * @param request
20      * @param response
21      * @return
22      */
23     public ModelAndView say(HttpServletRequest request, HttpServletResponse response) {
24         System.out.println("--你好世界--");
25         ModelAndView mv = new ModelAndView();
26         // 设置返回的视图
27         mv.setViewName("/view/hello.jsp");
28         mv.addObject("msg", "张三");
29         return mv;
30     }
31 }
⑤ 创建一个 Spring 的配置文件 dispatcherServlet-servlet.xml
说明:
默认的 Spring 配置文件放在 WEB-INF 下,名为 {servlet-name}-servlet.xml ,其中 {servlet-name} 指的是核心控制器配置的名字,如:dispathcherServlet-servlet.xml
 1 <?xml version="1.0" encoding="UTF-8"?>
 2 <beans xmlns="http://www.springframework.org/schema/beans"
 3     xmlns:xsi="http://www.w3.org/2001/XMLSchema-instance"
 4     xsi:schemaLocation="http://www.springframework.org/schema/beans http://www.springframework.org/schema/beans/spring-beans.xsd">
 5
 6     <!--
 7         请求路径与业务控制器的执行方法的关系
 8         请求与执行方法的规则:
 9             SpringMVC 会根据请求的名字:/say.mvc 的 say 自动去找到 say 这个方法
10      -->
11      <bean name="/say.mvc" class="cn.mgy.controller.HelloController"></bean>
12
13     <!-- 视图解释器,不用配置,默认已经配置了 jsp 视图解释器 -->
14 </beans>
⑥ 创建一个返回的视图界面 hello.jsp
 1 <%@ page language="java" contentType="text/html; charset=UTF-8"
 2     pageEncoding="UTF-8"%>
 3 <!DOCTYPE html PUBLIC "-//W3C//DTD HTML 4.01 Transitional//EN" "http://www.w3.org/TR/html4/loose.dtd">
 4 <html>
 5 <head>
 6 <meta http-equiv="Content-Type" content="text/html; charset=UTF-8">
 7 <title>欢迎界面</title>
 8 </head>
 9 <body>
10     ${msg}欢迎您
11 </body>
12 </html>
⑦ 测试结果


示例二十二:SpringMVC 配置流程--基于注解的配置
说明:
映射路径:@RequestMapping
映射路径是什么?答:所谓的映射路径,就是匹配请求路径和执行方法关系的路径
请求路径:http://localhost:8080/spring-demo-22-springMVC-annotation/say.mvc
映射路径:@RequestMapping(value="/say.mvc")
注意:基于注解的映射路径可以忽略前后缀
如:
@RequestMapping(value="/say.mvc")
等同于:
(1)@RequestMapping(value="say.mvc")
(2)@RequestMapping(value="/say")【推荐使用】
(3)@RequestMapping(value="say")
SpringMVC 框架支持三种映射路径:标准映射路径、带通配符的映射路径、带路径变量的映射路劲
(1)标准的映射路径:就是不带通配符、不带路径变量的映射路径。如:@RequestMapping(value="/say.mvc")
(2)带通配符的映射路径:所谓的带通配符的映射路径,就是在映射路径设置通配符,让一个路径可以接收多个可以匹配的请求
| 通配符 | 说明 | 例子 |
| ? | 匹配一个字符,只能是一个字符 |
前台的请求路径:http://localhost:8080/spring-demo-22-springMVC-annotation/say1.mvc http://localhost:8080/spring-demo-22-springMVC-annotation/saya.mvc http://localhost:8080/spring-demo-22-springMVC-annotation/saybb.mvc (与后台映射路径不匹配) 后台映射路径:@RequestMapping(value="/say?") |
| * | 匹配同一级路径目录 0~N 个字符 |
前台的请求路径:http://localhost:8080/spring-demo-22-springMVC-annotation/say.mvc http://localhost:8080/spring-demo-22-springMVC-annotation/saya.mvc http://localhost:8080/spring-demo-22-springMVC-annotation/saybb.mvc http://localhost:8080/spring-demo-22-springMVC-annotation/aa/say.mvc(与后台映射路径不匹配) 后台映射路径:@RequestMapping(value="/say*") |
| ** | 匹配多级路径目录 |
前台的请求路径:http://localhost:8080/spring-demo-22-springMVC-annotation/say.mvc http://localhost:8080/spring-demo-22-springMVC-annotation/saya.mvc (与后台映射路径不匹配) http://localhost:8080/spring-demo-22-springMVC-annotation/saybb.mvc (与后台映射路径不匹配) http://localhost:8080/spring-demo-22-springMVC-annotation/aa/say.mvc 后台映射路径:@RequestMapping(value="**/say") |
通配符的优先级:通配范围小的通配符优先级大于通配范围大的通配符
如:没有通配符 > ? > * > **
因此被 ? 号通配的,使用 * 号就不能通配,被 * 号通配的,使用 ** 号就不能通配
路径目录是什么?答:请求路径每一个 / 就是一个路径目录
如:http://localhost:8080/spring-demo-22-springMVC-annotation/aa/bb/say.mvc
(3)带路径变量映射路径:所谓的路径变量,就是将参数放在路径里面,而不是放在 ?的后面
例子:
前台代码:
1 <a href="${pageContext.request.contextPath }/zhangsan/say.mvc">say hello</a><br/>
后台代码:
 1 package cn.mgy.controller;
 2
 3 import org.springframework.stereotype.Controller;
 4 import org.springframework.web.bind.annotation.PathVariable;
 5 import org.springframework.web.bind.annotation.RequestMapping;
 6 import org.springframework.web.servlet.ModelAndView;
 7
 8 @Controller
 9 public class PatVarController {
10
11     /**
12      * 获得路径的变量
13      * ${pageContext.request.contextPath }/zhangsan/say.mvc
14      * 如何让执行方法获得请求路径的zhangsan
15      * @param name
16      * @return
17      */
18     @RequestMapping(value="{name}/say")
19     public ModelAndView say(@PathVariable String name){
20         System.out.println("-你好世界!-"+name);
21         ModelAndView mv=new ModelAndView();
22         //设置返回的视图
23         mv.setViewName("/hello.jsp");
24         mv.addObject("msg", "张三");
25         return mv;
26     }
27 }
路径变量的作用:主要是用于实现伪静态。所谓的伪静态就是看上去是静态页面,实际上是动态页面。如果路径有了 ?,一定是动态页面了,所以需要将 ?后面的参数放在路径里面。
基于 RestFul 风格的需要,不建议后缀有 ?的参数。
SpringMVC 提供了两种限制:请求方法限制、参数限制
(1)请求方法限制:就是设置请求的 method 类型。如果发送过来的请求方式和方法设置的 method 不一样,就不能访问执行方法。
前台代码:
1 <form action="${pageContext.request.contextPath }/login.mvc" method="get">
2     <input type="submit" value="登录">
3   </form>
后台代码:
1 /**
2   * 接收的请求,必须是POST
3   * @return
4   */
5 @RequestMapping(value="login",method=RequestMethod.POST)
6 public String login(){
7     System.out.println("-登录-");
8     return "/login.jsp";
9 }
前台发送的是 GET 请求,而方法限制是 POST 请求,所以请求无法执行方法
后台方法限制可以配置多个请求方法:
1 @RequestMapping(value="login",method={RequestMethod.GET,RequestMethod.POST})
2     public String login(){
3         System.out.println("-登录-");
4         return "/login.jsp";
5     }
(2)参数限制:就是请求里面必须包括哪些参数、或不包括哪些参数,必须包含哪些参数值、或必须不能包含哪些参数值
参数限制格式:
① 参数必须包括:params={"username","password"}
① 参数不能包括:params={"!userid"}
① 参数值必须是指定的值:params={"username=zhangsan"}
① 参数值必须不是指定的值:params={"password!=123"}
前台代码:
1 <form action="${pageContext.request.contextPath }/login2.mvc" method="post">
2     <input type="submit" value="登录">
3  </form>
后台代码:
1 /**
2     * 需求:登录时必须包括用户名,密码
3     * @return
4     */
5 @RequestMapping(value="login2",params={"username","password"})
6 public String login2(){
7     System.out.println("-登录-");
8     return "/login.jsp";
9 }
由于前台没有指定后天台要求的参数,所以报错:

需要指定的参数,修改前台代码:
1 <form action="${pageContext.request.contextPath }/login2.mvc" method="post">
2    用户名: <input name="username" type="text"><br/>
3    密码: <input name="password" type="text"><br/>
4    <input type="submit" value="登录">
5  </form>
参数值的限定
前台代码:
1 <form action="${pageContext.request.contextPath }/login4.mvc" method="post">
2 <!--   用户编号:<input name="userid" type="text"><br/> -->
3    用户名: <input name="username" type="text"><br/>
4    密码: <input name="password" type="text"><br/>
5    <input type="submit" value="登录">
6  </form>
后台代码:
1 /**
2   * 需求:登录时必须包括用户名,密码,不包括userid,规定登录的用户名是zhangsan,密码:不是123就可以
3   * @return
4   */
5 @RequestMapping(value="login4",params={"username=zhangsan","password!=123","!userid"})
6 public String login4(){
7     System.out.println("-登录-");
8     return "/login.jsp";
9 }
命名空间:当 @RequestMapping 放在类上面,这个时候 @RequestMapping 的值作为命名空间使用。
命名空间的作用:在开发过程中,可以不同的 Controller 会出现方法的映射路径是一样的。这时候,通过命名空间是可以解决。所以,命名空间就是为了解决不同的 Controller,请求冲突的问题的。
前台代码:
1 <form action="${pageContext.request.contextPath }/user/login.mvc" method="post">
2     <input type="submit" value="登录">
3 </form>
后台代码:
 1 package cn.mgy.controller;
 2
 3 import org.springframework.stereotype.Controller;
 4 import org.springframework.web.bind.annotation.RequestMapping;
 5 import org.springframework.web.bind.annotation.RequestMethod;
 6
 7 @Controller
 8 //在类上面加了一个RequestMapping注解,意味着,这个业务控制器的所有执行方法的请求路径都要增加一个前缀/user
 9 @RequestMapping(value="user")
10 public class UserController {
11     /**
12      * 接收的请求,必须是POST
13      * @return
14      */
15     @RequestMapping(value="login",method={RequestMethod.GET,RequestMethod.POST})
16     public String login(){
17         System.out.println("-登录-user");
18         return "/login.jsp";
19     }
20
21
22 }
数据绑定:SpringMVC 里面,将请求带过来的数据绑定到执行方法的参数变量称为数据绑定
内置绑定类与对象有哪些?
包含 ServletAPI:
(1)HttpServletRequest
(2)HttpServletResponse
(3)HttpSession
还包含两个 SpringMVC 内置的对象:
(4)Model
(5)ModelMap
Model 和 ModelMap 默认都是存储在 Request 请求作用域的数据的对象
总结:内置绑定的这几个 Servlet 对象,用户获得页面表单请求的数据是非常麻烦的。SpringMVC 建议这些内置的对象一般用于返回数据到页面,而不是用户获得页面的表单数据。
① 创建一个 web 项目并导入依赖的 jar 包

② 创建一个请求的发送界面 index.jsp
 1 <%@ page language="java" contentType="text/html; charset=UTF-8"
 2     pageEncoding="UTF-8"%>
 3 <!DOCTYPE html PUBLIC "-//W3C//DTD HTML 4.01 Transitional//EN" "http://www.w3.org/TR/html4/loose.dtd">
 4 <html>
 5 <head>
 6 <meta http-equiv="Content-Type" content="text/html; charset=UTF-8">
 7 <title>开始界面</title>
 8 </head>
 9 <body>
10     <a href="${pageContext.request.contextPath }/say.mvc">say hello</a> <br />
11     <a href="${pageContext.request.contextPath }/say1.mvc">say1 hello</a>
12 </body>
13 </html>
③ 在 web.xml 配置核心控制器
 1 <?xml version="1.0" encoding="UTF-8"?>
 2 <web-app version="3.1"
 3     xmlns="http://xmlns.jcp.org/xml/ns/javaee"
 4     xmlns:xml="http://www.w3.org/XML/1998/namespace"
 5     xmlns:xsi="http://www.w3.org/2001/XMLSchema-instance"
 6     xsi:schemaLocation="http://xmlns.jcp.org/xml/ns/javaee http://xmlns.jcp.org/xml/ns/javaee/web-app_3_1.xsd ">
 7
 8     <!-- 配置过滤器 -->
 9     <filter>
10         <filter-name>characterEncodingFilter</filter-name>
11         <filter-class>org.springframework.web.filter.CharacterEncodingFilter</filter-class>
12         <!-- 配置过滤器编码 -->
13         <init-param>
14             <param-name>encoding</param-name>
15             <param-value>UTF-8</param-value>
16         </init-param>
17     </filter>
18     <filter-mapping>
19         <filter-name>characterEncodingFilter</filter-name>
20         <url-pattern>/*</url-pattern>
21     </filter-mapping>
22
23     <!-- 配置核心控制器 -->
24     <servlet>
25         <servlet-name>dispatcherServlet</servlet-name>
26         <servlet-class>org.springframework.web.servlet.DispatcherServlet</servlet-class>
27         <!-- 加载 Spring 配置文件 -->
28         <init-param>
29             <param-name>contextConfigLocation</param-name>
30             <param-value>classpath:spring-config.xml</param-value>
31         </init-param>
32         <!-- 启动网站的时候,Servlet 就创建实例 -->
33         <load-on-startup>1</load-on-startup>
34     </servlet>
35     <servlet-mapping>
36         <servlet-name>dispatcherServlet</servlet-name>
37         <!--
38             不可以将拦截路径配置为 /*,因为这样意味着 servlet 拦截所有的请求以及动态页面(JSP),
39             但 SpringMVC 是没有对 jsp 页面进行特殊处理的。
40             如使用 /*. 代表 jsp 无法访问
41         -->
42         <url-pattern>*.mvc</url-pattern>
43     </servlet-mapping>
44 </web-app>
④ 创建一个 Spring 的配置文件 spring-config.xml
 1 <?xml version="1.0" encoding="UTF-8"?>
 2 <beans xmlns="http://www.springframework.org/schema/beans"
 3     xmlns:xsi="http://www.w3.org/2001/XMLSchema-instance"
 4     xmlns:mvc="http://www.springframework.org/schema/mvc"
 5     xmlns:context="http://www.springframework.org/schema/context"
 6     xsi:schemaLocation="http://www.springframework.org/schema/mvc http://www.springframework.org/schema/mvc/spring-mvc-4.3.xsd
 7         http://www.springframework.org/schema/beans http://www.springframework.org/schema/beans/spring-beans.xsd
 8         http://www.springframework.org/schema/context http://www.springframework.org/schema/context/spring-context-4.3.xsd">
 9
10     <!--
11         启动注解默认配置
12         如果不加这句话,就会将注解有的,而 xml 配置没有的功能失效,如:
13         (1)json 的自动转换
14         (2)上传组件不能用
15         (3)mvc 开头的部分组件不能使用
16      -->
17      <mvc:annotation-driven />
18
19      <!-- 组件扫描器,将加了组解的组件对象加入到 Spring 容器 -->
20      <context:component-scan base-package="cn.mgy" />
21
22      <!-- 视图解释器,不用配置,默认已经配置了 jsp 视图解释器 -->
23 </beans>
⑤ 创建一个业务控制器 HelloController.java
 1 package cn.mgy.controller;
 2
 3 import org.springframework.stereotype.Controller;
 4 import org.springframework.ui.Model;
 5 import org.springframework.web.bind.annotation.RequestMapping;
 6 import org.springframework.web.servlet.ModelAndView;
 7
 8 /**
 9  * 业务控制器
10  * 必须要加上控制层组件注解 @Controller,<context:component-scan> 才可以将该类扫描到 Spring 容器
11  * @author Administrator
12  *
13  */
14 @Controller
15 public class HelloController {
16
17     /**
18      * 将映射路径配置在执行方法的上面
19      * @return
20      */
21     @RequestMapping(value="/say.mvc")
22     public ModelAndView say() {
23         System.out.println("--你好世界--");
24         ModelAndView mv = new ModelAndView();
25         // 设置返回的视图
26         mv.setViewName("/view/hello.jsp");
27         mv.addObject("msg", "张三");
28         return mv;
29     }
30
31     @RequestMapping(value="/say1.mvc")
32     public String say1(Model model) {
33         System.out.println("--你好世界--");
34         // 参数的内置对象
35         model.addAttribute("msg", "张三1");
36         return "/view/hello.jsp";
37     }
38 }
⑥ 创建一个返回的视图界面
 1 <%@ page language="java" contentType="text/html; charset=UTF-8"
 2     pageEncoding="UTF-8"%>
 3 <!DOCTYPE html PUBLIC "-//W3C//DTD HTML 4.01 Transitional//EN" "http://www.w3.org/TR/html4/loose.dtd">
 4 <html>
 5 <head>
 6 <meta http-equiv="Content-Type" content="text/html; charset=UTF-8">
 7 <title>欢迎界面</title>
 8 </head>
 9 <body>
10     ${msg}欢迎您
11 </body>
12 </html>
⑦ 测试结果


示例二十三:视图解释器
① 创建一个 web 项目并导入依赖的 jar 包
② 创建一个请求的发送界面
 1 <%@ page language="java" contentType="text/html; charset=UTF-8"
 2     pageEncoding="UTF-8"%>
 3 <!DOCTYPE html PUBLIC "-//W3C//DTD HTML 4.01 Transitional//EN" "http://www.w3.org/TR/html4/loose.dtd">
 4 <html>
 5 <head>
 6 <meta http-equiv="Content-Type" content="text/html; charset=UTF-8">
 7 <title>开始界面</title>
 8 </head>
 9 <body>
10   <p>用户1登录</p>
11   <form action="${pageContext.request.contextPath }/user/login.mvc" method="post">
12            用户名:<input name="username" type="text">
13            密码:<input name="password" type="text">
14     <input type="submit" value="登录">
15   </form>
16   <p>用户2登录</p>
17   <form action="${pageContext.request.contextPath }/user/login2.mvc" method="post">
18             用户名:<input name="username" type="text">
19             密码:<input name="password" type="text">
20      <input type="submit" value="登录">
21   </form>
22 </body>
23 </html>
③ 在 web.xml 配置核心控制器
 1 <?xml version="1.0" encoding="UTF-8"?>
 2 <web-app version="3.1"
 3     xmlns="http://xmlns.jcp.org/xml/ns/javaee"
 4     xmlns:xml="http://www.w3.org/XML/1998/namespace"
 5     xmlns:xsi="http://www.w3.org/2001/XMLSchema-instance"
 6     xsi:schemaLocation="http://xmlns.jcp.org/xml/ns/javaee http://xmlns.jcp.org/xml/ns/javaee/web-app_3_1.xsd ">
 7
 8     <!-- 配置过滤器 -->
 9     <filter>
10         <filter-name>characterEncodingFilter</filter-name>
11         <filter-class>org.springframework.web.filter.CharacterEncodingFilter</filter-class>
12         <!-- 配置过滤器编码 -->
13         <init-param>
14             <param-name>encoding</param-name>
15             <param-value>UTF-8</param-value>
16         </init-param>
17     </filter>
18     <filter-mapping>
19         <filter-name>characterEncodingFilter</filter-name>
20         <url-pattern>/*</url-pattern>
21     </filter-mapping>
22
23     <!-- 配置核心控制器 -->
24     <servlet>
25         <servlet-name>dispatcherServlet</servlet-name>
26         <servlet-class>org.springframework.web.servlet.DispatcherServlet</servlet-class>
27         <!-- 加载 Spring 配置文件 -->
28         <init-param>
29             <param-name>contextConfigLocation</param-name>
30             <param-value>classpath:spring-config.xml</param-value>
31         </init-param>
32         <!-- 启动网站的时候,Servlet 就创建实例 -->
33         <load-on-startup>1</load-on-startup>
34     </servlet>
35     <servlet-mapping>
36         <servlet-name>dispatcherServlet</servlet-name>
37         <!--
38             不可以将拦截路径配置为 /*,因为这样意味着 servlet 拦截所有的请求以及动态页面(JSP),
39             但 SpringMVC 是没有对 jsp 页面进行特殊处理的。
40             如使用 /*. 代表 jsp 无法访问
41         -->
42         <url-pattern>*.mvc</url-pattern>
43     </servlet-mapping>
44 </web-app>
④ 创建一个 Spring 的配置文件
 1 <?xml version="1.0" encoding="UTF-8"?>
 2 <beans xmlns="http://www.springframework.org/schema/beans"
 3     xmlns:xsi="http://www.w3.org/2001/XMLSchema-instance"
 4     xmlns:mvc="http://www.springframework.org/schema/mvc"
 5     xmlns:context="http://www.springframework.org/schema/context"
 6     xsi:schemaLocation="http://www.springframework.org/schema/mvc http://www.springframework.org/schema/mvc/spring-mvc-4.3.xsd
 7         http://www.springframework.org/schema/beans http://www.springframework.org/schema/beans/spring-beans.xsd
 8         http://www.springframework.org/schema/context http://www.springframework.org/schema/context/spring-context-4.3.xsd">
 9
10     <!--
11         启动注解默认配置
12         如果不加这句话,就会将注解有的,而 xml 配置没有的功能失效,如:
13         (1)json 的自动转换
14         (2)上传组件不能用
15         (3)mvc 开头的部分组件不能使用
16      -->
17      <mvc:annotation-driven />
18
19      <!-- 组件扫描器,将加了组解的组件对象加入到 Spring 容器 -->
20      <context:component-scan base-package="cn.mgy" />
21
22     <!-- 配置视图解释器 -->
23     <!-- 内置的 jsp 视图解释器 -->
24     <bean class="org.springframework.web.servlet.view.InternalResourceViewResolver">
25         <!--
26             如果使用 InternalResourceView 是不支持 jstl,所以需要配置 jstl 的 JstlView
27             <property name="viewClass" value="org.springframework.web.servlet.view.JstlView" />
28             注意事项:如果要支持 jstl,还要加入 jstl 的 jar 包
29          -->
30          <property name="prefix" value="/WEB-INF/views/jsp/" />
31          <property name="suffix" value=".jsp" />
32     </bean>
33 </beans>
⑤ 创建一个业务控制器
 1 package cn.mgy.controller;
 2
 3 import javax.servlet.http.HttpSession;
 4
 5 import org.springframework.stereotype.Controller;
 6 import org.springframework.web.bind.annotation.RequestMapping;
 7 import org.springframework.web.bind.annotation.RequestMethod;
 8
 9 /**
10  * 业务控制器
11  * 必须要加上控制层组件注解 @Controller,<context:component-scan> 才可以将该类扫描到 Spring 容器
12  * @author Administrator
13  *
14  */
15 @Controller
16 @RequestMapping(value="/user")
17 public class UserController {
18
19     /**
20      * 将映射路径配置在执行方法的上面
21      * @return
22      */
23     @RequestMapping(value="/login",method=RequestMethod.POST)
24     public String login(HttpSession session, String password, String username) {
25         System.out.println("--登录-user-"+username);
26         System.out.println("用户名:"+username);
27         System.out.println("密码:"+password);
28         session.setAttribute("username", username);
29         session.setAttribute("password", password);
30         /**
31          * WEB-INF/views/jsp/hello.jsp 返回的路径太长
32          * 想法:
33          *     将 /WEB-INF/views/jsp/ 忽略
34          *     后缀的 .jsp 忽略
35          *     可以通过重新配置视图解释器来忽略它们
36          */
37         return "hello";
38     }
39
40     /**
41      * 将映射路径配置在执行方法的上面
42      * @return
43      */
44     @RequestMapping(value="/login2",method=RequestMethod.POST)
45     public String login2(HttpSession session, String password, String username) {
46         System.out.println("--登录-user-"+username);
47         System.out.println("用户名:"+username);
48         System.out.println("密码:"+password);
49         session.setAttribute("username", username);
50         session.setAttribute("password", password);
51         /**
52          * WEB-INF/views/jsp/hello.jsp 返回的路径太长
53          * 想法:
54          *     将 /WEB-INF/views/jsp/ 忽略
55          *     后缀的 .jsp 忽略
56          *     可以通过重新配置视图解释器来忽略它们
57          * 如果要返回到 webapp 下的页面?
58          * 答:如果遇到跳转的路径不是前缀设定的路径,可以使用请求转发 forward: 或者重定向 redirect: 两个关键字忽略视图解释器前后缀的配置
59          */
60         return "redirect:/hello.jsp";
61     }
62 }
⑥ 创建一个在 /WEB-INF/views/jsp/hello.jsp 返回的视图界面
 1 <%@ page language="java" contentType="text/html; charset=UTF-8"
 2     pageEncoding="UTF-8"%>
 3 <!DOCTYPE html PUBLIC "-//W3C//DTD HTML 4.01 Transitional//EN" "http://www.w3.org/TR/html4/loose.dtd">
 4 <html>
 5 <head>
 6 <meta http-equiv="Content-Type" content="text/html; charset=UTF-8">
 7 <title>WEB-INF 下的欢迎界面</title>
 8 </head>
 9 <body>
10     ${sessionScope.username}欢迎您
11 </body>
12 </html>
⑦ 创建一个在 /webapp/hello.jsp 返回的视图界面
 1 <%@ page language="java" contentType="text/html; charset=UTF-8"
 2     pageEncoding="UTF-8"%>
 3 <!DOCTYPE html PUBLIC "-//W3C//DTD HTML 4.01 Transitional//EN" "http://www.w3.org/TR/html4/loose.dtd">
 4 <html>
 5 <head>
 6 <meta http-equiv="Content-Type" content="text/html; charset=UTF-8">
 7 <title>webapp 路径下的页面的欢迎界面</title>
 8 </head>
 9 <body>
10     ${sessionScope.username}欢迎您
11 </body>
12 </html>
⑦ 测试结果


也可以使用 mvc 命名空间下标签配置视图解释器:
 1 <?xml version="1.0" encoding="UTF-8"?>
 2 <beans xmlns="http://www.springframework.org/schema/beans"
 3     xmlns:xsi="http://www.w3.org/2001/XMLSchema-instance"
 4     xmlns:mvc="http://www.springframework.org/schema/mvc"
 5     xmlns:context="http://www.springframework.org/schema/context"
 6     xsi:schemaLocation="http://www.springframework.org/schema/mvc http://www.springframework.org/schema/mvc/spring-mvc-4.3.xsd
 7         http://www.springframework.org/schema/beans http://www.springframework.org/schema/beans/spring-beans.xsd
 8         http://www.springframework.org/schema/context http://www.springframework.org/schema/context/spring-context-4.3.xsd">
 9
10     <!--
11         启动注解默认配置
12         如果不加这句话,就会将注解有的,而 xml 配置没有的功能失效,如:
13         (1)json 的自动转换
14         (2)上传组件不能用
15         (3)mvc 开头的部分组件不能使用
16      -->
17      <mvc:annotation-driven />
18
19      <!-- 组件扫描器,将加了组解的组件对象加入到 Spring 容器 -->
20      <context:component-scan base-package="cn.mgy" />
21
22     <!-- 配置视图解释器 -->
23     <!-- 内置的 jsp 视图解释器 -->
24     <!-- <bean class="org.springframework.web.servlet.view.InternalResourceViewResolver">
25
26             如果使用 InternalResourceView 是不支持 jstl,所以需要配置 jstl 的 JstlView
27             <property name="viewClass" value="org.springframework.web.servlet.view.JstlView" />
28             注意事项:如果要支持 jstl,还要加入 jstl 的 jar 包
29
30          <property name="prefix" value="/WEB-INF/views/jsp/" />
31          <property name="suffix" value=".jsp" />
32     </bean> -->
33     <mvc:view-resolvers>
34         <mvc:jsp prefix="/WEB-INF/views/jsp/" suffix=".jsp" view-class="org.springframework.web.servlet.view.JstlView"/>
35     </mvc:view-resolvers>
36 </beans>
不过,还要导入支持 jstl 的 jar 包
![]()
示例二十四:文件上传
注意事项:
为什么上传解释器的对象名是固定的
答:因为核心控制器对上传解释器的名字是固定的.是multipartResolver,所以我们配置上传解释器,名字必须是multipartResolver
--查询核心控制器DispacherServlet代码,发现multipartResolver是一个固定加载的属性。
如图所示:SpringMVC的核心控制器里面初始化上传组件时,是通过multipartResolver这个名字精准定位对象的。必须要multipartResolver才可以获得对象


① 创建一个 web 项目并导入依赖的 jar 包
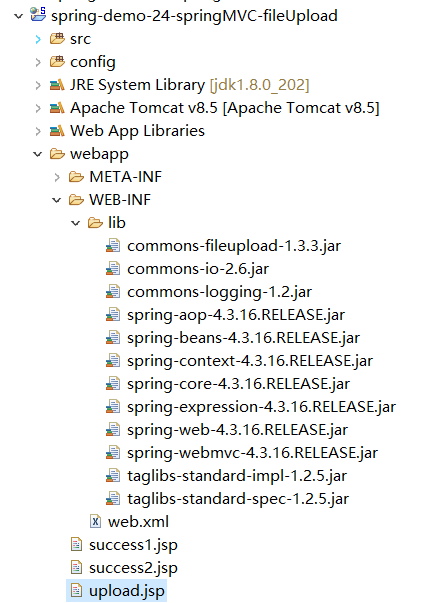
② 创建一个文件上传的界面
 1 <%@ page language="java" contentType="text/html; charset=UTF-8"
 2     pageEncoding="UTF-8"%>
 3 <!DOCTYPE html PUBLIC "-//W3C//DTD HTML 4.01 Transitional//EN" "http://www.w3.org/TR/html4/loose.dtd">
 4 <html>
 5 <head>
 6 <meta http-equiv="Content-Type" content="text/html; charset=UTF-8">
 7 <title>文件上传</title>
 8 </head>
 9 <body>
10     <p>文件上传</p>
11     <!--
12         要求:
13             method 必须是 POST
14             内容类型:multipart/form-data
15      -->
16      <form action="${pageContext.request.contextPath}/upload.mvc" method="post" enctype="multipart/form-data">
17          <input name="file" type="file" />
18          <input type="submit" value="上传" />
19      </form>
20     <p>多文件上传</p>
21     <!--
22         要求:
23             method 必须是 POST
24             内容类型:multipart/form-data
25             多文件上传是使用数组,所以上传框的 name 要一样
26      -->
27      <form action="${pageContext.request.contextPath}/multi-upload.mvc" method="post" enctype="multipart/form-data">
28          <input name="file" type="file" /> <br />
29          <input name="file" type="file" /> <br />
30          <input name="file" type="file" /> <br />
31          <input name="file" type="file" /> <br />
32          <input type="submit" value="上传" />
33      </form>
34 </body>
35 </html>
③ 配置 web.xml 文件
 1 <?xml version="1.0" encoding="UTF-8"?>
 2 <web-app xmlns:xsi="http://www.w3.org/2001/XMLSchema-instance" xmlns="http://xmlns.jcp.org/xml/ns/javaee" xsi:schemaLocation="http://xmlns.jcp.org/xml/ns/javaee http://xmlns.jcp.org/xml/ns/javaee/web-app_3_1.xsd" id="WebApp_ID" version="3.1">
 3   <display-name>spring-demo-24-springMVC-fileUpload</display-name>
 4   <!-- 配置编码过滤器  -->
 5   <filter>
 6       <filter-name>characterEncodingFilter</filter-name>
 7       <filter-class>org.springframework.web.filter.CharacterEncodingFilter</filter-class>
 8       <init-param>
 9           <param-name>encoding</param-name>
10           <param-value>UTF-8</param-value>
11       </init-param>
12   </filter>
13   <filter-mapping>
14       <filter-name>characterEncodingFilter</filter-name>
15       <url-pattern>/*</url-pattern>
16   </filter-mapping>
17
18   <!-- 配置核心控制器  -->
19   <servlet>
20       <servlet-name>dispatcherServlet</servlet-name>
21       <servlet-class>org.springframework.web.servlet.DispatcherServlet</servlet-class>
22       <!-- 加载配置文件 -->
23       <init-param>
24           <param-name>contextConfigLocation</param-name>
25           <param-value>classpath:spring-config.xml</param-value>
26       </init-param>
27   </servlet>
28   <servlet-mapping>
29       <servlet-name>dispatcherServlet</servlet-name>
30       <url-pattern>*.mvc</url-pattern>
31   </servlet-mapping>
32   <welcome-file-list>
33     <welcome-file>index.jsp</welcome-file>
34   </welcome-file-list>
35 </web-app>
④ 创建一个 Spring 的配置文件
 1 <?xml version="1.0" encoding="UTF-8"?>
 2 <beans xmlns="http://www.springframework.org/schema/beans"
 3     xmlns:xsi="http://www.w3.org/2001/XMLSchema-instance"
 4     xmlns:context="http://www.springframework.org/schema/context"
 5     xmlns:mvc="http://www.springframework.org/schema/mvc"
 6     xsi:schemaLocation="http://www.springframework.org/schema/beans http://www.springframework.org/schema/beans/spring-beans.xsd
 7         http://www.springframework.org/schema/context http://www.springframework.org/schema/context/spring-context-4.3.xsd
 8         http://www.springframework.org/schema/mvc http://www.springframework.org/schema/mvc/spring-mvc-4.3.xsd">
 9
10     <!-- 配置扫描器,扫描注解组件并加入Spring容器 -->
11     <context:component-scan base-package="cn.mgy" />
12
13     <!--
14         启动注解的默认配置
15         为什么要启动注解的默认配置?
16         答:由于历史原因 SpringMVC 的内核是使用 XML 编写的,而注解的支持类似系统补丁的方式打到框架里面的。
17         后来出现很多注解有的,而配置文件没有的功能,这些功能就通过 <mvc:annotation-driven /> 标签扩展加入,
18         常用依赖该标签的功能如下:
19         (1)作用域 request、session 的扩展
20         (2)放开静态资源的访问
21         (3)上传组件的支持
22         (4)JSON 的支持
23     -->
24     <mvc:annotation-driven />
25
26     <!--
27         文件上传解释器
28         名字不能写错,一定是 multipartResolver
29      -->
30      <bean name="multipartResolver" class="org.springframework.web.multipart.commons.CommonsMultipartResolver">
31          <!-- 设置默认编码 -->
32          <property name="defaultEncoding" value="UTF-8" />
33          <!-- 设置默认内存的大小  B -->
34          <!-- <property name="maxInMemorySize" value="512000000" /> -->
35          <!-- 设置默认文件最大大小  B -->
36          <property name="maxUploadSize" value="20000000" />
37      </bean>
38
39 </beans>
⑤ 创建一个业务控制器
 1 package cn.mgy.controller;
 2
 3 import java.io.File;
 4 import java.io.IOException;
 5 import java.util.ArrayList;
 6 import java.util.List;
 7
 8 import javax.servlet.http.HttpServletRequest;
 9
10 import org.springframework.stereotype.Controller;
11 import org.springframework.web.bind.annotation.RequestMapping;
12 import org.springframework.web.bind.annotation.RequestParam;
13 import org.springframework.web.multipart.MultipartFile;
14
15 @Controller
16 public class FileUploadController {
17
18     /**
19      * 注意接收上传文件的接口
20      * SpringMVC 的业务控制器执行方法除了已经有内置对象的接口,可以声明接口
21      * 如果内置对象声明接口会报错。
22      * 原因只有在执行方法上面放一个类或者接口,SpringMVC 会先去容器查找是否有兼容类型的对象,
23      * 如果有,就赋予给它,如果没有就会重新创建一个新的对象,如果声明了接口,如果声明的接口,容器原来没有,
24      * 新创建的时候就会报错。
25      * SpringMVC 常见的内置对象有:
26      * Model
27      * ModelMap
28      * HttpServletRequest
29      * HttpServletResponse
30      * HttpSession
31      * MultipartFile
32      * @param file
33      * @return
34      */
35     // 请求路径:/spring-demo-24-springMVC-fileUpload/upload.mvc
36     @RequestMapping(value="upload")
37     public String upload(MultipartFile file, HttpServletRequest request) {
38         System.out.println("--文件上传--");
39         // 获得文件的原名
40         System.out.println(file.getOriginalFilename());
41         // 创建一个文件
42         File destfile = new File("D:/dir/"+file.getOriginalFilename());
43         // 将读取到的上传文件写入到 destfile
44         try {
45             file.transferTo(destfile);
46         } catch (IllegalStateException e) {
47             e.printStackTrace();
48         } catch (IOException e) {
49             e.printStackTrace();
50         }
51
52         request.setAttribute("msg", file.getOriginalFilename());
53         return "/success1.jsp";
54     }
55     // 请求路径:/spring-demo-24-springMVC-fileUpload/upload-mush.mvc
56     // 多文件上传执行方法
57     @RequestMapping(value="multi-upload")
58     public String uploadMush(@RequestParam(value="file")MultipartFile[] files, HttpServletRequest request) {
59         System.out.println("--文件上传--");
60         List<String> fileNames = new ArrayList<>();
61         for (MultipartFile file : files) {
62             // 获得文件的原名
63             System.out.println(file.getOriginalFilename());
64             // 创建一个文件
65             File destfile = new File("D:/dir/"+file.getOriginalFilename());
66             System.out.println(destfile);
67             System.out.println(destfile.isFile());
68             fileNames.add(file.getOriginalFilename());
69             // 将读取到的上传文件写入到 destfile
70             try {
71                 file.transferTo(destfile);
72             } catch (IllegalStateException e) {
73                 e.printStackTrace();
74             } catch (IOException e) {
75                 e.printStackTrace();
76             }
77         }
78         System.out.println(fileNames);
79         request.setAttribute("fileNames", fileNames);
80         return "/success2.jsp";
81     }
82 }
⑥ 创建单文件上传成功返回的视图界面
 1 <%@ page language="java" contentType="text/html; charset=UTF-8" pageEncoding="UTF-8"%>
 2 <!DOCTYPE html PUBLIC "-//W3C//DTD HTML 4.01 Transitional//EN" "http://www.w3.org/TR/html4/loose.dtd">
 3 <html>
 4 <head>
 5 <meta http-equiv="Content-Type" content="text/html; charset=UTF-8">
 6 <title>文件上传成功</title>
 7 </head>
 8 <body>
 9     <p>${msg}上传成功</p> <br />
10 </body>
11 </html>
⑦ 创建多文件文件上传成功返回的视图界面
 1 <%@ page language="java" contentType="text/html; charset=UTF-8" pageEncoding="UTF-8"%>
 2 <%@ taglib uri="http://java.sun.com/jsp/jstl/core" prefix="c" %>
 3 <!DOCTYPE html PUBLIC "-//W3C//DTD HTML 4.01 Transitional//EN" "http://www.w3.org/TR/html4/loose.dtd">
 4 <html>
 5 <head>
 6 <meta http-equiv="Content-Type" content="text/html; charset=UTF-8">
 7 <title>文件上传成功</title>
 8 </head>
 9 <body>
10     <c:forEach items="${requestScope.fileNames}" var="fileName">
11         <p>${fileName}上传成功</p> <br />
12     </c:forEach>
13 </body>
14 </html>
⑧ 测试结果
单文件上传测试:


多文件上传测试: