使用ELK+Filebeat架构,还需要明确Filebeat采集K8S集群日志的方式。
方式1:Node级日志代理
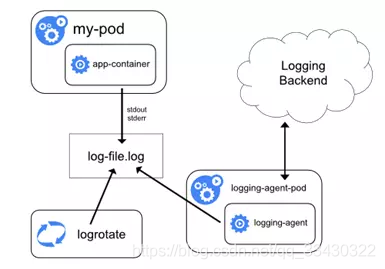
在每个节点(即宿主机)上可以独立运行一个Node级日志代理,通常的实现方式为DaemonSet。用户应用只需要将日志写到标准输出,Docker 的日志驱动会将每个容器的标准输出收集并写入到主机文件系统,这样Node级日志代理就可以将日志统一收集并上传。另外,可以使用K8S的logrotate或Docker 的log-opt 选项负责日志的轮转。
Docker默认的日志驱动(LogDriver)是json-driver,其会将日志以JSON文件的方式存储。所有容器输出到控制台的日志,都会以*-json.log的命名方式保存在/var/lib/docker/containers/目录下。对于Docker日志驱动的具体介绍,请参考官方文档。另外,除了收集Docker容器日志,一般建议同时收集K8S自身的日志以及宿主机的所有系统日志,其位置都在var/log下。

所以,简单来说,本方式就是在每个node上各运行一个日志代理容器,对本节点/var/log和 /var/lib/docker/containers/两个目录下的日志进行采集,然后汇总到elasticsearch集群,最后通过kibana展示。
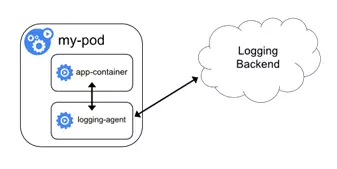
方式2:伴生容器(sidecar container)作为日志代理
创建一个伴生容器(也可称作日志容器),与应用程序容器在处于同一个Pod中。同时伴生容器内部运行一个独立的、专门为收集应用日志的代理,常见的有Logstash、Fluentd 、Filebeat等。日志容器通过共享卷可以获得应用容器的日志,然后进行上传。
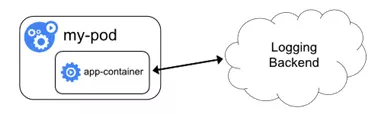
方式3:应用直接上传日志
应用程序容器直接通过网络连接上传日志到后端,这是最简单的方式。
对比

相对来说,方式1在业界使用更为广泛,并且官方也更为推荐。因此,最终我们采用ELK+Filebeat架构,并基于方式1,如下:
1.创建es.yaml 【kubectl apply -f ./es.yaml】
apiVersion: apps/v1
kind: StatefulSet
metadata:
  name: elasticsearch
  namespace: kube-system
  labels:
    k8s-app: elasticsearch
spec:
  serviceName: elasticsearch
  selector:
    matchLabels:
      k8s-app: elasticsearch
  template:
    metadata:
      labels:
        k8s-app: elasticsearch
    spec:
      containers:
      - image: docker.elastic.co/elasticsearch/elasticsearch:7.9.0
        name: elasticsearch
        resources:
          limits:
            cpu: 1
            memory: 1Gi
          requests:
            cpu: 0.5
            memory: 500Mi
        env:
          - name: "discovery.type"
            value: "single-node"
          - name: ES_JAVA_OPTS
            value: "-Xms512m -Xmx2g"
        ports:
        - containerPort: 9200
          name: db
          protocol: TCP
        volumeMounts:
        - name: elasticsearch-data
          mountPath: /usr/share/elasticsearch/data
  volumeClaimTemplates:
  - metadata:
      name: elasticsearch-data
    spec:
      storageClassName: "nfs"
      accessModes: [ "ReadWriteOnce" ]
      resources:
        requests:
          storage: 2Gi

---

apiVersion: v1
kind: Service
metadata:
  name: elasticsearch
  namespace: kube-system
spec:
  clusterIP: None
  ports:
  - port: 9200
    protocol: TCP
    targetPort: db
  selector:
    k8s-app: elasticsearch
2.创建kibana.yaml【kubectl apply -f ./kibana.yaml】
apiVersion: apps/v1
kind: Deployment
metadata:
  name: kibana
  namespace: kube-system
  labels:
    k8s-app: kibana
spec:
  replicas: 1
  selector:
    matchLabels:
      k8s-app: kibana
  template:
    metadata:
      labels:
        k8s-app: kibana
    spec:
      containers:
      - name: kibana
        image: kibana:7.3.1
        resources:
          limits:
            cpu: 1
            memory: 500Mi
          requests:
            cpu: 0.5
            memory: 200Mi
        env:
          - name: ELASTICSEARCH_HOSTS
            value: http://elasticsearch:9200
        ports:
        - containerPort: 5601
          name: ui
          protocol: TCP
---
apiVersion: v1
kind: Service
metadata:
  name: kibana
  namespace: kube-system
spec:
  type: NodePort
  ports:
  - port: 5601
    protocol: TCP
    targetPort: ui
    nodePort: 30056
  selector:
    k8s-app: kibana
3.现在有一个nginx程序, 我们采用方式2来收集日志 nginx-dm.yaml 【 kubectl apply -f ./nginx-dm.yaml】
apiVersion: apps/v1beta1
kind: Deployment
metadata:
  name: php-demo
  namespace: kube-system
spec:
  replicas: 1
  selector:
    matchLabels:
      project: www
      app: php-demo
  template:
    metadata:
      labels:
        project: www
        app: php-demo
    spec:
      imagePullSecrets:
      - name: registry-pull-secret
      containers:
      - name: nginx
        image: lizhenliang/nginx-php
        ports:
        - containerPort: 80
          name: web
          protocol: TCP
        resources:
          requests:
            cpu: 0.5
            memory: 256Mi
          limits:
            cpu: 1
            memory: 1Gi
        livenessProbe:
          httpGet:
            path: /status.html
            port: 80
          initialDelaySeconds: 20
          timeoutSeconds: 20
        readinessProbe:
          httpGet:
            path: /status.html
            port: 80
          initialDelaySeconds: 20
          timeoutSeconds: 20
        volumeMounts:
        - name: nginx-logs
          mountPath: /usr/local/nginx/logs

      - name: filebeat
        image: docker.elastic.co/beats/filebeat:7.9.0
        args: [
          "-c", "/etc/filebeat.yml",
          "-e",
        ]
        resources:
          limits:
            memory: 500Mi
          requests:
            cpu: 100m
            memory: 100Mi
        securityContext:
          runAsUser: 0
        volumeMounts:
        - name: filebeat-config
          mountPath: /etc/filebeat.yml
          subPath: filebeat.yml
        - name: nginx-logs
          mountPath: /usr/local/nginx/logs

      volumes:
      - name: nginx-logs
        emptyDir: {}
      - name: filebeat-config
        configMap:
          name: filebeat-nginx-config
---
apiVersion: v1
kind: ConfigMap
metadata:
  name: filebeat-nginx-config
  namespace: kube-system

data:
  filebeat.yml: |-
    filebeat.inputs:
      - type: log
        paths:
          - /usr/local/nginx/logs/access.log
        # tags: ["access"]
        fields:
          app: www
          type: nginx-access
        fields_under_root: true

    setup.ilm.enabled: false
    setup.template.name: "nginx-access"
    setup.template.pattern: "nginx-access-*"

    output.elasticsearch:
      hosts: ['elasticsearch.kube-system:9200']
      index: "nginx-access-%{+yyyy.MM.dd}"
等pod启动起来 我们可以进入pod 查看日志如下:

在kibana创建index nginx-access*然后访问如下:

4.现在我们来用方式1来拉日志 filebeat-k8s.yaml 【 kubectl apply -f ./filebeat-k8s.yaml 】
apiVersion: v1
kind: ConfigMap
metadata:
  name: filebeat-config
  namespace: kube-system
  labels:
    k8s-app: filebeat
    kubernetes.io/cluster-service: "true"
data:
  filebeat.yml: |-
    filebeat.config:
      inputs:
        # Mounted `filebeat-inputs` configmap:
        path: ${path.config}/inputs.d/*.yml
        # Reload inputs configs as they change:
        reload.enabled: false
      modules:
        path: ${path.config}/modules.d/*.yml
        # Reload module configs as they change:
        reload.enabled: false

    # To enable hints based autodiscover, remove `filebeat.config.inputs` configuration and uncomment this:
    #filebeat.autodiscover:
    #  providers:
    #    - type: kubernetes
    #      hints.enabled: true
    output.elasticsearch:
      hosts: ['${ELASTICSEARCH_HOST:elasticsearch}:${ELASTICSEARCH_PORT:9200}']
---
apiVersion: v1
kind: ConfigMap
metadata:
  name: filebeat-inputs
  namespace: kube-system
  labels:
    k8s-app: filebeat
    kubernetes.io/cluster-service: "true"
data:
  kubernetes.yml: |-
    - type: docker
      containers.ids:
      - "*"
      processors:
        - add_kubernetes_metadata:
            in_cluster: true
---
apiVersion: apps/v1
kind: DaemonSet
metadata:
  name: filebeat
  namespace: kube-system
  labels:
    k8s-app: filebeat
    kubernetes.io/cluster-service: "true"
spec:
  selector:
    matchLabels:
      k8s-app: filebeat
  template:
    metadata:
      labels:
        k8s-app: filebeat
        kubernetes.io/cluster-service: "true"
    spec:
      serviceAccountName: filebeat
      terminationGracePeriodSeconds: 30
      containers:
      - name: filebeat
        image: docker.elastic.co/beats/filebeat:7.9.0
        args: [
          "-c", "/etc/filebeat.yml",
          "-e",
        ]
        env:
        - name: ELASTICSEARCH_HOST
          value: elasticsearch
        - name: ELASTICSEARCH_PORT
          value: "9200"
        securityContext:
          runAsUser: 0
          # If using Red Hat OpenShift uncomment this:
          #privileged: true
        resources:
          requests:
            cpu: 10m
            memory: 100Mi
          limits:
            cpu: 50m
            memory: 500Mi
        volumeMounts:
        - name: config
          mountPath: /etc/filebeat.yml
          readOnly: true
          subPath: filebeat.yml
        - name: inputs
          mountPath: /usr/share/filebeat/inputs.d
          readOnly: true
        - name: data
          mountPath: /usr/share/filebeat/data
        - name: varlibdockercontainers
          mountPath: /var/lib/docker/containers
          readOnly: true
      volumes:
      - name: config
        configMap:
          defaultMode: 0600
          name: filebeat-config
      - name: varlibdockercontainers
        hostPath:
          path: /var/lib/docker/containers
      - name: inputs
        configMap:
          defaultMode: 0600
          name: filebeat-inputs
      # data folder stores a registry of read status for all files, so we don't send everything again on a Filebeat pod restart
      - name: data
        hostPath:
          path: /var/lib/filebeat-data
          type: DirectoryOrCreate
---
apiVersion: rbac.authorization.k8s.io/v1beta1
kind: ClusterRoleBinding
metadata:
  name: filebeat
subjects:
- kind: ServiceAccount
  name: filebeat
  namespace: kube-system
roleRef:
  kind: ClusterRole
  name: filebeat
  apiGroup: rbac.authorization.k8s.io
---
apiVersion: rbac.authorization.k8s.io/v1beta1
kind: ClusterRole
metadata:
  name: filebeat
  labels:
    k8s-app: filebeat
rules:
- apiGroups: [""] # "" indicates the core API group
  resources:
  - namespaces
  - pods
  verbs:
  - get
  - watch
  - list
---
apiVersion: v1
kind: ServiceAccount
metadata:
  name: filebeat
  namespace: kube-system
  labels:
    k8s-app: filebeat
在kibanan 创建 filebeat-7.9.0-* 索引

5.我们修改 nginx-dm.yaml文件之创建pod, log改在到nfs上去 【 kubectl apply -f ./nginx-dm.yaml】
apiVersion: apps/v1beta1
kind: Deployment
metadata:
  name: php-demo
  namespace: kube-system
spec:
  replicas: 1
  selector:
    matchLabels:
      project: www
      app: php-demo
  template:
    metadata:
      labels:
        project: www
        app: php-demo
    spec:
      imagePullSecrets:
      - name: registry-pull-secret
      containers:
      - name: nginx
        image: lizhenliang/nginx-php
        ports:
        - containerPort: 80
          name: web
          protocol: TCP
        resources:
          requests:
            cpu: 0.5
            memory: 256Mi
          limits:
            cpu: 1
            memory: 1Gi
        livenessProbe:
          httpGet:
            path: /status.html
            port: 80
          initialDelaySeconds: 20
          timeoutSeconds: 20
        readinessProbe:
          httpGet:
            path: /status.html
            port: 80
          initialDelaySeconds: 20
          timeoutSeconds: 20
        volumeMounts:
        - name: nginx-logs
          mountPath: /usr/local/nginx/logs
      volumes: #定义一组挂载设备
       - name: nginx-logs #定义一个挂载设备的名字
        #persistentVolumeClaim: 使用PVC模式
           #claimName: nfs-pvc
         nfs:                          #这里是nfs挂载
           server: 192.168.100.11         #nfs服务器的ip或者域名
           path: "/nfs/jenkins"               #nfs服务配置的挂载目录
我这里把pod的日志写道nfs上【如果日志写的不频繁这是可以的】然后在创建k8s-log.yaml把nfs的日志写道es 【 kubectl apply -f ./k8s-log.yaml】
apiVersion: v1
kind: ConfigMap
metadata:
  name: k8s-logs-filebeat-config
  namespace: kube-system

data:
  filebeat.yml: |
    filebeat.inputs:
      - type: log
        paths:
          - /var/log/messages
        fields:
          app: k8s
          type: module
        fields_under_root: true

    setup.ilm.enabled: false
    setup.template.name: "k8s-module"
    setup.template.pattern: "k8s-module-*"

    output.elasticsearch:
      hosts: ['elasticsearch.kube-system:9200']
      index: "k8s-module-%{+yyyy.MM.dd}"

---

apiVersion: apps/v1
kind: DaemonSet
metadata:
  name: k8s-logs
  namespace: kube-system
spec:
  selector:
    matchLabels:
      project: k8s
      app: filebeat
  template:
    metadata:
      labels:
        project: k8s
        app: filebeat
    spec:
      containers:
      - name: filebeat
        image: docker.elastic.co/beats/filebeat:7.9.0
        args: [
          "-c", "/etc/filebeat.yml",
          "-e",
        ]
        resources:
          requests:
            cpu: 10m
            memory: 100Mi
          limits:
            cpu: 50m
            memory: 500Mi
        securityContext:
          runAsUser: 0
        volumeMounts:
        - name: filebeat-config
          mountPath: /etc/filebeat.yml
          subPath: filebeat.yml
        - name: k8s-logs
          mountPath: /var/log/messages
      volumes:
      - name: k8s-logs
        nfs:
          server: 192.168.100.11
          path: "/nfs/jenkins"
      - name: filebeat-config
        configMap:
          name: k8s-logs-filebeat-config
在kibanan 创建 k8s-module-* 索引

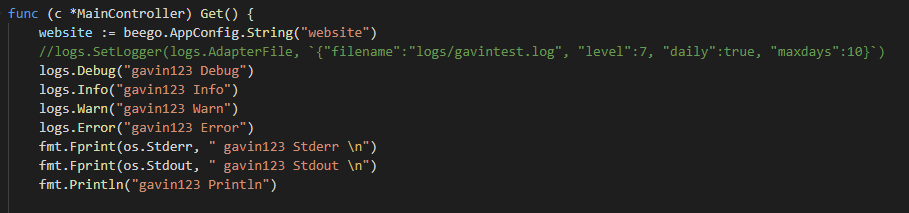
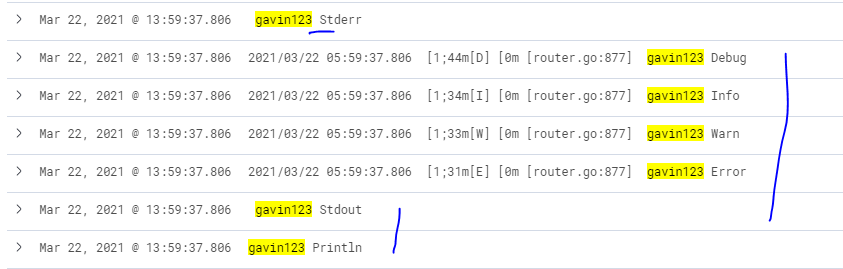
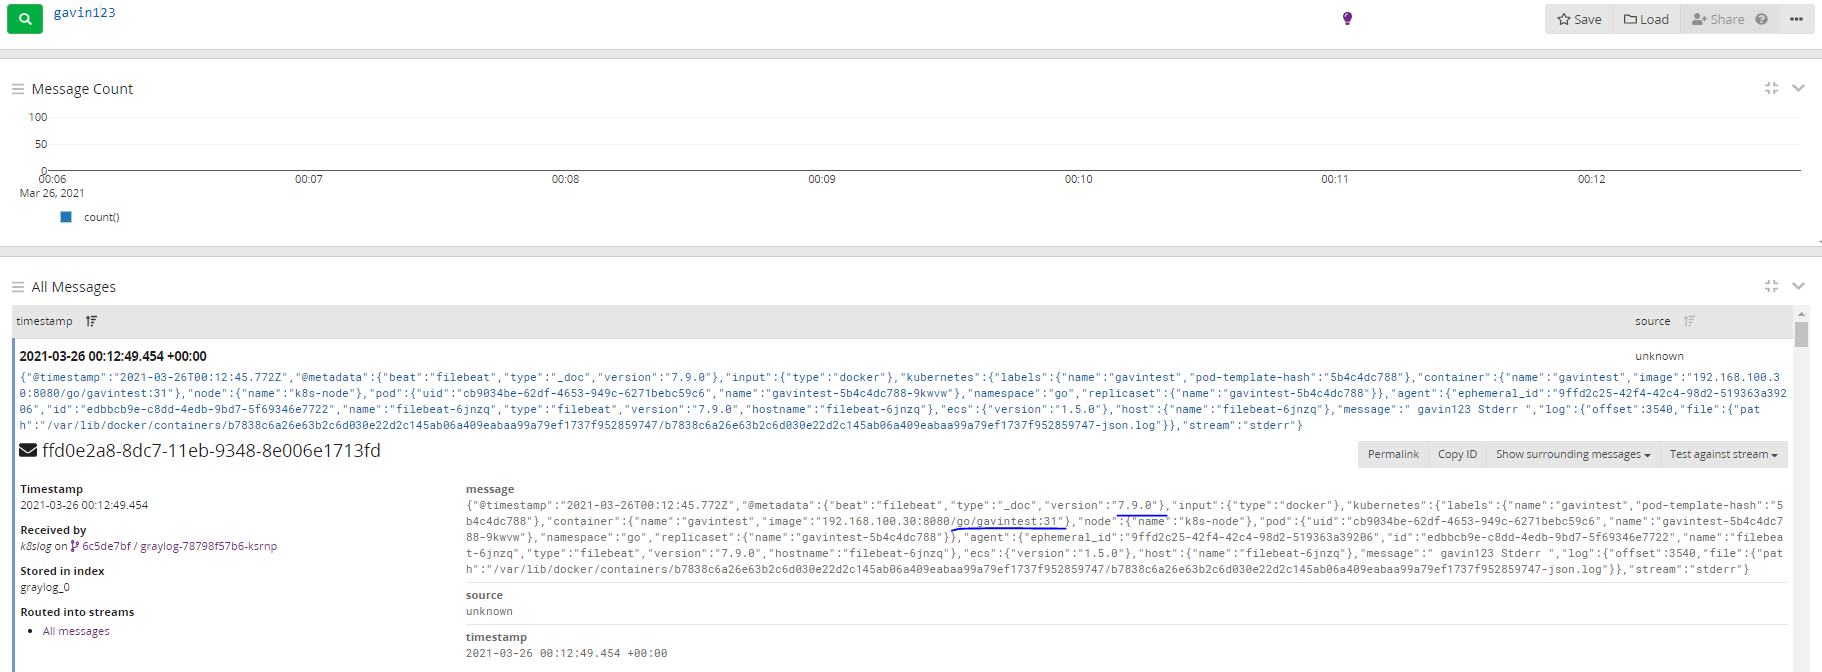
6.如果我们自己的程序日志需要用到方案1 该如何实现:需要将我们的日志写道 错误输出里面【标准输出默认是不会显示到屏幕的】,也就是我们可以通过 kubectl logs gavintest-5f4d66bc58-67d4x -n go 可以在屏幕查看到日志信息, 方式1才能手机此信息
修改程序如下[ 我这里是beego项目]
用jenkins发版,然后访问,查看pod日志

查看 kibana日志

备注:有些时候直接下载镜像很慢,可以先下载下来: 我曾先用 docker.elastic.co/kibana/kibana:7.9.0 结果发现kibana 端口拒绝, 后来换一个镜像
docker pull docker.elastic.co/beats/filebeat:7.9.0
docker pull docker.elastic.co/elasticsearch/elasticsearch:7.9.0
#docker pull docker.elastic.co/kibana/kibana:7.9.0
docker pull lizhenliang/nginx-php

docker save -o filebeat:7.9.0.tar docker.elastic.co/beats/filebeat:7.9.0
docker save -o elasticsearch:7.9.0.tar docker.elastic.co/elasticsearch/elasticsearch:7.9.0
#docker save -o kibana:7.9.0.tar docker.elastic.co/kibana/kibana:7.9.0
docker save -o kibana:7.3.1.tar kibana:7.3.1
docker save -o nginx-php.tar lizhenliang/nginx-php

docker load -i filebeat:7.9.0.tar
docker load -i elasticsearch:7.9.0.tar
#docker load -i kibana:7.9.0.tar
docker load -i kibana:7.3.1.tar
docker load -i nginx-php.tar
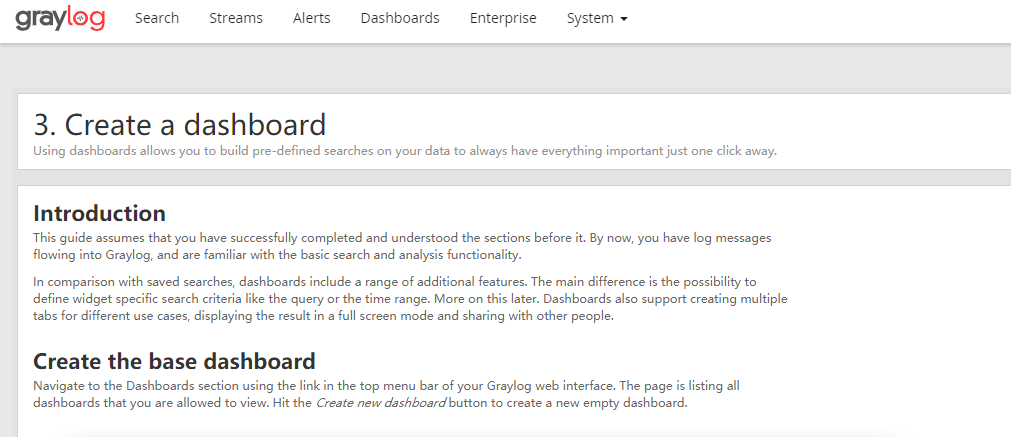
GrayLog
我这里已经有es了,那我就直安装mongodb和graylog了
新建mongodb.yaml 【kubectl apply -f mongodb.yaml】
apiVersion: apps/v1
kind: StatefulSet
metadata:
  name: mongo
  namespace: kube-system
  labels:
    k8s-app: mongo
spec:
  serviceName: mongo
  selector:
    matchLabels:
      k8s-app: mongo
  template:
    metadata:
      labels:
        k8s-app: mongo
    spec:
      containers:
      - image: mongo:latest
        name: mongo
        ports:
        - containerPort: 27017
          protocol: TCP
        volumeMounts:
        - name: mongo-data
          mountPath: /data/db
  volumeClaimTemplates:
  - metadata:
      name: mongo-data
    spec:
      storageClassName: "nfs"
      accessModes: [ "ReadWriteMany" ]
      resources:
        requests:
          storage: 1Gi

---
apiVersion: v1
kind: Service
metadata:
  name: mongo
  namespace: kube-system
spec:
  ports:
  - port: 27017
    protocol: TCP
    targetPort: 27017
  selector:
    k8s-app: mongo
如果遇到changing ownership of '/data/db': Operation not permitted错误, 我这里的原因是
NFS默认是squash_all模式,但是要想使用NFS目录,将目录映射到docker容器中,必须要配置成no_root_squash模式才行,否则root用户无权限使用nfs的volume来映射docker容器中的目录!!!
no_root_squash模式:是登入 NFS 主机使用分享目录的使用者,如果是 root 的话,那么对于这个分享的目录来说,他就具有 root 的权限!这个项目『极不安全』,不建议使用!
编辑vim /etc/exports 文件在指定位置添加 no_root_squash
如:/nfs/jenkins *(rw,sync,no_subtree_check,no_root_squash)
然后重启nfs服务 systemctl restart nfs-kernel-server
2新建graylog.yaml 【kubectl apply -f graylog.yaml】
apiVersion: apps/v1
kind: Deployment
metadata:
  name: graylog
  namespace: kube-system
  labels:
    k8s-app: graylog
spec:
  replicas: 1
  selector:
    matchLabels:
      k8s-app: graylog
  template:
    metadata:
      labels:
        k8s-app: graylog
    spec:
      containers:
      - name: graylog
        image: graylog/graylog:4.0.3
        env:
        - name: GRAYLOG_PASSWORD_SECRET
          value: somepasswordpepper
        - name: GRAYLOG_ROOT_PASSWORD_SHA2
          value: 8c6976e5b5410415bde908bd4dee15dfb167a9c873fc4bb8a81f6f2ab448a918
        - name: GRAYLOG_HTTP_EXTERNAL_URI
          value: http://192.168.100.11:30003/
        - name: GRAYLOG_ELASTICSEARCH_HOSTS
          value: http://elasticsearch:9200
        - name: GRAYLOG_MONGODB_URI
          value: mongodb://mongo:27017/graylog
        ports:
        - containerPort: 9000
        - containerPort: 12201
        - containerPort: 5044


---
apiVersion: v1
kind: Service
metadata:
  name: graylog
  namespace: kube-system
spec:
  type: NodePort
  selector:
    k8s-app: graylog
  ports:
  - name: "9000"
    port: 9000
    targetPort: 9000
    nodePort: 30003
  - name: "12201"
    port: 12201
    targetPort: 12201
    nodePort: 30004
  - name: "5044"
    port: 5044
    targetPort: 5044
    nodePort: 30005
访问http://192.168.100.11:30003/ 用户名和密码 都是admin,【我这里es是7.9,我graylog曾用过3.3 结果不兼容,所以改为最新的4.0.3,大家启动gray也可以看看日志】
filebeat
首先我们建一个filebeat的输入【看到这里的端口是5044了吧】,然后修改采集日志的文件k8s-log.yaml

k8s-log.yaml 【kubectl apply -f k8s-log.yaml]
apiVersion: v1
kind: ConfigMap
metadata:
  name: k8s-logs-filebeat-config
  namespace: kube-system

data:
  filebeat.yml: |
    filebeat.inputs:
      - type: log
        paths:
          - /var/log/messages/*.log
        fields:
          app: k8s
          type: module
        fields_under_root: true

    setup.ilm.enabled: false
    setup.template.name: "k8s-module"
    setup.template.pattern: "k8s-module-*"

    #output.elasticsearch:
      #hosts: ['elasticsearch.kube-system:9200']
      #index: "k8s-module-%{+yyyy.MM.dd}"
    output:
       logstash:
          hosts:
           - 192.168.100.11:30005

---

apiVersion: apps/v1
kind: DaemonSet
metadata:
  name: k8s-logs
  namespace: kube-system
spec:
  selector:
    matchLabels:
      project: k8s
      app: filebeat
  template:
    metadata:
      labels:
        project: k8s
        app: filebeat
    spec:
      containers:
      - name: filebeat
        image: docker.elastic.co/beats/filebeat:7.9.0
        args: [
          "-c", "/etc/filebeat.yml",
          "-e",
        ]
        resources:
          requests:
            cpu: 10m
            memory: 100Mi
          limits:
            cpu: 50m
            memory: 500Mi
        securityContext:
          runAsUser: 0
        volumeMounts:
        - name: filebeat-config
          mountPath: /etc/filebeat.yml
          subPath: filebeat.yml
        - name: k8s-logs
          mountPath: /var/log/messages
      volumes:
      - name: k8s-logs
        nfs:
          server: 192.168.100.11
          path: "/nfs/jenkins"
      - name: filebeat-config
        configMap:
          name: k8s-logs-filebeat-config
查看结果 【需要把前面的nginx-dm.yam 文件运行起来, 往nfs写日志】

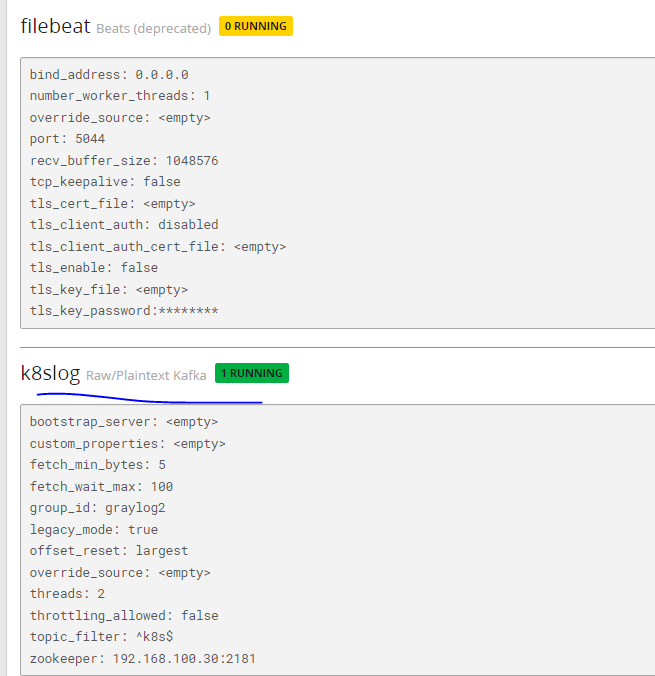
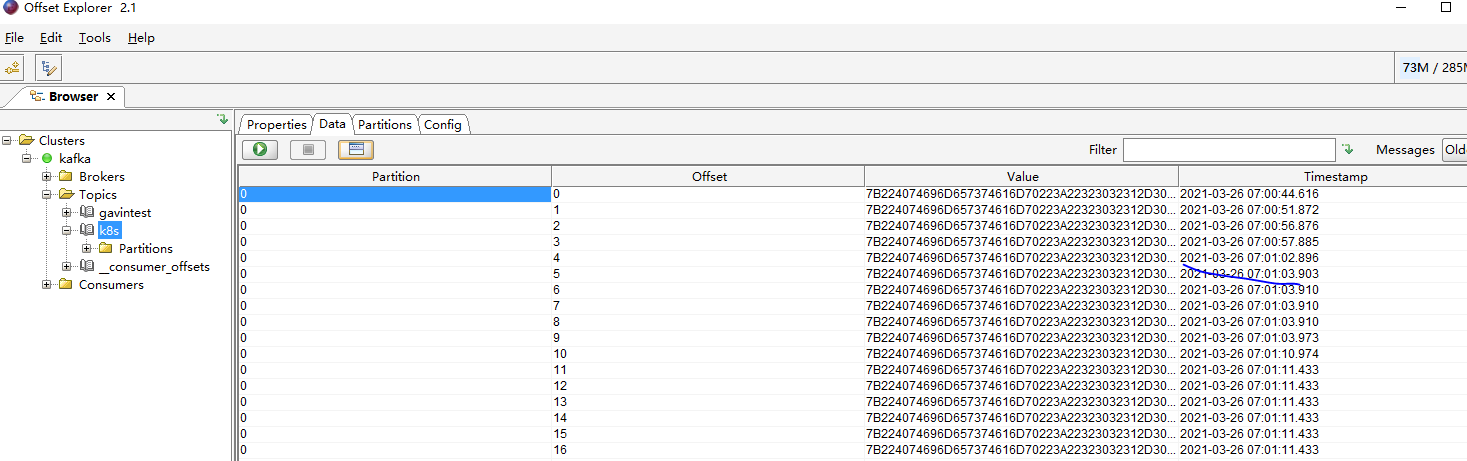
kafka
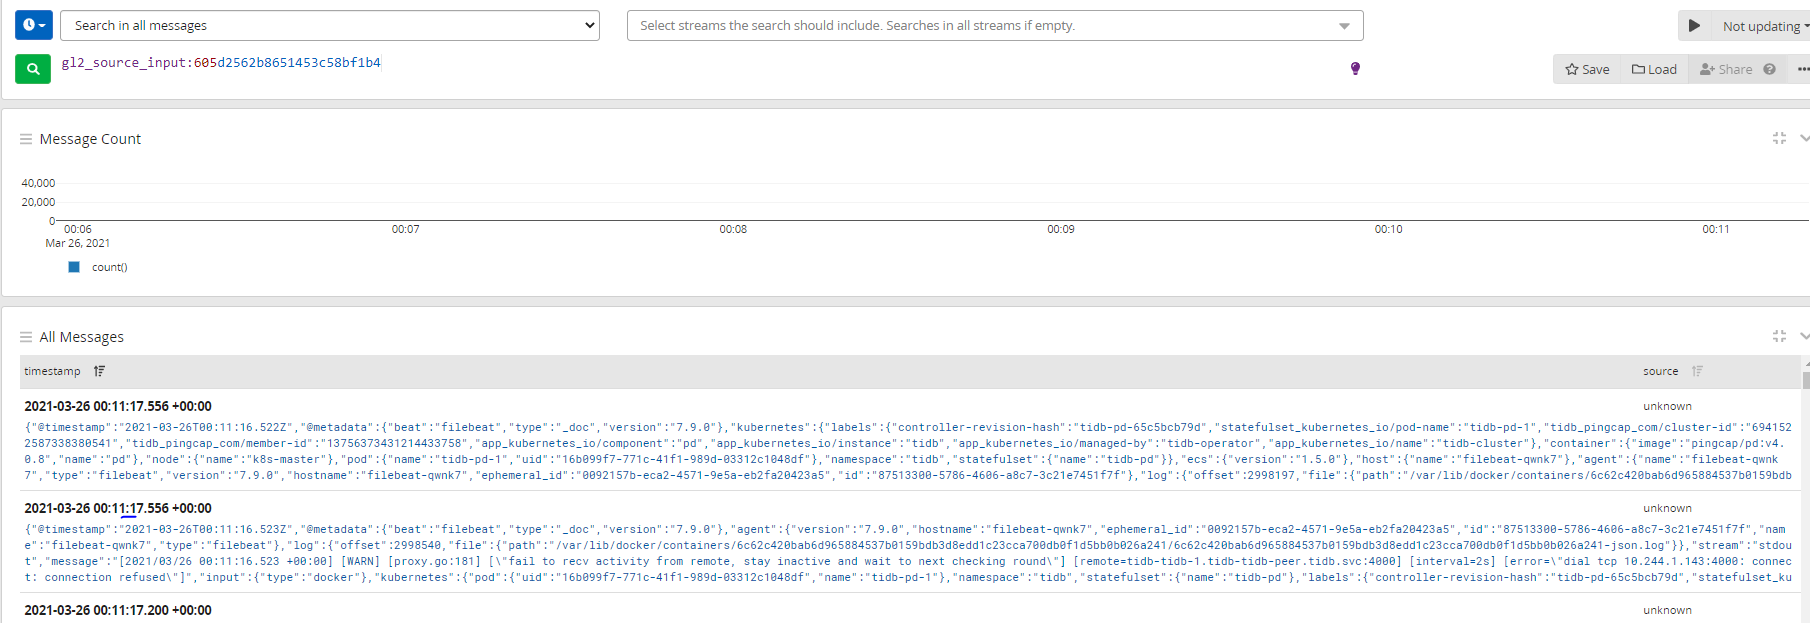
这里我的日志 从filebeat->kafka->graylog,新建graylog的input 【为了防止干扰 我们把向前的日志文件干掉 kubectl delete -f k8s-log.yaml 和 kubectl delete -f nginx-dm.yaml】
修改filebeat-k8s.yaml 使日志输出到kafka而不是es [kubectl apply -f filebeat-k8s.yaml]
apiVersion: v1
kind: ConfigMap
metadata:
  name: filebeat-config
  namespace: kube-system
  labels:
    k8s-app: filebeat
    kubernetes.io/cluster-service: "true"
data:
  filebeat.yml: |-
    filebeat.config:
      inputs:
        # Mounted `filebeat-inputs` configmap:
        path: ${path.config}/inputs.d/*.yml
        # Reload inputs configs as they change:
        reload.enabled: false
      modules:
        path: ${path.config}/modules.d/*.yml
        # Reload module configs as they change:
        reload.enabled: false

    # To enable hints based autodiscover, remove `filebeat.config.inputs` configuration and uncomment this:
    #filebeat.autodiscover:
    #  providers:
    #    - type: kubernetes
    #      hints.enabled: true
    #output.elasticsearch:
      #hosts: ['${ELASTICSEARCH_HOST:elasticsearch}:${ELASTICSEARCH_PORT:9200}']
    output.kafka:
      enabled: true
      hosts: ["192.168.100.30:9092"]
      topic: "k8s"
---
apiVersion: v1
kind: ConfigMap
metadata:
  name: filebeat-inputs
  namespace: kube-system
  labels:
    k8s-app: filebeat
    kubernetes.io/cluster-service: "true"
data:
  kubernetes.yml: |-
    - type: docker
      containers.ids:
      - "*"
      processors:
        - add_kubernetes_metadata:
            in_cluster: true
---
apiVersion: apps/v1
kind: DaemonSet
metadata:
  name: filebeat
  namespace: kube-system
  labels:
    k8s-app: filebeat
    kubernetes.io/cluster-service: "true"
spec:
  selector:
    matchLabels:
      k8s-app: filebeat
  template:
    metadata:
      labels:
        k8s-app: filebeat
        kubernetes.io/cluster-service: "true"
    spec:
      serviceAccountName: filebeat
      terminationGracePeriodSeconds: 30
      containers:
      - name: filebeat
        image: docker.elastic.co/beats/filebeat:7.9.0
        args: [
          "-c", "/etc/filebeat.yml",
          "-e",
        ]
        env:
        - name: ELASTICSEARCH_HOST
          value: elasticsearch
        - name: ELASTICSEARCH_PORT
          value: "9200"
        securityContext:
          runAsUser: 0
          # If using Red Hat OpenShift uncomment this:
          #privileged: true
        resources:
          requests:
            cpu: 10m
            memory: 100Mi
          limits:
            cpu: 50m
            memory: 500Mi
        volumeMounts:
        - name: config
          mountPath: /etc/filebeat.yml
          readOnly: true
          subPath: filebeat.yml
        - name: inputs
          mountPath: /usr/share/filebeat/inputs.d
          readOnly: true
        - name: data
          mountPath: /usr/share/filebeat/data
        - name: varlibdockercontainers
          mountPath: /var/lib/docker/containers
          readOnly: true
      volumes:
      - name: config
        configMap:
          defaultMode: 0600
          name: filebeat-config
      - name: varlibdockercontainers
        hostPath:
          path: /var/lib/docker/containers
      - name: inputs
        configMap:
          defaultMode: 0600
          name: filebeat-inputs
      # data folder stores a registry of read status for all files, so we don't send everything again on a Filebeat pod restart
      - name: data
        hostPath:
          path: /var/lib/filebeat-data
          type: DirectoryOrCreate
---
apiVersion: rbac.authorization.k8s.io/v1beta1
kind: ClusterRoleBinding
metadata:
  name: filebeat
subjects:
- kind: ServiceAccount
  name: filebeat
  namespace: kube-system
roleRef:
  kind: ClusterRole
  name: filebeat
  apiGroup: rbac.authorization.k8s.io
---
apiVersion: rbac.authorization.k8s.io/v1beta1
kind: ClusterRole
metadata:
  name: filebeat
  labels:
    k8s-app: filebeat
rules:
- apiGroups: [""] # "" indicates the core API group
  resources:
  - namespaces
  - pods
  verbs:
  - get
  - watch
  - list
---
apiVersion: v1
kind: ServiceAccount
metadata:
  name: filebeat
  namespace: kube-system
  labels:
    k8s-app: filebeat
参考:
https://hub.kubeapps.com/charts/stable/graylog#!
https://blog.51cto.com/liujingyu/2537488?source=dra
https://blog.csdn.net/qq_33430322/article/details/89237140
https://blog.51cto.com/14143894/2438188?source=dra