正文
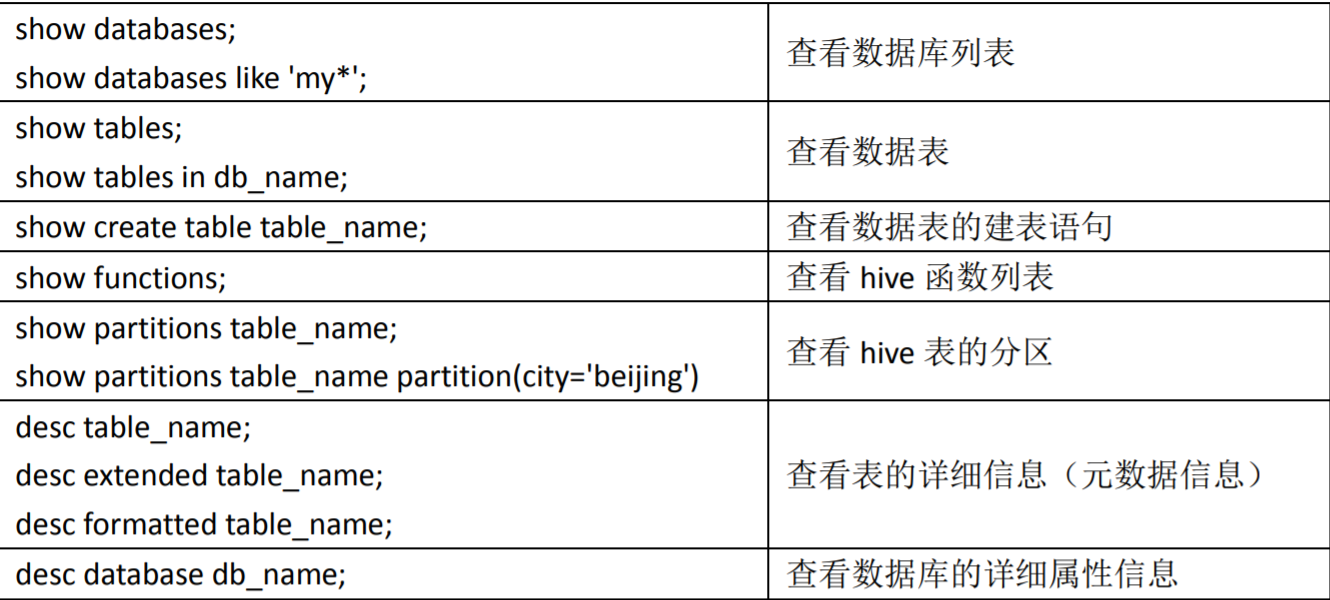
库操作
1、创建库
语法结构
CREATE (DATABASE|SCHEMA) [IF NOT EXISTS] database_name
[COMMENT database_comment] //关于数据块的描述
[LOCATION hdfs_path] //指定数据库在HDFS上的存储位置
[WITH DBPROPERTIES (property_name=property_value, ...)]; //指定数据块属性
默认地址:/user/hive/warehouse/db_name.db/table_name/partition_name/…
创建库的方式
(1)创建普通的数据库

0: jdbc:hive2://hadoop3:10000> create database t1;
No rows affected (0.308 seconds)
0: jdbc:hive2://hadoop3:10000> show databases;
+----------------+
| database_name  |
+----------------+
| default        |
| myhive         |
| t1             |
+----------------+
3 rows selected (0.393 seconds)
0: jdbc:hive2://hadoop3:10000>
(2)创建库的时候检查存与否
0: jdbc:hive2://hadoop3:10000> create database if not exists t1;
No rows affected (0.176 seconds)
0: jdbc:hive2://hadoop3:10000>
(3)创建库的时候带注释
0: jdbc:hive2://hadoop3:10000> create database if not exists t2 comment 'learning hive';
No rows affected (0.217 seconds)
0: jdbc:hive2://hadoop3:10000>

(4)创建带属性的库
0: jdbc:hive2://hadoop3:10000> create database if not exists t3 with dbproperties('creator'='hadoop','date'='2018-04-05');
No rows affected (0.255 seconds)
0: jdbc:hive2://hadoop3:10000>
2、查看库
查看库的方式
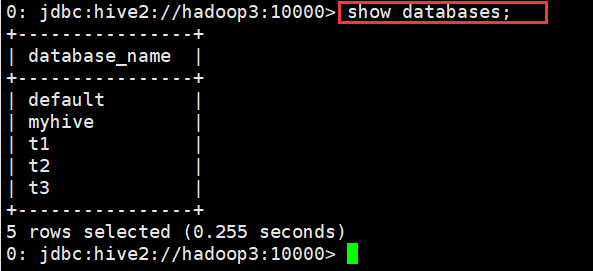
(1)查看有哪些数据库
0: jdbc:hive2://hadoop3:10000> show databases;
+----------------+
| database_name |
+----------------+
| default |
| myhive |
| t1 |
| t2 |
| t3 |
+----------------+
5 rows selected (0.164 seconds)
0: jdbc:hive2://hadoop3:10000>
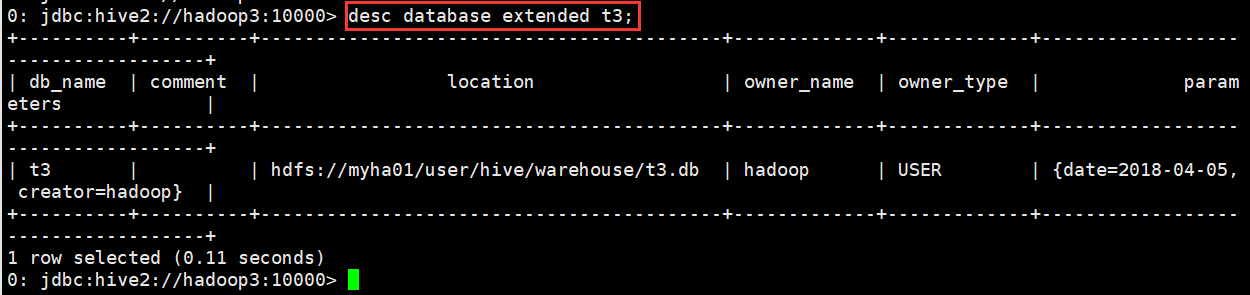
(2)显示数据库的详细属性信息
语法
desc database [extended] dbname;
示例
0: jdbc:hive2://hadoop3:10000> desc database extended t3;
+----------+----------+------------------------------------------+-------------+-------------+------------------------------------+
| db_name  | comment  |                 location                 | owner_name  | owner_type  |             parameters             |
+----------+----------+------------------------------------------+-------------+-------------+------------------------------------+
| t3       |          | hdfs://myha01/user/hive/warehouse/t3.db  | hadoop      | USER        | {date=2018-04-05, creator=hadoop}  |
+----------+----------+------------------------------------------+-------------+-------------+------------------------------------+
1 row selected (0.11 seconds)
0: jdbc:hive2://hadoop3:10000>
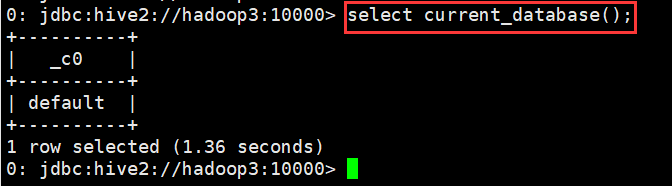
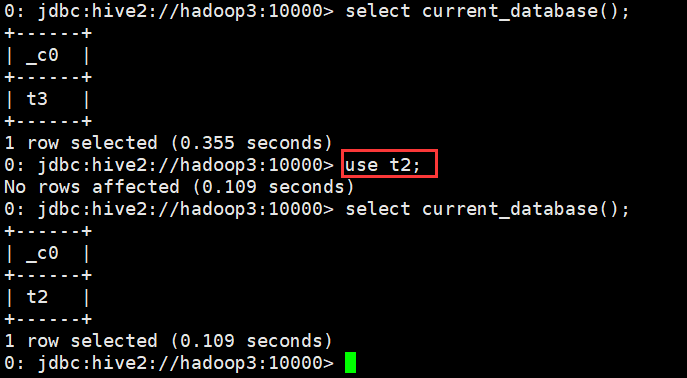
(3)查看正在使用哪个库
0: jdbc:hive2://hadoop3:10000> select current_database();
+----------+
|   _c0    |
+----------+
| default  |
+----------+
1 row selected (1.36 seconds)
0: jdbc:hive2://hadoop3:10000>
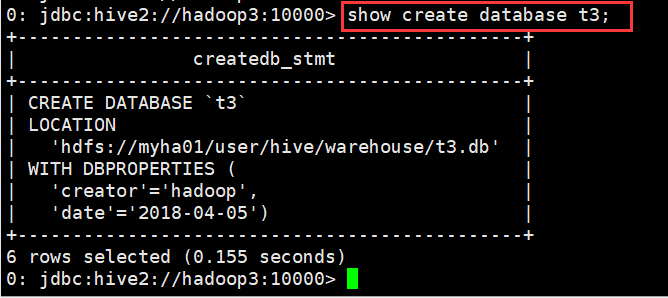
(4)查看创建库的详细语句
0: jdbc:hive2://hadoop3:10000> show create database t3;
+----------------------------------------------+
|                createdb_stmt                 |
+----------------------------------------------+
| CREATE DATABASE `t3`                         |
| LOCATION                                     |
|   'hdfs://myha01/user/hive/warehouse/t3.db'  |
| WITH DBPROPERTIES (                          |
|   'creator'='hadoop',                        |
|   'date'='2018-04-05')                       |
+----------------------------------------------+
6 rows selected (0.155 seconds)
0: jdbc:hive2://hadoop3:10000>
3、删除库
说明
删除库操作
drop database dbname;
drop database if exists dbname;
默认情况下,hive 不允许删除包含表的数据库,有两种解决办法:
1、 手动删除库下所有表,然后删除库
2、 使用 cascade 关键字
drop database if exists dbname cascade;
默认情况下就是 restrict drop database if exists myhive ==== drop database if exists myhive restrict
示例
(1)删除不含表的数据库
0: jdbc:hive2://hadoop3:10000> show tables in t1;
+-----------+
| tab_name  |
+-----------+
+-----------+
No rows selected (0.147 seconds)
0: jdbc:hive2://hadoop3:10000> drop database t1;
No rows affected (0.178 seconds)
0: jdbc:hive2://hadoop3:10000> show databases;
+----------------+
| database_name  |
+----------------+
| default        |
| myhive         |
| t2             |
| t3             |
+----------------+
4 rows selected (0.124 seconds)
0: jdbc:hive2://hadoop3:10000>

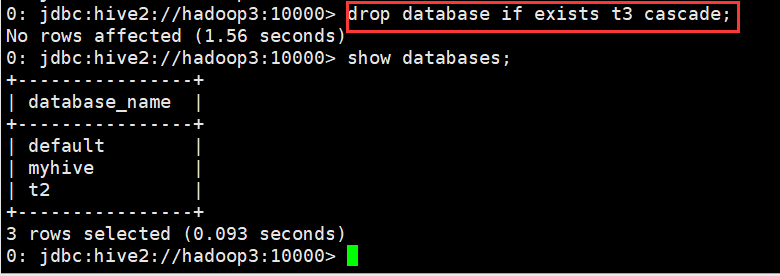
(2)删除含有表的数据库
0: jdbc:hive2://hadoop3:10000> drop database if exists t3 cascade;
No rows affected (1.56 seconds)
0: jdbc:hive2://hadoop3:10000>
4、切换库
语法
use database_name
示例
0: jdbc:hive2://hadoop3:10000> use t2;
No rows affected (0.109 seconds)
0: jdbc:hive2://hadoop3:10000>
表操作
1、创建表
语法
CREATE [EXTERNAL] TABLE [IF NOT EXISTS] table_name
[(col_name data_type [COMMENT col_comment], ...)]
[COMMENT table_comment]
[PARTITIONED BY (col_name data_type [COMMENT col_comment], ...)]
[CLUSTERED BY (col_name, col_name, ...)
[SORTED BY (col_name [ASC|DESC], ...)] INTO num_buckets BUCKETS]
[ROW FORMAT row_format]
[STORED AS file_format]
[LOCATION hdfs_path]
详情请参见: https://cwiki.apache.org/confluence/display/Hive/LanguageManual+DDL#LanguageManualD DL-CreateTable
•CREATE TABLE 创建一个指定名字的表。如果相同名字的表已经存在,则抛出异常;用户可以用 IF NOT EXIST 选项来忽略这个异常
•EXTERNAL 关键字可以让用户创建一个外部表,在建表的同时指定一个指向实际数据的路径(LOCATION)
•LIKE 允许用户复制现有的表结构,但是不复制数据
•COMMENT可以为表与字段增加描述
•PARTITIONED BY 指定分区
•ROW FORMAT
  DELIMITED [FIELDS TERMINATED BY char] [COLLECTION ITEMS TERMINATED BY char]
    MAP KEYS TERMINATED BY char] [LINES TERMINATED BY char]
    | SERDE serde_name [WITH SERDEPROPERTIES
    (property_name=property_value, property_name=property_value, ...)]
  用户在建表的时候可以自定义 SerDe 或者使用自带的 SerDe。如果没有指定 ROW FORMAT 或者 ROW FORMAT DELIMITED,将会使用自带的 SerDe。在建表的时候,
用户还需要为表指定列,用户在指定表的列的同时也会指定自定义的 SerDe,Hive 通过 SerDe 确定表的具体的列的数据。
•STORED AS
  SEQUENCEFILE //序列化文件
  | TEXTFILE //普通的文本文件格式
  | RCFILE  //行列存储相结合的文件
  | INPUTFORMAT input_format_classname OUTPUTFORMAT output_format_classname //自定义文件格式
  如果文件数据是纯文本,可以使用 STORED AS TEXTFILE。如果数据需要压缩,使用 STORED AS SEQUENCE 。
•LOCATION指定表在HDFS的存储路径
最佳实践:
如果一份数据已经存储在HDFS上,并且要被多个用户或者客户端使用,最好创建外部表
反之,最好创建内部表。
如果不指定,就按照默认的规则存储在默认的仓库路径中。
示例
使用t2数据库进行操作
(1)创建默认的内部表
0: jdbc:hive2://hadoop3:10000> create table student(id int, name string, sex string, age int,department string) row format delimited fields terminated by ",";
No rows affected (0.222 seconds)
0: jdbc:hive2://hadoop3:10000> desc student;
+-------------+------------+----------+
|  col_name   | data_type  | comment  |
+-------------+------------+----------+
| id          | int        |          |
| name        | string     |          |
| sex         | string     |          |
| age         | int        |          |
| department  | string     |          |
+-------------+------------+----------+
5 rows selected (0.168 seconds)
0: jdbc:hive2://hadoop3:10000>

(2)外部表
0: jdbc:hive2://hadoop3:10000> create external table student_ext
(id int, name string, sex string, age int,department string) row format delimited fields terminated by "," location "/hive/student";
No rows affected (0.248 seconds)
0: jdbc:hive2://hadoop3:10000>
(3)分区表
0: jdbc:hive2://hadoop3:10000> create external table student_ptn(id int, name string, sex string, age int,department string)
. . . . . . . . . . . . . . .> partitioned by (city string)
. . . . . . . . . . . . . . .> row format delimited fields terminated by ","
. . . . . . . . . . . . . . .> location "/hive/student_ptn";
No rows affected (0.24 seconds)
0: jdbc:hive2://hadoop3:10000>
添加分区
0: jdbc:hive2://hadoop3:10000> alter table student_ptn add partition(city="beijing");
No rows affected (0.269 seconds)
0: jdbc:hive2://hadoop3:10000> alter table student_ptn add partition(city="shenzhen");
No rows affected (0.236 seconds)
0: jdbc:hive2://hadoop3:10000>
如果某张表是分区表。那么每个分区的定义,其实就表现为了这张表的数据存储目录下的一个子目录
如果是分区表。那么数据文件一定要存储在某个分区中,而不能直接存储在表中。
(4)分桶表
0: jdbc:hive2://hadoop3:10000> create external table student_bck(id int, name string, sex string, age int,department string)
. . . . . . . . . . . . . . .> clustered by (id) sorted by (id asc, name desc) into 4 buckets
. . . . . . . . . . . . . . .> row format delimited fields terminated by ","
. . . . . . . . . . . . . . .> location "/hive/student_bck";
No rows affected (0.216 seconds)
0: jdbc:hive2://hadoop3:10000>
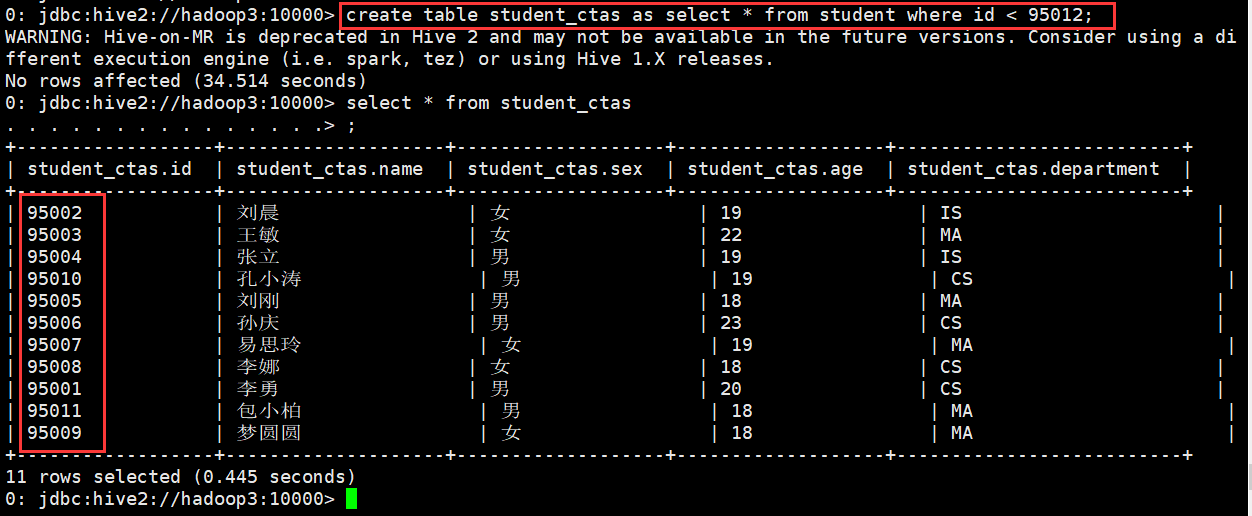
(5)使用CTAS创建表
作用: 就是从一个查询SQL的结果来创建一个表进行存储
现象student表中导入数据
0: jdbc:hive2://hadoop3:10000> load data local inpath "/home/hadoop/student.txt" into table student;
No rows affected (0.715 seconds)
0: jdbc:hive2://hadoop3:10000> select * from student;
+-------------+---------------+--------------+--------------+---------------------+
| student.id  | student.name  | student.sex  | student.age  | student.department  |
+-------------+---------------+--------------+--------------+---------------------+
| 95002       | 刘晨            | 女            | 19           | IS                  |
| 95017       | 王风娟           | 女            | 18           | IS                  |
| 95018       | 王一            | 女            | 19           | IS                  |
| 95013       | 冯伟            | 男            | 21           | CS                  |
| 95014       | 王小丽           | 女            | 19           | CS                  |
| 95019       | 邢小丽           | 女            | 19           | IS                  |
| 95020       | 赵钱            | 男            | 21           | IS                  |
| 95003       | 王敏            | 女            | 22           | MA                  |
| 95004       | 张立            | 男            | 19           | IS                  |
| 95012       | 孙花            | 女            | 20           | CS                  |
| 95010       | 孔小涛           | 男            | 19           | CS                  |
| 95005       | 刘刚            | 男            | 18           | MA                  |
| 95006       | 孙庆            | 男            | 23           | CS                  |
| 95007       | 易思玲           | 女            | 19           | MA                  |
| 95008       | 李娜            | 女            | 18           | CS                  |
| 95021       | 周二            | 男            | 17           | MA                  |
| 95022       | 郑明            | 男            | 20           | MA                  |
| 95001       | 李勇            | 男            | 20           | CS                  |
| 95011       | 包小柏           | 男            | 18           | MA                  |
| 95009       | 梦圆圆           | 女            | 18           | MA                  |
| 95015       | 王君            | 男            | 18           | MA                  |
+-------------+---------------+--------------+--------------+---------------------+
21 rows selected (0.342 seconds)
0: jdbc:hive2://hadoop3:10000>
使用CTAS创建表
0: jdbc:hive2://hadoop3:10000> create table student_ctas as select * from student where id < 95012;
WARNING: Hive-on-MR is deprecated in Hive 2 and may not be available in the future versions. Consider using a different execution
engine (i.e. spark, tez) or using Hive 1.X releases.
No rows affected (34.514 seconds)
0: jdbc:hive2://hadoop3:10000> select * from student_ctas
. . . . . . . . . . . . . . .> ;
+------------------+--------------------+-------------------+-------------------+--------------------------+
| student_ctas.id  | student_ctas.name  | student_ctas.sex  | student_ctas.age  | student_ctas.department  |
+------------------+--------------------+-------------------+-------------------+--------------------------+
| 95002            | 刘晨                 | 女                 | 19                | IS                       |
| 95003            | 王敏                 | 女                 | 22                | MA                       |
| 95004            | 张立                 | 男                 | 19                | IS                       |
| 95010            | 孔小涛                | 男                 | 19                | CS                       |
| 95005            | 刘刚                 | 男                 | 18                | MA                       |
| 95006            | 孙庆                 | 男                 | 23                | CS                       |
| 95007            | 易思玲                | 女                 | 19                | MA                       |
| 95008            | 李娜                 | 女                 | 18                | CS                       |
| 95001            | 李勇                 | 男                 | 20                | CS                       |
| 95011            | 包小柏                | 男                 | 18                | MA                       |
| 95009            | 梦圆圆                | 女                 | 18                | MA                       |
+------------------+--------------------+-------------------+-------------------+--------------------------+
11 rows selected (0.445 seconds)
0: jdbc:hive2://hadoop3:10000>
(6)复制表结构
0: jdbc:hive2://hadoop3:10000> create table student_copy like student;
No rows affected (0.217 seconds)
0: jdbc:hive2://hadoop3:10000>
注意:
如果在table的前面没有加external关键字,那么复制出来的新表。无论如何都是内部表
如果在table的前面有加external关键字,那么复制出来的新表。无论如何都是外部表

2、查看表
(1)查看表列表
查看当前使用的数据库中有哪些表
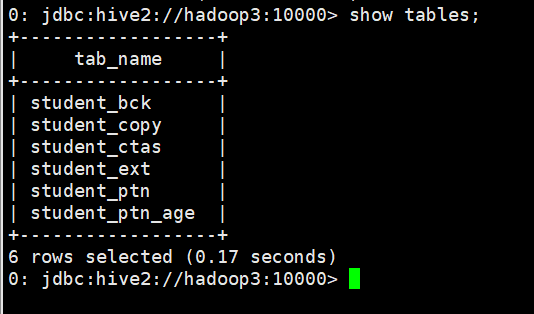
0: jdbc:hive2://hadoop3:10000> show tables;
+---------------+
|   tab_name    |
+---------------+
| student       |
| student_bck   |
| student_copy  |
| student_ctas  |
| student_ext   |
| student_ptn   |
+---------------+
6 rows selected (0.163 seconds)
0: jdbc:hive2://hadoop3:10000>
查看非当前使用的数据库中有哪些表
0: jdbc:hive2://hadoop3:10000> show tables in myhive;
+-----------+
| tab_name  |
+-----------+
| student   |
+-----------+
1 row selected (0.144 seconds)
0: jdbc:hive2://hadoop3:10000>
查看数据库中以xxx开头的表
0: jdbc:hive2://hadoop3:10000> show tables like 'student_c*';
+---------------+
|   tab_name    |
+---------------+
| student_copy  |
| student_ctas  |
+---------------+
2 rows selected (0.13 seconds)
0: jdbc:hive2://hadoop3:10000>
(2)查看表的详细信息
查看表的信息
0: jdbc:hive2://hadoop3:10000> desc student;
+-------------+------------+----------+
|  col_name   | data_type  | comment  |
+-------------+------------+----------+
| id          | int        |          |
| name        | string     |          |
| sex         | string     |          |
| age         | int        |          |
| department  | string     |          |
+-------------+------------+----------+
5 rows selected (0.149 seconds)
0: jdbc:hive2://hadoop3:10000>
查看表的详细信息(格式不友好)
0: jdbc:hive2://hadoop3:10000> desc extended student;

查看表的详细信息(格式友好)
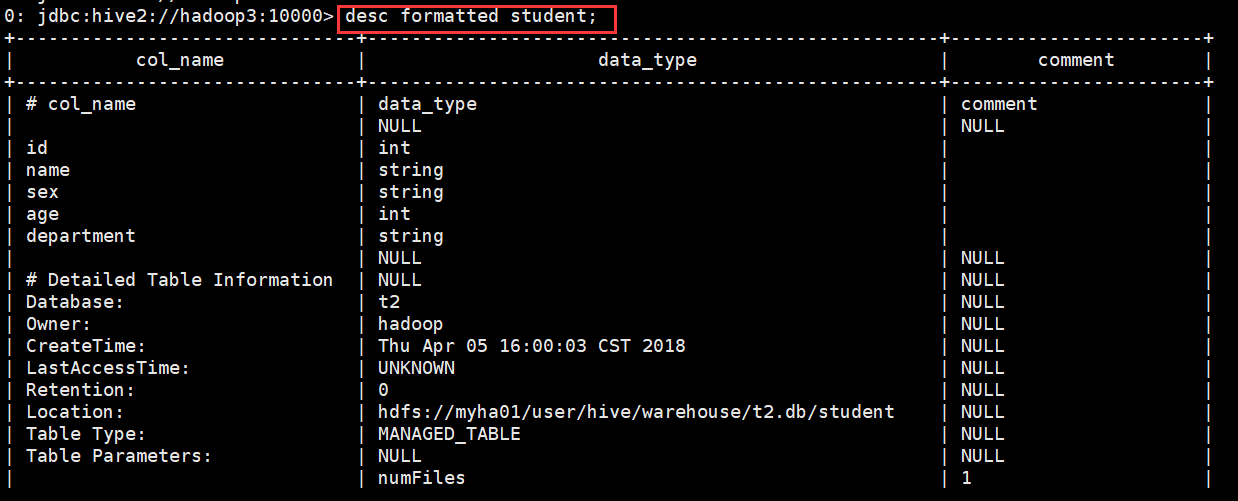
0: jdbc:hive2://hadoop3:10000> desc formatted student;
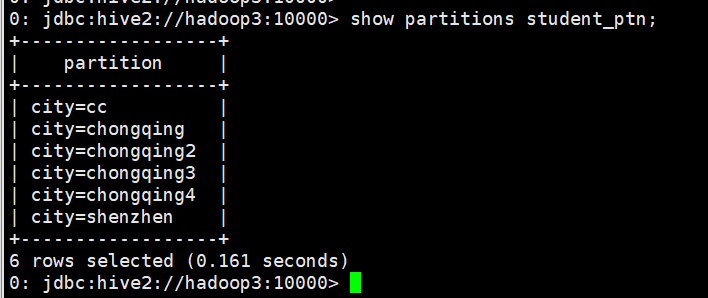
查看分区信息
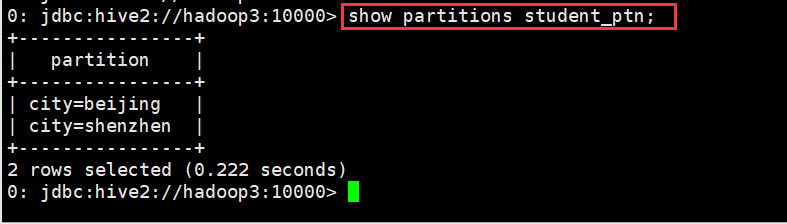
0: jdbc:hive2://hadoop3:10000> show partitions student_ptn;
(3)查看表的详细建表语句
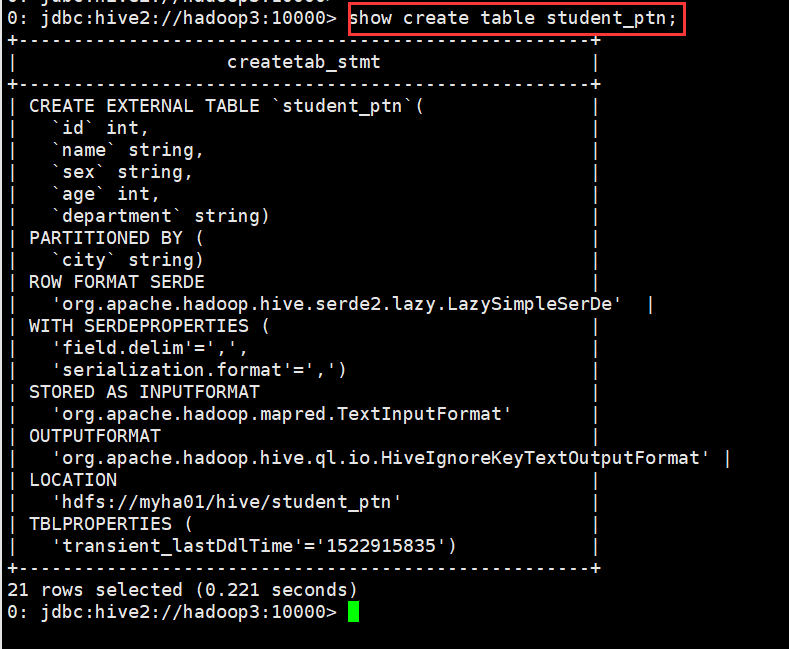
0: jdbc:hive2://hadoop3:10000> show create table student_ptn;
3、修改表
(1)修改表名
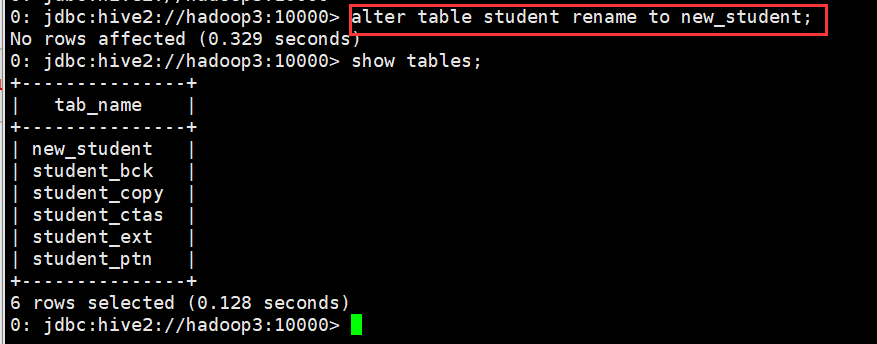
0: jdbc:hive2://hadoop3:10000> alter table student rename to new_student;
(2)修改字段定义
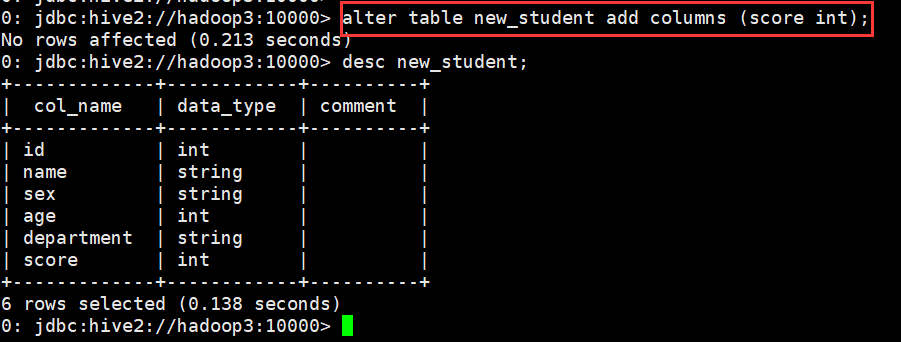
A. 增加一个字段
0: jdbc:hive2://hadoop3:10000> alter table new_student add columns (score int);
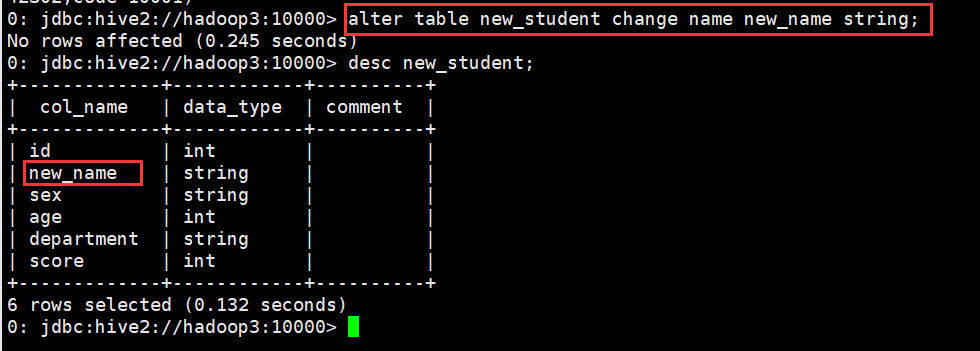
B. 修改一个字段的定义
0: jdbc:hive2://hadoop3:10000> alter table new_student change name new_name string;
C. 删除一个字段
不支持
D. 替换所有字段
0: jdbc:hive2://hadoop3:10000> alter table new_student replace columns (id int, name string, address string);

(3)修改分区信息
A. 添加分区
静态分区
添加一个
0: jdbc:hive2://hadoop3:10000> alter table student_ptn add partition(city="chongqing");
添加多个
0: jdbc:hive2://hadoop3:10000> alter table student_ptn add partition(city="chongqing2") partition(city="chongqing3") partition(city="chongqing4");
动态分区
先向student_ptn表中插入数据,数据格式如下图
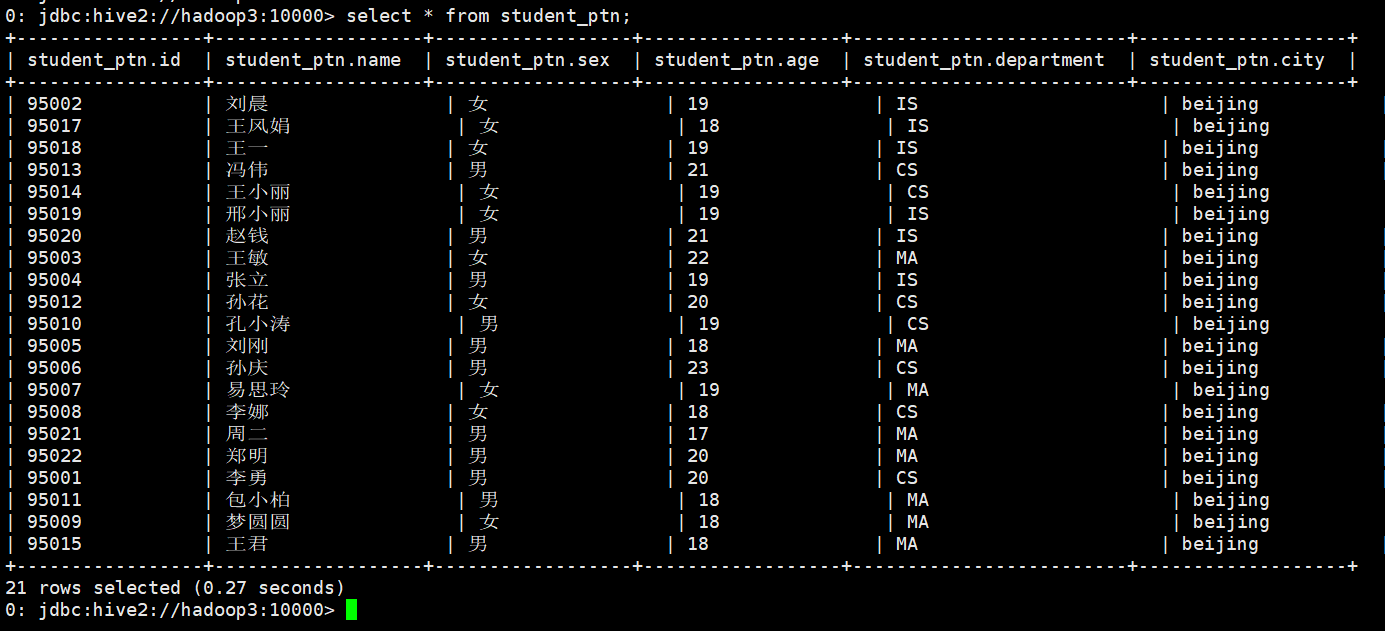
0: jdbc:hive2://hadoop3:10000> load data local inpath "/home/hadoop/student.txt" into table student_ptn partition(city="beijing");
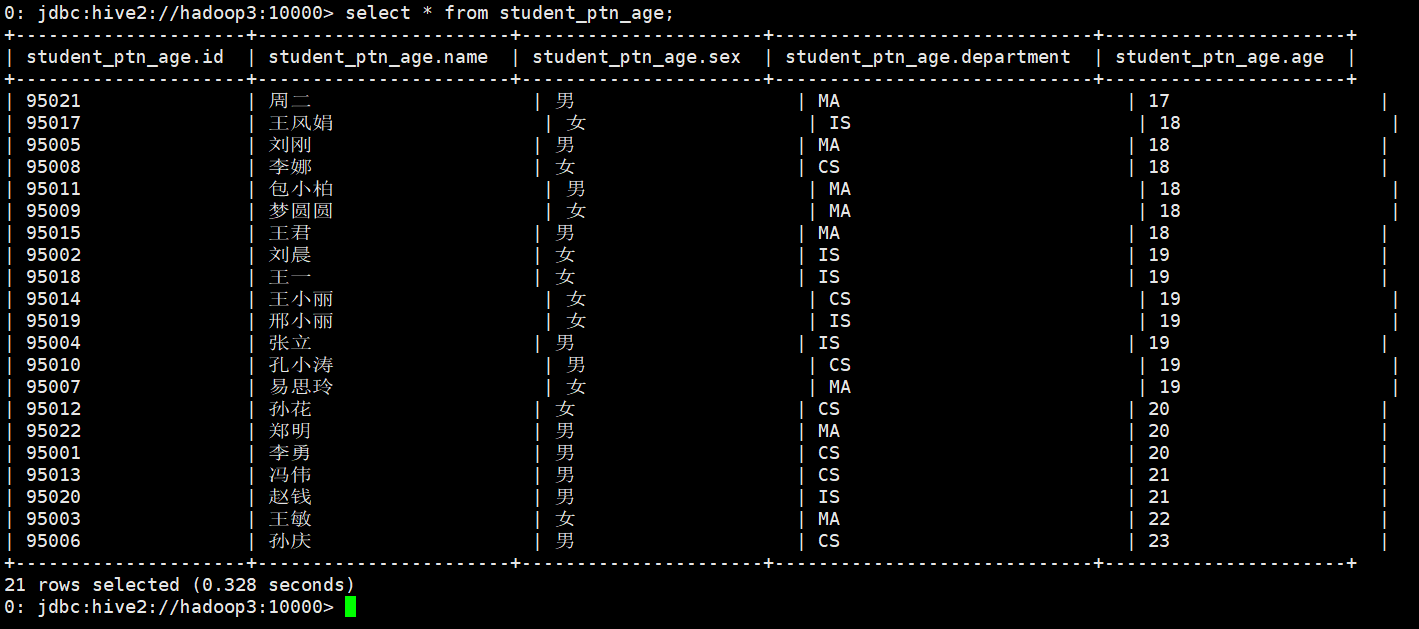
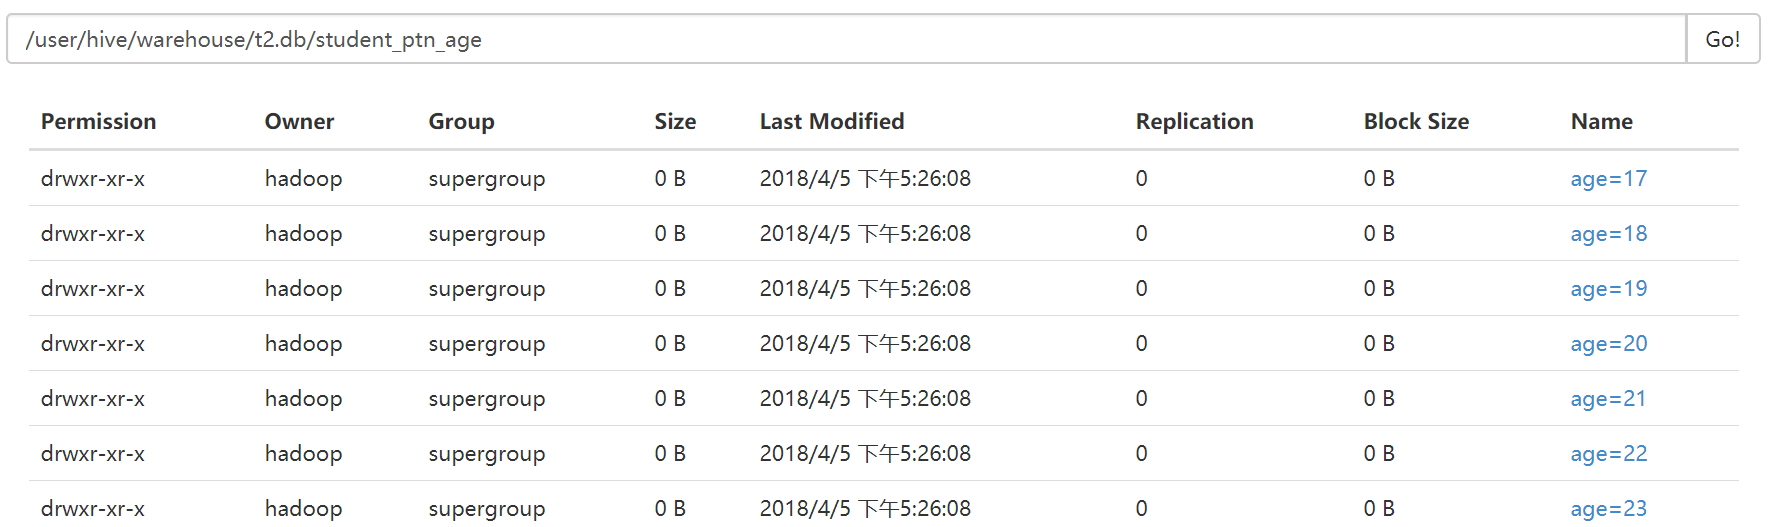
现在我把这张表的内容直接插入到另一张表student_ptn_age中,并实现sex为动态分区(不指定到底是哪中性别,让系统自己分配决定)
首先创建student_ptn_age并指定分区为age
0: jdbc:hive2://hadoop3:10000> create table student_ptn_age(id int,name string,sex string,department string) partitioned by (age int);
从student_ptn表中查询数据并插入student_ptn_age表中
0: jdbc:hive2://hadoop3:10000> insert overwrite table student_ptn_age partition(age)
. . . . . . . . . . . . . . .> select id,name,sex,department,age from student_ptn;
WARNING: Hive-on-MR is deprecated in Hive 2 and may not be available in the future versions. Consider using a different execution engine (i.e. spark, tez) or using Hive 1.X releases.
No rows affected (27.905 seconds)
0: jdbc:hive2://hadoop3:10000>
B. 修改分区
修改分区,一般来说,都是指修改分区的数据存储目录
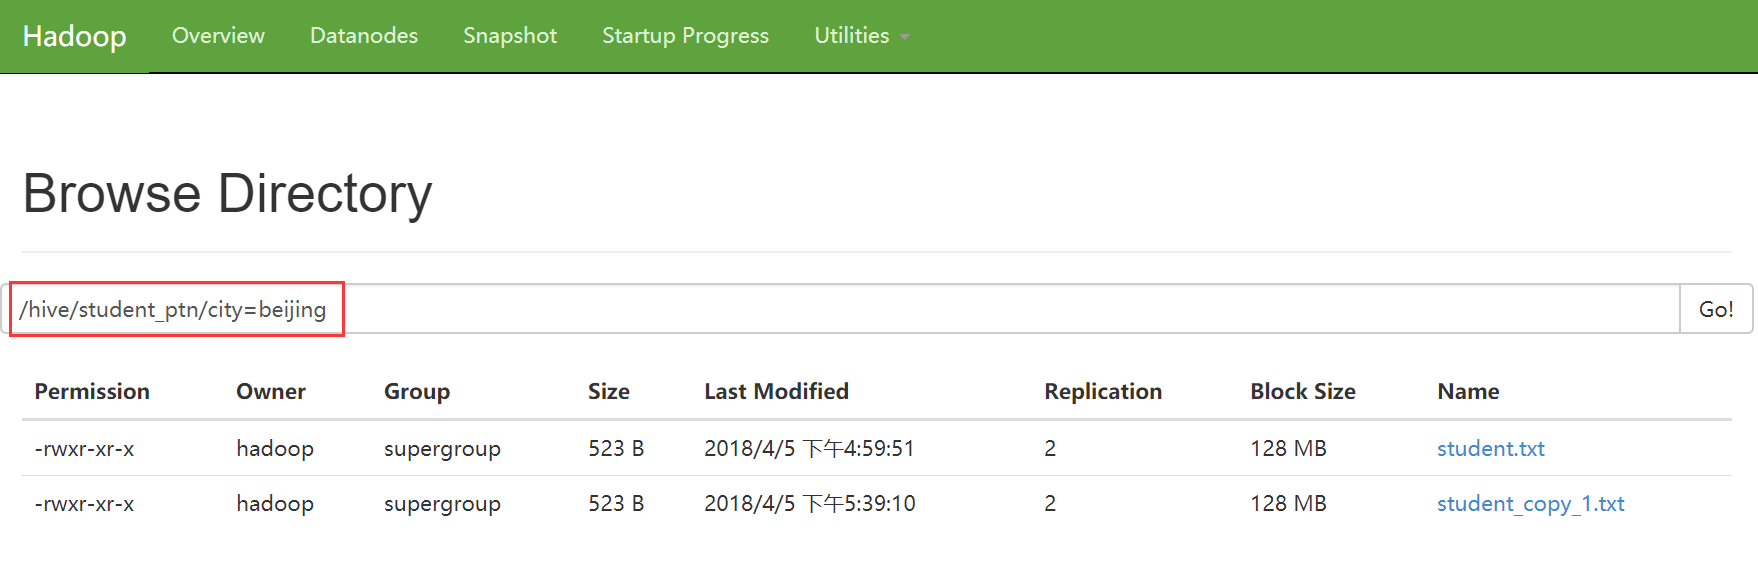
在添加分区的时候,直接指定当前分区的数据存储目录
0: jdbc:hive2://hadoop3:10000> alter table student_ptn add if not exists partition(city='beijing')
. . . . . . . . . . . . . . .> location '/student_ptn_beijing' partition(city='cc') location '/student_cc';
No rows affected (0.306 seconds)
0: jdbc:hive2://hadoop3:10000>
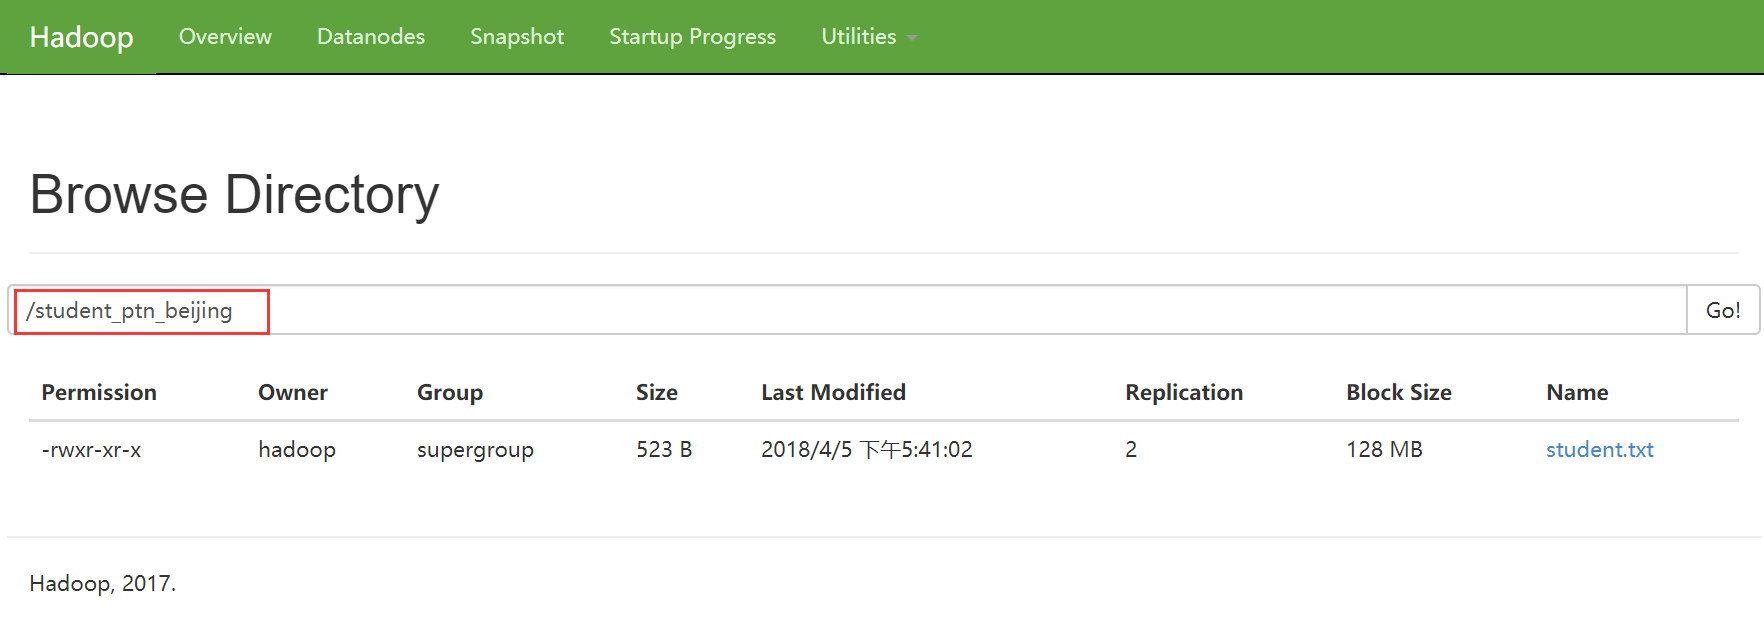
修改已经指定好的分区的数据存储目录
0: jdbc:hive2://hadoop3:10000> alter table student_ptn partition (city='beijing') set location '/student_ptn_beijing';
此时原先的分区文件夹仍存在,但是在往分区添加数据时,只会添加到新的分区目录
C. 删除分区
0: jdbc:hive2://hadoop3:10000> alter table student_ptn drop partition (city='beijing');
4、删除表
0: jdbc:hive2://hadoop3:10000> drop table new_student;
5、清空表
0: jdbc:hive2://hadoop3:10000> truncate table student_ptn;
其他辅助命令