Introduction
My objective is to give an introduction to the inherent Correlation feature available in WF4 through a simple application. You need to have VS 2010 B2 installed to explore the attached code. The correlation that I'd touched on here is between multiple receives of the WF service. In earlier versions, we have to explicitly establish the correlation using GUID.
Steps to Create Correlation Application
The following steps are involved in creating Correlation WF4 application.
- Create the Data Entity Library.
- Create WF Service.
- Create Client Application to Call/Use the WF Service.
Scenario
The scenario I've taken is very simple so that it will be easy to understand the correlation logic. In WF4, you can create a correlation using any data member (which is used to uniquely identify an instance). Let's take a Customer Registration App which knows Customer First Name in the first hand and then updates the Last Name later. So, obviously, we need two(2) receive activities.
Step 1: Create the Data Entity Library
Let us start by creating the data entity library which is shared between the WF service and the Client. This entity library will have 3 private members and 3 public properties to access and assign values.
- Start VS 2010 B2.
- File -> Open -> New Project -> Select VC# -> Class Library and Name it as Customer.
- Rename Class1.cs to Customer.cs and add reference to
System.Runtime.Serializationclass. - In the code, refer to that class using “
using” statement. Add the[DataContract]attribute on top of the Class declaration. Add threeprivatemembers andPublic get,setProperties for First Name, Customer ID and Last Name. Add [DataMember] attribute on top of each of the properties.
Your code should look like...
 View Code
Step 2: Create WF Service
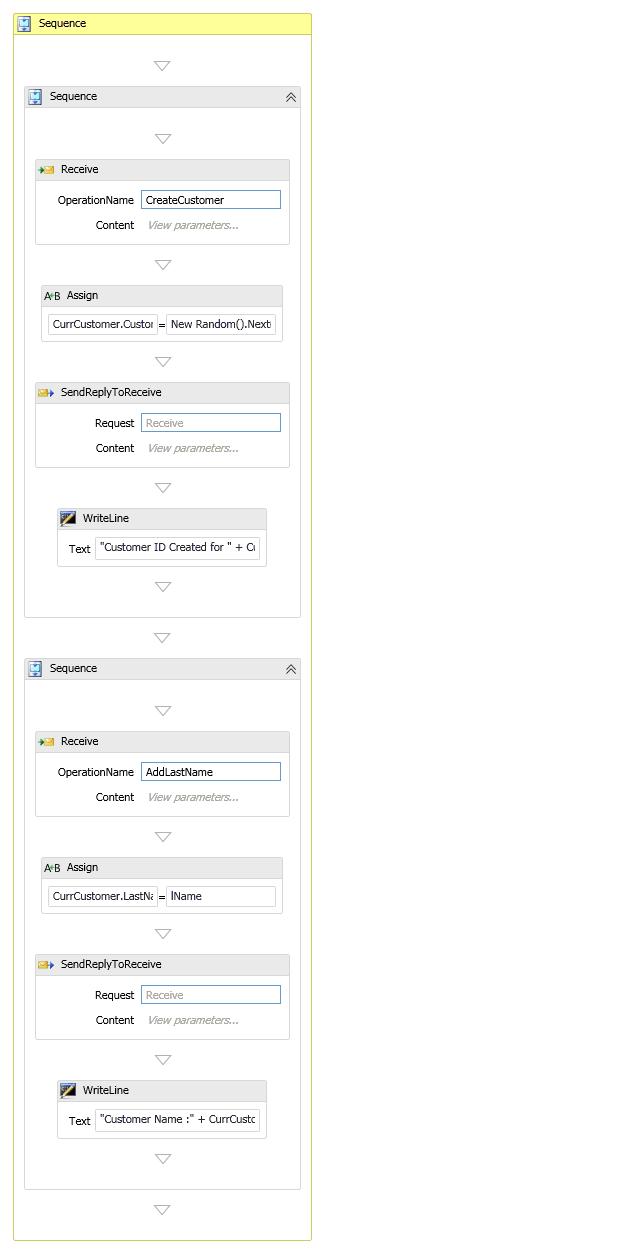
- Right Click the same solution and add a new Project of type Workflow Console Application. Double ClickWorkflow1.xaml to go to the design view. Drag and Drop the “Sequence” from “Control Flow” to the center of the design window. Drag and Drop the “ReceiveAndSendReply” from the Messaging toolbar section on to the body of the “Sequence” control. Again drag and drop the same
ReceiveAndSendReplyfrom the Messaging toolbar beneath the earlierReceiveAndSendReply.Please refer to the Image for the WF Design (as of now, don’t bother about the updated Operation Name, Text, etc. in the image).
- Click the Outer Sequence control. Select “Variables” from the bottom left bar and create the following variables. Before that, refer the Customer (Entity Library) to this Console Application by clicking Add reference from the Solution explorer.
Variable Name Variable Type Scope __handleCorrelation Handle Sequence CurrCustomerCustomer Sequence From the dropdown, select
System.ServiceModel.Activities.CorrelationHandleas variable type for__handle, likewise, chooseCustomer.Customerfor theCurrCustomervariable.__handlevariable is used as handler to route the next call to the already existing instance andCurrCustomerwill hold the current state of theCustomerobject passed to the Service. - Select the “Receive” activity from the first Sequence control inside the main sequence. Do the following in the Properties window for the “Receive” activity.
OperationName = CreateCustomer ServiceContractName = CustomerService CanCreateInstance = True (Check the check box) CorrelatesWith = __handle CorrelatesOn = From the Xpath Query Dropdown, select Customer ID
- Click “View Parameters” button inside the “Receive” box to add parameters to this activity from the client app. Select Parameters radio button and enter the following:
Name Type AssignTo valueCustomerCurrCustomerThis step assigns the
Customerobject to the local variableCurrCustomerfor further processing within the Workflow service. - Add “Assign” control (from Primitives section of the toolbar) between the Receive and “
SendReplyToReceive” controls. This action is to assign any values in the Service. Click the button next to “To” in the properties window after selecting this control from the design panel. You should be able to typeCurrCustomer.CustomerIDwithout any errors. If there is any error, a red info image will display towards the end of the box. Click OK and close it. Click the button next toValuefrom the Properties box and enterNew Random().Next(). This will assign a newCustomer ID (integer)to the existing Customer object in the service). Click “View Parameters” button of the “SendReplyToReceive” box and add the following:Name Type Value resultAddString"Customer Added. ID for " + CurrCustomer.FirstName is " + CurrCustomer.CustomerID.ToString()Note: The Syntax to follow here in XAML is VB syntax. So, we should be learning both C# and VB. This
resultAddwill be sent back to the Client app asstring. - Drag and Drop WriteLine component from the Primitives section next to
SendReplyToReceive. This is to print on the Service Console window to see what is happening in the service. - Click the button next to “Text” property in the Properties window and copy and paste the following:
"Customer ID Created for " + CurrCustomer.FirstName + " " + CurrCustomer.LastName + "=" + CurrCustomer.CustomerID.ToString()
With these above steps, one part of the action which is creating Customer ID for the passed in Customer is done. Now, we are going to create one more Receive activity to add Last Name to the already existing Customer Object in the Service.
- Select the Second Sequence in the Design window and click Variables in the bottom left bar and add the following variables:
Name Variable Type Scope lNameStringSequence custIDInt32Sequence - Select Receive activity and add the following values to the corresponding properties:
OperationName = AddLastNameServiceContractName = CustomerServiceCorrelatesWith = __handle(this is the one which correlates the first receive and second receive activity)CorrelatesOn = Choose “ID : Int32”from the Xpath queries dropdown. This ID is the parameter which we are going to pass from the Client App as defined in the previous step.- Insert Assign component from the Primitives section between Receive and
SendReplyToReceivesections in the design area. In the To text box, type the followingCurrCustomer.LastName. In the value text box, typelName(local variable name) - Click “View Parameters” button in the
SendReplyToReceivebox and add the following. Choose parameters option button.Name Type Value resultAddString"last Name " + CurrCustomer.LastName + " added to Customer ID " + CurrCustomer.CustomerID.ToString()This is the value going to be returned to the Client App.
- Finally, drag and Drop the
WriteLineComponent and type the following in the Text property to see what is happening in the Service."Customer Name :" + CurrCustomer.FirstName + " " + CurrCustomer.LastName + " ID : " + CurrCustomer.CustomerID.ToString()
We are done with creating the WF4 Service in the XAML.
- Open the Program.cs of the WF Service App and type the following.
- Refer
System.ServiceModel.ActivitiesandSystem.ServiceModel.Descriptionassemblies. - Inside the main method, copy and paste the following:
string baseAddress="http://localhost:8081/CustomerService";
using (WorkflowServiceHost shost =  	new WorkflowServiceHost(new Activity1(), new Uri(baseAddress)))
{
shost.Description.Behaviors.Add(new ServiceMetadataBehavior()  	{HttpGetEnabled = true });
shost.Open();
Console.WriteLine("CustomerService is listening @ " + baseAddress);
Console.ReadLine();
}
Variable lName is to hold the passed-in Last name value from the client app and so is the custID to hold the Customer ID. Click the “View Parameters” button from the receive Component and add the following variables. Choose Parameters option button.
| Name | Type | AssignTo |
value | String | lName |
ID | Int32 | custID |
Here we should not check the CanCreateInstance property as the instance is already created by the firstReceive and from this time around we are going to update the already existing Customer object in the Service app.
Build the solution and make sure that there is no type error or any other build errors. Go to bin/debug of the WF Service Console App and Run the Console App.
Step 3: Create Client Application to call the WF Service
- Right Click the solution and add VC# Console Application and name it as
ClientApp. Refer theCustomerlibrary to the project. Right Click “Service Reference” of theClientAppand click Add Service reference. In the Address bar type http://localhost:8081/CustomerService and click Go. Form the Services Box, choose the Service and click OK. Now, you have added a reference to the Running Service in the localhost.Note: Every time you make a change to Service, you need to update the Client App.
- Open the Program.cs of the
ClientAppand copy and paste the following withinMainmethod.
View Code
ClientApp as the staring project and click Run button. Alternatively, you can go and execute the EXE from bin/debug folder of the ClientApp. note:
this article is come from here.
and download code form here.