将数据存储在数据库中是任何软件应用程序不可或缺的一部分。无论如何控制该数据库都有一个该数据的主控。区块链技术将数据存储到区块链网络内的区块中。因此,只要某个节点与网络同步,它们就会获得区块中数据的副本。因此,该技术中没有特定的数据主控。
在本教程中,我们将编写一份智能合约(我将进一步解释),以便在区块链上保留用户数据。我们将使用python web3(web3的python库)来开发和部署智能合约。一旦我们在区块链上部署了智能合约。我们将使用flask API与智能合约进行交互以存储一些数据/信息。我们将它存储在区块链上,它是不可变的。
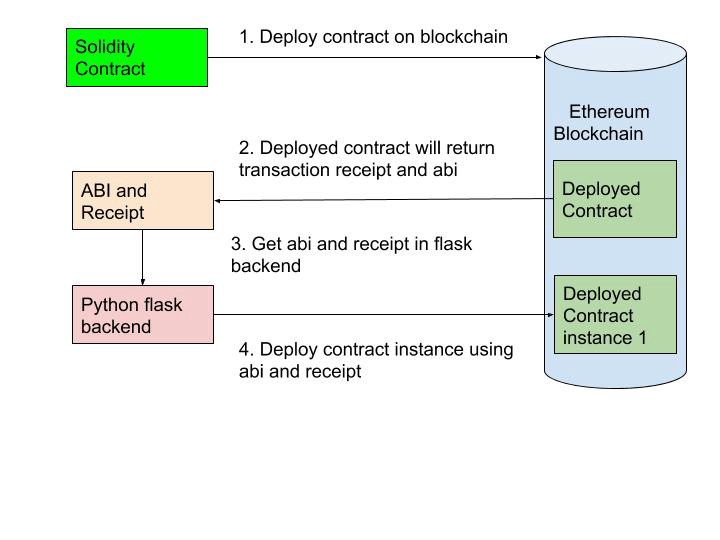
环境要求
Python 3.6
安装
1.创建一个python虚拟环境。
Virtualenv将你的Python软件包本地化保存在你项目的虚拟环境中,而不是强迫你在系统范围内安装软件包。
$ virtualenv -p /usr/bin/python3.6 venv
$ source venv/bin/activate
2.现在我们需要Ganache那样的以太坊测试链。
Ganache是以太坊开发的个人区块链,可用于部署合约,开发应用程序和运行测试。
$ npm install -g ganache-cli
3.安装python web3
Web3.py是一个用于与以太坊交互的python库。它的API源自Web3.js Javascript API,对于使用过web3.js的人来说应该很熟悉。
$ pip3 install web3
4.Flask
Flask是一个python轻量级框架。
$ pip3 install flask
5.Flask Restful
Flask-RESTful是Flask的扩展,增加了对快速构建REST API的支持。
$ pip3 install flask-restful
- Flask Marshmallow
Flask marshmallow是一个对象序列化/反序列化库。
$ pip3 install flask-marshmallow
启动以太坊测试区块链服务器
要部署智能合约,我们应该启动测试以太坊服务器。我们正在使用ganache进行测试。在终端中键入以下命令:
$ ganache-cli
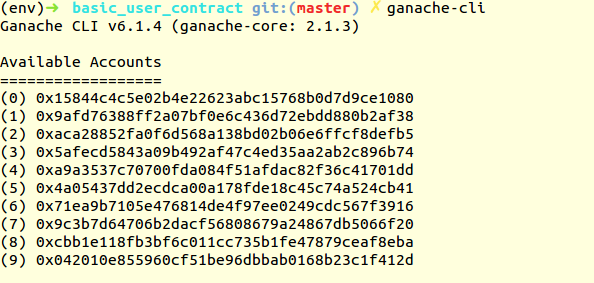
Ganache为我们提供了10个默认测试帐户,每个帐户中有100个假ether,用于交易。我们将使用这些帐户在合约中部署和设置各种值。
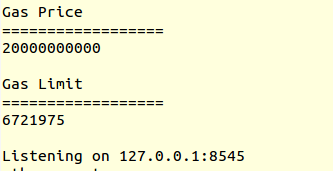
我们可以看到gas价格和限制以及部署ganache的host:port。我们在部署合约时需要这个。
创建user.sol文件
现在我们将用Solidity编写智能合约。Solidity是在ethereum上编写智能合约的语言。智能合约包括我们将在区块链上存储的数据,数据和getter方法的可选验证函数,访问数据的setter方法。
例如,要在区块链上进行考勤注册,你将拥有一组用户对象。它将可以访问用户的getter,setter方法。由于每个用户每天只能标记一次出勤,因此你需要一个验证功能来检查,智能合约与我们通常用其他任何语言开发的应用程序非常相似。
在下面的文件中,我们使用getter,setter函数构建简单的用户合约。
1.在.sol文件中声明solidity编译器版本。
pragma solidity ^ 0.4.21;
了解使用的编译器版本。
$ solidity — version
2.导入库文件Import library。我们应该将库用于常用的实用程序函数。库可以只编译一次并反复使用(点击这里获取一些好的库资源)。
import“stringUtils.sol”;
3.为用户声明合约
contract userRecords {}
4.现在,对于基本演示,我们将存储有关用户的名称和性别信息。因此,使用struct和enum数据类型初始化这两个变量。
//枚举类型变量来存储用户性别
enum genderType { male, female }
//我们将存储在以太坊合约中的实际用户对象
struct user{
    string name; genderType gender;
}
5.现在我们将声明user(struct)类型的用户对象。也可以将其声明为public,以便从合约外部访问它(有关可见范围,请单击此处)。
user user_obj;
6.现在为用户对象添加getter,setter方法。我们将在区块链上保留每个用户的信息。我们应该始终公开此方法,因为我们将从合约外部访问它们。
//设置用户公共功能
//这类似于db中的持久对象。
function setUser(string name, string gender) public {
    genderType gender_type = getGenderFromString(gender);
    user_obj = user({name:name, gender: gender_type});
}
//获取用户公共功能
//这类似于从db获取对象。
function getUser() public returns (string, string) {
    return (user_obj.name, getGenderToString(user_obj.gender));
}
7.请注意,我们使用了两个内部函数getGenderFromString()和getGenderToString()。让我们添加这个内部函数。将它们声明为内部,因为我们不会在外面使用它们。
//用于从string中转换genderType枚举的内部函数
function getGenderFromString(string gender) internal returns(genderType) {
    if(StringUtils.equal(gender, "male")) {
        return genderType.male;
    } else {
        return genderType.female;
    }
}
//将genderType枚举转换为字符串的内部函数
(string) {
    if(gender == genderType.male) {
        return "male";
    } else {
        return "female";
    }
}
我们正在使用stringUtils.equal()库函数。由于此版本的solidity不支持使用(==)进行字符串比较。
8.现在我们的user.sol文件合约如下所示:
pragma solidity ^0.4.21;
// import library file
import "stringUtils.sol";
contract userRecords {
  // enum type variable to store user gender
  enum genderType { male, female };
  // Actual user object which we will store
  struct user{
    string name;
    genderType gender;
  }
  // user object
  user user_obj;
  //Internal function to conver genderType enum from string
  function getGenderFromString(string gender) internal returns   (genderType) {
    if(StringUtils.equal(gender, "male")) {
      return genderType.male;
    } else {
      return genderType.female;
    }
  }
  //Internal function to convert genderType enum to string
  function getGenderToString(genderType gender) internal returns (string) {
    if(gender == genderType.male) {
      return "male";
    } else {
      return "female";
    }
  }
  // set user public function
  // This is similar to persisting object in db.
  function setUser(string name, string gender) public {
    genderType gender_type = getGenderFromString(gender);
    user_obj = user({name:name, gender: gender_type});
  }

  // get user public function
  // This is similar to getting object from db.
  function getUser() public returns (string, string) {
    return (user_obj.name, getGenderToString(user_obj.gender));
  }
}
使用python脚本编译和部署solidity文件。
1.在下面的python脚本中,我们需要实例化python-web3测试以太坊节点。我们将设置ganche url为测试以太坊节点。我们将使用下面的w3对象来部署合约。
from web3 import Web3
# web3.py instance
w3 = Web3(Web3.HTTPProvider("http://127.0.0.1:8545"))
2.现在我们将编译solidity代码。为了编译solidity代码,我们使用py-solc,它是用于solidity编译器的python扩展。
from solc import compile_files
# 编译所有合约文件
contracts = compile_files(['user.sol', 'stringUtils.sol'])
# 单独的主文件和链接文件
main_contract = contracts.pop("user.sol:userRecords")
library_link = contracts.pop("stringUtils.sol:StringUtils")
3.每当使用import语句编译.sol文件时。我们还需要链接导入文件的部署地址以及主合约。 因此,对于部署所有链接首先通过编译它(如果已经部署然后保存地址)请参见下图主合约的bin。
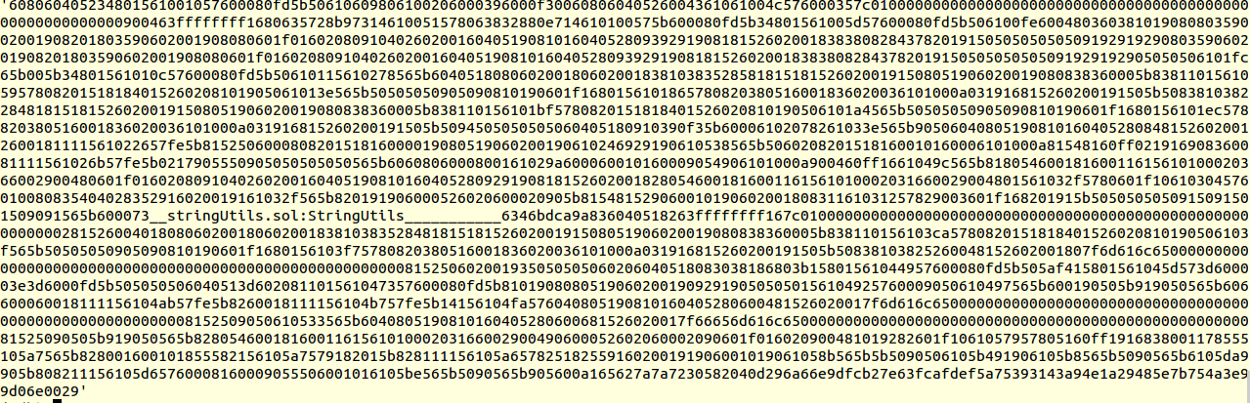
当你编译主合约时,如果你看到它的bin部分,你将找到我们正在导入的库的_stringUtils.sol:StringUtils ___________(它也可以用于合约)。 这部分我们应该通过在部署合约之前的库地址来替换它。
4.然后我们将库地址与主合约相关联。
from solc import link_code
def deploy_contract(contract_interface):
    #实例化和部署合约
    contract = w3.eth.contract(
        abi=contract_interface['abi'],
        bytecode=contract_interface['bin']
    )
    #从已部署的合约中获取交易哈希
    tx_hash = contract.deploy(
        transaction={'from': w3.eth.accounts[1]}
    )
    #获取tx收据以获取合约地址
    tx_receipt = w3.eth.getTransactionReceipt(tx_hash)
    return tx_receipt['contractAddress']
library_address = {
    "stringUtils.sol:StringUtils": deploy_contract(library_link)
}
main_contract['bin'] = link_code(
    main_contract['bin'], library_address
)
链接后主合约bin的见下图:
你将看到导入库的bin已添加。
5.现在使用我们的w3对象部署主合约。使用ethereum account {'from':w3.eth.accounts [1]}的默认地址进行部署。
def deploy_contract(contract_interface):
    # 实例化和部署合约
    contract = w3.eth.contract(
        abi=contract_interface['abi'],
        bytecode=contract_interface['bin']
    )
    # 从部署的合约中获取交易哈希
    tx_hash = contract.deploy(
        transaction={'from': w3.eth.accounts[1]}
    )
    # 获取tx收据以获取合同地址
    tx_receipt = w3.eth.getTransactionReceipt(tx_hash)
    return tx_receipt['contractAddress']
contract_address = deploy_contract(main_contract)
你将在运行ganache测试服务器的选项卡中看到以下这行:

这与合约部署后在tx_receipt中获得的信息相同。
6.现在将abi和contract_address存储在json文件中。这样我们以后可以在flask api中使用它来存储合约中的用户对象。
# 在json文件中添加abi(应用程序二进制接口)和交易收据
with open('data.json', 'w') as outfile:
    data = {
       "abi": main_contract['abi'],
       "contract_address": deploy_contract(main_contract)
    }
    json.dump(data, outfile, indent=4, sort_keys=True)
7.现在我们的完整脚本如下所示:
import json
from web3 import Web3
from solc import compile_files, link_code, compile_source
# web3.py instance
w3 = Web3(Web3.HTTPProvider("http://127.0.0.1:8545"))
def deploy_contract(contract_interface):
    # Instantiate and deploy contract
    contract = w3.eth.contract(
        abi=contract_interface['abi'],
        bytecode=contract_interface['bin']
    )
    # Get transaction hash from deployed contract
    tx_hash =contract.deploy(transaction{'from':w3.eth.accounts[1]})
    # Get tx receipt to get contract address
    tx_receipt = w3.eth.getTransactionReceipt(tx_hash)
    return tx_receipt['contractAddress']
# compile all contract files
contracts = compile_files(['user.sol', 'stringUtils.sol'])
# separate main file and link file
main_contract = contracts.pop("user.sol:userRecords")
library_link = contracts.pop("stringUtils.sol:StringUtils")
# print bin part in  console you will see 'stringUtils' in that we need to link library address in that bin code.
# to that we have to deploy library code first then link it
library_address = {
    "stringUtils.sol:StringUtils": deploy_contract(library_link)
}
main_contract['bin'] = link_code(
    main_contract['bin'], library_address)
# add abi(application binary interface) and transaction reciept in json file
with open('data.json', 'w') as outfile:
    data = {
        "abi": main_contract['abi'],
        "contract_address": deploy_contract(main_contract)
    }
    json.dump(data, outfile, indent=4, sort_keys=True)
创建flask api以为用户存储不同的值
你只需部署一次合约。但是使用它的地址,你会一次又一次地存储数据。同样,在db的世界中,你只需定义一次模型/模式,但你将在db中添加不同的行/文档。
我们将使用flask post api来获取用户的用户信息并返回成功。
from flask import Flask, Response, request, jsonify
from marshmallow import Schema, fields, ValidationError
def check_gender(data):
    valid_list = ["male", "female"]
    if data not in valid_list:
        raise ValidationError(
            'Invalid gender. Valid choices are'+ valid_list
        )
#For api validations
class UserSchema(Schema):
    name = fields.String(required=True)
    gender = fields.String(required=True, validate=check_gender)
# Initializing flask app
app = Flask(__name__)
# api to set new user every api call
@app.route("/blockchain/user", methods=['POST'])
def user():
    body = request.get_json()
    result, error = UserSchema().load(body)
    if error:
        return jsonify(error), 422
    return jsonify({"data": result}), 200
由于这不是flask教程,我不会详细说明这一点。我们的API用户将从客户端获取数据(curl请求)并对其进行验证将其返回给客户端(curl请求)
2.现在我们将初始化web3对象以与已部署的用户合约进行通信。
from web3 import Web3
# web3.py instance
w3 = Web3(Web3.HTTPProvider("http://127.0.0.1:8545"))
3.现在我们将获得之前存储在data.json文件中的abi和合约地址。
with open("data.json", 'r') as f:
     datastore = json.load(f)
     abi = datastore["abi"]
     contract_address = datastore["contract_address"]
4.选择交易的默认帐户地址。每次在合约中为用户设置新值。你会从钱包里拿出一些gas。
w3.eth.defaultAccount = w3.eth.accounts[1]
5.最后,你将在以太坊合约中设置api调用用户对象时获得的值。
@app.route("/blockchain/user", methods=['POST'])
def user():
    # Create the contract instance with the newly-deployed address
    user = w3.eth.contract(address=contract_address, abi=abi)
    body = request.get_json()
    result, error = UserSchema().load(body)
    if error:
        return jsonify(error), 422
    tx_hash = user.functions.setUser(
        result['name'],result['gender']
    )
    tx_hash = tx_hash.transact()
    # Wait for transaction to be mined...
    w3.eth.waitForTransactionReceipt(tx_hash)
    user_data = user.functions.getUser().call()
    return jsonify({"data": user_data}), 200
我们首先使用abi和contract_address获得部署合约。
user = w3.eth.contract(address=contract_address, abi=abi)
然后我们可以使用合约实例调用任何合约公共函数。在为用户设置值之后,我们将使用transact方法将其公之于众。这将在以太坊区块中添加新的用户值。
tx_hash = user.functions.setUser(
    result['name'],result['gender']
).transact()
现在我们可以使用call方法获得已在合约中设置的值,这将调用合约函数而不在区块链中添加任何区块。
user_data = user.functions.getUser().call()
我们的api文件的最终代码如下所示。将其另存为app.py。
import json
from flask import Flask, Response, request, jsonify
from marshmallow import Schema, fields, ValidationError
from web3 import Web3
# web3.py instance
w3 = Web3(Web3.HTTPProvider("http://127.0.0.1:8545"))
w3.eth.defaultAccount = w3.eth.accounts[1]
# Get stored abi and contract_address
with open("data.json", 'r') as f:
    datastore = json.load(f)
    abi = datastore["abi"]
    contract_address = datastore["contract_address"]
def check_gender(data):
    valid_list = ["male", "female"]
    if data not in valid_list:
        raise ValidationError(
            'Invalid gender. Valid choices are'+ valid_list
        )
#For api validations
class UserSchema(Schema):
    name = fields.String(required=True)
    gender = fields.String(required=True, validate=check_gender)
# Initializing flask app
app = Flask(__name__)
# api to set new user every api call
@app.route("/blockchain/user", methods=['POST'])
def user():
    # Create the contract instance with the newly-deployed address
    user = w3.eth.contract(address=contract_address, abi=abi)
    body = request.get_json()
    result, error = UserSchema().load(body)
    if error:
        return jsonify(error), 422
    tx_hash = user.functions.setUser(
        result['name'],result['gender']
    ).transact()
    # Wait for transaction to be mined...
    receipt = w3.eth.waitForTransactionReceipt(tx_hash)
    user_data = user.functions.getUser().call()
    return jsonify({"data": user_data}), 200
运行以下命令以启动服务器。
$ FLASK_APP=app.py flask run
用curl调用api
$ curl -H "Content-Type: application/json" --request POST -d '{"name":"John Doe","gender":"male"}' http://localhost:5000/blockchain/user
你也可以在这里找到完整代码。
python用web3.py库开发以太坊来说非常的方便,有需要学的也可以看看这里:http://t.cn/RdXcpVD