1 MySQL相关概念介绍
MySQL为关系型数据库(Relational Database Management System), 这种所谓的"关系型"可以理解为"表格"的概念, 一个关系型数据库由一个或数个表格组成, 如图所示的一个表格:
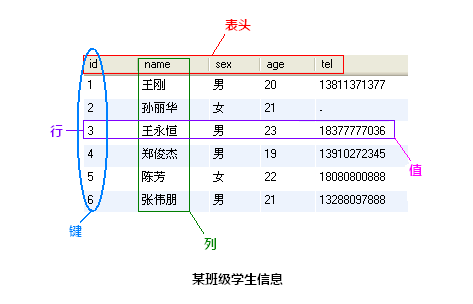
- 表头(header): 每一列的名称;
- 列(row): 具有相同数据类型的数据的集合;
- 行(col): 每一行用来描述某个人/物的具体信息;
- 值(value): 行的具体信息, 每个值必须与该列的数据类型相同;
- 键(key): 表中用来识别某个特定的人物的方法, 键的值在当前列中具有唯一性。
2 MySQL的安装配置以及服务的启停
|
windows下MySQL安装以及配置 即字符编码设置:default-character-set = gbk |
3 MySQL脚本以及数据类型
3.1 MySQL脚本
与常规的脚本语言类似, MySQL也具有一套对字符、单词以及特殊符号的使用规定, MySQL通过执行SQL语句来完成对数据库的操作, 该脚本由一条或多条MySQL语句(SQL语句 + 扩展语句)组成, 保存时脚本文件后缀名一般为.sql。在控制台下, MySQL客户端也可以对语句进行单句的执行而不用保存为.sql文件。
语句——MySQL语句是组成MySQL脚本的基本单位, 每条语句能完成特定的操作, 他是由SQL标准语句 + MySQL扩展语句组成。
函数——MySQL函数用来实现数据库操作的一些高级功能, 这些函数大致分为以下几类:字符串函数、数学函数、日期时间函数、搜索函数、加密函数、信息函数。
3.2 MySQL数据类型
MySQL有三大类数据类型, 分别为数字、日期/时间、字符串, 这三大类中又更细致的划分了许多子类型:
数字类型
整数: tinyint、smallint、mediumint、int、bigint
浮点数: float、double、real、decimal
日期和时间: date、time、datetime、timestamp、year
字符串类型:
字符串: char、varchar
文本: tinytext、text、mediumtext、longtext
二进制(可用来存储图片、音乐等): tinyblob、blob、mediumblob、longblob
4 MySQL基本操作
(1)启动、登陆数据库
启动:net start mysql(/etc/init.d/mysql start)
登陆:mysql -h 地址 -P 端口 -u 用户名 -p 密码
登陆本机:mysql -u'主机名或ip地址' -p
跳过权限验证登录:mysqld --skip-grant-tables
(2)库基本操作
查看:show databases;
使用:use [databasename];
创建:create database [name];
(3)表基本操作
查看:show tables;
创建:
create table students
(
id int not null auto_increment primary key,
name char(8) not null,
sex char(4) not null,
age tinyint unsigned not null,
tel char(13) null default "-"
);
(4)数据操作
插入:insert into students(name,sex,age,tel) values('alex','man',18,'151515151')
删除:delete from students where id =2;
修改:update students set name = 'sb' where id =1;
查询:select * from students


 1 #创建数据库jumpserver,设置字符编码为utf8
 2 create database jumpserver character set = utf8;
 3 #使用数据库
 4 use jumpserver
 5
 6 #创建数据表host_group(主机组表)
 7 create table host_group
 8     (
 9         group_id int auto_increment primary key,
10         name char(20) not null,
11         description text
12     );
13
14 #创建数据表user_info(用户表)
15 create table user_info
16     (
17         user_id int auto_increment primary key,
18         user_name char(20) not null,
19         user_group_id int not null,
20         foreign key(user_group_id) references host_group(group_id)
21     );
22
23 #创建数据表host_info(主机表)
24 create table host_info
25     (
26         host_id int auto_increment primary key,
27         host_name char(50) not null,
28         host_type char(50) not null,
29         address char(15) not null,
30         cpu_count smallint,
31         cpu_type char(20),
32         disk_count smallint,
33         size_perdisk int,
34         host_description text
35     );
36
37 #创建数据表host_group_relation(主机与主机组关系表)
38 create table host_group_relation
39     (
40     id int,
41     host_id int not null,
42     group_id int not null,
43     foreign key(host_id) references host_info(host_id),
44     foreign key(group_id) references host_group(group_id),
45     primary key(host_id,group_id)
46     );
47
48 #向表host_group中插入3条数据
49 insert into host_group values
50 (1,'admin','管理员,可操作所有机器,执行任何操作'),
51 (2,'developer','程序开发人员,只能操作应用服务器'),
52 (3,'dba','数据库管理员,只能操作数据库服务器');
53
54 #向表user_info中插入3条数据
55 insert into user_info values
56 (1,'alex',1),(2,'eric',2),(3,'tony',3);
57
58 #向表host_info中插入3条数据
59 insert into host_info (host_id,host_name,host_type,address) values
60 (1,'host1','web','192.168.1.171'),
61 (2,'host2','application','192.168.1.172'),
62 (3,'host3','db','192.168.1.173');
63
64 #向表host_group_relation中插入5条数据
65 insert into host_group_relation values
66 (1,1,1),
67 (2,2,1),
68 (3,3,1),
69 (4,2,2),
70 (5,3,3);
更多请参考:
http://www.cnblogs.com/shockerli/p/1000-plus-line-mysql-notes.html
http://www.cnblogs.com/yunf/archive/2011/04/12/2013448.html
http://www.cnblogs.com/hoojo/archive/2011/06/20/2085390.html
5 Python MySQL API
5.1 Python 操作 Mysql 模块的安装
linux:
    yum install MySQL-python
window:
    http://files.cnblogs.com/files/wupeiqi/py-mysql-win.zip
|
5.2 数据库操作
 1 #导入Python操作MySQL的模块
 2 import MySQLdb
 3 #创建连接对象
 4 conn = MySQLdb.connect(host='127.0.0.1',user='root',passwd='111111',db='mydb')
 5 #创建游标
 6 cur = conn.cursor()
 7 #执行sql语句,返回影响数据库的条数(语句最后传入的是元组)
 8 reCount = cur.execute('insert into UserInfo(Name,Address) values(%s,%s)',('tim','china'))
 9 #同上(语句最后传入的是字典)
10 # reCount = cur.execute('insert into UserInfo(Name,Address) values(%(id)s, %(name)s)',{'id':12345,'name':'alex'})
11 #把修改提交到数据库
12 conn.commit()
13 #关闭游标
14 cur.close()
15 #关闭数据库连接
16 conn.close()
 1 #导入Python操作MySQL的模块
 2 import MySQLdb
 3 #创建连接对象
 4 conn = MySQLdb.connect(host='127.0.0.1',user='root',passwd='111111',db='mydb')
 5 #创建游标
 6 cur = conn.cursor()
 7 #插入的数据列表
 8 li =[
 9      ('name1','address1'),
10      ('name2','address2'),
11 ]
12 #执行批量插入语句
13 reCount = cur.executemany('insert into UserInfo(Name,Address) values(%s,%s)',li)
14 #把修改提交到数据库
15 conn.commit()
16 #关闭游标
17 cur.close()
18 #关闭数据库连接
19 conn.close()
20 #打印影响的数据库条数
21 print reCount
 1 #导入Python操作MySQL的模块
 2 import MySQLdb
 3 #创建连接对象
 4 conn = MySQLdb.connect(host='127.0.0.1',user='root',passwd='111111',db='mydb')
 5 #创建游标
 6 cur = conn.cursor()
 7 #执行sql语句,返回影响数据库的条数
 8 reCount = cur.execute('delete from UserInfo')
 9 #把修改提交到数据库
10 conn.commit()
11 #关闭游标
12 cur.close()
13 #关闭数据库连接
14 conn.close()
15 #打印影响数据库的条数
16 print reCount
 1 #导入Python操作MySQL的模块
 2 import MySQLdb
 3 #创建连接对象
 4 conn = MySQLdb.connect(host='127.0.0.1',user='root',passwd='111111',db='mydb')
 5 #创建游标
 6 cur = conn.cursor()
 7 #执行sql语句,返回影响数据库的条数
 8 reCount = cur.execute('update UserInfo set Name = %s',('alin',))
 9 #把修改提交到数据库
10 conn.commit()
11 #关闭游标
12 cur.close()
13 #关闭数据库连接
14 conn.close()
15 #打印影响数据库的条数
16 print reCount
 1 # ##########fetchone/fetchmany(num) ##############
 2 #导入模块
 3 import MySQLdb
 4 #创建连接
 5 conn = MySQLdb.connect(host='127.0.0.1',user='root',passwd='111111',db='mydb')
 6 #创建游标
 7 cur = conn.cursor()
 8 #执行sql语句
 9 reCount = cur.execute('select * from UserInfo')
10 #打印查询到得结果,fetchone每次只取一条,类似文件操作,当前指针指向下一条
11 print cur.fetchone()
12 print cur.fetchone()
13 #类似于文件操作的文件指针移动,相对移动
14 cur.scroll(-1,mode='relative')
15 print cur.fetchone()
16 print cur.fetchone()
17 #绝对移动
18 cur.scroll(0,mode='absolute')
19 print cur.fetchone()
20 print cur.fetchone()
21 #关闭游标、连接
22 cur.close()
23 conn.close()
24 #打印影响数据条数
25 print reCount
26
27 # ############ fetchall #############
28 #导入模块
29 import MySQLdb
30 #创建连接
31 conn = MySQLdb.connect(host='127.0.0.1',user='root',passwd='111111',db='mydb')
32 #创建字典操作游标,查询返回的数据为字典形式
33 #cur = conn.cursor(cursorclass = MySQLdb.cursors.DictCursor)
34 #默认返回数据为序列形式
35 cur = conn.cursor()
36 #执行sql语句
37 reCount = cur.execute('select Name,Address from UserInfo')
38 #一次性把查询数据从内存中取出
39 nRet = cur.fetchall()
40 #关闭游标、连接
41 cur.close()
42 conn.close()
43 #打印
44 print reCount
45 print nRet
46 for i in nRet:
47     print i[0],i[1]
参考资料:
http://www.cnblogs.com/wupeiqi/articles/5095821.html