第1章 上节课复习
1、数据库管理软件

    本质就是套接字


2、基本概念

    数据库服务器:运行数据库管理软件的计算机

    数据库管理软件:MySQL,Oracle,DB2,SQL SERVER

    库:文件夹

    表:文件

    记录:1,egon,19,male,oldboy


3、基本的SQL语句

    文件夹(库)

        增

            create database db1 charset utf8;

        改

            alter database db1 charset gbk;

        查

            select database();

            show databases;

            show create database db1;

        删

            drop database db1;


    文件(表)

        use db1; # 切换文件夹

        增

            create table t1(id int,name char(16))engine=innodb;

        改

            alter table t1 add age int;

            alter table t1 drop age;

            alter table t1 modify name char(10);

            alter table t1 change name NAME char(10);

        查

            show tables;

            show create table t1;

            desc t1;

        删

            drop table t1;


    文件的内容(记录)

        增

            insert into t1(id,name) values(...),(...),(...);

        改

            update t1 set name='EGON' where name='egon';

        查

            select id,name from t1;

        删

            delete from t1 where id > 3;

            truncate t1;


4、数据类型

    数值类型

        整型:

            int

            create table t1(id int unsigned)


            强调:对于整型类型宽度指的是显示宽度

        浮点型:

            float(255,30)

            double(255,30)

            decimal(65,30)

            区别:精度依次增高


    日期类型:

        date:1990-01-03

        time:11:11:11

        datetime(timestamp):1990-01-03 11:11:11

        year:1990


    字符类型(宽度指的是字符的宽度)

        char:定长

            egon |alex |wxx  |

        varchar:变长

            1bytes+egon|1bytes+alex|1bytes+wxx|


        create table t2(x char(4),y varchar(4));

        insert into t2 values('','');


    补充SQL_MODE:

    set sql_mode='strict_trans_tables';


5、枚举类型

    单选:enum(1,2,3)

    多选:set(1,2,3)
第2章 MySQL之完整性约束
2.1 介绍
约束条件与数据类型的宽度一样,都是可选参数
作用:用于保证数据的完整性和一致性
2.1.1 分类
主要分为:
PRIMARY KEY (PK)    标识该字段为该表的主键,可以唯一的标识记录

FOREIGN KEY (FK)    标识该字段为该表的外键

NOT NULL    标识该字段不能为空

UNIQUE KEY (UK)    标识该字段的值是唯一的

AUTO_INCREMENT    标识该字段的值自动增长(整数类型,而且为主键)

DEFAULT    为该字段设置默认值


UNSIGNED 无符号

ZEROFILL 使用0填充


####ZEROFILL的使用效果

mysql> use db2

Database changed

mysql> create table t3(id int zerofill);

Query OK, 0 rows affected (1.74 sec)


mysql> insert into t3 values(1);

Query OK, 1 row affected (0.30 sec)


mysql> select * from t3;

+------------+

| id         |

+------------+

| 0000000001 |

+------------+

1 row in set (0.00 sec)


mysql>
2.1.2 说明
1. 是否允许为空,默认NULL,可设置NOT NULL,字段不允许为空,必须赋值
2. 字段是否有默认值,缺省的默认值是NULL,如果插入记录时不给字段赋值,此字段使用默认值
sex enum('male','female') not null default 'male'
age int unsigned NOT NULL default 20 必须为正值(无符号) 不允许为空 默认是20
3. 是否是key
主键 primary key
外键 foreign key
索引 (index,unique...)
2.2 not null,default
是否可空,null表示空,非字符串
not null - 不可空
null - 可空
默认值,创建列时可以指定默认值,当插入数据时如果未主动设置,则自动添加默认值
create table tb1(
nid int not null defalut 2,
num int not null
)
2.2.1 课堂演示
create table t4(x char(4) not null);

create table user(id int,name char(16),sex enum('male','female') not null default 'male');

mysql> desc user;

+-------+-----------------------+------+-----+---------+-------+

| Field | Type                  | Null | Key | Default | Extra |

+-------+-----------------------+------+-----+---------+-------+

| id    | int(11)               | YES  |     | NULL    |       |

| name  | char(16)              | YES  |     | NULL    |       |

| sex   | enum('male','female') | NO   |     | male    |       |

+-------+-----------------------+------+-----+---------+-------+

3 rows in set (0.00 sec)

mysql> select * from user;

Empty set (0.00 sec)

mysql> insert into user(id,name) values(1,'egon');

Query OK, 1 row affected (1.68 sec)

mysql> select * from user;

+------+------+------+

| id   | name | sex  |

+------+------+------+

|    1 | egon | male |

+------+------+------+

1 row in set (0.00 sec)
2.2.2 验证
==================not null====================

mysql> create table t1(id int); #id字段默认可以插入空

mysql> desc t1;

+-------+---------+------+-----+---------+-------+

| Field | Type    | Null | Key | Default | Extra |

+-------+---------+------+-----+---------+-------+

| id    | int(11) | YES  |     | NULL    |       |

+-------+---------+------+-----+---------+-------+

mysql> insert into t1 values(); #可以插入空


mysql> create table t2(id int not null); #设置字段id不为空

mysql> desc t2;

+-------+---------+------+-----+---------+-------+

| Field | Type    | Null | Key | Default | Extra |

+-------+---------+------+-----+---------+-------+

| id    | int(11) | NO   |     | NULL    |       |

+-------+---------+------+-----+---------+-------+

mysql> insert into t2 values(); #不能插入空

ERROR 1364 (HY000): Field 'id' doesn't have a default value


==================default====================

#设置id字段有默认值后,则无论id字段是null还是not null,都可以插入空,插入空默认填入default指定的默认值

mysql> create table t3(id int default 1);

mysql> alter table t3 modify id int not null default 1;


==================综合练习====================

mysql> create table student(

    -> name varchar(20) not null,

    -> age int(3) unsigned not null default 18,

    -> sex enum('male','female') default 'male',

    -> hobby set('play','study','read','music') default 'play,music'

    -> );

mysql> desc student;

+-------+------------------------------------+------+-----+------------+-------+

| Field | Type                               | Null | Key | Default    | Extra |

+-------+------------------------------------+------+-----+------------+-------+

| name  | varchar(20)                        | NO   |     | NULL       |       |

| age   | int(3) unsigned                    | NO   |     | 18         |       |

| sex   | enum('male','female')              | YES  |     | male       |       |

| hobby | set('play','study','read','music') | YES  |     | play,music |       |

+-------+------------------------------------+------+-----+------------+-------+

mysql> insert into student(name) values('egon');

mysql> select * from student;

+------+-----+------+------------+

| name | age | sex  | hobby      |

+------+-----+------+------------+

| egon |  18 | male | play,music |

+------+-----+------+------------+
2.3 primary key
2.3.1 primary key字段介绍
从约束角度看primary key字段的值不为空且唯一,那我们直接使用not null+unique不就可以了吗,要它干什么?
主键primary key是innodb存储引擎组织数据的依据,innodb称之为索引组织表,一张表中必须有且只有一个主键。
一个表中可以:
单列做主键
多列做主键(复合主键)
============单列做主键===============

#方法一:not null+unique

create table department1(

id int not null unique, #主键

name varchar(20) not null unique,

comment varchar(100)

);


mysql> desc department1;

+---------+--------------+------+-----+---------+-------+

| Field   | Type         | Null | Key | Default | Extra |

+---------+--------------+------+-----+---------+-------+

| id      | int(11)      | NO   | PRI | NULL    |       |

| name    | varchar(20)  | NO   | UNI | NULL    |       |

| comment | varchar(100) | YES  |     | NULL    |       |

+---------+--------------+------+-----+---------+-------+

rows in set (0.01 sec)


#方法二:在某一个字段后用primary key

create table department2(

id int primary key, #主键

name varchar(20),

comment varchar(100)

);


mysql> desc department2;

+---------+--------------+------+-----+---------+-------+

| Field   | Type         | Null | Key | Default | Extra |

+---------+--------------+------+-----+---------+-------+

| id      | int(11)      | NO   | PRI | NULL    |       |

| name    | varchar(20)  | YES  |     | NULL    |       |

| comment | varchar(100) | YES  |     | NULL    |       |

+---------+--------------+------+-----+---------+-------+

rows in set (0.00 sec)


#方法三:在所有字段后单独定义primary key

create table department3(

id int,

name varchar(20),

comment varchar(100),

constraint pk_name primary key(id); #创建主键并为其命名pk_name


mysql> desc department3;

+---------+--------------+------+-----+---------+-------+

| Field   | Type         | Null | Key | Default | Extra |

+---------+--------------+------+-----+---------+-------+

| id      | int(11)      | NO   | PRI | NULL    |       |

| name    | varchar(20)  | YES  |     | NULL    |       |

| comment | varchar(100) | YES  |     | NULL    |       |

+---------+--------------+------+-----+---------+-------+

rows in set (0.01 sec)
==================多列做主键================

create table service(

ip varchar(15),

port char(5),

service_name varchar(10) not null,

primary key(ip,port)

);


mysql> desc service;

+--------------+-------------+------+-----+---------+-------+

| Field        | Type        | Null | Key | Default | Extra |

+--------------+-------------+------+-----+---------+-------+

| ip           | varchar(15) | NO   | PRI | NULL    |       |

| port         | char(5)     | NO   | PRI | NULL    |       |

| service_name | varchar(10) | NO   |     | NULL    |       |

+--------------+-------------+------+-----+---------+-------+

3 rows in set (0.00 sec)


mysql> insert into service values

    -> ('172.16.45.10','3306','mysqld'),

    -> ('172.16.45.11','3306','mariadb')

    -> ;

Query OK, 2 rows affected (0.00 sec)

Records: 2  Duplicates: 0  Warnings: 0


mysql> insert into service values ('172.16.45.10','3306','nginx');

ERROR 1062 (23000): Duplicate entry '172.16.45.10-3306' for key 'PRIMARY'
2.3.2 课堂讲解
约束字段不为空并且唯一

    依据:主键是innodb的表组织数据的依据

    注意:一张表中必须有且只能有一个主键


    create table t5(

        id int primary key auto_increment,

        name char(20)

    );

    insert into t5(name) values('egon'),('alex');


    select name from t5 where id = 1000;


    了解:联合主键

    create table t6(

        id int,

        name char(20),

        primary key(id,name)

    );
2.4 unique key
2.4.1 设置唯一约束 UNIQUE
============设置唯一约束 UNIQUE===============

方法一:

create table department1(

id int,

name varchar(20) unique,

comment varchar(100)

);


方法二:

create table department2(

id int,

name varchar(20),

comment varchar(100),

constraint uk_name unique(name)

);


mysql> insert into department1 values(1,'IT','技术');

Query OK, 1 row affected (0.00 sec)

mysql> insert into department1 values(1,'IT','技术');

ERROR 1062 (23000): Duplicate entry 'IT' for key 'name'
2.4.2 not null+unique的化学反应
mysql> create table t1(id int not null unique);

Query OK, 0 rows affected (0.02 sec)


mysql> desc t1;

+-------+---------+------+-----+---------+-------+

| Field | Type    | Null | Key | Default | Extra |

+-------+---------+------+-----+---------+-------+

| id    | int(11) | NO   | PRI | NULL    |       |

+-------+---------+------+-----+---------+-------+

row in set (0.00 sec)
2.4.3 联合唯一
create table service(

id int primary key auto_increment,

name varchar(20),

host varchar(15) not null,

port int not null,

unique(host,port) #联合唯一

);


mysql> insert into service values

    -> (1,'nginx','192.168.0.10',80),

    -> (2,'haproxy','192.168.0.20',80),

    -> (3,'mysql','192.168.0.30',3306)

    -> ;

Query OK, 3 rows affected (0.01 sec)

Records: 3  Duplicates: 0  Warnings: 0


mysql> insert into service(name,host,port) values('nginx','192.168.0.10',80);

ERROR 1062 (23000): Duplicate entry '192.168.0.10-80' for key 'host'
2.4.4 课堂讲解
create table service(

        id int primary key auto_increment,

        name char(20) unique

    );


    not null+unique:会在没有指定主键的情况下被识别为主键

    create table service1(

        id int,

        name char(20) not null unique

    );


    create table service2(

        id int primary key auto_increment,

        name char(20) unique,

        ip char(15),

        port int,

        unique(ip,port)

    );

    insert into service2(name,ip,port) values

    ('nginx','192.168.1.10',80),

    ('haproxy','192.168.1.10',8080),

    ('mysql','192.168.1.10',3306);


    insert into service2(name,ip,port) values

    ('nginx1','192.168.1.10',80);
2.5 auto_increment
约束字段为自动增长,被约束的字段必须同时被key约束
2.5.1 auto_increment使用实例
#不指定id,则自动增长

create table student(

id int primary key auto_increment,

name varchar(20),

sex enum('male','female') default 'male'

);


mysql> desc student;

+-------+-----------------------+------+-----+---------+----------------+

| Field | Type                  | Null | Key | Default | Extra          |

+-------+-----------------------+------+-----+---------+----------------+

| id    | int(11)               | NO   | PRI | NULL    | auto_increment |

| name  | varchar(20)           | YES  |     | NULL    |                |

| sex   | enum('male','female') | YES  |     | male    |                |

+-------+-----------------------+------+-----+---------+----------------+

mysql> insert into student(name) values

    -> ('egon'),

    -> ('alex')

    -> ;


mysql> select * from student;

+----+------+------+

| id | name | sex  |

+----+------+------+

|  1 | egon | male |

|  2 | alex | male |

+----+------+------+


#也可以指定id

mysql> insert into student values(4,'asb','female');

Query OK, 1 row affected (0.00 sec)


mysql> insert into student values(7,'wsb','female');

Query OK, 1 row affected (0.00 sec)


mysql> select * from student;

+----+------+--------+

| id | name | sex    |

+----+------+--------+

|  1 | egon | male   |

|  2 | alex | male   |

|  4 | asb  | female |

|  7 | wsb  | female |

+----+------+--------+


#对于自增的字段,在用delete删除后,再插入值,该字段仍按照删除前的位置继续增长

mysql> delete from student;

Query OK, 4 rows affected (0.00 sec)


mysql> select * from student;

Empty set (0.00 sec)


mysql> insert into student(name) values('ysb');

mysql> select * from student;

+----+------+------+

| id | name | sex  |

+----+------+------+

|  8 | ysb  | male |

+----+------+------+


#应该用truncate清空表,比起delete一条一条地删除记录,truncate是直接清空表,在删除大表时用它

mysql> truncate student;

Query OK, 0 rows affected (0.01 sec)


mysql> insert into student(name) values('egon');

Query OK, 1 row affected (0.01 sec)


mysql> select * from student;

+----+------+------+

| id | name | sex  |

+----+------+------+

|  1 | egon | male |

+----+------+------+

row in set (0.00 sec)
2.5.2 了解知识
######步长:auto_increment_increment,起始偏移量:auto_increment_offset###########

#在创建完表后,修改自增字段的起始值

mysql> create table student(

    -> id int primary key auto_increment,

    -> name varchar(20),

    -> sex enum('male','female') default 'male'

    -> );


mysql> alter table student auto_increment=3;


mysql> show create table student;

.......

ENGINE=InnoDB AUTO_INCREMENT=3 DEFAULT CHARSET=utf8


mysql> insert into student(name) values('egon');

Query OK, 1 row affected (0.01 sec)


mysql> select * from student;

+----+------+------+

| id | name | sex  |

+----+------+------+

|  3 | egon | male |

+----+------+------+

row in set (0.00 sec)


mysql> show create table student;

.......

ENGINE=InnoDB AUTO_INCREMENT=4 DEFAULT CHARSET=utf8


#也可以创建表时指定auto_increment的初始值,注意初始值的设置为表选项,应该放到括号外

create table student(

id int primary key auto_increment,

name varchar(20),

sex enum('male','female') default 'male'

)auto_increment=3;


#设置步长

sqlserver:自增步长

    基于表级别

    create table t1(

        id int。。。

    )engine=innodb,auto_increment=2 步长=2 default charset=utf8


mysql自增的步长:

    show session variables like 'auto_inc%';


    #基于会话级别

    set session auth_increment_increment=2 #修改会话级别的步长


    #基于全局级别的

    set global auth_increment_increment=2 #修改全局级别的步长(所有会话都生效)


#!!!注意了注意了注意了!!!

If the value of auto_increment_offset is greater than that of auto_increment_increment, the value of auto_increment_offset is ignored.

翻译:如果auto_increment_offset的值大于auto_increment_increment的值,则auto_increment_offset的值会被忽略 ,这相当于第一步步子就迈大了,扯着了蛋

比如:设置auto_increment_offset=3,auto_increment_increment=2


mysql> set global auto_increment_increment=5;

Query OK, 0 rows affected (0.00 sec)


mysql> set global auto_increment_offset=3;

Query OK, 0 rows affected (0.00 sec)


mysql> show variables like 'auto_incre%'; #需要退出重新登录

+--------------------------+-------+

| Variable_name            | Value |

+--------------------------+-------+

| auto_increment_increment | 1     |

| auto_increment_offset    | 1     |

+--------------------------+-------+


create table student(

id int primary key auto_increment,

name varchar(20),

sex enum('male','female') default 'male'

);


mysql> insert into student(name) values('egon1'),('egon2'),('egon3');

mysql> select * from student;

+----+-------+------+

| id | name  | sex  |

+----+-------+------+

|  3 | egon1 | male |

|  8 | egon2 | male |

| 13 | egon3 | male |

+----+-------+------+
2.5.3 课堂讲解
    show variables like '%auto%';

    # 结果

    auto_increment_increment    | 1 # 步长

    auto_increment_offset       | 1 # 起始位置

    #强调:起始位置的值必须<=步长


    set global auto_increment_increment=5;

    set global auto_increment_offset=3;


    create table t7(id int unique auto_increment);

    insert into t7 values();


    set global auto_increment_increment=1;

    set global auto_increment_offset=1;
2.6 foregn key
2.6.1 快速理解foreign key
员工信息表有三个字段:工号 姓名 部门
公司有3个部门,但是有1个亿的员工,那意味着部门这个字段需要重复存储,部门名字越长,越浪费
解决方法:
我们完全可以定义一个部门表
然后让员工信息表关联该表,如何关联,即foreign key
#############################示范#########################

#表类型必须是innodb存储引擎,且被关联的字段,即references指定的另外一个表的字段,必须保证唯一

create table department(

id int primary key,

name varchar(20) not null

)engine=innodb;


#dpt_id外键,关联父表(department主键id),同步更新,同步删除

create table employee(

id int primary key,

name varchar(20) not null,

dpt_id int,

constraint fk_name foreign key(dpt_id)

references department(id)

on delete cascade

on update cascade

)engine=innodb;


#先往父表department中插入记录

insert into department values

(1,'欧德博爱技术有限事业部'),

(2,'艾利克斯人力资源部'),

(3,'销售部');


#再往子表employee中插入记录

insert into employee values

(1,'egon',1),

(2,'alex1',2),

(3,'alex2',2),

(4,'alex3',2),

(5,'李坦克',3),

(6,'刘飞机',3),

(7,'张火箭',3),

(8,'林子弹',3),

(9,'加特林',3)

;


#删父表department,子表employee中对应的记录跟着删

mysql> delete from department where id=3;

mysql> select * from employee;

+----+-------+--------+

| id | name  | dpt_id |

+----+-------+--------+

|  1 | egon  |      1 |

|  2 | alex1 |      2 |

|  3 | alex2 |      2 |

|  4 | alex3 |      2 |

+----+-------+--------+


#更新父表department,子表employee中对应的记录跟着改

mysql> update department set id=22222 where id=2;

mysql> select * from employee;

+----+-------+--------+

| id | name  | dpt_id |

+----+-------+--------+

|  1 | egon  |      1 |

|  3 | alex2 |  22222 |

|  4 | alex3 |  22222 |

|  5 | alex1 |  22222 |

+----+-------+--------+
2.6.2 如何找出两张表之间的关系
分析步骤:

#1、先站在左表的角度去找

是否左表的多条记录可以对应右表的一条记录,如果是,则证明左表的一个字段foreign key 右表一个字段(通常是id)

#2、再站在右表的角度去找

是否右表的多条记录可以对应左表的一条记录,如果是,则证明右表的一个字段foreign key 左表一个字段(通常是id)

#3、总结:

#多对一:

如果只有步骤1成立,则是左表多对一右表

如果只有步骤2成立,则是右表多对一左表

#多对多

如果步骤1和2同时成立,则证明这两张表时一个双向的多对一,即多对多,需要定义一个这两张表的关系表来专门存放二者的关系

#一对一:

如果1和2都不成立,而是左表的一条记录唯一对应右表的一条记录,反之亦然。这种情况很简单,就是在左表foreign key右表的基础上,将左表的外键字段设置成unique即可
2.6.3 建立表之间的关系
#一对多或称为多对一
三张表:出版社,作者信息,书
一对多(或多对一):一个出版社可以出版多本书
关联方式:foreign key
=====================多对一=====================

create table press(

id int primary key auto_increment,

name varchar(20)

);


create table book(

id int primary key auto_increment,

name varchar(20),

press_id int not null,

foreign key(press_id) references press(id)

on delete cascade

on update cascade

);


insert into press(name) values

('北京工业地雷出版社'),

('人民音乐不好听出版社'),

('知识产权没有用出版社')

;


insert into book(name,press_id) values

('九阳神功',1),

('九阴真经',2),

('九阴白骨爪',2),

('独孤九剑',3),

('降龙十巴掌',2),

('葵花宝典',3);
##################其他例子#####################

一夫多妻制
#妻子表的丈夫id外键到丈夫表的id
#多对多
三张表:出版社,作者信息,书
多对多:一个作者可以写多本书,一本书也可以有多个作者,双向的一对多,即多对多
关联方式:foreign key+一张新的表
=====================多对多=====================

create table author(

id int primary key auto_increment,

name varchar(20)

);


#这张表就存放作者表与书表的关系,即查询二者的关系查这表就可以了

create table author2book(

id int not null unique auto_increment,

author_id int not null,

book_id int not null,

constraint fk_author foreign key(author_id) references author(id)

on delete cascade

on update cascade,

constraint fk_book foreign key(book_id) references book(id)

on delete cascade

on update cascade,

primary key(author_id,book_id)

);


#插入四个作者,id依次排开

insert into author(name) values('egon'),('alex'),('yuanhao'),('wpq');


#每个作者与自己的代表作如下

egon:

九阳神功

九阴真经

九阴白骨爪

独孤九剑

降龙十巴掌

葵花宝典

alex:

九阳神功

葵花宝典

yuanhao:

独孤九剑

降龙十巴掌

葵花宝典

wpq:

九阳神功


insert into author2book(author_id,book_id) values

(1,1),

(1,2),

(1,3),

(1,4),

(1,5),

(1,6),

(2,1),

(2,6),

(3,4),

(3,5),

(3,6),

(4,1)

;
#######################其他例子#######################

单张表:用户表+相亲关系表,相当于:用户表+相亲关系表+用户表

多张表:用户表+用户与主机关系表+主机表


中间那一张存放关系的表,对外关联的字段可以联合唯一
#一对一
两张表:学生表和客户表
一对一:一个学生是一个客户,一个客户有可能变成一个学校,即一对一的关系
关联方式:foreign key+unique
#一定是student来foreign key表customer,这样就保证了:

#1 学生一定是一个客户,

#2 客户不一定是学生,但有可能成为一个学生


create table customer(

id int primary key auto_increment,

name varchar(20) not null,

qq varchar(10) not null,

phone char(16) not null

);


create table student(

id int primary key auto_increment,

class_name varchar(20) not null,

customer_id int unique, #该字段一定要是唯一的

foreign key(customer_id) references customer(id) #外键的字段一定要保证unique

on delete cascade

on update cascade

);


#增加客户

insert into customer(name,qq,phone) values

('李飞机','31811231',13811341220),

('王大炮','123123123',15213146809),

('守榴弹','283818181',1867141331),

('吴坦克','283818181',1851143312),

('赢火箭','888818181',1861243314),

('战地雷','112312312',18811431230)

;


#增加学生

insert into student(class_name,customer_id) values

('脱产3班',3),

('周末19期',4),

('周末19期',5)

;
#####################其他例子##################

例一:一个用户只有一个博客


    用户表:

    id  name

   egon

   alex

   wupeiqi


    博客表

           fk+unique

    id url name_id

 xxxx   1

 yyyy   3

 zzz    2


例二:一个管理员唯一对应一个用户

    用户表:

    id user  password

 egon    xxxx

 alex    yyyy


    管理员表:

       fk+unique

    id user_id password

  1      xxxxx

  2      yyyyy
2.6.4 课堂讲解
    创建表:

        1、先创建被关联的表:部门表

        #强调:被关联的字段必须唯一

        create table dep(

            id int primary key auto_increment,

            name char(10)

        );

        2、再创建关联表:员工表

        create table emp(

            id int primary key auto_increment,

            name char(16),

            age int,

            dep_id int,

            foreign key(dep_id) references dep(id)

            on delete cascade

            on update cascade

        );


    插入记录时:

        #1、先往被关联表插入:部门表

        insert into dep(name) values

        ('外交部'),

        ('技术哈哈部'),

        ('销售部');


        #2、再往关联表插入:员工表

        insert into emp(name,age,dep_id) values

        ('egon',19,1),

        ('alex',74,2),

        ('wxx',38,2),

        ('yxx',22,3);


        #错误操作

         insert into emp(name,age,dep_id) values

        ('lhf',29,4);


     delete from dep where id=2;

     delete from emp where dep_id=2;
2.7 练习
练习:账号信息表,用户组,主机表,主机组
#用户表

create table user(

id int not null unique auto_increment,

username varchar(20) not null,

password varchar(50) not null,

primary key(username,password)

);


insert into user(username,password) values

('root','123'),

('egon','456'),

('alex','alex3714')

;


#用户组表

create table usergroup(

id int primary key auto_increment,

groupname varchar(20) not null unique

);


insert into usergroup(groupname) values

('IT'),

('Sale'),

('Finance'),

('boss')

;


#主机表

create table host(

id int primary key auto_increment,

ip char(15) not null unique default '127.0.0.1'

);


insert into host(ip) values

('172.16.45.2'),

('172.16.31.10'),

('172.16.45.3'),

('172.16.31.11'),

('172.10.45.3'),

('172.10.45.4'),

('172.10.45.5'),

('192.168.1.20'),

('192.168.1.21'),

('192.168.1.22'),

('192.168.2.23'),

('192.168.2.223'),

('192.168.2.24'),

('192.168.3.22'),

('192.168.3.23'),

('192.168.3.24')

;


#业务线表

create table business(

id int primary key auto_increment,

business varchar(20) not null unique

);

insert into business(business) values

('轻松贷'),

('随便花'),

('大富翁'),

('穷一生')

;


#建关系:user与usergroup


create table user2usergroup(

id int not null unique auto_increment,

user_id int not null,

group_id int not null,

primary key(user_id,group_id),

foreign key(user_id) references user(id),

foreign key(group_id) references usergroup(id)

);


insert into user2usergroup(user_id,group_id) values

(1,1),

(1,2),

(1,3),

(1,4),

(2,3),

(2,4),

(3,4)

;


#建关系:host与business


create table host2business(

id int not null unique auto_increment,

host_id int not null,

business_id int not null,

primary key(host_id,business_id),

foreign key(host_id) references host(id),

foreign key(business_id) references business(id)

);


insert into host2business(host_id,business_id) values

(1,1),

(1,2),

(1,3),

(2,2),

(2,3),

(3,4)

;


#建关系:user与host


create table user2host(

id int not null unique auto_increment,

user_id int not null,

host_id int not null,

primary key(user_id,host_id),

foreign key(user_id) references user(id),

foreign key(host_id) references host(id)

);


insert into user2host(user_id,host_id) values

(1,1),

(1,2),

(1,3),

(1,4),

(1,5),

(1,6),

(1,7),

(1,8),

(1,9),

(1,10),

(1,11),

(1,12),

(1,13),

(1,14),

(1,15),

(1,16),

(2,2),

(2,3),

(2,4),

(2,5),

(3,10),

(3,11),

(3,12)

;
2.8 作业

第3章 MySQL之单表查询
3.1 单表查询的语法
SELECT 字段1,字段2... FROM 表名

                  WHERE 条件

                  GROUP BY field

                  HAVING 筛选

                  ORDER BY field

                  LIMIT 限制条数
单表语法:

    select

        distinct

        字段1,

        字段2,...

    from

        表名

    where 约束条件

    group by 分组条件

    having 过滤条件

    order by 排序字段

    limit n;
3.2 关键字的执行优先级(重点)
3.2.1 执行顺序
重点中的重点:关键字的执行优先级
from
where
group by
having
select
distinct
order by
limit
3.2.2 执行顺序解读
1.找到表:from
2.拿着where指定的约束条件,去文件/表中取出一条条记录
3.将取出的一条条记录进行分组group by,如果没有group by,则整体作为一组
4.将分组的结果进行having过滤
5.执行select
6.去重
7.将结果按条件排序:order by
8.限制结果的显示条数
3.3 简单查询
3.3.1 准备表和记录
######################准备表和记录######################

company.employee

    员工id      id                  int

    姓名        emp_name            varchar

    性别        sex                 enum

    年龄        age                 int

    入职日期     hire_date           date

    岗位        post                varchar

    职位描述     post_comment        varchar

    薪水        salary              double

    办公室       office              int

    部门编号     depart_id           int


#创建表

create table employee(

id int not null unique auto_increment,

name varchar(20) not null,

sex enum('male','female') not null default 'male', #大部分是男的

age int(3) unsigned not null default 28,

hire_date date not null,

post varchar(50),

post_comment varchar(100),

salary double(15,2),

office int, #一个部门一个屋子

depart_id int

);


#查看表结构

mysql> desc employee;

+--------------+-----------------------+------+-----+---------+----------------+

| Field        | Type                  | Null | Key | Default | Extra          |

+--------------+-----------------------+------+-----+---------+----------------+

| id           | int(11)               | NO   | PRI | NULL    | auto_increment |

| name         | varchar(20)           | NO   |     | NULL    |                |

| sex          | enum('male','female') | NO   |     | male    |                |

| age          | int(3) unsigned       | NO   |     | 28      |                |

| hire_date    | date                  | NO   |     | NULL    |                |

| post         | varchar(50)           | YES  |     | NULL    |                |

| post_comment | varchar(100)          | YES  |     | NULL    |                |

| salary       | double(15,2)          | YES  |     | NULL    |                |

| office       | int(11)               | YES  |     | NULL    |                |

| depart_id    | int(11)               | YES  |     | NULL    |                |

+--------------+-----------------------+------+-----+---------+----------------+


#插入记录

#三个部门:教学,销售,运营

insert into employee(name,sex,age,hire_date,post,salary,office,depart_id) values

('egon','male',18,'20170301','老男孩驻沙河办事处外交大使',7300.33,401,1), #以下是教学部

('alex','male',78,'20150302','teacher',1000000.31,401,1),

('wupeiqi','male',81,'20130305','teacher',8300,401,1),

('yuanhao','male',73,'20140701','teacher',3500,401,1),

('liwenzhou','male',28,'20121101','teacher',2100,401,1),

('jingliyang','female',18,'20110211','teacher',9000,401,1),

('jinxin','male',18,'19000301','teacher',30000,401,1),

('成龙','male',48,'20101111','teacher',10000,401,1),


('歪歪','female',48,'20150311','sale',3000.13,402,2),#以下是销售部门

('丫丫','female',38,'20101101','sale',2000.35,402,2),

('丁丁','female',18,'20110312','sale',1000.37,402,2),

('星星','female',18,'20160513','sale',3000.29,402,2),

('格格','female',28,'20170127','sale',4000.33,402,2),


('张野','male',28,'20160311','operation',10000.13,403,3), #以下是运营部门

('程咬金','male',18,'19970312','operation',20000,403,3),

('程咬银','female',18,'20130311','operation',19000,403,3),

('程咬铜','male',18,'20150411','operation',18000,403,3),

('程咬铁','female',18,'20140512','operation',17000,403,3)

;


#ps:如果在windows系统中,插入中文字符,select的结果为空白,可以将所有字符编码统一设置成gbk
3.3.2 简单查询实例
#简单查询

    SELECT id,name,sex,age,hire_date,post,post_comment,salary,office,depart_id

    FROM employee;


    SELECT * FROM employee;


    SELECT name,salary FROM employee;


#避免重复DISTINCT

    SELECT DISTINCT post FROM employee;


#通过四则运算查询

    SELECT name, salary*12 FROM employee;

    SELECT name, salary*12 AS Annual_salary FROM employee;

    SELECT name, salary*12 Annual_salary FROM employee;


#定义显示格式

   CONCAT() 函数用于连接字符串

   SELECT CONCAT('姓名: ',name,'  年薪: ', salary*12)  AS Annual_salary

   FROM employee;


   CONCAT_WS() 第一个参数为分隔符

   SELECT CONCAT_WS(':',name,salary*12)  AS Annual_salary

   FROM employee;


   结合CASE语句:

   SELECT

       (

           CASE

           WHEN NAME = 'egon' THEN

               NAME

           WHEN NAME = 'alex' THEN

               CONCAT(name,'_BIGSB')

           ELSE

               concat(NAME, 'SB')

           END

       ) as new_name

   FROM

       emp;
3.3.3 小练习
1 查出所有员工的名字,薪资,格式为

    <名字:egon>    <薪资:3000>

2 查出所有的岗位(去掉重复)

3 查出所有员工名字,以及他们的年薪,年薪的字段名为annual_year
select concat('<名字:',name,'>    ','<薪资:',salary,'>') from employee;

select distinct depart_id from employee;

select name,salary*12 annual_salary from employee;
3.3.4 课堂实例
#1、简单查询

        select * from emp;

        select id,name from emp;


    # 去除重复

        select distinct post from emp;

    # 四则运算

        select name,salary*12 as annual_salary from emp;

        select name,salary*12 annual_salary from emp;


    # 定义显示格式

        select

            concat('姓名: ',name) as new_name,

            concat('年薪: ',salary*12) as annual_salary

        from

            emp;


        select concat(name,'_SB') as new_name from emp;


        select concat(name,'_SB') as new_name from emp where name != 'egon';


        select

            (

                case

                when name = 'egon' then

                    name

                when name = 'alex' then

                    concat(name,'_BIGSB')

                else

                    concat(name,'_SB')

                end

            ) as new_name

        from

            emp;


        select concat(name,':',salary,':',sex) from emp;

        select concat_ws(':',name,salary,sex) from emp;
3.4 WHERE约束
3.4.1 介绍
where字句中可以使用:
1. 比较运算符:> < >= <= <> !=
2. between 80 and 100 值在10到20之间
3. in(80,90,100) 值是10或20或30
4. like 'egon%'
pattern可以是%或_,
%表示任意多字符
_表示一个字符
5. 逻辑运算符:在多个条件直接可以使用逻辑运算符 and or not
3.4.2 实例
#1:单条件查询

    SELECT name FROM employee

        WHERE post='sale';


#2:多条件查询

    SELECT name,salary FROM employee

        WHERE post='teacher' AND salary>10000;


#3:关键字BETWEEN AND

    SELECT name,salary FROM employee

        WHERE salary BETWEEN 10000 AND 20000;


    SELECT name,salary FROM employee

        WHERE salary NOT BETWEEN 10000 AND 20000;


#4:关键字IS NULL(判断某个字段是否为NULL不能用等号,需要用IS)

    SELECT name,post_comment FROM employee

        WHERE post_comment IS NULL;


    SELECT name,post_comment FROM employee

        WHERE post_comment IS NOT NULL;


    SELECT name,post_comment FROM employee

        WHERE post_comment=''; 注意''是空字符串,不是null

    ps:

        执行

        update employee set post_comment='' where id=2;

        再用上条查看,就会有结果了


#5:关键字IN集合查询

    SELECT name,salary FROM employee

        WHERE salary=3000 OR salary=3500 OR salary=4000 OR salary=9000 ;


    SELECT name,salary FROM employee

        WHERE salary IN (3000,3500,4000,9000) ;


    SELECT name,salary FROM employee

        WHERE salary NOT IN (3000,3500,4000,9000) ;


#6:关键字LIKE模糊查询

    通配符’%’

    SELECT * FROM employee

            WHERE name LIKE 'eg%';


    通配符’_’

    SELECT * FROM employee

            WHERE name LIKE 'al__';
3.4.3 小练习
1. 查看岗位是teacher的员工姓名、年龄
2. 查看岗位是teacher且年龄大于30岁的员工姓名、年龄
3. 查看岗位是teacher且薪资在9000-1000范围内的员工姓名、年龄、薪资
4. 查看岗位描述不为NULL的员工信息
5. 查看岗位是teacher且薪资是10000或9000或30000的员工姓名、年龄、薪资
6. 查看岗位是teacher且薪资不是10000或9000或30000的员工姓名、年龄、薪资
7. 查看岗位是teacher且名字是jin开头的员工姓名、年薪
select name,age from employee where post = 'teacher';

select name,age from employee where post='teacher' and age > 30;

select name,age,salary from employee where post='teacher' and salary between 9000 and 10000;

select * from employee where post_comment is not null;

select name,age,salary from employee where post='teacher' and salary in (10000,9000,30000);

select name,age,salary from employee where post='teacher' and salary not in (10000,9000,30000);

select name,salary*12 from employee where post='teacher' and name like 'jin%';
3.4.4 课堂实例
2、where约束

    select id,name,age from emp where age > 20;

    select id,name,age from emp where age >= 20 and age <= 38;

    select id,name,age from emp where age between 20 and 38;

    select id,name,age from emp where age <= 20 or age >= 38;

    select id,name,age from emp where age not between 20 and 38;


    select * from emp where age=18 or age=28 or age=38;

    select * from emp where age in (18,28,38);


    select * from emp where age=18 or sex='male';


    select * from emp where name like 'jin%';

    select * from emp where name like '__';
3.5 分组查询:GROUP BY
3.5.1 什么是分组?为什么要分组?
#1、首先明确一点:分组发生在where之后,即分组是基于where之后得到的记录而进行的
#2、分组指的是:将所有记录按照某个相同字段进行归类,比如针对员工信息表的职位分组,或者按照性别进行分组等
#3、为何要分组呢?
取每个部门的最高工资
取每个部门的员工数
取男人数和女人数
小窍门:‘每’这个字后面的字段,就是我们分组的依据
#4、大前提:
可以按照任意字段分组,但是分组完毕后,比如group by post,只能查看post字段,如果想查看组内信息,需要借助于聚合函数
3.5.2 ONLY_FULL_GROUP_BY
###############!!!SQL_MODE设置!!!#######################

#查看MySQL 5.7默认的sql_mode如下:

mysql> select @@global.sql_mode;

ONLY_FULL_GROUP_BY,STRICT_TRANS_TABLES,NO_ZERO_IN_DATE,NO_ZERO_DATE,ERROR_FOR_DIVISION_BY_ZERO,NO_AUTO_CREATE_USER,NO_ENGINE_SUBSTITUTION


#!!!注意

ONLY_FULL_GROUP_BY的语义就是确定select target list中的所有列的值都是明确语义,简单的说来,在ONLY_FULL_GROUP_BY模式下,target list中的值要么是来自于聚集函数的结果,要么是来自于group by list中的表达式的值。


#设置sql_mole如下操作(我们可以去掉ONLY_FULL_GROUP_BY模式):

mysql> set global sql_mode='STRICT_TRANS_TABLES,NO_ZERO_IN_DATE,NO_ZERO_DATE,ERROR_FOR_DIVISION_BY_ZERO,NO_AUTO_CREATE_USER,NO_ENGINE_SUBSTITUTION';
3.5.3 实例
mysql> select @@global.sql_mode;

+-------------------+

| @@global.sql_mode |

+-------------------+

|                   |

+-------------------+

row in set (0.00 sec)


mysql> select * from emp group by post;

+----+------+--------+-----+------------+----------------------------+--------------+------------+--------+-----------+

| id | name | sex    | age | hire_date  | post                       | post_comment | salary     | office | depart_id |

+----+------+--------+-----+------------+----------------------------+--------------+------------+--------+-----------+

| 14 | 张野 | male   |  28 | 2016-03-11 | operation                  | NULL         |   10000.13 |    403 |         3 |

|  9 | 歪歪 | female |  48 | 2015-03-11 | sale                       | NULL         |    3000.13 |    402 |         2 |

|  2 | alex | male   |  78 | 2015-03-02 | teacher                    | NULL         | 1000000.31 |    401 |         1 |

|  1 | egon | male   |  18 | 2017-03-01 | 老男孩驻沙河办事处外交大使 | NULL         |    7300.33 |    401 |         1 |

+----+------+--------+-----+------------+----------------------------+--------------+------------+--------+-----------+

rows in set (0.00 sec)


#由于没有设置ONLY_FULL_GROUP_BY,于是也可以有结果,默认都是组内的第一条记录,但其实这是没有意义的


mysql> set global sql_mode='ONLY_FULL_GROUP_BY';

Query OK, 0 rows affected (0.00 sec)


mysql> quit #设置成功后,一定要退出,然后重新登录方可生效

Bye


mysql> use db1;

Database changed

mysql> select * from emp group by post; #报错

ERROR 1055 (42000): 'db1.emp.id' isn't in GROUP BY

mysql> select post,count(id) from emp group by post; #只能查看分组依据和使用聚合函数

+----------------------------+-----------+

| post                       | count(id) |

+----------------------------+-----------+

| operation                  |         5 |

| sale                       |         5 |

| teacher                    |         7 |

| 老男孩驻沙河办事处外交大使 |         1 |

+----------------------------+-----------+

rows in set (0.00 sec)
3.5.4 GROUP BY
单独使用GROUP BY关键字分组

    SELECT post FROM employee GROUP BY post;

    注意:我们按照post字段分组,那么select查询的字段只能是post,想要获取组内的其他相关信息,需要借助函数


GROUP BY关键字和GROUP_CONCAT()函数一起使用

    SELECT post,GROUP_CONCAT(name) FROM employee GROUP BY post;#按照岗位分组,并查看组内成员名

    SELECT post,GROUP_CONCAT(name) as emp_members FROM employee GROUP BY post;


GROUP BY与聚合函数一起使用

    select post,count(id) as count from employee group by post;#按照岗位分组,并查看每个组有多少人
强调:
如果我们用unique的字段作为分组的依据,则每一条记录自成一组,这种分组没有意义
多条记录之间的某个字段值相同,该字段通常用来作为分组的依据
3.5.5 聚合函数
#强调:聚合函数聚合的是组的内容,若是没有分组,则默认一组


示例:

    SELECT COUNT(*) FROM employee;

    SELECT COUNT(*) FROM employee WHERE depart_id=1;

    SELECT MAX(salary) FROM employee;

    SELECT MIN(salary) FROM employee;

    SELECT AVG(salary) FROM employee;

    SELECT SUM(salary) FROM employee;

    SELECT SUM(salary) FROM employee WHERE depart_id=3;
3.5.6 小练习
1. 查询岗位名以及岗位包含的所有员工名字
2. 查询岗位名以及各岗位内包含的员工个数
3. 查询公司内男员工和女员工的个数
4. 查询岗位名以及各岗位的平均薪资
5. 查询岗位名以及各岗位的最高薪资
6. 查询岗位名以及各岗位的最低薪资
7. 查询男员工与男员工的平均薪资,女员工与女员工的平均薪资
#题1:分组

mysql> select post,group_concat(name) from employee group by post;

+-----------------------------------------+---------------------------------------------------------+

| post                                    | group_concat(name)                                      |

+-----------------------------------------+---------------------------------------------------------+

| operation                               | 张野,程咬金,程咬银,程咬铜,程咬铁                        |

| sale                                    | 歪歪,丫丫,丁丁,星星,格格                                |

| teacher                                 | alex,wupeiqi,yuanhao,liwenzhou,jingliyang,jinxin,成龙   |

| 老男孩驻沙河办事处外交大使              | egon                                                    |

+-----------------------------------------+---------------------------------------------------------+


#题目2:

mysql> select post,count(id) from employee group by post;

+-----------------------------------------+-----------+

| post                                    | count(id) |

+-----------------------------------------+-----------+

| operation                               |         5 |

| sale                                    |         5 |

| teacher                                 |         7 |

| 老男孩驻沙河办事处外交大使              |         1 |

+-----------------------------------------+-----------+


#题目3:

mysql> select sex,count(id) from employee group by sex;

+--------+-----------+

| sex    | count(id) |

+--------+-----------+

| male   |        10 |

| female |         8 |

+--------+-----------+


#题目4:

mysql> select post,avg(salary) from employee group by post;

+-----------------------------------------+---------------+

| post                                    | avg(salary)   |

+-----------------------------------------+---------------+

| operation                               |  16800.026000 |

| sale                                    |   2600.294000 |

| teacher                                 | 151842.901429 |

| 老男孩驻沙河办事处外交大使              |   7300.330000 |

+-----------------------------------------+---------------+


#题目5

mysql> select post,max(salary) from employee group by post;

+-----------------------------------------+-------------+

| post                                    | max(salary) |

+-----------------------------------------+-------------+

| operation                               |    20000.00 |

| sale                                    |     4000.33 |

| teacher                                 |  1000000.31 |

| 老男孩驻沙河办事处外交大使              |     7300.33 |

+-----------------------------------------+-------------+


#题目6

mysql> select post,min(salary) from employee group by post;

+-----------------------------------------+-------------+

| post                                    | min(salary) |

+-----------------------------------------+-------------+

| operation                               |    10000.13 |

| sale                                    |     1000.37 |

| teacher                                 |     2100.00 |

| 老男孩驻沙河办事处外交大使              |     7300.33 |

+-----------------------------------------+-------------+


#题目七

mysql> select sex,avg(salary) from employee group by sex;

+--------+---------------+

| sex    | avg(salary)   |

+--------+---------------+

| male   | 110920.077000 |

| female |   7250.183750 |

+--------+---------------+
3.5.7 课堂实例
3、group by分组

    分组依据应该找重复度比较高的字段


    分组之后只能查到分组字段,或者聚合的结果

    set global sql_mode='strict_trans_tables,only_full_group_by';

    select post,max(salary) from emp group by post;

    select post,min(salary) from emp group by post;

    select post,sum(salary) from emp group by post;

    select post,avg(salary) from emp group by post;

    select post,count(id) from emp group by post;

    select post,group_concat(name) from emp group by post;


    select count(id) from emp;

    select count(id) from emp where max(salary) > 1;
3.6 HAVING过滤
3.6.1 介绍
HAVING与WHERE不一样的地方在于!!!!!!
#!!!执行优先级从高到低:where > group by > having
#1. Where 发生在分组group by之前,因而Where中可以有任意字段,但是绝对不能使用聚合函数。
#2. Having发生在分组group by之后,因而Having中可以使用分组的字段,无法直接取到其他字段,可以使用聚合函数
###################################验证########################################

mysql> select @@sql_mode;

+--------------------+

| @@sql_mode         |

+--------------------+

| ONLY_FULL_GROUP_BY |

+--------------------+

row in set (0.00 sec)


mysql> select * from emp where salary > 100000;

+----+------+------+-----+------------+---------+--------------+------------+--------+-----------+

| id | name | sex  | age | hire_date  | post    | post_comment | salary     | office | depart_id |

+----+------+------+-----+------------+---------+--------------+------------+--------+-----------+

|  2 | alex | male |  78 | 2015-03-02 | teacher | NULL         | 1000000.31 |    401 |         1 |

+----+------+------+-----+------------+---------+--------------+------------+--------+-----------+

row in set (0.00 sec)


mysql> select * from emp having salary > 100000;

ERROR 1463 (42000): Non-grouping field 'salary' is used in HAVING clause


mysql> select post,group_concat(name) from emp group by post having salary > 10000;#错误,分组后无法直接取到salary字段

ERROR 1054 (42S22): Unknown column 'salary' in 'having clause'

mysql> select post,group_concat(name) from emp group by post having avg(salary) > 10000;

+-----------+-------------------------------------------------------+

| post | group_concat(name) |

+-----------+-------------------------------------------------------+

| operation | 程咬铁,程咬铜,程咬银,程咬金,张野 |

| teacher | 成龙,jinxin,jingliyang,liwenzhou,yuanhao,wupeiqi,alex |

+-----------+-------------------------------------------------------+

rows in set (0.00 sec)
3.6.2 小练习
1. 查询各岗位内包含的员工个数小于2的岗位名、岗位内包含员工名字、个数
3. 查询各岗位平均薪资大于10000的岗位名、平均工资
4. 查询各岗位平均薪资大于10000且小于20000的岗位名、平均工资
#题1:

mysql> select post,group_concat(name),count(id) from employee group by post having count(id) < 2;

+-----------------------------------------+--------------------+-----------+

| post                                    | group_concat(name) | count(id) |

+-----------------------------------------+--------------------+-----------+

| 老男孩驻沙河办事处外交大使              | egon               |         1 |

+-----------------------------------------+--------------------+-----------+


#题目2:

mysql> select post,avg(salary) from employee group by post having avg(salary) > 10000;

+-----------+---------------+

| post      | avg(salary)   |

+-----------+---------------+

| operation |  16800.026000 |

| teacher   | 151842.901429 |

+-----------+---------------+


#题目3:

mysql> select post,avg(salary) from employee group by post having avg(salary) > 10000 and avg(salary) <20000;

+-----------+--------------+

| post      | avg(salary)  |

+-----------+--------------+

| operation | 16800.026000 |

+-----------+--------------+
3.6.3 课堂实例
4: having 过滤条件

    select post,avg(salary) from emp group by post having avg(salary) > 20000;
3.7 查询排序:ORDER BY
按单列排序
SELECT * FROM employee ORDER BY salary;
SELECT * FROM employee ORDER BY salary ASC;
SELECT * FROM employee ORDER BY salary DESC;
按多列排序:先按照age排序,如果年纪相同,则按照薪资排序
SELECT * from employee
ORDER BY age,
salary DESC;
3.7.1 小练习
1. 查询所有员工信息,先按照age升序排序,如果age相同则按照hire_date降序排序
2. 查询各岗位平均薪资大于10000的岗位名、平均工资,结果按平均薪资升序排列
3. 查询各岗位平均薪资大于10000的岗位名、平均工资,结果按平均薪资降序排列
#题目1

mysql> select * from employee ORDER BY age asc,hire_date desc;


#题目2

mysql> select post,avg(salary) from employee group by post having avg(salary) > 10000 order by avg(salary) asc;

+-----------+---------------+

| post      | avg(salary)   |

+-----------+---------------+

| operation |  16800.026000 |

| teacher   | 151842.901429 |

+-----------+---------------+


#题目3

mysql> select post,avg(salary) from employee group by post having avg(salary) > 10000 order by avg(salary) desc;

+-----------+---------------+

| post      | avg(salary)   |

+-----------+---------------+

| teacher   | 151842.901429 |

| operation |  16800.026000 |

+-----------+---------------+
3.7.2 课堂实例
5: order by排序

    select * from emp order by age asc; # 默认升序,从小到大

    select * from emp order by age desc; #从大到小


    select * from emp order by age asc,id desc;


    select post,avg(salary) from emp group by post order by avg(salary);
3.8 限制查询的记录数:LIMIT
3.8.1 示例
示例:

    SELECT * FROM employee ORDER BY salary DESC

        LIMIT 3;                    #默认初始位置为0


    SELECT * FROM employee ORDER BY salary DESC

        LIMIT 0,5; #从第0开始,即先查询出第一条,然后包含这一条在内往后查5条


    SELECT * FROM employee ORDER BY salary DESC

        LIMIT 5,5; #从第5开始,即先查询出第6条,然后包含这一条在内往后查5条
3.8.2 小练习
1. 分页显示,每页5条
mysql> select * from  employee limit 0,5;

+----+-----------+------+-----+------------+-----------------------------------------+--------------+------------+--------+-----------+

| id | name      | sex  | age | hire_date  | post                                    | post_comment | salary     | office | depart_id |

+----+-----------+------+-----+------------+-----------------------------------------+--------------+------------+--------+-----------+

|  1 | egon      | male |  18 | 2017-03-01 | 老男孩驻沙河办事处外交大使              | NULL         |    7300.33 |    401 |         1 |

|  2 | alex      | male |  78 | 2015-03-02 | teacher                                 |              | 1000000.31 |    401 |         1 |

|  3 | wupeiqi   | male |  81 | 2013-03-05 | teacher                                 | NULL         |    8300.00 |    401 |         1 |

|  4 | yuanhao   | male |  73 | 2014-07-01 | teacher                                 | NULL         |    3500.00 |    401 |         1 |

|  5 | liwenzhou | male |  28 | 2012-11-01 | teacher                                 | NULL         |    2100.00 |    401 |         1 |

+----+-----------+------+-----+------------+-----------------------------------------+--------------+------------+--------+-----------+

rows in set (0.00 sec)


mysql> select * from  employee limit 5,5;

+----+------------+--------+-----+------------+---------+--------------+----------+--------+-----------+

| id | name       | sex    | age | hire_date  | post    | post_comment | salary   | office | depart_id |

+----+------------+--------+-----+------------+---------+--------------+----------+--------+-----------+

|  6 | jingliyang | female |  18 | 2011-02-11 | teacher | NULL         |  9000.00 |    401 |         1 |

|  7 | jinxin     | male   |  18 | 1900-03-01 | teacher | NULL         | 30000.00 |    401 |         1 |

|  8 | 成龙       | male   |  48 | 2010-11-11 | teacher | NULL         | 10000.00 |    401 |         1 |

|  9 | 歪歪       | female |  48 | 2015-03-11 | sale    | NULL         |  3000.13 |    402 |         2 |

| 10 | 丫丫       | female |  38 | 2010-11-01 | sale    | NULL         |  2000.35 |    402 |         2 |

+----+------------+--------+-----+------------+---------+--------------+----------+--------+-----------+

rows in set (0.00 sec)


mysql> select * from  employee limit 10,5;

+----+-----------+--------+-----+------------+-----------+--------------+----------+--------+-----------+

| id | name      | sex    | age | hire_date  | post      | post_comment | salary   | office | depart_id |

+----+-----------+--------+-----+------------+-----------+--------------+----------+--------+-----------+

| 11 | 丁丁      | female |  18 | 2011-03-12 | sale      | NULL         |  1000.37 |    402 |         2 |

| 12 | 星星      | female |  18 | 2016-05-13 | sale      | NULL         |  3000.29 |    402 |         2 |

| 13 | 格格      | female |  28 | 2017-01-27 | sale      | NULL         |  4000.33 |    402 |         2 |

| 14 | 张野      | male   |  28 | 2016-03-11 | operation | NULL         | 10000.13 |    403 |         3 |

| 15 | 程咬金    | male   |  18 | 1997-03-12 | operation | NULL         | 20000.00 |    403 |         3 |

+----+-----------+--------+-----+------------+-----------+--------------+----------+--------+-----------+

rows in set (0.00 sec)
3.8.3 课堂实例
6、limit n

    select * from emp limit 3;

    select * from emp limit 0,5;

    select * from emp limit 5,5;

    select * from emp limit 10,5;

    select * from emp limit 15,5;


def from(db,table):

    f=open(filepath,'r')

    return f


def where(f,pattern):

    for line in f:

        if pattern:

            yield line


def group():

    pass


def having():

    pass


def distinct():

    pass


def order():

    pass


def limit():

    pass


def select():

    f=from(db,table)

    lines=where(f,'id > 1')

    group_res=group(lines)

    having_res=having(group_res)

    distinct_res=distinct(having_res)

    order_res=order(distinct_res)

    res=limit(order_res)

    print(res)
3.9 使用正则表达式查询
SELECT * FROM employee WHERE name REGEXP '^ale';

SELECT * FROM employee WHERE name REGEXP 'on$';

SELECT * FROM employee WHERE name REGEXP 'm{2}';

小结:对字符串匹配的方式

WHERE name = 'egon';

WHERE name LIKE 'yua%';

WHERE name REGEXP 'on$';
3.9.1 小练习
查看所有员工中名字是jin开头,n或者g结果的员工信息
select * from employee where name regexp '^jin.*[gn]$';
3.9.2 课堂实例
# 正则
select * from emp where name regexp '^jin.*$';
第4章 MySQL之多表查询
4.1 介绍
本节主题
l 多表连接查询
l 复合条件连接查询
l 子查询
4.1.1 准备表
#################表department与employee##################

#建表

create table department(

id int,

name varchar(20)

);


create table employee(

id int primary key auto_increment,

name varchar(20),

sex enum('male','female') not null default 'male',

age int,

dep_id int

);


#插入数据

insert into department values

(200,'技术'),

(201,'人力资源'),

(202,'销售'),

(203,'运营');


insert into employee(name,sex,age,dep_id) values

('egon','male',18,200),

('alex','female',48,201),

('wupeiqi','male',38,201),

('yuanhao','female',28,202),

('liwenzhou','male',18,200),

('jingliyang','female',18,204)

;


#查看表结构和数据

mysql> desc department;

+-------+-------------+------+-----+---------+-------+

| Field | Type | Null | Key | Default | Extra |

+-------+-------------+------+-----+---------+-------+

| id | int(11) | YES | | NULL | |

| name | varchar(20) | YES | | NULL | |

+-------+-------------+------+-----+---------+-------+


mysql> desc employee;

+--------+-----------------------+------+-----+---------+----------------+

| Field | Type | Null | Key | Default | Extra |

+--------+-----------------------+------+-----+---------+----------------+

| id | int(11) | NO | PRI | NULL | auto_increment |

| name | varchar(20) | YES | | NULL | |

| sex | enum('male','female') | NO | | male | |

| age | int(11) | YES | | NULL | |

| dep_id | int(11) | YES | | NULL | |

+--------+-----------------------+------+-----+---------+----------------+


mysql> select * from department;

+------+--------------+

| id | name |

+------+--------------+

| 200 | 技术 |

| 201 | 人力资源 |

| 202 | 销售 |

| 203 | 运营 |

+------+--------------+


mysql> select * from employee;

+----+------------+--------+------+--------+

| id | name | sex | age | dep_id |

+----+------------+--------+------+--------+

| 1 | egon | male | 18 | 200 |

| 2 | alex | female | 48 | 201 |

| 3 | wupeiqi | male | 38 | 201 |

| 4 | yuanhao | female | 28 | 202 |

| 5 | liwenzhou | male | 18 | 200 |

| 6 | jingliyang | female | 18 | 204 |

+----+------------+--------+------+--------+
4.2 多表连接查询
#重点:外链接语法
SELECT 字段列表
FROM 表1 INNER|LEFT|RIGHT JOIN 表2
ON 表1.字段 = 表2.字段;
4.2.1 交叉连接:不适用任何匹配条件。生成笛卡尔积
mysql> select * from employee,department;

+----+------------+--------+------+--------+------+--------------+

| id | name       | sex    | age  | dep_id | id   | name         |

+----+------------+--------+------+--------+------+--------------+

|  1 | egon       | male   |   18 |    200 |  200 | 技术         |

|  1 | egon       | male   |   18 |    200 |  201 | 人力资源     |

|  1 | egon       | male   |   18 |    200 |  202 | 销售         |

|  1 | egon       | male   |   18 |    200 |  203 | 运营         |

|  2 | alex       | female |   48 |    201 |  200 | 技术         |

|  2 | alex       | female |   48 |    201 |  201 | 人力资源     |

|  2 | alex       | female |   48 |    201 |  202 | 销售         |

|  2 | alex       | female |   48 |    201 |  203 | 运营         |

|  3 | wupeiqi    | male   |   38 |    201 |  200 | 技术         |

|  3 | wupeiqi    | male   |   38 |    201 |  201 | 人力资源     |

|  3 | wupeiqi    | male   |   38 |    201 |  202 | 销售         |

|  3 | wupeiqi    | male   |   38 |    201 |  203 | 运营         |

|  4 | yuanhao    | female |   28 |    202 |  200 | 技术         |

|  4 | yuanhao    | female |   28 |    202 |  201 | 人力资源     |

|  4 | yuanhao    | female |   28 |    202 |  202 | 销售         |

|  4 | yuanhao    | female |   28 |    202 |  203 | 运营         |

|  5 | liwenzhou  | male   |   18 |    200 |  200 | 技术         |

|  5 | liwenzhou  | male   |   18 |    200 |  201 | 人力资源     |

|  5 | liwenzhou  | male   |   18 |    200 |  202 | 销售         |

|  5 | liwenzhou  | male   |   18 |    200 |  203 | 运营         |

|  6 | jingliyang | female |   18 |    204 |  200 | 技术         |

|  6 | jingliyang | female |   18 |    204 |  201 | 人力资源     |

|  6 | jingliyang | female |   18 |    204 |  202 | 销售         |

|  6 | jingliyang | female |   18 |    204 |  203 | 运营         |

+----+------------+--------+------+--------+------+--------------+
4.2.2 内连接:只连接匹配的行
#找两张表共有的部分,相当于利用条件从笛卡尔积结果中筛选出了正确的结果

#department没有204这个部门,因而employee表中关于204这条员工信息没有匹配出来

mysql> select employee.id,employee.name,employee.age,employee.sex,department.name from employee inner join department on employee.dep_id=department.id;

+----+-----------+------+--------+--------------+

| id | name      | age  | sex    | name         |

+----+-----------+------+--------+--------------+

|  1 | egon      |   18 | male   | 技术         |

|  2 | alex      |   48 | female | 人力资源     |

|  3 | wupeiqi   |   38 | male   | 人力资源     |

|  4 | yuanhao   |   28 | female | 销售         |

|  5 | liwenzhou |   18 | male   | 技术         |

+----+-----------+------+--------+--------------+


#上述sql等同于

mysql> select employee.id,employee.name,employee.age,employee.sex,department.name from employee,department where employee.dep_id=department.id;
4.2.3 外链接之左连接:优先显示左表全部记录
#以左表为准,即找出所有员工信息,当然包括没有部门的员工

#本质就是:在内连接的基础上增加左边有右边没有的结果

mysql> select employee.id,employee.name,department.name as depart_name from employee left join department on employee.dep_id=department.id;

+----+------------+--------------+

| id | name       | depart_name  |

+----+------------+--------------+

|  1 | egon       | 技术         |

|  5 | liwenzhou  | 技术         |

|  2 | alex       | 人力资源     |

|  3 | wupeiqi    | 人力资源     |

|  4 | yuanhao    | 销售         |

|  6 | jingliyang | NULL         |

+----+------------+--------------+
4.2.4 外链接之右连接:优先显示右表全部记录
#以右表为准,即找出所有部门信息,包括没有员工的部门

#本质就是:在内连接的基础上增加右边有左边没有的结果

mysql> select employee.id,employee.name,department.name as depart_name from employee right join department on employee.dep_id=department.id;

+------+-----------+--------------+

| id   | name      | depart_name  |

+------+-----------+--------------+

|    1 | egon      | 技术         |

|    2 | alex      | 人力资源     |

|    3 | wupeiqi   | 人力资源     |

|    4 | yuanhao   | 销售         |

|    5 | liwenzhou | 技术         |

| NULL | NULL      | 运营         |

+------+-----------+--------------+
4.2.5 全外连接:显示左右两个表全部记录
全外连接:在内连接的基础上增加左边有右边没有的和右边有左边没有的结果

#注意:mysql不支持全外连接 full JOIN

#强调:mysql可以使用此种方式间接实现全外连接

select * from employee left join department on employee.dep_id = department.id

union

select * from employee right join department on employee.dep_id = department.id

;

#查看结果

+------+------------+--------+------+--------+------+--------------+

| id   | name       | sex    | age  | dep_id | id   | name         |

+------+------------+--------+------+--------+------+--------------+

|    1 | egon       | male   |   18 |    200 |  200 | 技术         |

|    5 | liwenzhou  | male   |   18 |    200 |  200 | 技术         |

|    2 | alex       | female |   48 |    201 |  201 | 人力资源     |

|    3 | wupeiqi    | male   |   38 |    201 |  201 | 人力资源     |

|    4 | yuanhao    | female |   28 |    202 |  202 | 销售         |

|    6 | jingliyang | female |   18 |    204 | NULL | NULL         |

| NULL | NULL       | NULL   | NULL |   NULL |  203 | 运营         |

+------+------------+--------+------+--------+------+--------------+


#注意 union与union all的区别:union会去掉相同的纪录
4.2.6 符合条件连接查询
#示例1:以内连接的方式查询employee和department表,并且employee表中的age字段值必须大于25,即找出年龄大于25岁的员工以及员工所在的部门

select employee.name,department.name from employee inner join department

    on employee.dep_id = department.id

    where age > 25;


#示例2:以内连接的方式查询employee和department表,并且以age字段的升序方式显示

select employee.id,employee.name,employee.age,department.name from employee,department

    where employee.dep_id = department.id

    and age > 25

    order by age asc;
4.2.7 课堂实例
#1、笛卡尔积

select * from emp,dep;

select * from emp,dep where emp.dep_id=dep.id;


#2、内连接inner join:取两张表的共同部分

select * from emp inner join dep on emp.dep_id=dep.id;


#3、左连接left join:在内连接的基础上保留左表的记录

select * from emp left join dep on emp.dep_id=dep.id;


#4、右连接right join:在内连接的基础上保留右表的记录

select * from emp right join dep on emp.dep_id=dep.id;


#5、全外连接full join:在内连接的基础上保留左、右表的记录

select * from emp left join dep on emp.dep_id=dep.id

union

select * from emp right join dep on emp.dep_id=dep.id;
4.3 子查询
#1:子查询是将一个查询语句嵌套在另一个查询语句中。
#2:内层查询语句的查询结果,可以为外层查询语句提供查询条件。
#3:子查询中可以包含:IN、NOT IN、ANY、ALL、EXISTS 和 NOT EXISTS等关键字
#4:还可以包含比较运算符:= 、 !=、> 、<等
4.3.1 带IN关键字的子查询
#查询平均年龄在25岁以上的部门名

select id,name from department

    where id in

        (select dep_id from employee group by dep_id having avg(age) > 25);


#查看技术部员工姓名

select name from employee

    where dep_id in

        (select id from department where name='技术');


#查看不足1人的部门名(子查询得到的是有人的部门id)select name from department where id not in (select distinct dep_id from employee);
4.3.2 带比较运算符的子查询
#比较运算符:=、!=、>、>=、<、<=、<>

#查询大于所有人平均年龄的员工名与年龄

mysql> select name,age from emp where age > (select avg(age) from emp);

+---------+------+

| name | age |

+---------+------+

| alex | 48 |

| wupeiqi | 38 |

+---------+------+

rows in set (0.00 sec)


#查询大于部门内平均年龄的员工名、年龄

select t1.name,t1.age from emp t1

inner join

(select dep_id,avg(age) avg_age from emp group by dep_id) t2

on t1.dep_id = t2.dep_id

where t1.age > t2.avg_age;
4.3.3 带EXISTS关键字的子查询
EXISTS关字键字表示存在。在使用EXISTS关键字时,内层查询语句不返回查询的记录。
而是返回一个真假值。True或False
当返回True时,外层查询语句将进行查询;当返回值为False时,外层查询语句不进行查询
#department表中存在dept_id=203,Ture

mysql> select * from employee

    ->     where exists

    ->         (select id from department where id=200);

+----+------------+--------+------+--------+

| id | name       | sex    | age  | dep_id |

+----+------------+--------+------+--------+

|  1 | egon       | male   |   18 |    200 |

|  2 | alex       | female |   48 |    201 |

|  3 | wupeiqi    | male   |   38 |    201 |

|  4 | yuanhao    | female |   28 |    202 |

|  5 | liwenzhou  | male   |   18 |    200 |

|  6 | jingliyang | female |   18 |    204 |

+----+------------+--------+------+--------+


#department表中存在dept_id=205,False

mysql> select * from employee

    ->     where exists

    ->         (select id from department where id=204);

Empty set (0.00 sec)
4.3.4 课堂实例
1 带IN关键字的子查询

#查询平均年龄在25岁以上的部门名

select name from dep where id in

(select dep_id from emp group by dep_id having avg(age) > 25);


#查看技术部员工姓名

select

    emp.name

from emp

inner join dep on emp.dep_id = dep.id

where dep.name = '技术'

;

select name from emp where dep_id =(select id from dep where name='技术');


#查看不足1人的部门名

select name from dep where id not in (

select dep_id from emp group by dep_id having count(id) >= 1);


select name from dep where id not in (

select distinct dep_id from emp);


#查询大于所有人平均年龄的员工名与年龄

select name,age from emp where age > (

select avg(age) from emp);


#查询大于部门内平均年龄的员工名、年龄

select

    t1.*

from emp as t1

inner join

(select dep_id,avg(age) as avg_age from emp group by dep_id) as t2

on t1.dep_id = t2.dep_id

where t1.age > t2.avg_age

;


# 统计每个部门最新入职的员工名,入职日期


select

    t1.name,t1.hire_date

from emp as t1

inner join

(select post,max(hire_date) max_date from emp group by post) as t2

on t1.post = t2.post

where t1.hire_date = t2.max_date

;


select name from emp where name='egon';

select name from emp where id > 1000;

select name from emp where id > 1000 and id < 1005;

select name from emp where id = 1000;


select name from emp where salary = 20000/12;


select * from emp;
4.3.5 练习:查询每个部门最新入职的那位员工
#########################准备表和记录#############################

company.employee

    员工id      id                  int

    姓名        emp_name            varchar

    性别        sex                 enum

    年龄        age                 int

    入职日期     hire_date           date

    岗位        post                varchar

    职位描述     post_comment        varchar

    薪水        salary              double

    办公室       office              int

    部门编号     depart_id           int


#创建表

create table employee(

id int not null unique auto_increment,

name varchar(20) not null,

sex enum('male','female') not null default 'male', #大部分是男的

age int(3) unsigned not null default 28,

hire_date date not null,

post varchar(50),

post_comment varchar(100),

salary double(15,2),

office int, #一个部门一个屋子

depart_id int

);


#查看表结构

mysql> desc employee;

+--------------+-----------------------+------+-----+---------+----------------+

| Field        | Type                  | Null | Key | Default | Extra          |

+--------------+-----------------------+------+-----+---------+----------------+

| id           | int(11)               | NO   | PRI | NULL    | auto_increment |

| name         | varchar(20)           | NO   |     | NULL    |                |

| sex          | enum('male','female') | NO   |     | male    |                |

| age          | int(3) unsigned       | NO   |     | 28      |                |

| hire_date    | date                  | NO   |     | NULL    |                |

| post         | varchar(50)           | YES  |     | NULL    |                |

| post_comment | varchar(100)          | YES  |     | NULL    |                |

| salary       | double(15,2)          | YES  |     | NULL    |                |

| office       | int(11)               | YES  |     | NULL    |                |

| depart_id    | int(11)               | YES  |     | NULL    |                |

+--------------+-----------------------+------+-----+---------+----------------+


#插入记录

#三个部门:教学,销售,运营

insert into employee(name,sex,age,hire_date,post,salary,office,depart_id) values

('egon','male',18,'20170301','老男孩驻沙河办事处外交大使',7300.33,401,1), #以下是教学部

('alex','male',78,'20150302','teacher',1000000.31,401,1),

('wupeiqi','male',81,'20130305','teacher',8300,401,1),

('yuanhao','male',73,'20140701','teacher',3500,401,1),

('liwenzhou','male',28,'20121101','teacher',2100,401,1),

('jingliyang','female',18,'20110211','teacher',9000,401,1),

('jinxin','male',18,'19000301','teacher',30000,401,1),

('成龙','male',48,'20101111','teacher',10000,401,1),


('歪歪','female',48,'20150311','sale',3000.13,402,2),#以下是销售部门

('丫丫','female',38,'20101101','sale',2000.35,402,2),

('丁丁','female',18,'20110312','sale',1000.37,402,2),

('星星','female',18,'20160513','sale',3000.29,402,2),

('格格','female',28,'20170127','sale',4000.33,402,2),


('张野','male',28,'20160311','operation',10000.13,403,3), #以下是运营部门

('程咬金','male',18,'19970312','operation',20000,403,3),

('程咬银','female',18,'20130311','operation',19000,403,3),

('程咬铜','male',18,'20150411','operation',18000,403,3),

('程咬铁','female',18,'20140512','operation',17000,403,3)

;


#ps:如果在windows系统中,插入中文字符,select的结果为空白,可以将所有字符编码统一设置成gbk
################################答案一(链表)###############################

SELECT

    *

FROM

    emp AS t1

INNER JOIN (

    SELECT

        post,

        max(hire_date) max_date

    FROM

        emp

    GROUP BY

        post

) AS t2 ON t1.post = t2.post

WHERE

    t1.hire_date = t2.max_date;
#####################答案二(子查询)###########################

mysql> select (select t2.name from emp as t2 where t2.post=t1.post order by hire_date desc limit 1) from emp as t1 group by post;

+---------------------------------------------------------------------------------------+

| (select t2.name from emp as t2 where t2.post=t1.post order by hire_date desc limit 1) |

+---------------------------------------------------------------------------------------+

| 张野                                                                                  |

| 格格                                                                                  |

| alex                                                                                  |

| egon                                                                                  |

+---------------------------------------------------------------------------------------+

rows in set (0.00 sec)


mysql> select (select t2.id from emp as t2 where t2.post=t1.post order by hire_date desc limit 1) from emp as t1 group by post;

+-------------------------------------------------------------------------------------+

| (select t2.id from emp as t2 where t2.post=t1.post order by hire_date desc limit 1) |

+-------------------------------------------------------------------------------------+

|                                                                                  14 |

|                                                                                  13 |

|                                                                                   2 |

|                                                                                   1 |

+-------------------------------------------------------------------------------------+

rows in set (0.00 sec)


#正确答案

mysql> select t3.name,t3.post,t3.hire_date from emp as t3 where id in (select (select id from emp as t2 where t2.post=t1.post order by hire_date desc limit 1) from emp as t1 group by post);

+--------+-----------------------------------------+------------+

| name   | post                                    | hire_date  |

+--------+-----------------------------------------+------------+

| egon   | 老男孩驻沙河办事处外交大使              | 2017-03-01 |

| alex   | teacher                                 | 2015-03-02 |

| 格格   | sale                                    | 2017-01-27 |

| 张野   | operation                               | 2016-03-11 |

+--------+-----------------------------------------+------------+

rows in set (0.00 sec)
答案一为正确答案,答案二中的limit 1有问题(每个部门可能有>1个为同一时间入职的新员工),我只是想用该例子来说明可以在select后使用子查询
可以基于上述方法解决:比如某网站在全国各个市都有站点,每个站点一条数据,想取每个省下最新的那一条市的网站质量信息
4.4 慢查询优化的基本步骤
0.先运行看看是否真的很慢,注意设置SQL_NO_CACHE

1.where条件单表查,锁定最小返回记录表。这句话的意思是把查询语句的where都应用到表中返回的记录数最小的表开始查起,单表每个字段分别查询,看哪个字段的区分度最高

2.explain查看执行计划,是否与1预期一致(从锁定记录较少的表开始查询)

3.order by limit 形式的sql语句让排序的表优先查

4.了解业务方使用场景

5.加索引时参照建索引的几大原则

6.观察结果,不符合预期继续从0分析
4.5 慢日志管理
慢日志

            - 执行时间 > 10

            - 未命中索引

            - 日志文件路径


        配置:

            - 内存

                show variables like '%query%';

                show variables like '%queries%';

                set global 变量名 = 值

            - 配置文件

                mysqld --defaults-file='E:wupeiqimysql-5.7.16-winx64mysql-5.7.16-winx64my-default.ini'


                my.conf内容:

                    slow_query_log = ON

                    slow_query_log_file = D:/....


                注意:修改配置文件之后,需要重启服务
################################日志管理###############################

MySQL日志管理

========================================================

错误日志: 记录 MySQL 服务器启动、关闭及运行错误等信息

二进制日志: 又称binlog日志,以二进制文件的方式记录数据库中除 SELECT 以外的操作

查询日志: 记录查询的信息

慢查询日志: 记录执行时间超过指定时间的操作

中继日志: 备库将主库的二进制日志复制到自己的中继日志中,从而在本地进行重放

通用日志: 审计哪个账号、在哪个时段、做了哪些事件

事务日志或称redo日志: 记录Innodb事务相关的如事务执行时间、检查点等

========================================================

一、bin-log

1. 启用

# vim /etc/my.cnf

[mysqld]

log-bin[=dir[filename]]

# service mysqld restart

2. 暂停

//仅当前会话

SET SQL_LOG_BIN=0;

SET SQL_LOG_BIN=1;

3. 查看

查看全部:

# mysqlbinlog mysql.000002

按时间:

# mysqlbinlog mysql.000002 --start-datetime="2012-12-05 10:02:56"

# mysqlbinlog mysql.000002 --stop-datetime="2012-12-05 11:02:54"

# mysqlbinlog mysql.000002 --start-datetime="2012-12-05 10:02:56" --stop-datetime="2012-12-05 11:02:54"


按字节数:

# mysqlbinlog mysql.000002 --start-position=260

# mysqlbinlog mysql.000002 --stop-position=260

# mysqlbinlog mysql.000002 --start-position=260 --stop-position=930

4. 截断bin-log(产生新的bin-log文件)

a. 重启mysql服务器

b. # mysql -uroot -p123 -e 'flush logs'

5. 删除bin-log文件

# mysql -uroot -p123 -e 'reset master'


二、查询日志

启用通用查询日志

# vim /etc/my.cnf

[mysqld]

log[=dir[filename]]

# service mysqld restart


三、慢查询日志

启用慢查询日志

# vim /etc/my.cnf

[mysqld]

log-slow-queries[=dir[filename]]

long_query_time=n

# service mysqld restart

MySQL 5.6:

slow-query-log=1

slow-query-log-file=slow.log

long_query_time=3

查看慢查询日志

测试:BENCHMARK(count,expr)

SELECT BENCHMARK(50000000,2*3);
第5章 MySQL之数据备份、pymysql模块
5.1 pymysql模块
#安装

pip3 install pymysql
5.1.1 连接、执行sql、关闭(游标)

import pymysql

user=input('用户名: ').strip()

pwd=input('密码: ').strip()


#链接

conn=pymysql.connect(host='localhost',user='root',password='123',database='egon',charset='utf8')

#游标

cursor=conn.cursor() #执行完毕返回的结果集默认以元组显示

#cursor=conn.cursor(cursor=pymysql.cursors.DictCursor)


#执行sql语句

sql='select * from userinfo where name="%s" and password="%s"' %(user,pwd) #注意%s需要加引号

print(sql)

res=cursor.execute(sql) #执行sql语句,返回sql查询成功的记录数目

print(res)


cursor.close()

conn.close()


if res:

    print('登录成功')

else:

    print('登录失败')
5.1.2 execute()之sql注入问题
注意:符号--会注释掉它之后的sql,正确的语法:--后至少有一个任意字符
根本原理:就根据程序的字符串拼接name='%s',我们输入一个xxx' -- haha,用我们输入的xxx加'在程序中拼接成一个判断条件name='xxx' -- haha'
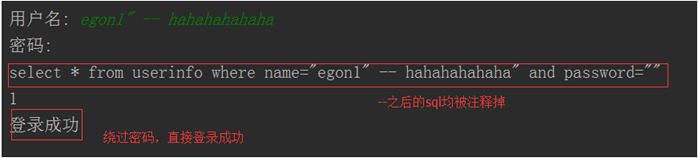
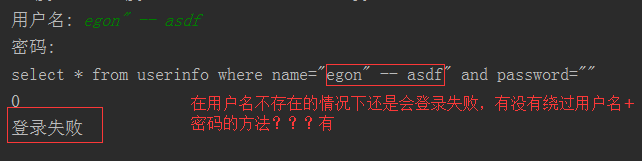
最后那一个空格,在一条sql语句中如果遇到select * from t1 where id > 3 -- and name='egon';则--之后的条件被注释掉了 #1、sql注入之:用户存在,绕过密码 egon' -- 任意字符
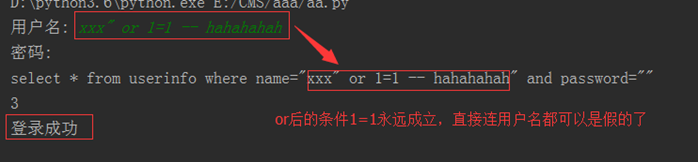
#2、sql注入之:用户不存在,绕过用户与密码 xxx' or 1=1 -- 任意字符
解决方法:
# 原来是我们对sql进行字符串拼接

# sql="select * from userinfo where name='%s' and password='%s'" %(user,pwd)

# print(sql)

# res=cursor.execute(sql)


#改写为(execute帮我们做字符串拼接,我们无需且一定不能再为%s加引号了)

sql="select * from userinfo where name=%s and password=%s" #!!!注意%s需要去掉引号,因为pymysql会自动为我们加上

res=cursor.execute(sql,[user,pwd]) #pymysql模块自动帮我们解决sql注入的问题,只要我们按照pymysql的规矩来。
5.1.3 增、删、改:conn.commit()
import pymysql

#链接

conn=pymysql.connect(host='localhost',user='root',password='123',database='egon')

#游标

cursor=conn.cursor()


#执行sql语句

#part1

# sql='insert into userinfo(name,password) values("root","123456");'

# res=cursor.execute(sql) #执行sql语句,返回sql影响成功的行数

# print(res)


#part2

# sql='insert into userinfo(name,password) values(%s,%s);'

# res=cursor.execute(sql,("root","123456")) #执行sql语句,返回sql影响成功的行数

# print(res)


#part3

sql='insert into userinfo(name,password) values(%s,%s);'

res=cursor.executemany(sql,[("root","123456"),("lhf","12356"),("eee","156")]) #执行sql语句,返回sql影响成功的行数

print(res)


conn.commit() #提交后才发现表中插入记录成功

cursor.close()

conn.close()
5.1.4 查:fetchone,fetchmany,fetchall
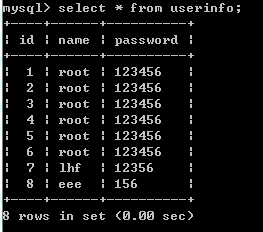
import pymysql

#链接

conn=pymysql.connect(host='localhost',user='root',password='123',database='egon')

#游标

cursor=conn.cursor()


#执行sql语句

sql='select * from userinfo;'

rows=cursor.execute(sql) #执行sql语句,返回sql影响成功的行数rows,将结果放入一个集合,等待被查询


# cursor.scroll(3,mode='absolute') # 相对绝对位置移动

# cursor.scroll(3,mode='relative') # 相对当前位置移动

res1=cursor.fetchone()

res2=cursor.fetchone()

res3=cursor.fetchone()

res4=cursor.fetchmany(2)

res5=cursor.fetchall()

print(res1)

print(res2)

print(res3)

print(res4)

print(res5)

print('%s rows in set (0.00 sec)' %rows)


conn.commit() #提交后才发现表中插入记录成功

cursor.close()

conn.close()


'''

(1, 'root', '123456')

(2, 'root', '123456')

(3, 'root', '123456')

((4, 'root', '123456'), (5, 'root', '123456'))

((6, 'root', '123456'), (7, 'lhf', '12356'), (8, 'eee', '156'))

rows in set (0.00 sec)

'''
5.1.5 获取插入的最后一条数据的自增ID
import pymysql

conn=pymysql.connect(host='localhost',user='root',password='123',database='egon')

cursor=conn.cursor()


sql='insert into userinfo(name,password) values("xxx","123");'

rows=cursor.execute(sql)

print(cursor.lastrowid) #在插入语句后查看


conn.commit()


cursor.close()

conn.close()
5.1.6 课堂实例讲解
#1、基本使用

# '''

# create table user(

#     id int primary key auto_increment,

#     username char(16),

#     password char(20)

# );

# insert into user(username,password) values

# ('egon','123'),

# ('alex','456'),

# ('wxx','456');

# '''

#

# import pymysql

#

# user=input('user>>: ').strip()

# pwd=input('password>>: ').strip()

#

# #1、建连接

# conn=pymysql.connect(

#     host='127.0.0.1',

#     port=3306,

#     user='root',

#     password='123',

#     db='db6'

# )

# #2、拿游标

# cursor=conn.cursor()

#

# #3、提交sql

# # sql='select id from user where username="%s" and password="%s"' %(user,pwd)

# # print(sql)

# sql='select id from user where username=%s and password=%s'

# rows=cursor.execute(sql,(user,pwd))

#

# if rows:

#     print('登录成功')

# else:

#     print('用户名或密码错误')

#

# conn.commit()

# #4、回收资源

# cursor.close()

# conn.close()


#2、增删改

# import pymysql

#

# #1、建连接

# conn=pymysql.connect(

#     host='127.0.0.1',

#     port=3306,

#     user='root',

#     password='123',

#     db='db6'

# )

# #2、拿游标

# cursor=conn.cursor()

#

# #3、提交sql

# sql='insert into user(username,password) values(%s,%s)'

# # rows=cursor.execute(sql,('yxx','123'))

# # print(rows)

#

# rows=cursor.executemany(sql,[('yxx1','123'),('yxx2','123'),('yxx3','123')])

# print(rows)

#

#

# conn.commit()

# #4、回收资源

# cursor.close()

# conn.close()


#3、查

import pymysql


#1、建连接

conn=pymysql.connect(

    host='127.0.0.1',

    port=3306,

    user='root',

    password='123',

    db='db6'

)

#2、拿游标

cursor=conn.cursor(pymysql.cursors.DictCursor)


#3、提交sql

sql='select * from user'

rows=cursor.execute(sql)

# print(rows)


# print(cursor.fetchall())

# print('===>',cursor.fetchall())


print(cursor.fetchone())

print(cursor.fetchone())

print(cursor.fetchmany(3))


cursor.scroll(0,mode='absolute') # 相对绝对位置移动

print(cursor.fetchone())

# cursor.scroll(3,mode='relative') # 相对当前位置移动


#4、回收资源

cursor.close()

conn.close()
5.2 MySQL数据备份
#1. 物理备份: 直接复制数据库文件,适用于大型数据库环境。但不能恢复到异构系统中如Windows。
#2. 逻辑备份: 备份的是建表、建库、插入等操作所执行SQL语句,适用于中小型数据库,效率相对较低。
#3. 导出表: 将表导入到文本文件中。
5.2.1 使用mysqldump实现逻辑备份
#语法:

# mysqldump -h 服务器 -u用户名 -p密码 数据库名 > 备份文件.sql


#示例:

#单库备份

mysqldump -uroot -p123 db1 > db1.sql

mysqldump -uroot -p123 db1 table1 table2 > db1-table1-table2.sql


#多库备份

mysqldump -uroot -p123 --databases db1 db2 mysql db3 > db1_db2_mysql_db3.sql


#备份所有库

mysqldump -uroot -p123 --all-databases > all.sql
5.2.2 恢复逻辑备份
#方法一:

[root@egon backup]# mysql -uroot -p123 < /backup/all.sql


#方法二:

mysql> use db1;

mysql> SET SQL_LOG_BIN=0;

mysql> source /root/db1.sql


#注:如果备份/恢复单个库时,可以修改sql文件

DROP database if exists school;

create database school;

use school;
5.2.3 备份/恢复案例
#数据库备份/恢复实验一:数据库损坏

备份:

1. # mysqldump -uroot -p123 --all-databases > /backup/`date +%F`_all.sql

2. # mysql -uroot -p123 -e 'flush logs' //截断并产生新的binlog

3. 插入数据 //模拟服务器正常运行

4. mysql> set sql_log_bin=0; //模拟服务器损坏

mysql> drop database db;


恢复:

1. # mysqlbinlog 最后一个binlog > /backup/last_bin.log

2. mysql> set sql_log_bin=0;

mysql> source /backup/2014-02-13_all.sql //恢复最近一次完全备份

mysql> source /backup/last_bin.log //恢复最后个binlog文件


#数据库备份/恢复实验二:如果有误删除

备份:

1. mysqldump -uroot -p123 --all-databases > /backup/`date +%F`_all.sql

2. mysql -uroot -p123 -e 'flush logs' //截断并产生新的binlog

3. 插入数据 //模拟服务器正常运行

4. drop table db1.t1 //模拟误删除

5. 插入数据 //模拟服务器正常运行


恢复:

1. # mysqlbinlog 最后一个binlog --stop-position=260 > /tmp/1.sql

# mysqlbinlog 最后一个binlog --start-position=900 > /tmp/2.sql

2. mysql> set sql_log_bin=0;

mysql> source /backup/2014-02-13_all.sql //恢复最近一次完全备份

mysql> source /tmp/1.log //恢复最后个binlog文件

mysql> source /tmp/2.log //恢复最后个binlog文件


注意事项:

1. 完全恢复到一个干净的环境(例如新的数据库或删除原有的数据库)

2. 恢复期间所有SQL语句不应该记录到binlog中
5.2.4 实现自动化备份
备份计划:

1. 什么时间 2:00

2. 对哪些数据库备份

3. 备份文件放的位置


备份脚本:

[root@egon ~]# vim /mysql_back.sql

#!/bin/bash

back_dir=/backup

back_file=`date +%F`_all.sql

user=root

pass=123


if [ ! -d /backup ];then

mkdir -p /backup

fi


# 备份并截断日志

mysqldump -u${user} -p${pass} --events --all-databases > ${back_dir}/${back_file}

mysql -u${user} -p${pass} -e 'flush logs'


# 只保留最近一周的备份

cd $back_dir

find . -mtime +7 -exec rm -rf {} ;


手动测试:

[root@egon ~]# chmod a+x /mysql_back.sql

[root@egon ~]# chattr +i /mysql_back.sql

[root@egon ~]# /mysql_back.sql


配置cron:

[root@egon ~]# crontab -l

* * * /mysql_back.sql
5.2.5 表的导出和导入
SELECT... INTO OUTFILE 导出文本文件

示例:

mysql> SELECT * FROM school.student1

INTO OUTFILE 'student1.txt'

FIELDS TERMINATED BY ',' //定义字段分隔符

OPTIONALLY ENCLOSED BY '”' //定义字符串使用什么符号括起来

LINES TERMINATED BY '
' ; //定义换行符


mysql 命令导出文本文件

示例:

# mysql -u root -p123 -e 'select * from student1.school' > /tmp/student1.txt

# mysql -u root -p123 --xml -e 'select * from student1.school' > /tmp/student1.xml

# mysql -u root -p123 --html -e 'select * from student1.school' > /tmp/student1.html


LOAD DATA INFILE 导入文本文件

mysql> DELETE FROM student1;

mysql> LOAD DATA INFILE '/tmp/student1.txt'

INTO TABLE school.student1

FIELDS TERMINATED BY ','

OPTIONALLY ENCLOSED BY '”'

LINES TERMINATED BY '
';
####################报错:Variable 'secure_file_priv' is a read only##################

#可能会报错

mysql> select * from db1.emp into outfile 'C:\db1.emp.txt' fields terminated by ',' lines terminated by '
';

ERROR 1238 (HY000): Variable 'secure_file_priv' is a read only variable


#数据库最关键的是数据,一旦数据库权限泄露,那么通过上述语句就可以轻松将数据导出到文件中然后下载拿走,因而mysql对此作了限制,只能将文件导出到指定目录

在配置文件中

[mysqld]

secure_file_priv='C:\' #只能将数据导出到C:\下


重启mysql

重新执行上述语句
5.2.6 数据库迁移
务必保证在相同版本之间迁移
# mysqldump -h 源IP -uroot -p123 --databases db1 | mysql -h 目标IP -uroot -p456
第6章 MySQL之触发器、事务、存储过程、函数
6.1 触发器
使用触发器可以定制用户对表进行【增、删、改】操作时前后的行为,注意:没有查询
6.1.1 创建触发器
# 插入前

CREATE TRIGGER tri_before_insert_tb1 BEFORE INSERT ON tb1 FOR EACH ROW

BEGIN

    ...

END


# 插入后

CREATE TRIGGER tri_after_insert_tb1 AFTER INSERT ON tb1 FOR EACH ROW

BEGIN

    ...

END


# 删除前

CREATE TRIGGER tri_before_delete_tb1 BEFORE DELETE ON tb1 FOR EACH ROW

BEGIN

    ...

END


# 删除后

CREATE TRIGGER tri_after_delete_tb1 AFTER DELETE ON tb1 FOR EACH ROW

BEGIN

    ...

END


# 更新前

CREATE TRIGGER tri_before_update_tb1 BEFORE UPDATE ON tb1 FOR EACH ROW

BEGIN

    ...

END


# 更新后

CREATE TRIGGER tri_after_update_tb1 AFTER UPDATE ON tb1 FOR EACH ROW

BEGIN

    ...

END
#####################插入后触发触发器##########################

#准备表

CREATE TABLE cmd (

    id INT PRIMARY KEY auto_increment,

    USER CHAR (32),

    priv CHAR (10),

    cmd CHAR (64),

    sub_time datetime, #提交时间

    success enum ('yes', 'no') #0代表执行失败

);


CREATE TABLE errlog (

    id INT PRIMARY KEY auto_increment,

    err_cmd CHAR (64),

    err_time datetime

);


#创建触发器

delimiter //

CREATE TRIGGER tri_after_insert_cmd AFTER INSERT ON cmd FOR EACH ROW

BEGIN

    IF NEW.success = 'no' THEN #等值判断只有一个等号

            INSERT INTO errlog(err_cmd, err_time) VALUES(NEW.cmd, NEW.sub_time) ; #必须加分号

      END IF ; #必须加分号

END//

delimiter ;


#往表cmd中插入记录,触发触发器,根据IF的条件决定是否插入错误日志

INSERT INTO cmd (

    USER,

    priv,

    cmd,

    sub_time,

    success

)

VALUES

    ('egon','0755','ls -l /etc',NOW(),'yes'),

    ('egon','0755','cat /etc/passwd',NOW(),'no'),

    ('egon','0755','useradd xxx',NOW(),'no'),

    ('egon','0755','ps aux',NOW(),'yes');


#查询错误日志,发现有两条

mysql> select * from errlog;

+----+-----------------+---------------------+

| id | err_cmd         | err_time            |

+----+-----------------+---------------------+

|  1 | cat /etc/passwd | 2017-09-14 22:18:48 |

|  2 | useradd xxx     | 2017-09-14 22:18:48 |

+----+-----------------+---------------------+

rows in set (0.00 sec)
特别的:NEW表示即将插入的数据行,OLD表示即将删除的数据行。
6.1.2 使用触发器
触发器无法由用户直接调用,而知由于对表的【增/删/改】操作被动引发的。
6.1.3 删除触发器
drop trigger tri_after_insert_cmd;
6.2 事务
事务用于将某些操作的多个SQL作为原子性操作,一旦有某一个出现错误,即可回滚到原来的状态,从而保证数据库数据完整性。
create table user(

id int primary key auto_increment,

name char(32),

balance int

);


insert into user(name,balance)

values

('wsb',1000),

('egon',1000),

('ysb',1000);


#原子操作

start transaction;

update user set balance=900 where name='wsb'; #买支付100元

update user set balance=1010 where name='egon'; #中介拿走10元

update user set balance=1090 where name='ysb'; #卖家拿到90元

commit;


#出现异常,回滚到初始状态

start transaction;

update user set balance=900 where name='wsb'; #买支付100元

update user set balance=1010 where name='egon'; #中介拿走10元

uppdate user set balance=1090 where name='ysb'; #卖家拿到90元,出现异常没有拿到

rollback;

commit;

mysql> select * from user;

+----+------+---------+

| id | name | balance |

+----+------+---------+

|  1 | wsb  |    1000 |

|  2 | egon |    1000 |

|  3 | ysb  |    1000 |

+----+------+---------+

rows in set (0.00 sec)
6.3 存储过程
6.3.1 介绍
存储过程包含了一系列可执行的sql语句,存储过程存放于MySQL中,通过调用它的名字可以执行其内部的一堆sql
使用存储过程的优点:
#1. 用于替代程序写的SQL语句,实现程序与sql解耦
#2. 基于网络传输,传别名的数据量小,而直接传sql数据量大
使用存储过程的缺点:
#1. 程序员扩展功能不方便
补充:程序与数据库结合使用的三种方式
#方式一:

    MySQL:存储过程

    程序:调用存储过程


#方式二:

    MySQL:

    程序:纯SQL语句


#方式三:

    MySQL:

    程序:类和对象,即ORM(本质还是纯SQL语句)
6.3.2 创建简单存储过程(无参)
delimiter //

create procedure p1()

BEGIN

    select * from blog;

    INSERT into blog(name,sub_time) values("xxx",now());

END //

delimiter ;


#在mysql中调用

call p1()


#在python中基于pymysql调用

cursor.callproc('p1')

print(cursor.fetchall())
6.3.3 创建存储过程(有参)
对于存储过程,可以接收参数,其参数有三类:


#in          仅用于传入参数用

#out        仅用于返回值用

#inout     既可以传入又可以当作返回值
#############################in:传入参数###############################

delimiter //

create procedure p2(

    in n1 int,

    in n2 int

)

BEGIN


    select * from blog where id > n1;

END //

delimiter ;


#在mysql中调用

call p2(3,2)


#在python中基于pymysql调用

cursor.callproc('p2',(3,2))

print(cursor.fetchall())
##########################out:返回值#############################

delimiter //

create procedure p3(

    in n1 int,

    out res int

)

BEGIN

    select * from blog where id > n1;

    set res = 1;

END //

delimiter ;


#在mysql中调用

set @res=0; #0代表假(执行失败),1代表真(执行成功)

call p3(3,@res);

select @res;


#在python中基于pymysql调用

cursor.callproc('p3',(3,0)) #0相当于set @res=0

print(cursor.fetchall()) #查询select的查询结果


cursor.execute('select @_p3_0,@_p3_1;') #@p3_0代表第一个参数,@p3_1代表第二个参数,即返回值

print(cursor.fetchall())
#######################inout:既可以传入又可以返回###########################

delimiter //

create procedure p4(

    inout n1 int

)

BEGIN

    select * from blog where id > n1;

    set n1 = 1;

END //

delimiter ;


#在mysql中调用

set @x=3;

call p4(@x);

select @x;


#在python中基于pymysql调用

cursor.callproc('p4',(3,))

print(cursor.fetchall()) #查询select的查询结果


cursor.execute('select @_p4_0;')

print(cursor.fetchall())
#############################事务##################################

#介绍

delimiter //

            create procedure p4(

                out status int

            )

            BEGIN

                1. 声明如果出现异常则执行{

                    set status = 1;

                    rollback;

                }


                开始事务

                    -- 由秦兵账户减去100

                    -- 方少伟账户加90

                    -- 张根账户加10

                    commit;

                结束


                set status = 2;


            END //

            delimiter ;


#实现

delimiter //

create PROCEDURE p5(

    OUT p_return_code tinyint

)

BEGIN

    DECLARE exit handler for sqlexception

    BEGIN

        -- ERROR

        set p_return_code = 1;

        rollback;

    END;


    DECLARE exit handler for sqlwarning

    BEGIN

        -- WARNING

        set p_return_code = 2;

        rollback;

    END;


    START TRANSACTION;

        DELETE from tb1; #执行失败

        insert into blog(name,sub_time) values('yyy',now());

    COMMIT;


    -- SUCCESS

    set p_return_code = 0; #0代表执行成功


END //

delimiter ;


#在mysql中调用存储过程

set @res=123;

call p5(@res);

select @res;


#在python中基于pymysql调用存储过程

cursor.callproc('p5',(123,))

print(cursor.fetchall()) #查询select的查询结果


cursor.execute('select @_p5_0;')

print(cursor.fetchall())
6.3.4 执行存储过程
############################在MySQL中执行存储过程##############################

-- 无参数

call proc_name()


-- 有参数,全in

call proc_name(1,2)


-- 有参数,有in,out,inout

set @t1=0;

set @t2=3;

call proc_name(1,2,@t1,@t2)


执行存储过程
#########################在python中基于pymysql执行存储过程###########################

#!/usr/bin/env python

# -*- coding:utf-8 -*-

import pymysql


conn = pymysql.connect(host='127.0.0.1', port=3306, user='root', passwd='123', db='t1')

cursor = conn.cursor(cursor=pymysql.cursors.DictCursor)

# 执行存储过程

cursor.callproc('p1', args=(1, 22, 3, 4))

# 获取执行完存储的参数

cursor.execute("select @_p1_0,@_p1_1,@_p1_2,@_p1_3")

result = cursor.fetchall()


conn.commit()

cursor.close()

conn.close()


print(result)
6.3.5 删除存储过程
drop procedure proc_name;
6.3.6 课堂实例
'''

delimiter //

create procedure p1()

BEGIN

    select user,host from mysql.user;

END //

delimiter ;


delimiter //

create procedure p2(

    in n1 int,

    in n2 int,

    out n3 int

)

BEGIN

    select * from emp where id > n1 and id < n2;

    set n3=1;

END //

delimiter ;

'''

import pymysql


#1、建连接

conn=pymysql.connect(

    host='127.0.0.1',

    port=3306,

    user='root',

    password='123',

    db='db5'

)

#2、拿游标

cursor=conn.cursor(pymysql.cursors.DictCursor)


#3、提交sql

# cursor.callproc('p1')

# print(cursor.fetchall())


cursor.callproc('p2',(3,5,0)) #@_p2_0=3,@_p2_1=5,@_p2_2=0

print(cursor.fetchall())


cursor.execute('select @_p2_2')

print(cursor.fetchone())


#4、回收资源

cursor.close()

conn.close()
6.4 函数
MySQL中提供了许多内置函数,例如:
一、数学函数

    ROUND(x,y)

        返回参数x的四舍五入的有y位小数的值


    RAND()

        返回0到1内的随机值,可以通过提供一个参数(种子)使RAND()随机数生成器生成一个指定的值。


二、聚合函数(常用于GROUP BY从句的SELECT查询中)

    AVG(col)返回指定列的平均值

    COUNT(col)返回指定列中非NULL值的个数

    MIN(col)返回指定列的最小值

    MAX(col)返回指定列的最大值

    SUM(col)返回指定列的所有值之和

    GROUP_CONCAT(col) 返回由属于一组的列值连接组合而成的结果


三、字符串函数


    CHAR_LENGTH(str)

        返回值为字符串str 的长度,长度的单位为字符。一个多字节字符算作一个单字符。

    CONCAT(str1,str2,...)

        字符串拼接

        如有任何一个参数为NULL ,则返回值为 NULL。

    CONCAT_WS(separator,str1,str2,...)

        字符串拼接(自定义连接符)

        CONCAT_WS()不会忽略任何空字符串。 (然而会忽略所有的 NULL)。


    CONV(N,from_base,to_base)

        进制转换

        例如:

            SELECT CONV('a',16,2); 表示将 a 由16进制转换为2进制字符串表示


    FORMAT(X,D)

        将数字X 的格式写为'#,###,###.##',以四舍五入的方式保留小数点后 D 位, 并将结果以字符串的形式返回。若  D 为 0, 则返回结果不带有小数点,或不含小数部分。

        例如:

            SELECT FORMAT(12332.1,4); 结果为: '12,332.1000'

    INSERT(str,pos,len,newstr)

        在str的指定位置插入字符串

            pos:要替换位置其实位置

            len:替换的长度

            newstr:新字符串

        特别的:

            如果pos超过原字符串长度,则返回原字符串

            如果len超过原字符串长度,则由新字符串完全替换

    INSTR(str,substr)

        返回字符串 str 中子字符串的第一个出现位置。


    LEFT(str,len)

        返回字符串str 从开始的len位置的子序列字符。


    LOWER(str)

        变小写


    UPPER(str)

        变大写


    REVERSE(str)

        返回字符串 str ,顺序和字符顺序相反。


    SUBSTRING(str,pos) , SUBSTRING(str FROM pos) SUBSTRING(str,pos,len) , SUBSTRING(str FROM pos FOR len)

        不带有len 参数的格式从字符串str返回一个子字符串,起始于位置 pos。带有len参数的格式从字符串str返回一个长度同len字符相同的子字符串,起始于位置 pos。 使用 FROM的格式为标准 SQL 语法。也可能对pos使用一个负值。假若这样,则子字符串的位置起始于字符串结尾的pos 字符,而不是字符串的开头位置。在以下格式的函数中可以对pos 使用一个负值。


        mysql> SELECT SUBSTRING('Quadratically',5);

            -> 'ratically'


        mysql> SELECT SUBSTRING('foobarbar' FROM 4);

            -> 'barbar'


        mysql> SELECT SUBSTRING('Quadratically',5,6);

            -> 'ratica'


        mysql> SELECT SUBSTRING('Sakila', -3);

            -> 'ila'


        mysql> SELECT SUBSTRING('Sakila', -5, 3);

            -> 'aki'


        mysql> SELECT SUBSTRING('Sakila' FROM -4 FOR 2);

            -> 'ki'


四、日期和时间函数

    CURDATE()或CURRENT_DATE() 返回当前的日期

    CURTIME()或CURRENT_TIME() 返回当前的时间

    DAYOFWEEK(date)   返回date所代表的一星期中的第几天(1~7)

    DAYOFMONTH(date)  返回date是一个月的第几天(1~31)

    DAYOFYEAR(date)   返回date是一年的第几天(1~366)

    DAYNAME(date)   返回date的星期名,如:SELECT DAYNAME(CURRENT_DATE);

    FROM_UNIXTIME(ts,fmt)  根据指定的fmt格式,格式化UNIX时间戳ts

    HOUR(time)   返回time的小时值(0~23)

    MINUTE(time)   返回time的分钟值(0~59)

    MONTH(date)   返回date的月份值(1~12)

    MONTHNAME(date)   返回date的月份名,如:SELECT MONTHNAME(CURRENT_DATE);

    NOW()    返回当前的日期和时间

    QUARTER(date)   返回date在一年中的季度(1~4),如SELECT QUARTER(CURRENT_DATE);

    WEEK(date)   返回日期date为一年中第几周(0~53)

    YEAR(date)   返回日期date的年份(1000~9999)


    重点:

    DATE_FORMAT(date,format) 根据format字符串格式化date值


       mysql> SELECT DATE_FORMAT('2009-10-04 22:23:00', '%W %M %Y');

        -> 'Sunday October 2009'

       mysql> SELECT DATE_FORMAT('2007-10-04 22:23:00', '%H:%i:%s');

        -> '22:23:00'

       mysql> SELECT DATE_FORMAT('1900-10-04 22:23:00',

        ->                 '%D %y %a %d %m %b %j');

        -> '4th 00 Thu 04 10 Oct 277'

       mysql> SELECT DATE_FORMAT('1997-10-04 22:23:00',

        ->                 '%H %k %I %r %T %S %w');

        -> '22 22 10 10:23:00 PM 22:23:00 00 6'

       mysql> SELECT DATE_FORMAT('1999-01-01', '%X %V');

        -> '1998 52'

       mysql> SELECT DATE_FORMAT('2006-06-00', '%d');

        -> '00'


五、加密函数

    MD5()

        计算字符串str的MD5校验和

    PASSWORD(str)

        返回字符串str的加密版本,这个加密过程是不可逆转的,和UNIX密码加密过程使用不同的算法。


六、控制流函数

    CASE WHEN[test1] THEN [result1]...ELSE [default] END

        如果testN是真,则返回resultN,否则返回default

    CASE [test] WHEN[val1] THEN [result]...ELSE [default]END

        如果test和valN相等,则返回resultN,否则返回default


    IF(test,t,f)

        如果test是真,返回t;否则返回f


    IFNULL(arg1,arg2)

        如果arg1不是空,返回arg1,否则返回arg2


    NULLIF(arg1,arg2)

        如果arg1=arg2返回NULL;否则返回arg1


七、控制流函数小练习

#7.1、准备表

/*

Navicat MySQL Data Transfer


Source Server         : localhost_3306

Source Server Version : 50720

Source Host           : localhost:3306

Source Database       : student


Target Server Type    : MYSQL

Target Server Version : 50720

File Encoding         : 65001


Date: 2018-01-02 12:05:30

*/


SET FOREIGN_KEY_CHECKS=0;


-- ----------------------------

-- Table structure for course

-- ----------------------------

DROP TABLE IF EXISTS `course`;

CREATE TABLE `course` (

  `c_id` int(11) NOT NULL,

  `c_name` varchar(255) DEFAULT NULL,

  `t_id` int(11) DEFAULT NULL,

  PRIMARY KEY (`c_id`),

  KEY `t_id` (`t_id`)

) ENGINE=InnoDB DEFAULT CHARSET=utf8;


-- ----------------------------

-- Records of course

-- ----------------------------

INSERT INTO `course` VALUES ('1', 'python', '1');

INSERT INTO `course` VALUES ('2', 'java', '2');

INSERT INTO `course` VALUES ('3', 'linux', '3');

INSERT INTO `course` VALUES ('4', 'web', '2');


-- ----------------------------

-- Table structure for score

-- ----------------------------

DROP TABLE IF EXISTS `score`;

CREATE TABLE `score` (

  `id` int(11) NOT NULL AUTO_INCREMENT,

  `s_id` int(10) DEFAULT NULL,

  `c_id` int(11) DEFAULT NULL,

  `num` double DEFAULT NULL,

  PRIMARY KEY (`id`)

) ENGINE=InnoDB AUTO_INCREMENT=12 DEFAULT CHARSET=utf8;


-- ----------------------------

-- Records of score

-- ----------------------------

INSERT INTO `score` VALUES ('1', '1', '1', '79');

INSERT INTO `score` VALUES ('2', '1', '2', '78');

INSERT INTO `score` VALUES ('3', '1', '3', '35');

INSERT INTO `score` VALUES ('4', '2', '2', '32');

INSERT INTO `score` VALUES ('5', '3', '1', '66');

INSERT INTO `score` VALUES ('6', '4', '2', '77');

INSERT INTO `score` VALUES ('7', '4', '1', '68');

INSERT INTO `score` VALUES ('8', '5', '1', '66');

INSERT INTO `score` VALUES ('9', '2', '1', '69');

INSERT INTO `score` VALUES ('10', '4', '4', '75');

INSERT INTO `score` VALUES ('11', '5', '4', '66.7');


-- ----------------------------

-- Table structure for student

-- ----------------------------

DROP TABLE IF EXISTS `student`;

CREATE TABLE `student` (

  `s_id` varchar(20) NOT NULL,

  `s_name` varchar(255) DEFAULT NULL,

  `s_age` int(10) DEFAULT NULL,

  `s_sex` char(1) DEFAULT NULL,

  PRIMARY KEY (`s_id`)

) ENGINE=InnoDB DEFAULT CHARSET=utf8;


-- ----------------------------

-- Records of student

-- ----------------------------

INSERT INTO `student` VALUES ('1', '鲁班', '12', '男');

INSERT INTO `student` VALUES ('2', '貂蝉', '20', '女');

INSERT INTO `student` VALUES ('3', '刘备', '35', '男');

INSERT INTO `student` VALUES ('4', '关羽', '34', '男');

INSERT INTO `student` VALUES ('5', '张飞', '33', '女');


-- ----------------------------

-- Table structure for teacher

-- ----------------------------

DROP TABLE IF EXISTS `teacher`;

CREATE TABLE `teacher` (

  `t_id` int(10) NOT NULL,

  `t_name` varchar(50) DEFAULT NULL,

  PRIMARY KEY (`t_id`)

) ENGINE=InnoDB DEFAULT CHARSET=utf8;


-- ----------------------------

-- Records of teacher

-- ----------------------------

INSERT INTO `teacher` VALUES ('1', '大王');

INSERT INTO `teacher` VALUES ('2', 'alex');

INSERT INTO `teacher` VALUES ('3', 'egon');

INSERT INTO `teacher` VALUES ('4', 'peiqi');


#7.2、统计各科各分数段人数.显示格式:课程ID,课程名称,[100-85],[85-70],[70-60],[ <60]


select  score.c_id,

          course.c_name,

      sum(CASE WHEN num BETWEEN 85 and 100 THEN 1 ELSE 0 END) as '[100-85]',

      sum(CASE WHEN num BETWEEN 70 and 85 THEN 1 ELSE 0 END) as '[85-70]',

      sum(CASE WHEN num BETWEEN 60 and 70 THEN 1 ELSE 0 END) as '[70-60]',

      sum(CASE WHEN num < 60 THEN 1 ELSE 0 END) as '[ <60]'

from score,course where score.c_id=course.c_id GROUP BY score.c_id;
#########################需要掌握函数:date_format############################

#1 基本使用

mysql> SELECT DATE_FORMAT('2009-10-04 22:23:00', '%W %M %Y');

        -> 'Sunday October 2009'

mysql> SELECT DATE_FORMAT('2007-10-04 22:23:00', '%H:%i:%s');

        -> '22:23:00'

mysql> SELECT DATE_FORMAT('1900-10-04 22:23:00',

    ->                 '%D %y %a %d %m %b %j');

        -> '4th 00 Thu 04 10 Oct 277'

mysql> SELECT DATE_FORMAT('1997-10-04 22:23:00',

    ->                 '%H %k %I %r %T %S %w');

        -> '22 22 10 10:23:00 PM 22:23:00 00 6'

mysql> SELECT DATE_FORMAT('1999-01-01', '%X %V');

        -> '1998 52'

mysql> SELECT DATE_FORMAT('2006-06-00', '%d');

        -> '00'


#2 准备表和记录

CREATE TABLE blog (

    id INT PRIMARY KEY auto_increment,

    NAME CHAR (32),

    sub_time datetime

);


INSERT INTO blog (NAME, sub_time)

VALUES

    ('第1篇','2015-03-01 11:31:21'),

    ('第2篇','2015-03-11 16:31:21'),

    ('第3篇','2016-07-01 10:21:31'),

    ('第4篇','2016-07-22 09:23:21'),

    ('第5篇','2016-07-23 10:11:11'),

    ('第6篇','2016-07-25 11:21:31'),

    ('第7篇','2017-03-01 15:33:21'),

    ('第8篇','2017-03-01 17:32:21'),

    ('第9篇','2017-03-01 18:31:21');


#3. 提取sub_time字段的值,按照格式后的结果即"年月"来分组

SELECT DATE_FORMAT(sub_time,'%Y-%m'),COUNT(1) FROM blog GROUP BY DATE_FORMAT(sub_time,'%Y-%m');


#结果

+-------------------------------+----------+

| DATE_FORMAT(sub_time,'%Y-%m') | COUNT(1) |

+-------------------------------+----------+

| 2015-03                       |        2 |

| 2016-07                       |        4 |

| 2017-03                       |        3 |

+-------------------------------+----------+

rows in set (0.00 sec)
6.4.1 自定义函数
#!!!注意!!!
#函数中不要写sql语句(否则会报错),函数仅仅只是一个功能,是一个在sql中被应用的功能
#若要想在begin...end...中写sql,请用存储过程
delimiter //

create function f1(

    i1 int,

    i2 int)

returns int

BEGIN

    declare num int;

    set num = i1 + i2;

    return(num);

END //

delimiter ;
delimiter //

create function f5(

    i int

)

returns int

begin

    declare res int default 0;

    if i = 10 then

        set res=100;

    elseif i = 20 then

        set res=200;

    elseif i = 30 then

        set res=300;

    else

        set res=400;

    end if;

    return res;

end //

delimiter ;
6.4.2 删除函数
drop function func_name;
6.4.3 执行函数
# 获取返回值

select UPPER('egon') into @res;

SELECT @res;


# 在查询中使用

select f1(11,nid) ,name from tb2;
6.5 流程控制
6.5.1 条件语句
#######################if条件语句##########################

delimiter //

CREATE PROCEDURE proc_if ()

BEGIN


    declare i int default 0;

    if i = 1 THEN

        SELECT 1;

    ELSEIF i = 2 THEN

        SELECT 2;

    ELSE

        SELECT 7;

    END IF;


END //

delimiter ;
6.5.2 循环语句
########################while循环##################################

delimiter //

CREATE PROCEDURE proc_while ()

BEGIN


    DECLARE num INT ;

    SET num = 0 ;

    WHILE num < 10 DO

        SELECT

            num ;

        SET num = num + 1 ;

    END WHILE ;


END //

delimiter ;
################################repeat循环##################################

delimiter //

CREATE PROCEDURE proc_repeat ()

BEGIN


    DECLARE i INT ;

    SET i = 0 ;

    repeat

        select i;

        set i = i + 1;

        until i >= 5

    end repeat;


END //

delimiter ;
###########################loop###########################

BEGIN


    declare i int default 0;

    loop_label: loop


        set i=i+1;

        if i<8 then

            iterate loop_label;

        end if;

        if i>=10 then

            leave loop_label;

        end if;

        select i;

    end loop loop_label;


END
6.6 MySQL使用工具-IDE工具介绍
生产环境还是推荐使用mysql命令行,但为了方便我们测试,可以使用IDE工具
下载链接:https://pan.baidu.com/s/1bpo5mqj
工具名称navicatformysql.zip