1 前后端跨域
1.1 前端
1.1.1 方法一
1)index.js
import axios from 'axios'
axios.defaults.baseURL="http://192.168.56.100:8000/"
axios.defaults.timeout = 1000000;
axios.defaults.headers.post['Content-Type'] = 'application/json';
axios.defaults.headers.put['Content-Type'] = 'application/json';

axios.interceptors.request.use(
    config => {
        // 每次发送请求之前判断是否存在token,如果存在,则统一在http请求的header都加上token,不用每次请求都手动添加了
        const token = sessionStorage.getItem("jwt_token")
        console.log(token)
        if (token){
            config.headers.Authorization = 'JWT '+ token
        }
        return config;
    },
    error => {
        return Promise.error(error);
    })


axios.interceptors.response.use(
    // 请求成功
    res => res.status === 200 ? Promise.resolve(res) : Promise.reject(res),

    // 请求失败
    error => {
        if (error.response) {
            // 判断一下返回结果的status == 401?  ==401跳转登录页面。  !=401passs
            console.log(error.response)
            if(error.response.status===401){
                // 跳转不可以使用this.$router.push方法、
                // this.$router.push({path:'/login'})
                window.location.href="http://127.0.0.1:8080/#/login"
            }else{
                // errorHandle(response.status, response.data.message);
                return Promise.reject(error.response);
            }
            // 请求已发出,但是不在2xx的范围
        } else {
            // 处理断网的情况
            // eg:请求超时或断网时,更新state的network状态
            // network状态在app.vue中控制着一个全局的断网提示组件的显示隐藏
            // 关于断网组件中的刷新重新获取数据,会在断网组件中说明
            // store.commit('changeNetwork', false);
            return Promise.reject(error.response);
        }
    });


// 封装xiaos请求  封装axios里的get
export function axios_get(url,params){
    return new Promise(
        (resolve,reject)=>{
            axios.get(url,{params:params})
            .then(res=>{
                console.log("封装信息的的res",res)
                resolve(res.data)
            }).catch(err=>{
                reject(err.data)
            })
        }
    )
}


export function axios_post(url,data){
    return new Promise(
        (resolve,reject)=>{
            console.log(data)
            axios.post(url,JSON.stringify(data))
            .then(res=>{
                console.log("封装信息的的res",res)
                resolve(res.data)
            }).catch(err=>{
                reject(err.data)
            })
        }
    )
}

export function axios_put(url,data){
    return new Promise(
        (resolve,reject)=>{
            console.log(data)
            axios.put(url,JSON.stringify(data))
            .then(res=>{
                console.log("封装信息的的res",res)
                resolve(res.data)
            }).catch(err=>{
                reject(err.data)
            })
        }
    )
}

export function axios_delete(url,data){
    return new Promise(
        (resolve,reject)=>{
            console.log(data)
            axios.delete(url,{params:data})
            .then(res=>{
                console.log("封装信息的的res",res)
                resolve(res.data)
            }).catch(err=>{
                reject(err.data)
            })
        }
    )
}
2)apis.js
/* eslint-disable */
// 接口信息,生成请求方法
// 引入get方法,post方法

import {axios_get,axios_post,axios_delete,axios_put} from '../http/index'

export const getBookList = p  => axios_get("/app01/books/",p)
1.1.2 方法二
1)index.js
/* eslint-disable */
// 第一步:实例化axios对象,简单封装
const axios = require('axios');                         // 生成一个axios实例
axios.defaults.baseURL = 'http://192.168.56.100:8000';  // 设置请求后端的URL地址
axios.defaults.timeout = 10000;                         // axios请求超时时间
axios.defaults.withCredentials = true;
axios.defaults.headers['Content-Type'] = 'application/json';        // axios发送数据时使用json格式
axios.defaults.transformRequest = data => JSON.stringify(data);     // 发送数据前进行json格式化


//  第二:设置拦截器
//
//  请求拦截器(当前端发送请求给后端前进行拦截)
//  例1:请求拦截器获取token设置到axios请求头中,所有请求接口都具有这个功能
//  例2:到用户访问某一个页面,但是用户没有登录,前端页面自动跳转 /login/ 页面
//
axios.interceptors.request.use(config => {
    // 从localStorage中获取token
    // let token = localStorage.getItem('token');
    // 如果有token, 就把token设置到请求头中Authorization字段中
    // token && (config.headers.Authorization = token);
    return config;
}, error => {
    return Promise.reject(error);
});

//  响应拦截器(当后端返回数据的时候进行拦截)
//  例1:当后端返回状态码是401/403时,跳转到 /login/ 页面
//
axios.interceptors.response.use(response => {
    // 当响应码是 2xx 的情况, 进入这里
    // debugger
    return response.data;
}, error => {
    // 当响应码不是 2xx 的情况, 进入这里
    // debugger
    return error
});
//
//  get方法,对应get请求
//  @param {String} url [请求的url地址]
//  @param {Object} params [请求时携带的参数]
//
export function get(url, params, headers) {
    return new Promise((resolve, reject) => {
        axios.get(url, { params, headers }).then(res => {
            resolve(res)
        }).catch(err => {

            reject(err)
        })
    })
}
//  第三:根据上面分装好的axios对象,封装 get、post、put、delete请求
//
//  post方法,对应post请求
//  @param {String} url [请求的url地址]
//  @param {Object} params [请求时携带的参数]
//
export function post(url, params, headers) {
    return new Promise((resolve, reject) => {
        axios.post(url, params, headers).then((res) => {
            resolve(res)
        }).catch((err) => {
            // debugger
            reject(err)
        })
    })
}
export function put(url, params, headers) {
    return new Promise((resolve, reject) => {
        axios.put(url, params, headers).then((res) => {
            resolve(res)
        }).catch((err) => {
            // debugger
            reject(err)
        })
    })
}
export function del(url, params, headers) {
    return new Promise((resolve, reject) => {
        axios.delete(url, { data: params, headers }).then((res) => {
            resolve(res)
        }).catch((err) => {
            // debugger
            reject(err)
        })
    })
}
export default axios;
2)api.js
/* eslint-disable */
import { get, post, put, del } from './index'

export const getBookList = (params, headers) => get("/app01/books/", params, headers)
export const addBook = (params, headers) => post("/app01/books/", params, headers)
export const editBook = (params, headers) => put("/app01/books/", params, headers)
export const delBook = (params, headers) => del("/app01/book/", params, headers)
1.2 后端
INSTALLED_APPS = [
    'django.contrib.admin',
    'django.contrib.auth',
    'django.contrib.contenttypes',
    'django.contrib.sessions',
    'django.contrib.messages',
    'django.contrib.staticfiles',
    'corsheaders',
    'rest_framework',
    'apps.app01',
]

MIDDLEWARE = [
    'corsheaders.middleware.CorsMiddleware',

    'django.middleware.security.SecurityMiddleware',
    'django.contrib.sessions.middleware.SessionMiddleware',
    'django.middleware.common.CommonMiddleware',
    # 'django.middleware.csrf.CsrfViewMiddleware',
    'django.contrib.auth.middleware.AuthenticationMiddleware',
    'django.contrib.messages.middleware.MessageMiddleware',
    'django.middleware.clickjacking.XFrameOptionsMiddleware'
]

ROOT_URLCONF = 'django01.urls'

CORS_ORIGIN_WHITELIST = (
    'http://127.0.0.1:8080',
    'http://localhost:8080',
)

CORS_ALLOW_CREDENTIALS = True    # 允许携带cookie
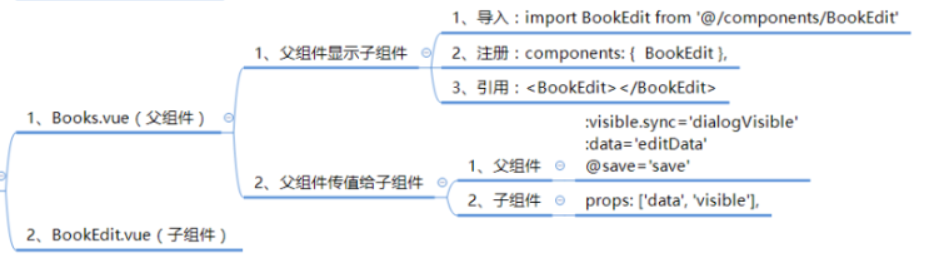
2 父子组件传参
2.1 思路
2.2 总体代码
2.2.1 子组件代码
<template>
    <div>
        <el-dialog title="新增图书" :visible="visible" >
            <div>
                <span>图书名称:</span>
                <el-input class='elinput' v-model="data.books_name" ></el-input>
            </div>
            <div>
                <span>发布日期:</span>
                <el-input class='elinput' v-model="data.public_time" ></el-input>
            </div>
            <div>
                <span>阅读量:</span>
                <el-input class='elinput' v-model="data.read" ></el-input>
            </div>
            <div>
                <span>评论量:</span>
                <el-input class='elinput' v-model="data.comment" ></el-input>
            </div>
            <el-button @click="cancel">取 消</el-button>
            <el-button type="primary" @click="addBook" >确 定</el-button>
        </el-dialog>
    </div>
</template>

<script>
export default {
    props: ['data', 'visible'],
    data() {
        return {

        }
    },
    methods: {
        addBook(){
            this.$emit('update:visible', false)
            this.$emit('save')
        },
        cancel(){
            this.$emit('update:visible', false)
        }
    },
    created() {

    }
}
</script>

<style scoped>
.elinput {
    width: 220px;
    height: 40px;
}
</style>
2.2.2 总页面
<template>
    <div>
        <h1>图书管理系统</h1>

        <div style="margin: 30px;">
            <button @click="addNew">新增图书</button>
            <BookEdit
            v-show='dialogVisible'
            :visible.sync='dialogVisible'
            :data='editData'
            @save='save' >
            </BookEdit>
        </div>

        <div>
            <table style="margin:0 auto">
                <tr>
                    <th>图书编号</th>
                    <th>图书名字</th>
                    <th>出版时间</th>
                    <th>阅读数</th>
                    <th>评论数</th>
                    <th>操作</th>
                </tr>
                <tr v-for="(book, index) in books_list" :key="index">
                    <td>{{book.id}}</td>
                    <td>{{book.books_name}}</td>
                    <td>{{book.public_time}}</td>
                    <td>{{book.read}}</td>
                    <td>{{book.comment}}</td>
                    <td>
                        <button @click="edit(index)">修改</button>
                        <button @click="del(index)">删除</button>
                    </td>
                </tr>
            </table>
        </div>

    </div>
</template>

<script>

import { getBookList, addBook, editBook, delBook  } from '@/http/apis'
import BookEdit from '@/components/BookEdit'
export default {
    components: {
        BookEdit
    },
    data() {
        return {
            dialogVisible: false,
            books_list:[],
            editData: {
                // 编辑的内容
                books_name: "",
                public_time: "",
                read: 100,
                comment: 0
            }
        }
    },
    methods: {
        // 1.点击新增图书时初始化数据
        addNew() {
            this.editData = {
                // 初始化 编辑内容
                books_name: "",
                public_time: "",
                read: '',
                comment: ''
            }
            this.dialogVisible = true
             // 显示弹框
        },
        // 2.获取图书列表,获取数据
        get(){
            getBookList().then((data) =>{
                this.books_list = data.books
                console.log(this.books_list)
            })
        },
        // 3.修改或者添加图书
        save() {
                // 根据editData中的id判断是更新还是新增
                // debugger
                console.log(this.editData)
                if (this.editData.id) {
                    // 如果有id, 修改图书
                    // 修改请求
                    let params = this.editData
                    editBook(params).then(res=>{
                        console.log(res)
                        this.get()
                        })
                }
                else {
                    // 增加图书
                    addBook(this.editData).then(res => {
                        this.get()
                    })
                }
            },
            // 点击修改弹出修改页面
            edit(index) {
                this.editData = JSON.parse(JSON.stringify(this.books_list[index]))
                // 复制 this.books_list[index] 的数据
                // this.editData = this.books_list[index]
                this.dialogVisible = true
            },
        // 删除
        del(index) {
            let params = {
                id: this.books_list[index].id
            }
            delBook(params).then(res=>{
                console.log(res)
                this.get()
                })
        }
    },
    created() {
        this.get()
    }
}
</script>

<style scoped>

</style>