(—)滚动条操作
selenium_webdriver(python)控制浏览器滚动条
selenium+Python(select定位)
Selenium+Python常见定位方法
selenium_webdriver(python)元素定位详解
#(1)使用JS操作浏览器(右侧竖向)滚动条
time.sleep(3)#最好等个几秒
#将滚动条移动到页面的顶部
js="var q=document.documentElement.scrollTop=0"
driver.execute_script(js)
#页面内嵌窗口浏览条滚动
js="var q=document.getElementById('id').scrollTop=1000"
driver.execute_script(js)
time.sleep(3)
# 通过按向下键将页面滚动条拖到底部
driver.find_element_by_xpath("xpath").send_keys(Keys.DOWN)

#(2)使用JS操作浏览器(底部横向)滚动条
#这个是全页面的
js = "window.scrollTo(210,550);" #(x, y)
x:代表横向坐标
y:代表纵向坐标
#(3)当我们需要定位的元素是动态元素,或者我们不确定它在哪时,可以先找到这个元素然后再使用JS操作
target = driver.find_element_by_id('id')
driver.execute_script("arguments[0].scrollIntoView();", target)
使用xpath解决一切复杂的定位。
find_element_by_xpath("//span[text()='APPRMIN']")
find_elements_by_xxx 会返回一个所有符合条件的element组成的列表,通过element.text属性获取文本

texts = list(ele.text for ele in find_elements_by_xpath("//span[@class='tree_title']"))
1、Select元素
1.打开百度-设置-搜索设置界面,如下图所示
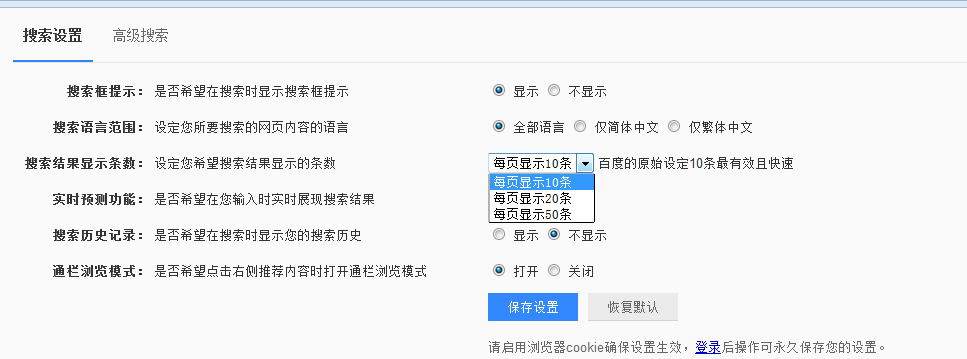
2.箭头所指位置,就是 select 选项框,打开页面元素定位,下方红色框框区域,可以看到 select 标签属性:
<select id="nr" name="NR">
3.选项有三个
<option selected="" value="10">每页显示 10 条</option>
<option value="20">每页显示 20 条</option>
<option value="50">每页显示 50 条</option>
2、定位select
定位select有多种方法,下面进行一一介绍
2.1 二次定位
1.定位 select 里的选项有多种方式,这里先介绍一种简单的方法:二次定位
2.基本思路,先定位 select 框,再定位 select 里的选项
完整代码如下:
|
1
2
3
4
5
6
7
8
9
10
11
12
13
14
15
|
# coding:utf-8from selenium import webdriverfrom selenium.webdriver.common.action_chains import ActionChainsdriver = webdriver.Firefox()driver.get("https://www.baidu.com/")driver.implicitly_wait(20)mouse = driver.find_element_by_link_text("设置")ActionChains(driver).move_to_element(mouse).perform()driver.find_element_by_link_text("搜索设置").click()s = driver.find_element_by_id("nr")s.find_element_by_xpath("//option[@value='50']").click()# 二次定位另外一种写法driver.find_element_by_id("nr").find_element_by_xpath("//option[@value='50']").click() |
3.还有另外一种写法也是可以的,把最下面两步合并成为一步:
driver.find_element_by_id("nr").find_element_by_xpath("//option[@value='50']").click()
2.2 直接定位
1.有很多小伙伴说 firebug 只能定位到 select 框,还能定位里面的选项。
2.用 direbug 定位到 select 后,下方查看元素属性地方,点 select 标签前面的+号,就可以展开里面的选项内容了。
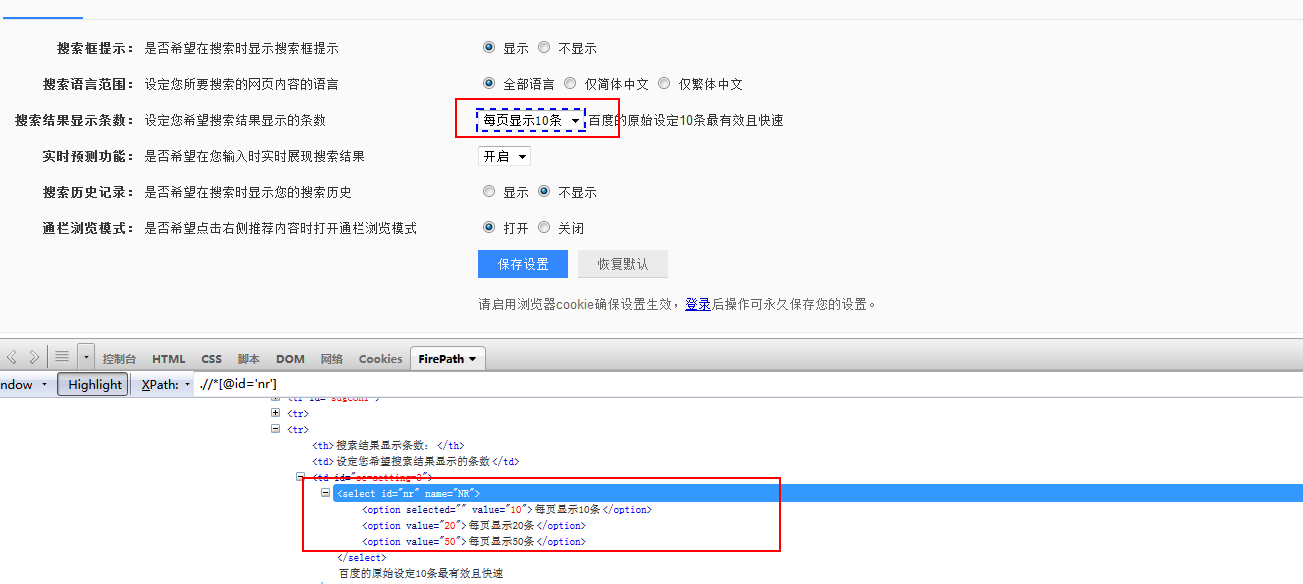
3.然后自己写 xpath 定位或者 css,一次性直接定位到 option 上的内容。
完整代码如下:
|
1
2
3
4
5
6
7
8
9
10
11
12
13
|
# coding:utf-8from selenium import webdriverfrom selenium.webdriver.common.action_chains import ActionChainsdriver = webdriver.Firefox()driver.get("https://www.baidu.com/")driver.implicitly_wait(20)mouse = driver.find_element_by_link_text("设置")ActionChains(driver).move_to_element(mouse).perform()driver.find_element_by_link_text("搜索设置").click()# 直接点位driver.find_element_by_xpath(".//*[@id='nr']/option[2]").click() |
2.3 Select 模块(index)点位
1.除了上面介绍的两种简单的方法定位到 select 选项,selenium 还提供了更高级的玩法,导入 Select 模块。直接根据属性或索引定位。
2.先要导入 select 方法:
from selenium.webdriver.support.select import Select
3.然后通过 select 选项的索引来定位选择对应选项(从 0 开始计数),如选择第三个选项:select_by_index(2)
完整代码如下:
|
1
2
3
4
5
6
7
8
9
10
11
12
13
14
15
|
# coding:utf-8from selenium import webdriverfrom selenium.webdriver.common.action_chains import ActionChainsfrom selenium.webdriver.support.select import Selectdriver = webdriver.Firefox()driver.get("https://www.baidu.com/")driver.implicitly_wait(20)mouse = driver.find_element_by_link_text("设置")ActionChains(driver).move_to_element(mouse).perform()driver.find_element_by_link_text("搜索设置").click()# 通过索引:select_by_index()s = driver.find_element_by_id("nr")Select(s).select_by_index(2) |
2.4 Select 模块(value)定位
1.Select 模块里面除了 index 的方法,还有一个方法,通过选项的 value值来定位。每个选项,都有对应的 value 值,如
<select id="nr" name="NR">
<option selected="" value="10">每页显示 10 条</option>
<option value="20">每页显示 20 条</option>
<option value="50">每页显示 50 条</option>
2.第二个选项对应的 value 值就是“20”:select_by_value(2)
完整代码如下:
|
1
2
3
4
5
6
7
8
9
10
11
12
13
14
15
|
# coding:utf-8from selenium import webdriverfrom selenium.webdriver.common.action_chains import ActionChainsfrom selenium.webdriver.support.select import Selectdriver = webdriver.Firefox()driver.get("https://www.baidu.com/")driver.implicitly_wait(20)mouse = driver.find_element_by_link_text("设置")ActionChains(driver).move_to_element(mouse).perform()driver.find_element_by_link_text("搜索设置").click()# 通过value定位:select_by_value()s = driver.find_element_by_id("nr")Select(s).select_by_value(20) |
2.5 Select 模块(text)定位
1.Select 模块里面还有一个更加高级的功能,可以直接通过选项的文本内容来定位。
2.定位“每页显示 50 条”:select_by_visible_text("每页显示 50 条")
完整代码如下:
|
1
2
3
4
5
6
7
8
9
10
11
12
13
14
15
|
# coding:utf-8from selenium import webdriverfrom selenium.webdriver.common.action_chains import ActionChainsfrom selenium.webdriver.support.select import Selectdriver = webdriver.Firefox()driver.get("https://www.baidu.com/")driver.implicitly_wait(20)mouse = driver.find_element_by_link_text("设置")ActionChains(driver).move_to_element(mouse).perform()driver.find_element_by_link_text("搜索设置").click()# 通过select_by_visible_text定位s = driver.find_element_by_id("nr")Select(s).select_by_visible_text("每页显示50条") |
3.Select 模块其它方法
1.select 里面方法除了上面介绍的三种,还有更多的功能如下

select_by_index() :通过索引定位
select_by_value() :通过 value 值定位
select_by_visible_text() :通过文本值定位
deselect_all() :取消所有选项
deselect_by_index() :取消对应 index 选项
deselect_by_value() :取消对应 value 选项
deselect_by_visible_text() :取消对应文本选项
first_selected_option() :返回第一个选项
all_selected_options() :返回所有的选项