1.引言
通过前边的系列教程,我们可以掌握WebAPI的初步运用,但是此时的API接口任何人都可以访问,这显然不是我们想要的,这时就需要控制对它的访问,也就是WebAPI的权限验证。验证方式非常多,本文就重点介绍一种常用的验证方式:基于JWT的token身份认证方案。
2.前期回顾
3.认识JWT
JWT是 JSON Web Token 的缩写,是一个开放标准(RFC 7519),它定义了一种紧凑的、自包含的方式,用于作为JSON对象在各方之间安全地传输信息。该信息可以被验证和信任,因为它是数字签名的。
3.1 JWT工作流程
这里我们通过一张图了解它的工作流程。
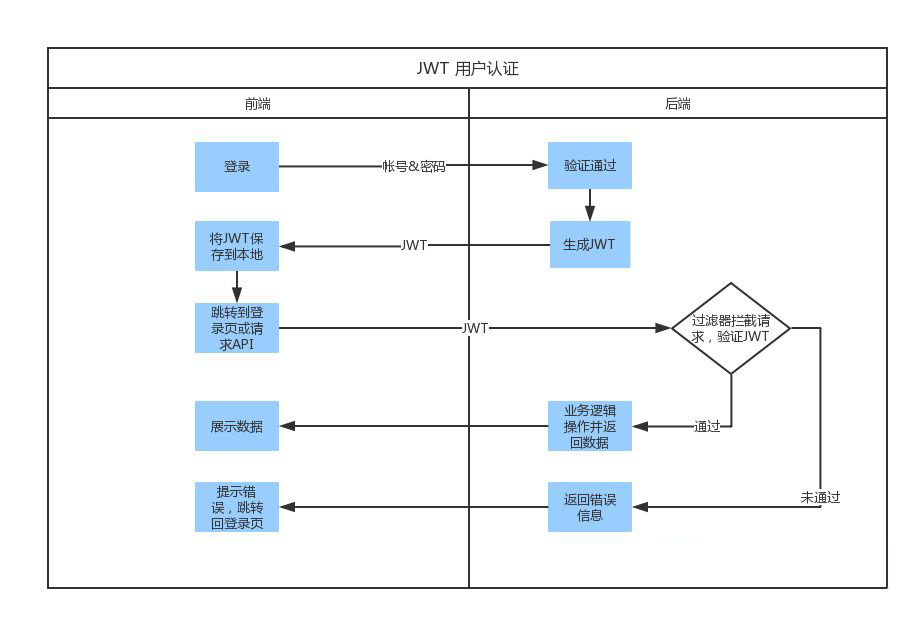
从上图中我们可以看出它是基于Token的身份认证,具体流程:客户端携带用户名和密码请求访问 - 服务器校验用户凭据 - 应用提供一个token给客户端 - 客户端存储token,并且在随后的每一次请求中都带着它 -服务器校验token并返回数据。
3.2JWT结构
JSON Web Token由三部分组成,它们之间用圆点(.)连接。这三部分分别是:
- Header:头部,它有token的类型(“JWT”)和算法名称(比如:HMAC SHA256或者RSA等等)两部分组成;
- Payload:荷载,它包含声明(要求)。声明是关于实体(通常是用户)和其他数据的声明;
- Signature:签名,目的是用来验证头部和载荷是否被非法篡改。
通过下图,我们可以直观的看到JWT的组成。
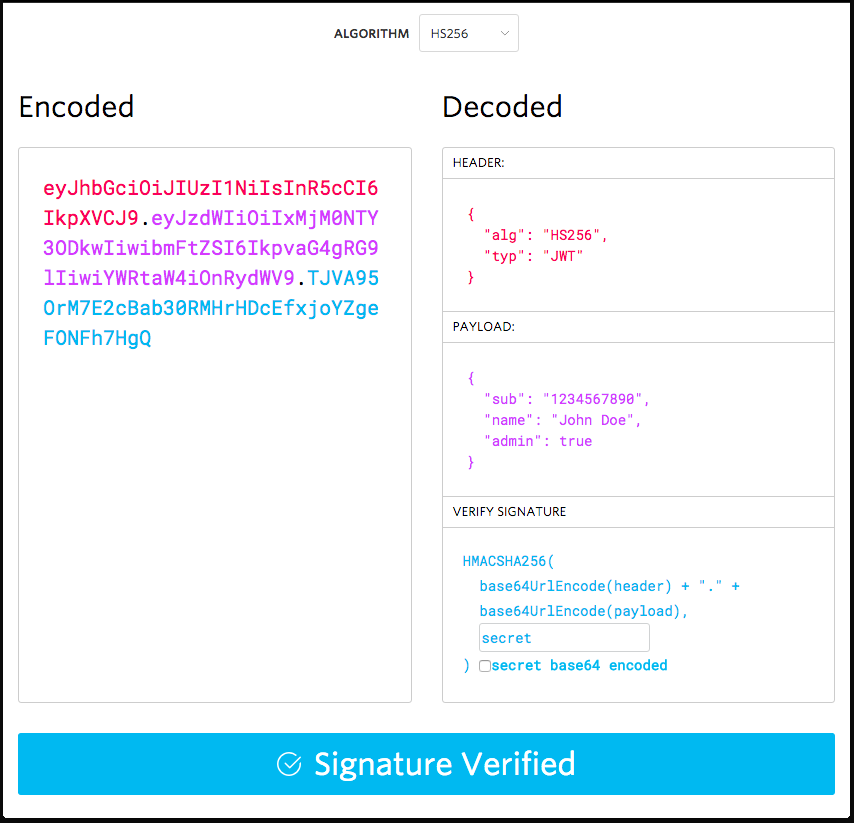
它本质上是一个独立的身份验证令牌,可以包含用户标识、用户角色和权限等信息,以及您可以存储任何其他信息(自包含)。任何人都可以轻松读取和解析,并使用密钥来验证真实性。
4.具体实现
上文介绍了JWT的原理,读者简单了解即可,这里我们通过具体代码来实现。
4.1安装JWT包
通过NuGget管理工具安装JWT包,如下图

4.2添加LoginRequest、AuthInfo和HttpResult三个实体类
在MyWebAPI.Entities中添加相应类
LoginRequest实体
public class LoginRequest
{
    public string UserId { get; set; }
    public string Password { get; set; }
}
AuthInfo实体类
public class AuthInfo
{
    public string UserId { get; set; }
    public DateTime Expires { get; set; }
}
HttpResul实体类
public class HttpResult
{
    public bool Success { get; set; }
    public dynamic Data { get; set; }
    public string Message { get; set; }
}
4.3添加SystemController,并添加Login登录方法
具体代码如下:
[RoutePrefix("api/System")]
public class SystemController : ApiController
{
    [HttpPost, Route("Login")]
    public HttpResult Login([FromBody] LoginRequest loginRequest)
    {
        if (loginRequest == null) return new HttpResult() { Success = false, Message = "登录信息为空!" };

        #region 通过数据库判断登录信息是否正确(这里简化判断)

        if (loginRequest.UserId != "admin" || loginRequest.Password != "admin")
        {
            return new HttpResult() { Success = false, Message = "用户名和密码不正确!" };
        }
        #endregion
        AuthInfo authInfo = new AuthInfo()
        {
            UserId = loginRequest.UserId,
            Expires = DateTime.Now.AddDays(1)
        };
        const string secretKey = "matanzhang";//口令加密秘钥(应该写到配置文件中)
        byte[] key = Encoding.UTF8.GetBytes(secretKey);
        IJwtAlgorithm algorithm = new HMACSHA256Algorithm();//加密方式
        IJsonSerializer serializer = new JsonNetSerializer();//序列化Json
        IBase64UrlEncoder urlEncoder = new JwtBase64UrlEncoder();//base64加解密
        IJwtEncoder encoder = new JwtEncoder(algorithm, serializer, urlEncoder);//JWT编码
        var token = encoder.Encode(authInfo, key);//生成令牌

        return new HttpResult() { Success = true, Data = token,Message = "登录成功!"};
    }
}
4.4添加API过滤器ApiAuthorizeAttribute
具体代码如下:
public class ApiAuthorizeAttribute: AuthorizeAttribute
{
    protected override bool IsAuthorized(HttpActionContext actionContext)
    {
        try
        {
            var authHeader = from t in actionContext.Request.Headers where t.Key == "auth" select t.Value.FirstOrDefault();
            var enumerable = authHeader as string[] ?? authHeader.ToArray();
            string token = enumerable.FirstOrDefault();
            if (string.IsNullOrEmpty(enumerable.FirstOrDefault())) return false;
            const string secretKey = "matanzhang";//口令加密秘钥(应该写到配置文件中)
            byte[] key = Encoding.UTF8.GetBytes(secretKey);
            IJsonSerializer serializer = new JsonNetSerializer();
            IDateTimeProvider provider = new UtcDateTimeProvider();
            IJwtValidator validator = new JwtValidator(serializer, provider);
            IBase64UrlEncoder urlEncoder = new JwtBase64UrlEncoder();
            IJwtAlgorithm algorithm = new HMACSHA256Algorithm();
            IJwtDecoder decoder = new JwtDecoder(serializer, validator, urlEncoder, algorithm);
            //解密
            var authInfo = decoder.DecodeToObject<AuthInfo>(token, key, verify: true);
            if (authInfo != null)
            {
                //判断口令过期时间
                if (authInfo.Expires < DateTime.Now)
                {
                    return false;
                }
                actionContext.RequestContext.RouteData.Values.Add("auth", authInfo);
                return true;
            }
        }
        catch (Exception e)
        {

        }
        return false;
    }
    /// <summary>
    /// 处理授权失败的请求
    /// </summary>
    /// <param name="actionContext"></param>
    protected override void HandleUnauthorizedRequest(HttpActionContext actionContext)
    {
        var erModel = new HttpResult()
        {
            Success = false,
            Message = "身份认证不正确!"
        };
        actionContext.Response = actionContext.Request.CreateResponse(HttpStatusCode.OK, erModel, "application/json");
    }
}
4.5在StudentController中添加过滤属性ApiAuthorize
具体如下:
[RoutePrefix("api/Student"),ApiAuthorize]
public class StudentController : ApiController
{
    private static readonly List<Student> StudentList = new List<Student>()
    {
        new Student() {Id = "001", Name = "张三", Sex = "男", Age = 19, Dept = "软件学院"},
        new Student() {Id = "002", Name = "李丽", Sex = "女", Age = 19, Dept = "资环学院"}
    };

    [HttpGet]
    public IEnumerable<Student> Get()
    {
        return StudentList;
    }

    [HttpGet, Route("GetByDept/{dept}")]
    public IEnumerable<Student> GetByDept(string dept)
    {
        List<Student> tempList = StudentList.Where(p => p.Dept == dept).ToList();
        return tempList;
    }
    [HttpGet]
    public Student Get(string id)
    {
        List<Student> tempList = StudentList.Where(p => p.Id == id).ToList();
        return tempList.Count == 1 ? tempList.First() : null;
    }

    [HttpPost]
    public bool Post([FromBody] Student student)
    {
        if (student == null) return false;
        if (StudentList.Where(p => p.Id == student.Id).ToList().Count > 0) return false;
        StudentList.Add(student);
        return true;
    }

    [HttpPut]
    public bool Put(string id, [FromBody] Student student)
    {
        if (student == null) return false;
        List<Student> tempList = StudentList.Where(p => p.Id == id).ToList();
        if (tempList.Count == 0) return false;
        Student originStudent = tempList[0];
        originStudent.Name = student.Name;
        originStudent.Sex = student.Sex;
        originStudent.Age = student.Age;
        originStudent.Dept = student.Dept;
        return true;
    }

    [HttpDelete]
    public bool Delete(string id)
    {
        List<Student> tempList = StudentList.Where(p => p.Id == id).ToList();
        if (tempList.Count == 0) return false;
        StudentList.Remove(tempList[0]);
        return true;
    }
}
依照步骤添加相关代码,此时就完成了JWT验证的添加。
5.通过PostMan测试程序
运行VS,查看相关API接口,如下图所示。

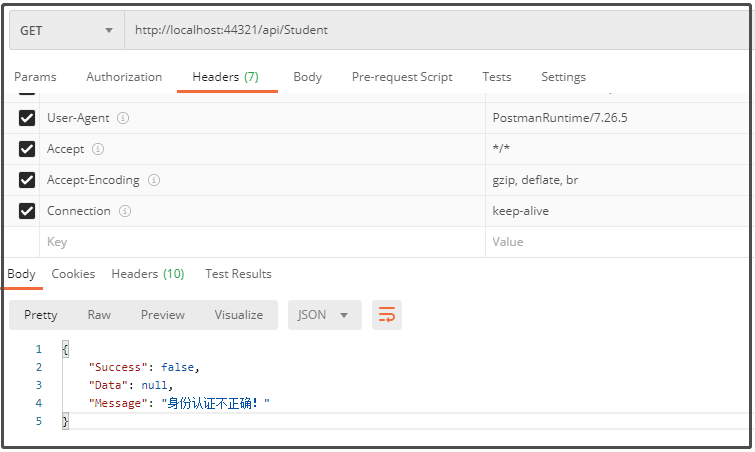
登录前,测试Get:http://localhost:44321/api/Student接口,返回结果如下图所示。
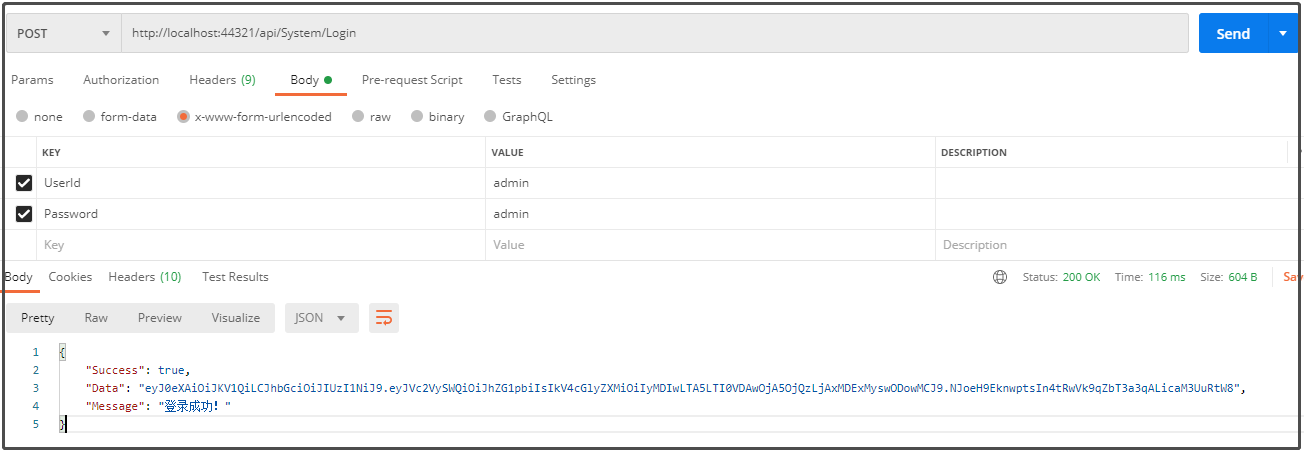
登录,测试Post:http://localhost:44321/api/System/Login接口,返回结果如下图所示。
登录后,测试Get:http://localhost:44321/api/Student接口,返回结果如下图所示。
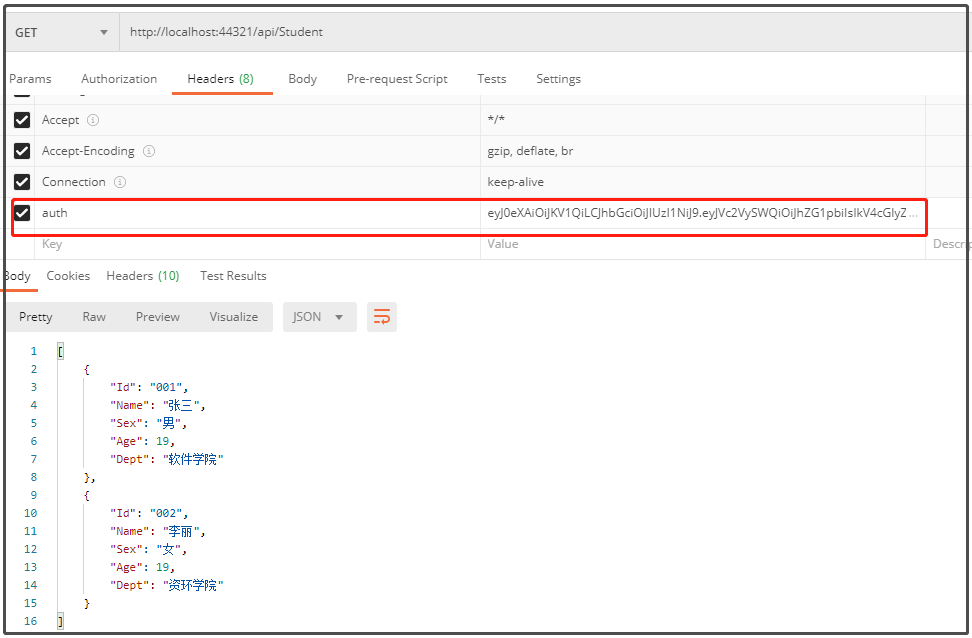
在APIController上添加权限验证后,访问相应接口时,需要在header里面添加auth属性(token),这样就完成了身份认证。
6.总结
本文介绍了JWT的原理,然后通过代码完成了相应实例教程,博文中的源代码可以通过笔者GitHUb获取。博文写作不易希望多多支持,后续会更新更多内容,感兴趣的朋友可以加关注,欢迎留言交流!也可以通过微信公众搜索“码探长”,联系笔者!
扫描添加下方的微信公众号,获取更多福利和干货!也可通公众号(码探长)联系探长,期待与你相遇!!!