DHCP服务器只作用于局域网同一网段内,客户端是通过广播消息来获得DHCP服务器响应后才能得到IP地址的,但广播消息不能跨越子网,那么如何让客户端获取到DHCP服务器提供的IP地址呢?这就是DHCP中继服务器的功能了。
实验拓扑图:
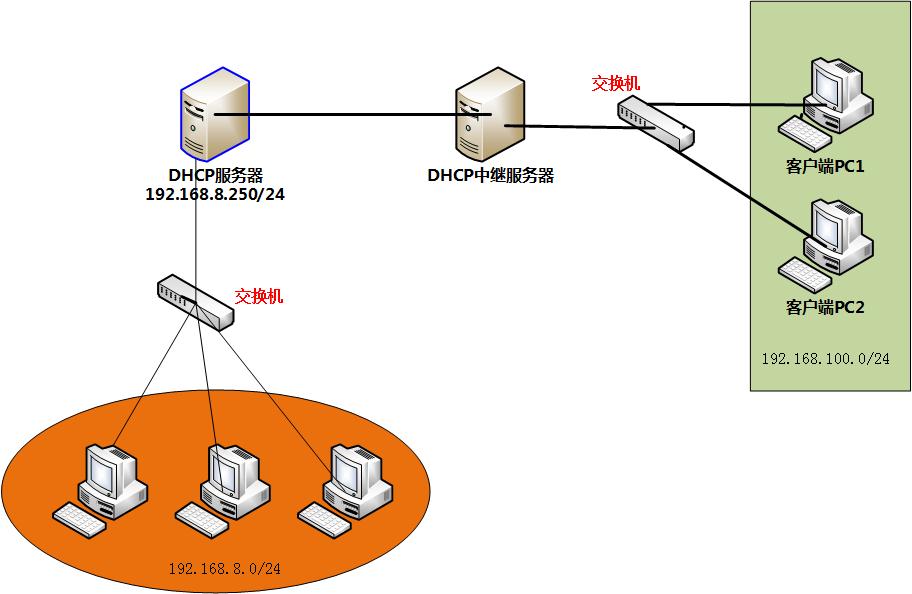
实验环境:
DHCP服务器:CentOS Linux release 7.3.1611
DHCP中继代理:CentOS Linux release 7.3.1611
客户端:CentOS 6.9
1、DHCP服务器配置
(1)、配置DHCP服务器的网络参数
[root@host02 ~]# vi /etc/sysconfig/network-scripts/ifcfg-ens33

TYPE="Ethernet"
BOOTPROTO="static"
IPADDR=192.168.8.250
NETMASK=255.255.255.0
GATEWAY=192.168.8.254
DEFROUTE="yes"
PEERDNS="yes"
PEERROUTES="yes"
IPV4_FAILURE_FATAL="no"
IPV6INIT="yes"
IPV6_AUTOCONF="yes"
IPV6_DEFROUTE="yes"
IPV6_PEERDNS="yes"
IPV6_PEERROUTES="yes"
IPV6_FAILURE_FATAL="no"
IPV6_ADDR_GEN_MODE="stable-privacy"
NAME="ens33"
UUID="8225206d-ab64-4101-b343-35316fc76a7c"
DEVICE="ens33"
ONBOOT="yes"
~
~
~
(2)、重启网络服务
[root@host02 ~]# systemctl restart network
查看DHCP服务器IP
[root@host02 ~]# ifconfig
ens33: flags=4163<UP,BROADCAST,RUNNING,MULTICAST>  mtu 1500
        inet 192.168.8.250  netmask 255.255.255.0  broadcast 192.168.8.255
        inet6 fe80::66d2:4ff4:82d6:a6e4  prefixlen 64  scopeid 0x20<link>
        ether 00:0c:29:19:7e:d0  txqueuelen 1000  (Ethernet)
        RX packets 32913  bytes 19217237 (18.3 MiB)
        RX errors 0  dropped 0  overruns 0  frame 0
        TX packets 23740  bytes 5933321 (5.6 MiB)
        TX errors 0  dropped 0 overruns 0  carrier 0  collisions 0

lo: flags=73<UP,LOOPBACK,RUNNING>  mtu 65536
        inet 127.0.0.1  netmask 255.0.0.0
        inet6 ::1  prefixlen 128  scopeid 0x10<host>
        loop  txqueuelen 1  (Local Loopback)
        RX packets 620  bytes 31136 (30.4 KiB)
        RX errors 0  dropped 0  overruns 0  frame 0
        TX packets 620  bytes 31136 (30.4 KiB)
        TX errors 0  dropped 0 overruns 0  carrier 0  collisions 0

virbr0: flags=4099<UP,BROADCAST,MULTICAST>  mtu 1500
        inet 192.168.122.1  netmask 255.255.255.0  broadcast 192.168.122.255
        ether 52:54:00:f7:80:1e  txqueuelen 1000  (Ethernet)
        RX packets 6  bytes 432 (432.0 B)
        RX errors 0  dropped 0  overruns 0  frame 0
        TX packets 0  bytes 0 (0.0 B)
        TX errors 0  dropped 0 overruns 0  carrier 0  collisions 0
(3) 安装DHCP服务
[root@host02 ~]# yum install dhcp
[root@host02 ~]# rpm -qa dhcp
dhcp-4.2.5-47.el7.centos.x86_64
(4)编辑DHCP服务器的配置文件
[root@host02 ~]# vi dhcpd.conf

#dhcp configuration

#整体环境设置

ddns-update-style  none;
ignore client-updates;
default-lease-time  259200;
max-lease-time     518400;
option routers  192.168.8.254;
option domain-name    "centos.me";
option  domain-name-servers  202.102.224.68,202.102.227.68;

#二个网段IP分配

subnet  192.168.8.0 netmask 255.255.255.0 {
    range  192.168.8.200 192.168.8.210;
    option subnet-mask  255.255.255.0;
    option routers 192.168.8.1;
    }
subnet 192.168.100.0 netmask 255.255.255.0 {
        range 192.168.100.80  192.168.100.100;
        option subnet-mask 255.255.255.0;
        option routers 192.168.100.1;
}
将编辑好的DHCP配置文件覆盖初装后的空白配置文件;
[root@host02 ~]# cp dhcpd.conf  /etc/dhcp/dhcpd.conf
cp: overwrite ‘/etc/dhcp/dhcpd.conf’? y
(5)启动DHCP服务,并检查状态;
[root@host02 ~]# systemctl start dhcpd
[root@host02 ~]# systemctl status dhcpd
● dhcpd.service - DHCPv4 Server Daemon
   Loaded: loaded (/usr/lib/systemd/system/dhcpd.service; disabled; vendor preset: disabled)
   Active: active (running) since Thu 2017-08-31 22:01:20 CST; 6s ago
     Docs: man:dhcpd(8)
           man:dhcpd.conf(5)
 Main PID: 27413 (dhcpd)
   Status: "Dispatching packets..."
   CGroup: /system.slice/dhcpd.service
           └─27413 /usr/sbin/dhcpd -f -cf /etc/dhcp/dhcpd.conf -user dhcpd -group dhcpd --no-pid

Aug 31 22:01:20 host02.linux.com dhcpd[27413]: No subnet declaration for virbr0 (192.168.122.1).
Aug 31 22:01:20 host02.linux.com dhcpd[27413]: ** Ignoring requests on virbr0.  If this is not what
Aug 31 22:01:20 host02.linux.com dhcpd[27413]:    you want, please write a subnet declaration
Aug 31 22:01:20 host02.linux.com dhcpd[27413]:    in your dhcpd.conf file for the network segment
Aug 31 22:01:20 host02.linux.com dhcpd[27413]:    to which interface virbr0 is attached. **
Aug 31 22:01:20 host02.linux.com dhcpd[27413]:
Aug 31 22:01:20 host02.linux.com dhcpd[27413]: Listening on LPF/ens33/00:0c:29:19:7e:d0/192.168.8.0/24
Aug 31 22:01:20 host02.linux.com dhcpd[27413]: Sending on   LPF/ens33/00:0c:29:19:7e:d0/192.168.8.0/24
Aug 31 22:01:20 host02.linux.com dhcpd[27413]: Sending on   Socket/fallback/fallback-net
Aug 31 22:01:20 host02.linux.com systemd[1]: Started DHCPv4 Server Daemon.
[root@host02 ~]# netstat -tunlp |grep dhcp
udp        0      0 0.0.0.0:67              0.0.0.0:*                           27413/dhcpd
udp        0      0 0.0.0.0:62793           0.0.0.0:*                           27413/dhcpd
udp6       0      0 :::7468                 :::*                                27413/dhcpd
DHCP服务器一切正常!至此DHCP服务器的配置已经完成;下一步配置DHCP中继代理服务器。
2、配置DHCP中继服务器
(1)、做为中继服务器首先要确保有两张网卡,否则没法中继;
本实验我已经在中继服务器上虚拟出两个网卡;
[root@host-a ~]# lspci |grep ethernet
[root@host-a ~]# lspci |grep Ethernet
02:01.0 Ethernet controller: Intel Corporation 82545EM Gigabit Ethernet Controller (Copper) (rev 01)
02:05.0 Ethernet controller: Intel Corporation 82545EM Gigabit Ethernet Controller (Copper) (rev 01)
(2)查看网卡信息
[root@host-a ~]# ifconfig
ens33: flags=4163<UP,BROADCAST,RUNNING,MULTICAST>  mtu 1500
        ether 00:0c:29:a9:16:dd  txqueuelen 1000  (Ethernet)
        RX packets 691  bytes 574904 (561.4 KiB)
        RX errors 0  dropped 0  overruns 0  frame 0
        TX packets 664  bytes 80407 (78.5 KiB)
        TX errors 0  dropped 0 overruns 0  carrier 0  collisions 0

ens37: flags=4163<UP,BROADCAST,RUNNING,MULTICAST>  mtu 1500
        ether 00:0c:29:a9:16:e7  txqueuelen 1000  (Ethernet)
        RX packets 11  bytes 2916 (2.8 KiB)
        RX errors 0  dropped 0  overruns 0  frame 0
        TX packets 462  bytes 70265 (68.6 KiB)
        TX errors 0  dropped 0 overruns 0  carrier 0  collisions 0

lo: flags=73<UP,LOOPBACK,RUNNING>  mtu 65536
        inet 127.0.0.1  netmask 255.0.0.0
        inet6 ::1  prefixlen 128  scopeid 0x10<host>
        loop  txqueuelen 1  (Local Loopback)
        RX packets 164  bytes 12880 (12.5 KiB)
        RX errors 0  dropped 0  overruns 0  frame 0
        TX packets 164  bytes 12880 (12.5 KiB)
        TX errors 0  dropped 0 overruns 0  carrier 0  collisions 0

virbr0: flags=4099<UP,BROADCAST,MULTICAST>  mtu 1500
        inet 192.168.122.1  netmask 255.255.255.0  broadcast 192.168.122.255
        ether 52:54:00:7a:2c:f4  txqueuelen 1000  (Ethernet)
        RX packets 0  bytes 0 (0.0 B)
        RX errors 0  dropped 0  overruns 0  frame 0
        TX packets 0  bytes 0 (0.0 B)
        TX errors 0  dropped 0 overruns 0  carrier 0  collisions 0
(2)接下来分别配置这两个网卡的网络参数
网卡ens33与DHCP服务器相连,属于192.168.8.0/24网段,注意网卡ens33的IP地址是DHCP服务器的网关地址,
配置如下:
[root@host-a ~]# vi /etc/sysconfig/network-scripts/ifcfg-ens33
TYPE="Ethernet"
BOOTPROTO="static"
IPADDR=192.168.8.254
NETMASK=255.255.255.0
DEFROUTE="yes"
PEERDNS="yes"
PEERROUTES="yes"
IPV4_FAILURE_FATAL="no"
IPV6INIT="yes"
IPV6_AUTOCONF="yes"
IPV6_DEFROUTE="yes"
IPV6_PEERDNS="yes"
IPV6_PEERROUTES="yes"
IPV6_FAILURE_FATAL="no"
IPV6_ADDR_GEN_MODE="stable-privacy"
NAME="ens33"
UUID="065ff1ad-9117-4cf4-a716-c61d5fdc0c00"
DEVICE="ens33"
ONBOOT="yes"
网卡ens37与192.168.100.0/24网段相连,注意网卡ens37的IP地址是192.168.100.0/24网段的网关地址,配置如下:
[root@host-a ~]# cat /etc/sysconfig/network-scripts/ifcfg-ens37
TYPE=Ethernet
BOOTPROTO=static
IPADDR=192.168.100.1
PREFIX=24
DEFROUTE=yes
IPV4_FAILURE_FATAL=no
IPV6INIT=yes
IPV6_AUTOCONF=yes
IPV6_DEFROUTE=yes
IPV6_PEERDNS=yes
IPV6_PEERROUTES=yes
IPV6_FAILURE_FATAL=no
IPV6_ADDR_GEN_MODE=stable-privacy
NAME="ens37"
UUID=e3854409-f832-4d4c-b7ae-271d0aa5ecc5
ONBOOT=yes
(3)配置好后,重起网络服务使设置生效
[root@host-a ~]# systemctl restart network
[root@host-a ~]# ifconfig
ens33: flags=4163<UP,BROADCAST,RUNNING,MULTICAST>  mtu 1500
        inet 192.168.8.254  netmask 255.255.255.0  broadcast 192.168.8.255
        inet6 fe80::f31:c380:a398:1df6  prefixlen 64  scopeid 0x20<link>
        ether 00:0c:29:a9:16:dd  txqueuelen 1000  (Ethernet)
        RX packets 703  bytes 575996 (562.4 KiB)
        RX errors 0  dropped 0  overruns 0  frame 0
        TX packets 759  bytes 93828 (91.6 KiB)
        TX errors 0  dropped 0 overruns 0  carrier 0  collisions 0

ens37: flags=4163<UP,BROADCAST,RUNNING,MULTICAST>  mtu 1500
        inet 192.168.100.1  netmask 255.255.255.0  broadcast 192.168.100.255
        inet6 fe80::3409:4bde:b57c:957d  prefixlen 64  scopeid 0x20<link>
        ether 00:0c:29:a9:16:e7  txqueuelen 1000  (Ethernet)
        RX packets 11  bytes 2916 (2.8 KiB)
        RX errors 0  dropped 0  overruns 0  frame 0
        TX packets 522  bytes 78535 (76.6 KiB)
        TX errors 0  dropped 0 overruns 0  carrier 0  collisions 0

lo: flags=73<UP,LOOPBACK,RUNNING>  mtu 65536
        inet 127.0.0.1  netmask 255.0.0.0
        inet6 ::1  prefixlen 128  scopeid 0x10<host>
        loop  txqueuelen 1  (Local Loopback)
        RX packets 164  bytes 12880 (12.5 KiB)
        RX errors 0  dropped 0  overruns 0  frame 0
        TX packets 164  bytes 12880 (12.5 KiB)
        TX errors 0  dropped 0 overruns 0  carrier 0  collisions 0

virbr0: flags=4099<UP,BROADCAST,MULTICAST>  mtu 1500
        inet 192.168.122.1  netmask 255.255.255.0  broadcast 192.168.122.255
        ether 52:54:00:7a:2c:f4  txqueuelen 1000  (Ethernet)
        RX packets 0  bytes 0 (0.0 B)
        RX errors 0  dropped 0  overruns 0  frame 0
        TX packets 0  bytes 0 (0.0 B)
        TX errors 0  dropped 0 overruns 0  carrier 0  collisions 0
(4)安装DHCP
#安装
[root@host-a network-scripts]# yum install dhcp
#安装成功
[root@host-a network-scripts]# rpm -qa dhcp
dhcp-4.2.5-47.el7.centos.x86_64
#注意dhcp包含dhcp中继服务
[root@host-a ~]# rpm -ql dhcp |grep dhcrelay
/usr/lib/systemd/system/dhcrelay.service
/usr/sbin/dhcrelay
/usr/share/man/man8/dhcrelay.8.gz
(5)打开DHCP中继服务器路由转发功能
编辑/etc/sysctl.conf 文件在文件添加一行内容为:
“net.ipv4.ip_forward=1”
开启路由转发功能
[root@host-a ~]# vi /etc/sysctl.conf
# sysctl settings are defined through files in
# /usr/lib/sysctl.d/, /run/sysctl.d/, and /etc/sysctl.d/.
#
# Vendors settings live in /usr/lib/sysctl.d/.
# To override a whole file, create a new file with the same in
# /etc/sysctl.d/ and put new settings there. To override
# only specific settings, add a file with a lexically later
# name in /etc/sysctl.d/ and put new settings there.
#
# For more information, see sysctl.conf(5) and sysctl.d(5).
net.ipv4.ip_forward = 1
使设置立即生效,执行以下命令:
[root@host-a ~]# sysctl -p
net.ipv4.ip_forward = 1
查看内核参数设置,确认生效;
[root@host-a ~]# sysctl -a |grep ip_forward
net.ipv4.ip_forward = 1
net.ipv4.ip_forward_use_pmtu = 0
[root@host-a ~]#
(6)开启DHCP中继服务
[root@host-a ~]# dhcrelay 192.168.8.250
Dropped all unnecessary capabilities.
Internet Systems Consortium DHCP Relay Agent 4.2.5
Copyright 2004-2013 Internet Systems Consortium.
All rights reserved.
For info, please visit https://www.isc.org/software/dhcp/
Listening on LPF/virbr0/52:54:00:7a:2c:f4
Sending on   LPF/virbr0/52:54:00:7a:2c:f4
Listening on LPF/ens37/00:0c:29:a9:16:e7
Sending on   LPF/ens37/00:0c:29:a9:16:e7
Listening on LPF/ens33/00:0c:29:a9:16:dd
Sending on   LPF/ens33/00:0c:29:a9:16:dd
Sending on   Socket/fallback
[root@host-a ~]#

[root@host-a ~]# netstat -tunlp |grep dhcrelay
udp        0      0 0.0.0.0:49976           0.0.0.0:*                           10428/dhcrelay
udp        0      0 0.0.0.0:67              0.0.0.0:*                           10428/dhcrelay
udp6       0      0 :::17324                :::*                                10428/dhcrelay
3、客户端测试
(1)配置客户端网络为自动获取IP


(2)重启网络服务

(3)查看IP
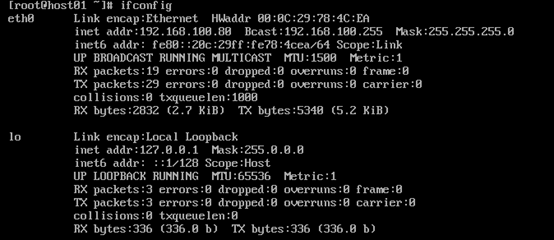
(4)查看客户端在重启网络时都做了什么

(5)查看DHCP服务器日志文件
[root@host02 ~]# tail -n 20  /var/log/messages
Aug 31 23:01:01 host02 systemd: Stopping user-0.slice.
Aug 31 23:01:02 host02 dhcpd: DHCPREQUEST for 192.168.6.6 from 00:0c:29:78:4c:ea via 192.168.100.1: ignored (not authoritative).
Aug 31 23:01:02 host02 dhcpd: DHCPREQUEST for 192.168.6.6 from 00:0c:29:78:4c:ea via 192.168.100.1: ignored (not authoritative).
Aug 31 23:01:15 host02 dhcpd: DHCPDISCOVER from 00:0c:29:78:4c:ea via 192.168.100.1
Aug 31 23:01:16 host02 dhcpd: DHCPOFFER on 192.168.100.80 to 00:0c:29:78:4c:ea (host01) via 192.168.100.1
Aug 31 23:01:16 host02 dhcpd: DHCPREQUEST for 192.168.100.80 (192.168.8.250) from 00:0c:29:78:4c:ea (host01) via 192.168.100.1
Aug 31 23:01:16 host02 dhcpd: DHCPACK on 192.168.100.80 to 00:0c:29:78:4c:ea (host01) via 192.168.100.1
Aug 31 23:01:16 host02 dhcpd: DHCPREQUEST for 192.168.100.80 (192.168.8.250) from 00:0c:29:78:4c:ea (host01) via 192.168.100.1
Aug 31 23:01:16 host02 dhcpd: DHCPACK on 192.168.100.80 to 00:0c:29:78:4c:ea (host01) via 192.168.100.1
(6)检查客户端获取的DNS是否正确

DNS与DHCP服务器设置的一致!
可以看到客户端已经可以正常获取DHCP服务器设置的网络参数了!!