approle配置参考https://www.vaultproject.io/api/auth/approle
approle auth参考https://www.vaultproject.io/docs/auth/approle
转载自https://www.bogotobogo.com/DevOps/Terraform/Hashicorp-Vault-agent.php
Enter the following command to start the Vault server in development mode:
$ vault server -dev -dev-root-token-id="my_root_token"
==> Vault server configuration:

             Api Address: http://127.0.0.1:8200
                     Cgo: disabled
         Cluster Address: https://127.0.0.1:8201
              Listener 1: tcp (addr: "127.0.0.1:8200", cluster address: "127.0.0.1:8201", max_request_duration: "1m30s", max_request_size: "33554432", tls: "disabled")
               Log Level: info
                   Mlock: supported: false, enabled: false
                 Storage: inmem
                 Version: Vault v1.1.2
             Version Sha: 0082501623c0b704b87b1fbc84c2d725994bac54

WARNING! dev mode is enabled! In this mode, Vault runs entirely in-memory
and starts unsealed with a single unseal key. The root token is already
authenticated to the CLI, so you can immediately begin using Vault.

You may need to set the following environment variable:

    $ export VAULT_ADDR='http://127.0.0.1:8200'

The unseal key and root token are displayed below in case you want to
seal/unseal the Vault or re-authenticate.

Unseal Key: VwDE+wYhR670cpUxPzkOqp2s0wB2sN6k/+064J6BEgU=
Root Token: my_root_token

Development mode should NOT be used in production installations!

==> Vault server started! Log data will stream in below:
...
Now that a vault server is running, let's login with the root token in another terminal. First, we need to set the VAULT_ADDR environment variable:
$ export VAULT_ADDR='http://127.0.0.1:8200'
Login with the generated root token:
$ vault login my_root_token
Success! You are now authenticated. The token information displayed below
is already stored in the token helper. You do NOT need to run "vault login"
again. Future Vault requests will automatically use this token.

Key                  Value
---                  -----
token                my_root_token
token_accessor       1SFWucpfTyqP2JIOEZh6bLOU
token_duration       ∞
token_renewable      false
token_policies       ["root"]
identity_policies    []
policies             ["root"]
Now, we are logged in as a root and ready to play!
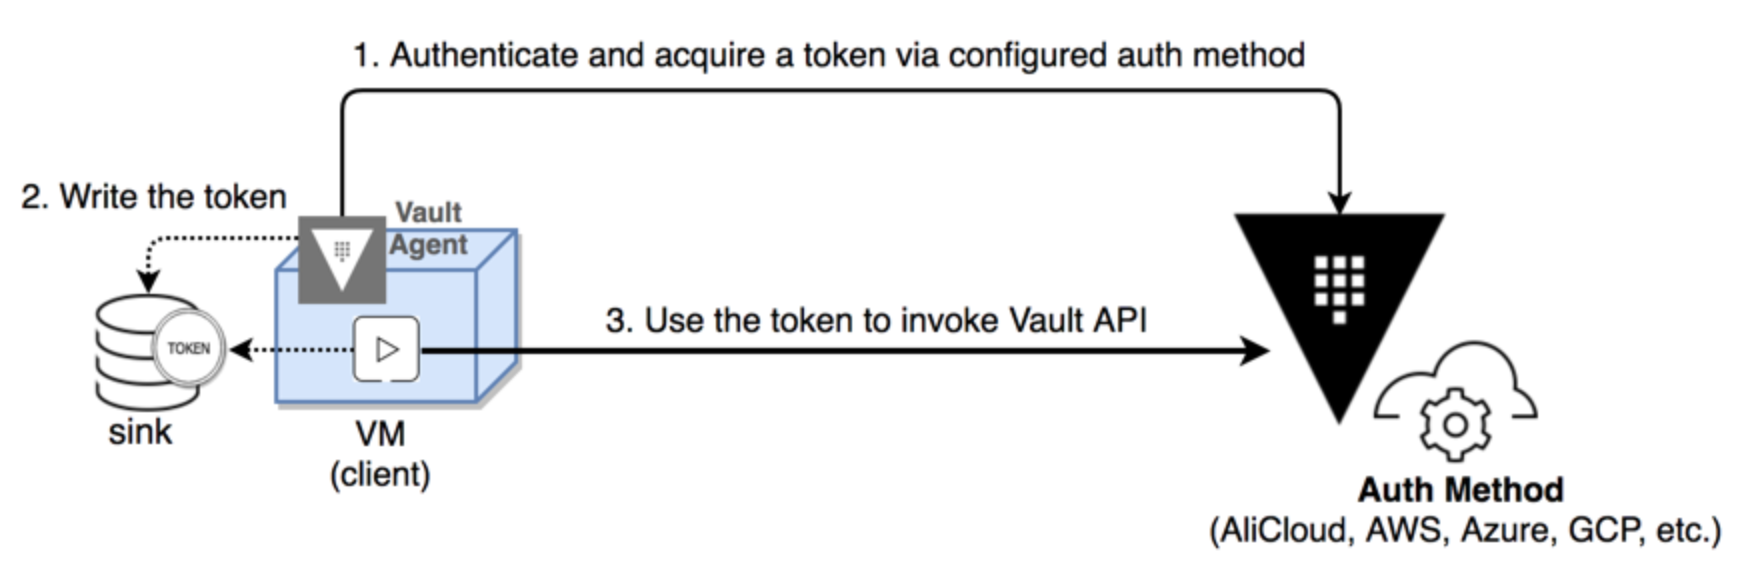
The Vault Agent runs on the client side to automate leases and tokens lifecycle management:
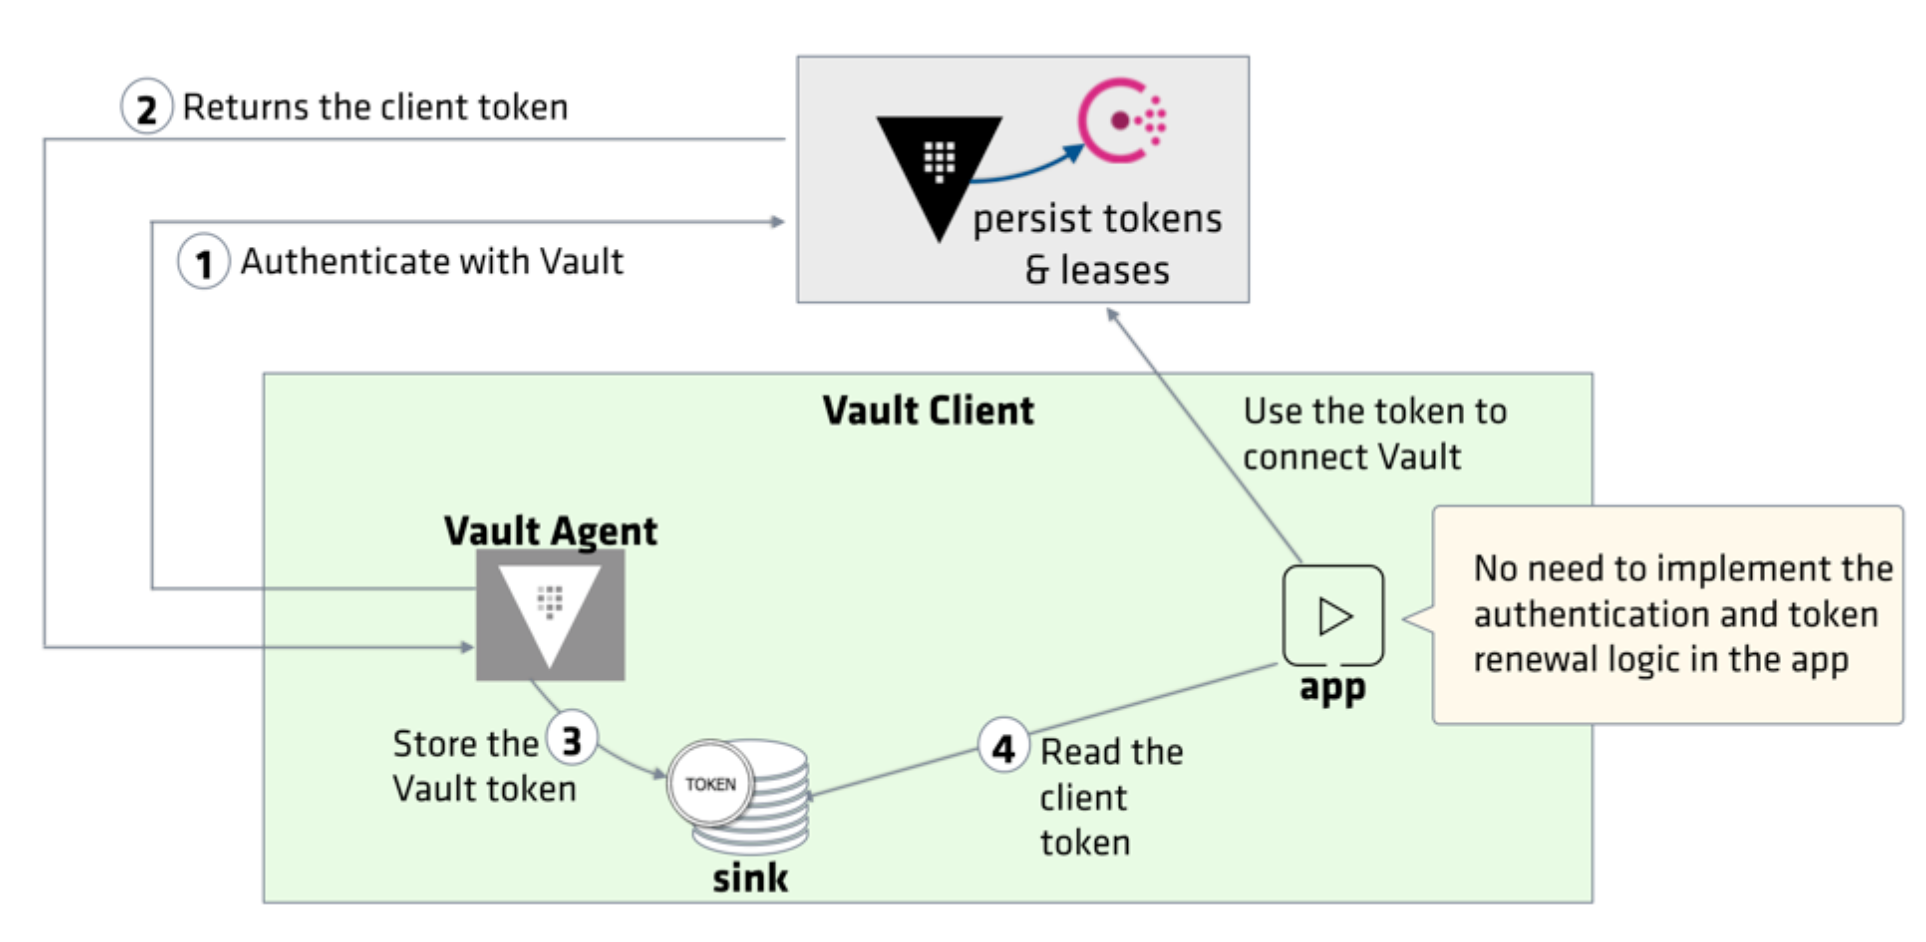
Credit - Vault Agent
In this post, we are going to run the Vault Agent on the same machine as where the Vault server is running. However, the basic working is the same except the host machine address.
Let's setup the auth method on the Vault server. In this post, we are going to enable approle auth method.
Enter the following command to setup the auth method on the Vault server:
$ vault auth enable approle
Success! Enabled approle auth method at: approle/
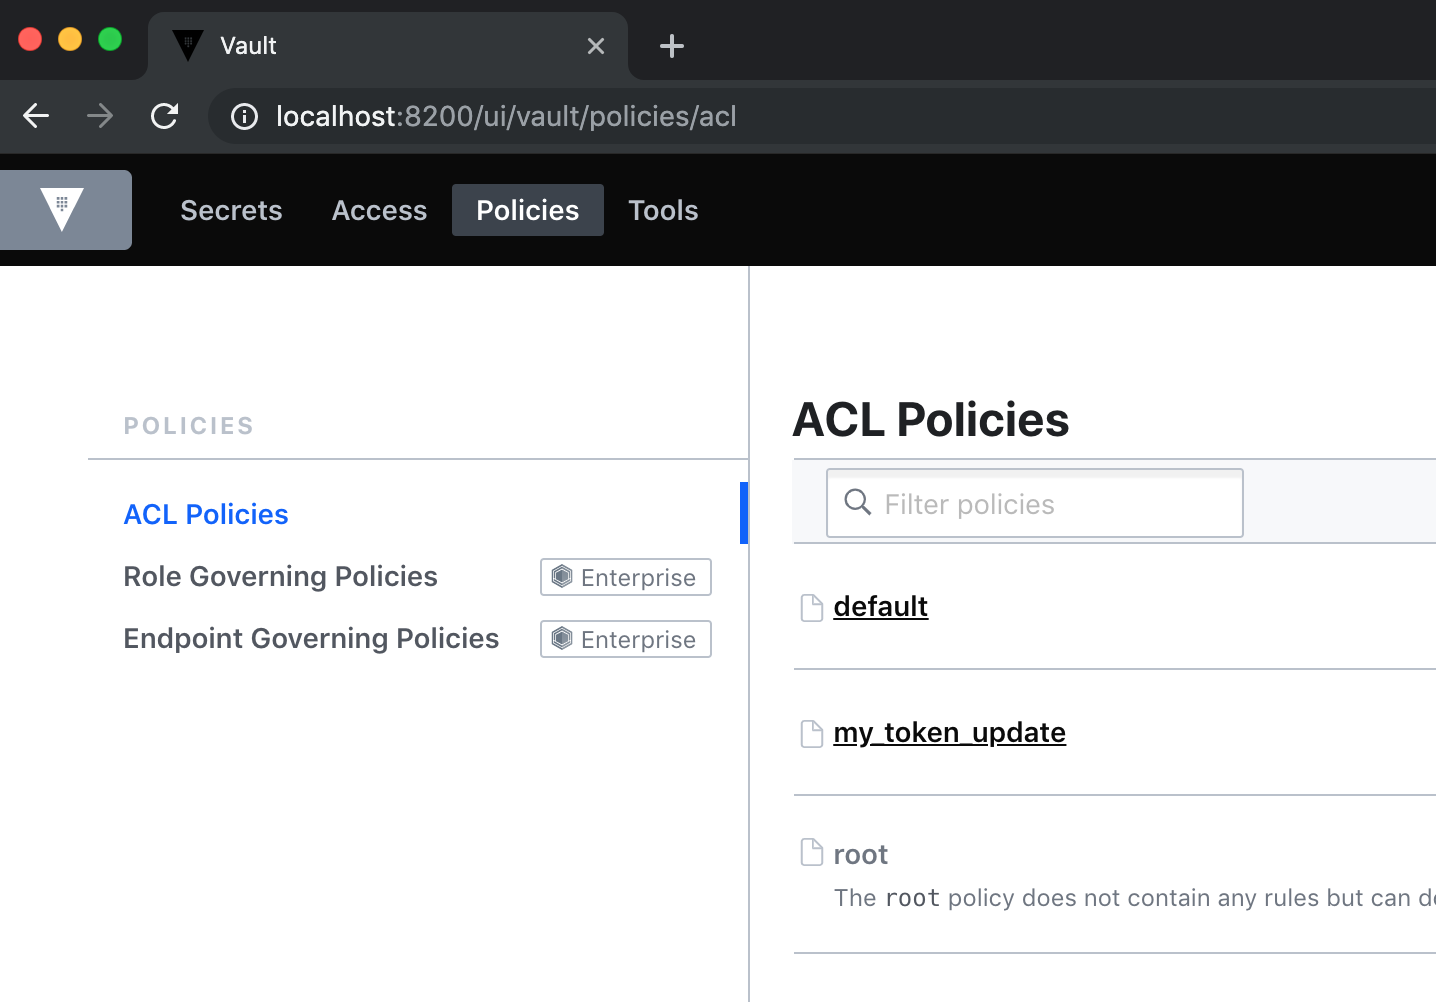
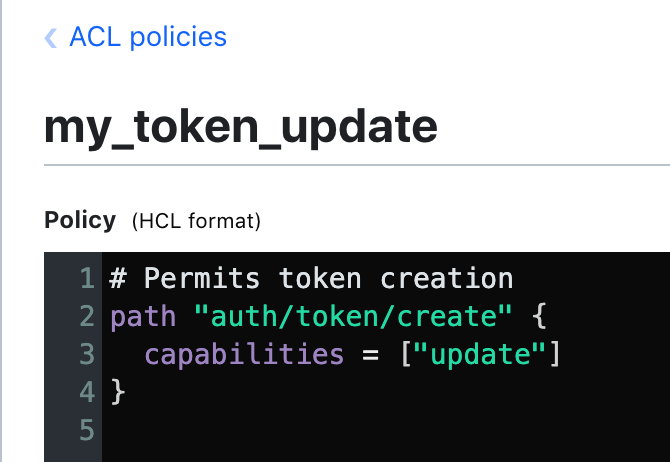
To create a policy, we need to define it. Let's create my_token_update.hcl file:
# Permits token creation
path "auth/token/create" {
  capabilities = ["update"]
}
Create a policy using the same name of the policy file we created:
# vault policy write policy-name policy-file.hcl

$ vault policy write my_token_update my_token_update.hcl
Success! Uploaded policy: my_token_update
The command to create a new AppRole:
$ vault write auth/approle/role/<ROLE_NAME> [parameters]
There are a number of parameters that we can set on a role. If we want to limit the use of the generated secret ID, set "secret_id_num_uses" or "secret_id_ttl" parameter values. Similarly, we can specify "token_num_uses" and "token_ttl". We may never want the app token to expire. In such a case, specify the period so that the token generated by this AppRole is a periodic token.
The following example creates a role named "my_apps" with "my_token_update" policy attached:
$ vault write auth/approle/role/my_apps policies="my_token_update"
Success! Data written to: auth/approle/role/my_apps
We can check the role and the policy attached to it:
$ vault read auth/approle/role/my_apps
WARNING! The following warnings were returned from Vault:

  * The "bound_cidr_list" parameter is deprecated and will be removed in favor
  of "secret_id_bound_cidrs".

Key                      Value
---                      -----
bind_secret_id           true
bound_cidr_list          <nil>
local_secret_ids         false
period                   0s
policies                 [my_token_update]
secret_id_bound_cidrs    <nil>
secret_id_num_uses       0
secret_id_ttl            0s
token_bound_cidrs        <nil>
token_max_ttl            0s
token_num_uses           0
token_ttl                0s
token_type               default
The Role ID and Secret ID are like a username and password. that a machine or app uses to authenticate.
Since the example created a "my_apps" role which operates in pull mode (SecretID is created against an AppRole by the role itself), Vault will generate the Secret ID.
Now, we need to fetch the Role ID and Secret ID of a role.
To read the Role ID and store it in a file named, "my_apps_roleID":
$ vault read -format=json auth/approle/role/my_apps/role-id
        | jq  -r '.data.role_id' > my_apps_roleID
The approle auth method allows machines or apps to authenticate with Vault using Vault-defined roles. The generated roleID is equivalent to username.
$ vault read auth/approle/role/my_apps/role-id
Key        Value
---        -----
role_id    eb750770-6de7-5d35-1ad0-7cee980dbf71
Now we may want to generate a secret ID and stores it in the "secretID" file:
$ vault write -f -format=json auth/approle/role/my_apps/secret-id
        | jq -r '.data.secret_id' > my_apps_secretID

$ cat my_apps_secretID
843bb968-d801-427f-3cf7-e2b058825b18
Note that the "-f" flag forces the write operation to continue without any data values specified. Or we can set parameters such as "cidr_list".
The generated secretID is equivalent to a password!
The client (in this case, my_apps) uses the role ID and secret ID passed by the admin to authenticate with Vault:
$ vault write auth/approle/login role_id="eb750770-6de7-5d35-1ad0-7cee980dbf71"
  secret_id="843bb968-d801-427f-3cf7-e2b058825b18"
Key                     Value
---                     -----
token                   s.xPKGfyHbW9ub996YHYXAVcel
token_accessor          iTxVzQU88T81mPFwNNaesiTt
token_duration          768h
token_renewable         true
token_policies          ["default" "my_token_update"]
identity_policies       []
policies                ["default" "my_token_update"]
token_meta_role_name    my_apps
Now we have a client token with "default" and "my_token_update" policies attached.
Here is the Vault Agent configuration file (agent-config.hcl):
exit_after_auth = false
pid_file = "./pidfile"

auto_auth {
   method "approle" {
       mount_path = "auth/approle"
       config = {
           role_id_file_path = "my_apps_roleID"
           secret_id_file_path = "my_apps_secretID"
           remove_secret_id_file_after_reading = false
       }
   }

   sink "file" {
       config = {
           path = "approleToken"
       }
   }
}

vault {
   address = "http://127.0.0.1:8200"
}
The auto_auth block points to the approle auth method, and the acquired token gets stored in approleToken file which is the sink location.
Execute the following command to start the Vault Agent with debug logs:
$ vault agent -config=agent-config.hcl -log-level=debug
==> Vault server started! Log data will stream in below:

==> Vault agent configuration:

                     Cgo: disabled
               Log Level: debug
                 Version: Vault v1.1.2
             Version Sha: 0082501623c0b704b87b1fbc84c2d725994bac54

2019-08-11T12:29:30.558-0700 [INFO]  sink.file: creating file sink
2019-08-11T12:29:30.560-0700 [INFO]  sink.file: file sink configured: path=approleToken
2019-08-11T12:29:30.560-0700 [INFO]  auth.handler: starting auth handler
2019-08-11T12:29:30.560-0700 [INFO]  auth.handler: authenticating
2019-08-11T12:29:30.560-0700 [INFO]  sink.server: starting sink server
2019-08-11T12:29:30.564-0700 [INFO]  auth.handler: authentication successful, sending token to sinks
2019-08-11T12:29:30.564-0700 [INFO]  auth.handler: starting renewal process
2019-08-11T12:29:30.565-0700 [INFO]  sink.file: token written: path=approleToken
2019-08-11T12:29:30.566-0700 [INFO]  auth.handler: renewed auth token
The acquired client token is now stored in the "approleToken" file. Our applications can read the token from "approleToken" and use it to invoke the Vault API.
Open a new terminal and execute the following commands:
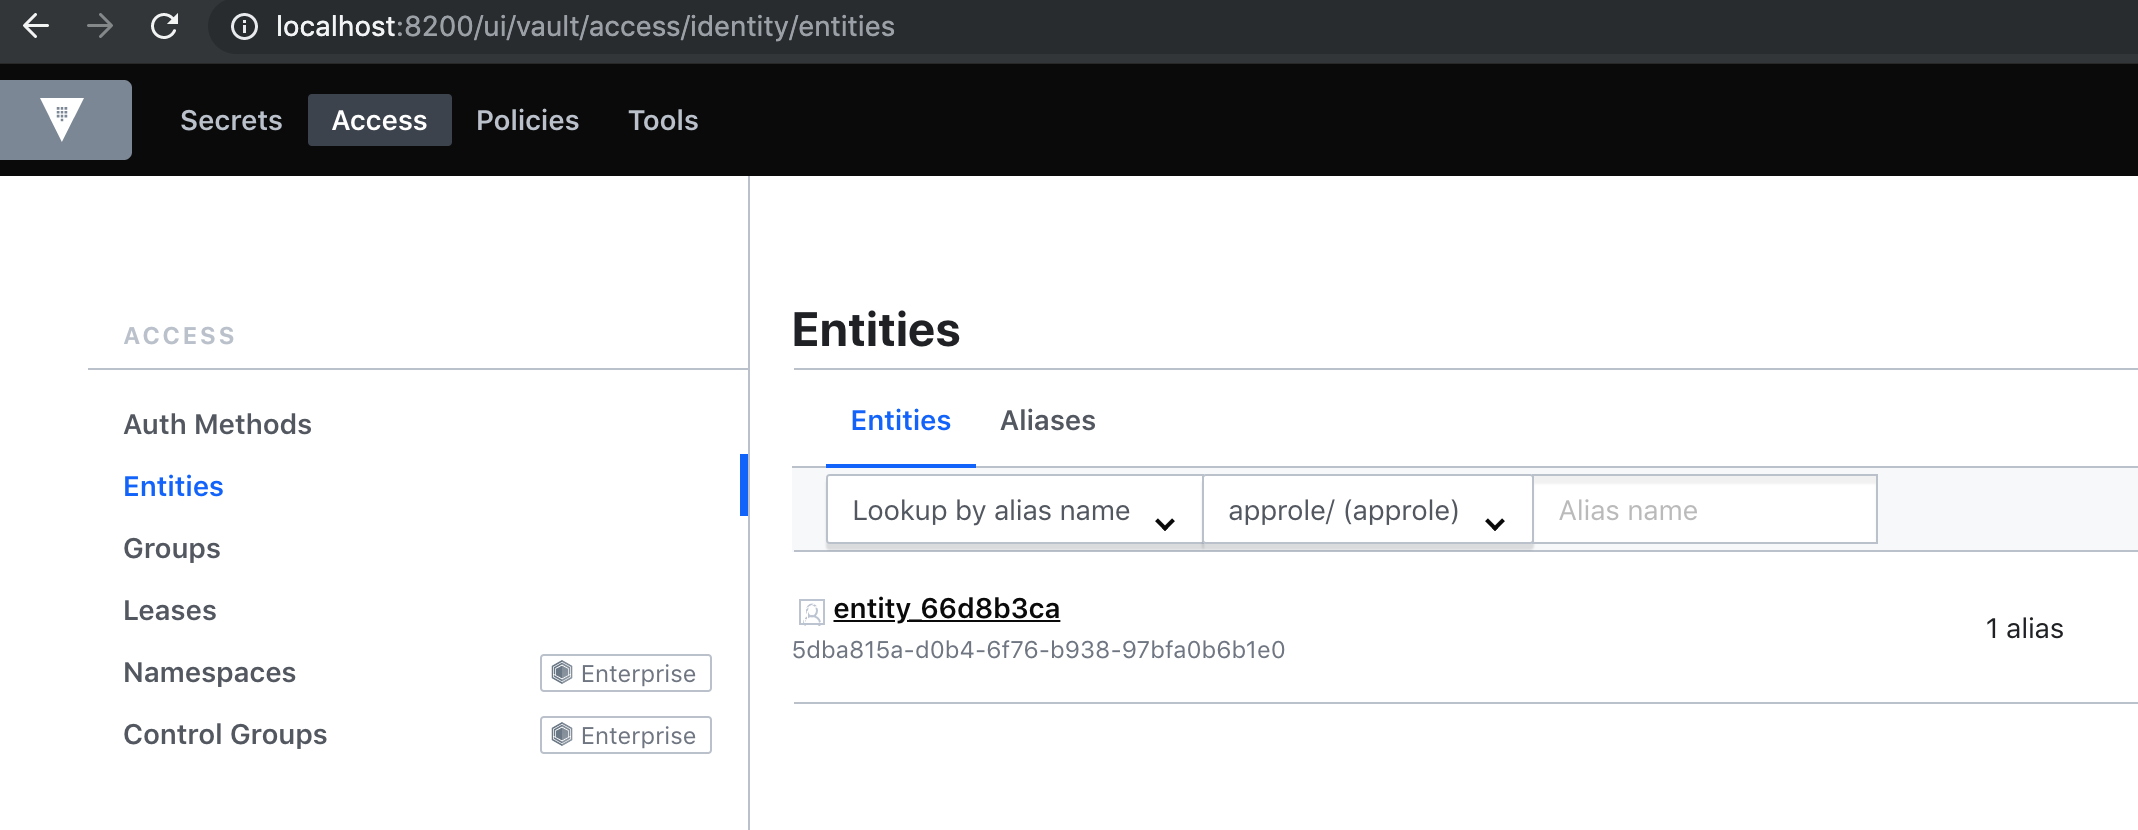
$ export VAULT_ADDR='http://127.0.0.1:8200'

$ vault token lookup $(cat approleToken)
Key                  Value
---                  -----
accessor             Meo2jCaRsZRo6xE5MtYbMbaz
creation_time        1565551770
creation_ttl         768h
display_name         approle
entity_id            5dba815a-d0b4-6f76-b938-97bfa0b6b1e0
expire_time          2019-09-12T12:29:30.566328-07:00
explicit_max_ttl     0s
id                   s.9QqBbFOkmA2Nl64MpgNDpTFS
issue_time           2019-08-11T12:29:30.563623-07:00
last_renewal         2019-08-11T12:29:30.566328-07:00
last_renewal_time    1565551770
meta                 map[role_name:my_apps]
num_uses             0
orphan               true
path                 auth/approle/login
policies             [default my_token_update]
renewable            true
ttl                  767h57m13s
type                 service
Now we should be able to create a token using this token (permitted by the my_token_update policy).
$ VAULT_TOKEN=$(cat approleToken) vault token create
Key                  Value
---                  -----
token                s.XfcnTI7Ihw7tJaUudKylpvvr
token_accessor       ThA0VzaBVwOEgomVwwbywwxg
token_duration       768h
token_renewable      true
token_policies       ["default" "my_token_update"]
identity_policies    []
policies             ["default" "my_token_update"]
Continue to Step 3 of Vault Agent
Or to get additional info, we can check Vault Agent Caching as well.
Depending on the location of your Vault clients and its secret access frequency, you may face some scaling or latency challenge. Even with Vault Performance Replication enabled, the pressure on the storage backend increases as the number of token or lease generation requests increase.
...
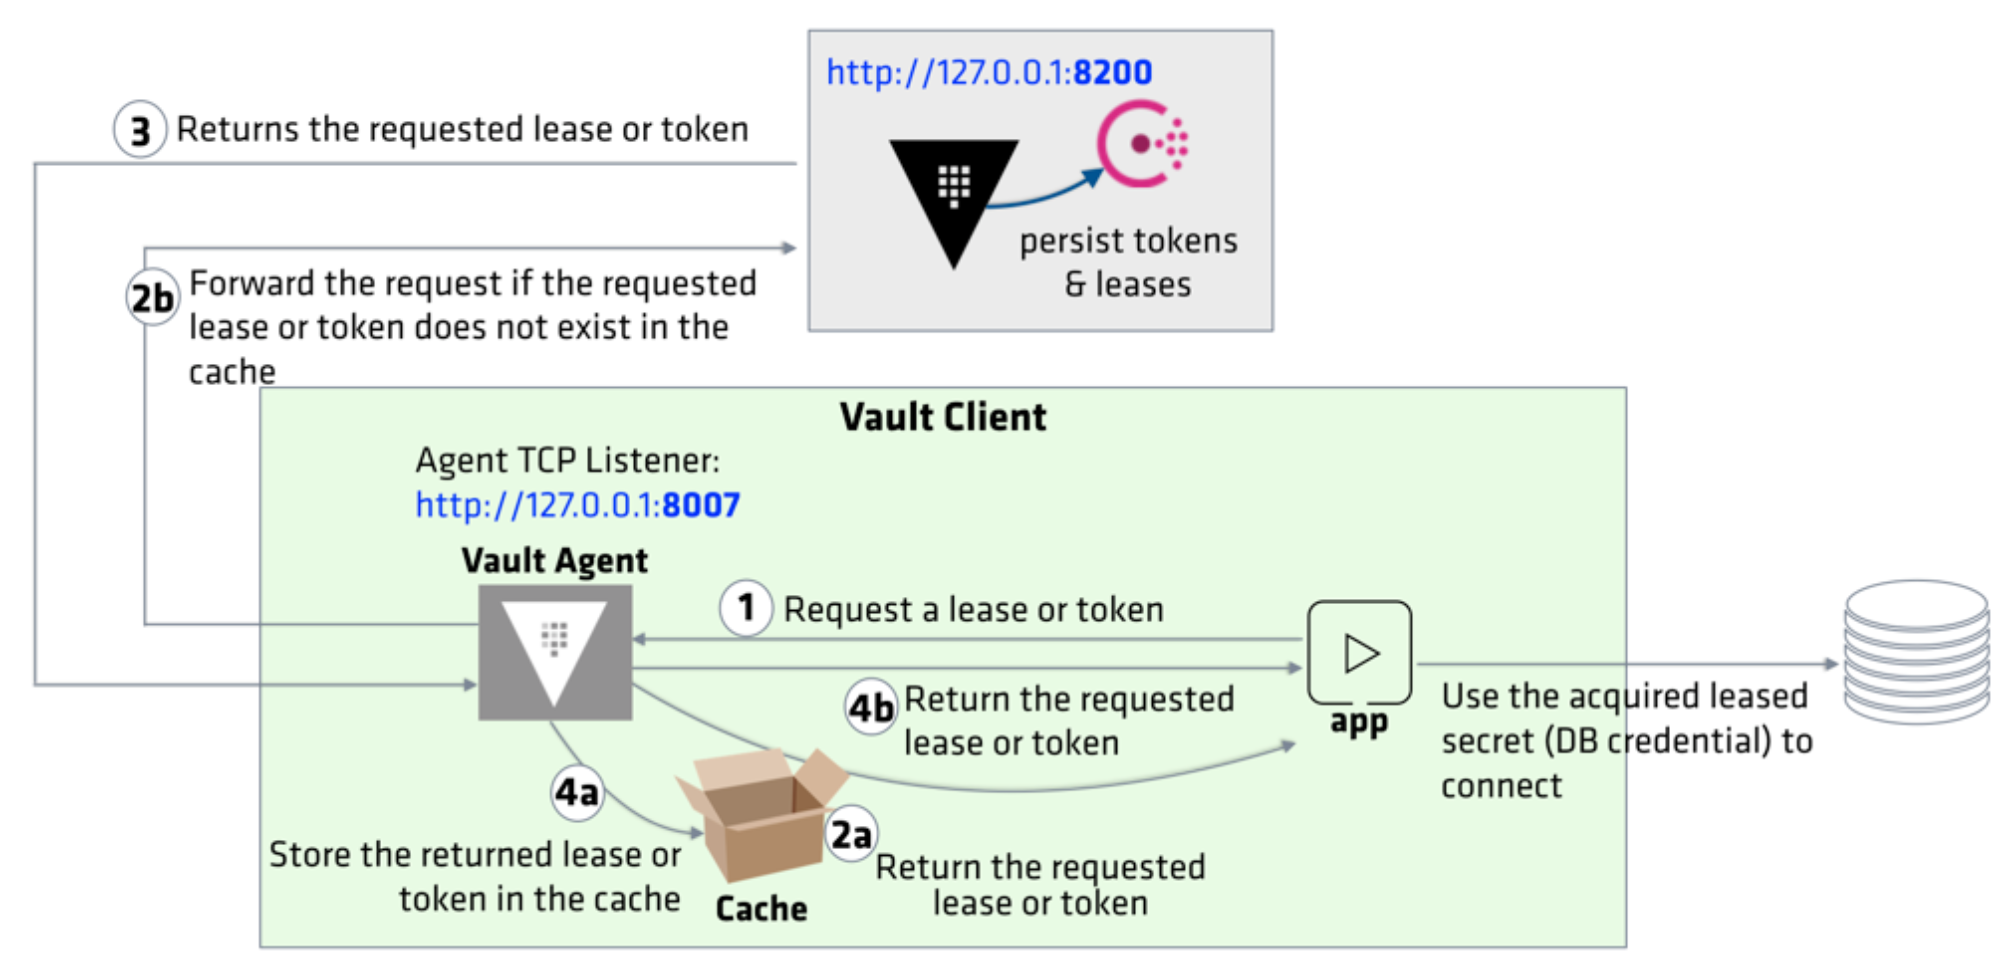
To increase the availability of tokens and secrets to the clients, Vault Agent introduced the Caching function.
Credit - Vault Agent
Vault Agent Caching can cache the tokens and leased secrets proxied through the agent which includes the auto-auth token. This allows for easier access to Vault secrets for edge applications, reduces the I/O burden for basic secrets access for Vault clusters, and allows for secure local access to leased secrets for the life of a valid token.
To enable Vault Agent Caching, the agent configuration file must define cache and listener stanzas. The listener stanza specifies the proxy address which Vault Agent listens. All the requests will be made through this address and forwarded to the Vault server. Our new config file (agent-config-with-caching.hcl) looks like this:
exit_after_auth = false
pid_file = "./pidfile"

auto_auth {
   method "approle" {
       mount_path = "auth/approle"
       config = {
           role_id_file_path = "my_apps_roleID"
           secret_id_file_path = "my_apps_secretID"
           remove_secret_id_file_after_reading = false
       }
   }

   sink "file" {
       config = {
           path = "approleToken"
       }
   }
}

cache {
   use_auto_auth_token = true
}

listener "tcp" {
   address = "127.0.0.1:8007"
   tls_disable = true
}

vault {
   address = "http://127.0.0.1:8200"
}
Note that the agent listens to port 8007.
Execute the following command to start the Vault Agent with debug logs:
$ vault agent -config=agent-config-with-caching.hcl -log-level=debug
==> Vault server started! Log data will stream in below:

==> Vault agent configuration:

           Api Address 1: http://127.0.0.1:8007
                     Cgo: disabled
               Log Level: debug
                 Version: Vault v1.1.2
             Version Sha: 0082501623c0b704b87b1fbc84c2d725994bac54

2019-08-11T15:52:01.218-0700 [INFO]  sink.file: creating file sink
2019-08-11T15:52:01.220-0700 [INFO]  sink.file: file sink configured: path=approleToken
2019-08-11T15:52:01.220-0700 [DEBUG] cache: auto-auth token is allowed to be used; configuring inmem sink
2019-08-11T15:52:01.220-0700 [INFO]  auth.handler: starting auth handler
2019-08-11T15:52:01.221-0700 [INFO]  auth.handler: authenticating
2019-08-11T15:52:01.220-0700 [INFO]  sink.server: starting sink server
2019-08-11T15:52:01.224-0700 [INFO]  auth.handler: authentication successful, sending token to sinks
2019-08-11T15:52:01.224-0700 [INFO]  auth.handler: starting renewal process
2019-08-11T15:52:01.225-0700 [INFO]  sink.file: token written: path=approleToken
2019-08-11T15:52:01.225-0700 [DEBUG] cache.leasecache: storing auto-auth token into the cache
2019-08-11T15:52:01.226-0700 [INFO]  auth.handler: renewed auth token
In a new terminal, set the VAULT_AGENT_ADDR environment variable:
$ export VAULT_AGENT_ADDR="http://127.0.0.1:8007"
Execute the following command to create a short-lived token and see how agent manages its lifecycle:
$ VAULT_TOKEN=$(cat approleToken) vault token create -ttl=30s -explicit-max-ttl=2m
Key                  Value
---                  -----
token                s.YxECdPnyDXCohHiMi4PjRDyK
token_accessor       8ktIYwK3PisGMynw90GnMtuE
token_duration       30s
token_renewable      true
token_policies       ["default" "my_token_update"]
identity_policies    []
policies             ["default" "my_token_update"]
Note that the generated token has only 30 seconds before it expires. Also, its max TTL is 2 minutes; therefore, it cannot be renewed beyond 2 minutes from its creation.
Examine the agent log and it should include the following messages:
==> Vault server started! Log data will stream in below:

==> Vault agent configuration:

           Api Address 1: http://127.0.0.1:8007
                     Cgo: disabled
               Log Level: debug
                 Version: Vault v1.1.2
             Version Sha: 0082501623c0b704b87b1fbc84c2d725994bac54

2019-08-11T15:52:01.218-0700 [INFO]  sink.file: creating file sink
2019-08-11T15:52:01.220-0700 [INFO]  sink.file: file sink configured: path=approleToken
2019-08-11T15:52:01.220-0700 [DEBUG] cache: auto-auth token is allowed to be used; configuring inmem sink
2019-08-11T15:52:01.220-0700 [INFO]  auth.handler: starting auth handler
2019-08-11T15:52:01.221-0700 [INFO]  auth.handler: authenticating
2019-08-11T15:52:01.220-0700 [INFO]  sink.server: starting sink server
2019-08-11T15:52:01.224-0700 [INFO]  auth.handler: authentication successful, sending token to sinks
2019-08-11T15:52:01.224-0700 [INFO]  auth.handler: starting renewal process
2019-08-11T15:52:01.225-0700 [INFO]  sink.file: token written: path=approleToken
2019-08-11T15:52:01.225-0700 [DEBUG] cache.leasecache: storing auto-auth token into the cache
2019-08-11T15:52:01.226-0700 [INFO]  auth.handler: renewed auth token
2019-08-11T15:57:45.019-0700 [INFO]  cache: received request: path=/v1/auth/token/create method=POST
2019-08-11T15:57:45.020-0700 [DEBUG] cache.leasecache: forwarding request: path=/v1/auth/token/create method=POST
2019-08-11T15:57:45.020-0700 [INFO]  cache.apiproxy: forwarding request: path=/v1/auth/token/create method=POST
2019-08-11T15:57:45.023-0700 [DEBUG] cache.leasecache: processing auth response: path=/v1/auth/token/create method=POST
2019-08-11T15:57:45.023-0700 [DEBUG] cache.leasecache: setting parent context: path=/v1/auth/token/create method=POST
2019-08-11T15:57:45.023-0700 [DEBUG] cache.leasecache: storing response into the cache: path=/v1/auth/token/create method=POST
2019-08-11T15:57:45.026-0700 [DEBUG] cache.leasecache: initiating renewal: path=/v1/auth/token/create method=POST
2019-08-11T15:57:45.029-0700 [DEBUG] cache.leasecache: secret renewed: path=/v1/auth/token/create
2019-08-11T15:58:06.171-0700 [DEBUG] cache.leasecache: secret renewed: path=/v1/auth/token/create
2019-08-11T15:58:27.318-0700 [DEBUG] cache.leasecache: secret renewed: path=/v1/auth/token/create
2019-08-11T15:58:48.467-0700 [DEBUG] cache.leasecache: secret renewed: path=/v1/auth/token/create
2019-08-11T15:59:09.612-0700 [DEBUG] cache.leasecache: secret renewed: path=/v1/auth/token/create
2019-08-11T15:59:30.761-0700 [DEBUG] cache.leasecache: secret renewed: path=/v1/auth/token/create
2019-08-11T15:59:41.907-0700 [DEBUG] cache.leasecache: secret renewed: path=/v1/auth/token/create
2019-08-11T15:59:41.907-0700 [DEBUG] cache.leasecache: renewal halted; evicting from cache: path=/v1/auth/token/create
2019-08-11T15:59:41.907-0700 [DEBUG] cache.leasecache: evicting index from cache: id=7e7841dfedcc5a67e1257cfc5396b007b1fc09b74d960f614a32a38cf69cf210 path=/v1/auth/token/create method=POST
...
The request was first sent to VAULT_AGENT_ADDR (http://127.0.0.1:8007, agent proxy) and then forwarded to the Vault server (VAULT_ADDR). You should find an entry in the log indicating that the returned token was stored in the cache.
Re-run the command and observe the returned token value which should be the same token:
$ VAULT_TOKEN=$(cat approleToken) vault token create -ttl=30s -explicit-max-ttl=2m
Key                  Value
---                  -----
token                s.e2dHXWyL541aoxs2JtFyGCPd
token_accessor       mFCw9WdmdYb3DCiadr9nZFPf
token_duration       30s
token_renewable      true
token_policies       ["default" "my_token_update"]
identity_policies    []
policies             ["default" "my_token_update"]
The agent log indicates the following:
2019-08-11T16:08:10.633-0700 [INFO]  cache: received request: path=/v1/auth/token/create method=POST
2019-08-11T16:08:10.633-0700 [DEBUG] cache.leasecache: forwarding request: path=/v1/auth/token/create method=POST
Continue watching the agent log to see how it manages the token's lifecycle:
2019-08-11T16:08:10.633-0700 [DEBUG] cache.leasecache: forwarding request: path=/v1/auth/token/create method=POST
2019-08-11T16:08:10.633-0700 [INFO]  cache.apiproxy: forwarding request: path=/v1/auth/token/create method=POST
2019-08-11T16:08:10.636-0700 [DEBUG] cache.leasecache: processing auth response: path=/v1/auth/token/create method=POST
2019-08-11T16:08:10.636-0700 [DEBUG] cache.leasecache: setting parent context: path=/v1/auth/token/create method=POST
2019-08-11T16:08:10.636-0700 [DEBUG] cache.leasecache: storing response into the cache: path=/v1/auth/token/create method=POST
2019-08-11T16:08:10.636-0700 [DEBUG] cache.leasecache: initiating renewal: path=/v1/auth/token/create method=POST
2019-08-11T16:08:10.640-0700 [DEBUG] cache.leasecache: secret renewed: path=/v1/auth/token/create
2019-08-11T16:08:32.629-0700 [DEBUG] cache.leasecache: secret renewed: path=/v1/auth/token/create
2019-08-11T16:08:54.617-0700 [DEBUG] cache.leasecache: secret renewed: path=/v1/auth/token/create
2019-08-11T16:09:16.604-0700 [DEBUG] cache.leasecache: secret renewed: path=/v1/auth/token/create
2019-08-11T16:09:38.593-0700 [DEBUG] cache.leasecache: secret renewed: path=/v1/auth/token/create
2019-08-11T16:10:00.584-0700 [DEBUG] cache.leasecache: secret renewed: path=/v1/auth/token/create
Vault Agent renews the token before its TTL until the token reaches its maximum TTL (2 minutes). Once the token reaches its max TTL, agent fails to renew it because the Vault server revokes it:
2019-08-11T16:10:00.584-0700 [DEBUG] cache.leasecache: renewal halted; evicting from cache: path=/v1/auth/token/create
2019-08-11T16:10:00.584-0700 [DEBUG] cache.leasecache: evicting index from cache: id=7e7841dfedcc5a67e1257cfc5396b007b1fc09b74d960f614a32a38cf69cf210 path=/v1/auth/token/create method=POST
When the token renewal failed, the agent automatically evicts the token from the cache since it's a stale cache.
Credit - Vault Agent