- skills_centos
- 将本机的/root/client/拷贝至远程的202.112.23.12:/home/work/目录
- -a:-a, 即 --archive,archive mode; equals -rlptgoD (no -H,-A,-X) (相当于-rlptgoD) ,其中 -r 是递归的意思
- -v:打印过程中的一些信息
- --progress:查看拷贝的过程
- -u:指定不覆盖原目录内容
- -q:不打印非错误的消息(有错误还是会打印到控制台上的)
- 压缩文件
- 解压缩文件(记忆敲门: 至孝潍坊)
- 解压缩到指定路径
- 24 su与sudo
- 25 权限管理
- 26 系统服务管理(CentOS 6.9)
- 27 定时任务(CentOS 6.9)
- 28 lrzsz命令
- 29 用户管理
- 30 cd - :cd 减号,切换到上一个所在目录中
- 31 tree {目录}
- 32 && 和 ||
- 33 创建软链接(快捷方式)
- 34 清理内存和Cache
- 35 进程前后台转换的操作
- 36 查看CPU温度
- 37 centos7 永久修改主机名如果要修改静态主机名,修改/etc/hostname
- 38 centos7.7部署memcached
- 39 centos7将docker配置成开机启动
- 40 linux(centos6.9)下使用yum安装mysql,及启动MySQL等
- 41 ssh命令
- 42
skills_centos
1 永久关闭蜂鸣器提示音(滴滴声,哔哔声)方法
执行:echo "rmmod pcspkr" >> /etc/rc.d/rc.local
授权:chmod +x /etc/rc.d/rc.local
但是有的电脑上会提示:rmmod: ERROR: Module pcspkr is not currently loaded
可以用该方法:vim /etc/inputrc
找到 #set bell-style none,将前面的#去掉,保存。但是在用vim时,还是会有哔哔声。
这2种方法最后都要重启:reboot
2 安装ifconfig
yum install net-tools.x86_64
3 永久修改主机名(和ubuntu相同)
3.1 centos7,centos8中
sudo vim /etc/hostname
然后直接修改hostname文档中的主机名即可。
重启后生效,或者直接执行命令: hostname 主机名。
3.2 centos6.10中
vim /etc/sysconfig/network
然后设置主机名: HOSTNAME=xxx
4 永久修改IP地址
4.1 centos6,centos7中
centos6.10: vim /etc/sysconfig/network-scripts/ifcfg-eth0
centos7.7,centos8: vim /etc/sysconfig/network-scripts/ifcfg-ens33
BOOTPROTO="static"
DEFROUTE="yes"
IPV4_FAILURE_FATAL="no"
IPV6INIT="yes"
IPV6_AUTOCONF="yes"
IPV6_DEFROUTE="yes"
IPV6_FAILURE_FATAL="no"
IPV6_ADDR_GEN_MODE="stable-privacy"
NAME="ens33"
UUID="1738c25c-cbd7-42cd-bf2f-2c203ee15148"
DEVICE="ens33"
ONBOOT="yes"
IPADDR=192.168.6.16
NETMASK=255.255.255.0
GATEWAY=192.168.6.1
DNS1=221.228.255.1
DNS2=218.2.135.1
PREFIX=24
IPV6_PEERDNS=yes
IPV6_PEERROUTES=yes
IPV6_PRIVACY=no
参数说明:
DEVICE:此配置文件应用到的设备
HWADDR:对应的设备的MAC地址
BOOTPROTO:激活此设备时使用的地址配置协议,常用的dhcp, static, none,bootp
NM_CONTROLLED: NM是NetworkManager的简写,此网卡是否接受NM控制;建议CentOS6为“no”
ONBOOT:在系统引导时是否激活此设备
TYPE:接口类型;常见有的Ethernet, Bridge
UUID:设备的惟一标识
IPADDR:指明IP地址
NETMASK:子网掩码
GATEWAY: 默认网关
DNS1:第一个DNS服务器指向
DNS2:第二个DNS服务器指向
USERCTL:普通用户是否可控制此设备
IPV4_FAILURE_FATAL 如果为yes,则ipv4配置失败禁用设备
最后重启网卡服务: systemctl restart network
5 配置时间同步服务
5.1 centos7中使用ntp
yum install -y ntp
service ntpd start 启动ntp服务
chkconfig ntpd on 设置开机启动
同步大概需要 5 - 10 分钟, 然后查看是否已经是同步状态即可:ntpstat
5.2 centos8中使用chrony(有报错timeout)
centos8默认不支持ntp了,改为使用chrony,也很简单。不过有报错timeout
# 1.安装chrony
yum install -y chrony
# 2.编辑chrony配置文件,添加2个时间同步服务器
vim /etc/chrony.conf

# Use public servers from the pool.ntp.org project.
# Please consider joining the pool (http://www.pool.ntp.org/join.html).
# pool 2.centos.pool.ntp.org iburst
server 210.72.145.44 iburst
server ntp.aliyun.com iburst
# 3.重新加载配置
systemctl restart chronyd.service
# 不过有报错:
Feb 09 14:39:13 1f7ae74ff02f systemd[1]: chronyd.service: Start-post operation timed out. Stopping.
Feb 09 14:39:13 1f7ae74ff02f systemd[1]: chronyd.service: Failed with result 'timeout'.
Feb 09 14:39:13 1f7ae74ff02f systemd[1]: Failed to start NTP client/server.
# 4.时间同步
chronyc sources -v
5.3 centos8中使用ntp(貌似没有后台自动操作)
# 添加wlnmp源
rpm -ivh http://mirrors.wlnmp.com/centos/wlnmp-release-centos.noarch.rpm
# 安装ntp服务
yum install -y wntp
# 时间同步
ntpdate ntp1.aliyun.com
6 修改hosts文件,添加本机IP和本机主机名的条目
vim /etc/hosts
192.168.1.100 hostname1 #本机IP 本机的主机名
7 关闭SELinux
vim /etc/selinux/config
这一行注释掉: SELINUX=enforcing
增加这一行: SELINUX=disabled
8 关闭防火墙
8.1 centos7,centos8中
查看防火墙状态:systemctl status firewalld.service
绿的running表示防火墙开启
关闭防火墙:systemctl stop firewalld.service
再次查看防火墙:systemctl status firewalld.service
开机自启防火墙:systemctl enable firewalld.service
开机时禁止防火墙自启:systemctl disable firewalld.service
8.2 centos6.10,centos7中
关闭防火墙:service iptables stop
开机是禁止防火墙自启:chkconfig iptables off
9 拷贝复制文件到远程主机,但是不覆盖已经存在文件
本地拷贝,可以使用cp命令的-n参数,但scp却没这个参数,所以不能使用scp命令,但是可以使用rsync命令,它比scp更强大,支持“不覆盖”原目录。
安装: yum -y install rsync
eg1. rsync -avz --progress /root/client/ root@202.112.23.12:/home/work/
将本机的/root/client/拷贝至远程的202.112.23.12:/home/work/目录
-a:-a, 即 --archive,archive mode; equals -rlptgoD (no -H,-A,-X) (相当于-rlptgoD) ,其中 -r 是递归的意思
-v:打印过程中的一些信息
--progress:查看拷贝的过程
eg2. rsync -avzuq --progress /root/.halo/upload/ asus:/home/witt/Bak/.halo/upload/
-u:指定不覆盖原目录内容
-q:不打印非错误的消息(有错误还是会打印到控制台上的)
10 shell脚本添加开机自启动
方法一(实测无效)
1、赋予脚本可执行权限(/opt/script/psubscribe.sh是你的脚本路径)
chmod 777 /data/aliyun51015cn/redisChannel/psubscribe.sh
2、打开/etc/rc.d/rc.local文件,在末尾增加如下内容
echo "/data/aliyun51015cn/redisChannel/psubscribe.sh" >> /etc/rc.d/rc.local
3、在centos7中,/etc/rc.d/rc.local的权限被降低了,所以需要执行如下命令赋予其可执行权限
chmod +x /etc/rc.d/rc.local
方法二(centos7.7上实测无效,并且man 5 crontab发现@reboot的说明是重启时才生效,不过测试下来发现重启时也无效)
crontab -e
@reboot  ( sleep 60; /usr/local/sbin/halo start )
方法三(实测无效,按照这个方法操作后,无法远程ssh到主机了)
1、首先创建控制程序的脚本
为了方便演示,将启动和停止函数中代码修改为了对应的echo命令输出信息;使用时替换掉StartAgent()和StopAgent()函数内代码即可!
[root@imzcy ~]# cat imzcy.sh
#!/bin/bash
# chkconfig: 2345 79 80
# description: Starts and stops uavagent.
# author: zcy
# site: https://www.imzcy.cn

### BEGIN My Functions
StartAgent(){
                sleep 2
                echo "start script..."
}

StopAgent(){
                sleep 2
                echo "stop script..."
}
### END My Functions

case $1 in
start)
      StartAgent
      ;;
stop)
      StopAgent
      ;;
restart)
      StopAgent
      StartAgent
      ;;
*)
      echo "Usage: $0 {start|stop|restart}"
      exit 1
esac
2、测试脚本是否能正常执行并且是否达到预期效果
[root@imzcy ~]# chmod u+x imzcy.sh

[root@imzcy ~]# ./imzcy.sh start
start script...
[root@imzcy ~]#

[root@imzcy ~]# ./imzcy.sh stop
stop script...
[root@imzcy ~]#

[root@imzcy ~]# ./imzcy.sh restart
stop script...
start script...
[root@imzcy ~]#

[root@imzcy ~]# ./imzcy.sh test
Usage: ./imzcy.sh {start|stop|restart}
3、使用 chkconfig 命令将脚本添加为系统服务,并测试启动和停止服务
[root@imzcy ~]# cp imzcy.sh /etc/init.d/imzcy
[root@imzcy ~]# chmod 755 /etc/init.d/imzcy
[root@imzcy ~]# chkconfig --add imzcy

[root@imzcy ~]# service imzcy start
start script...
[root@imzcy ~]# service imzcy stop
stop script...
4、常见问题
4.1、将脚本添加为服务时报错:服务不支持 chkconfig
[root@imzcy ~]# chkconfig --add imzcy
imzcy 服务不支持 chkconfig
解决方法:
出现上面那个报错,一般是/etc/init.d/下自定义的脚本中没有指明运行级别及启动、停止优先级。请尽量在脚本文件的第二行指明以下配置,以免遗漏。
# chkconfig: 2345 79 80
方法四、添加为系统服务并设置开机自启
eg. 设置halo系统的开机自启。
虽然halo的启动是java -jar,并非shell脚本,不过两者差不多的。而且,这个可以作为一个模板。
- 添加halo到系统服务
# 创建/etc/init.d/halo脚本
vim /etc/init.d/halo
# 脚本内容如下
#!/bin/bash
# chkconfig: 2345 79 80

DAEMON=/usr/local/nginx/sbin/nginx
JAVA_OPTS='-Dcom.sun.management.jmxremote -Djava.rmi.server.hostname=192.168.6.16 -Dcom.sun.management.jmxremote.port=9088 -Dcom.sun.management.jmxremote.authenticate=false -Dcom.sun.management.jmxremote.ssl=false'
JAVA_BIN=/usr/java/jdk1.8.0_231/bin

num=$(ps -ef | grep -v grep | grep -c "java $JAVA_OPTS -Xms256m -Xmx256m -jar /root/.halo/halo-1.2.1.jar")
pid=$(ps -ef | grep "java $JAVA_OPTS -Xms256m -Xmx256m -jar /root/.halo/halo-1.2.1.jar" | grep -v grep | awk '{print $2}')

# echo arg == $1
# echo num == $num
# echo pid == $pid

case "$1" in
  start)
    echo "Starting halo..."
    if [ $num -ge 1 ];then
      echo "Halo is already started, so you don't need to start it again!"
    else
      nohup $JAVA_BIN/java $JAVA_OPTS -Xms256m -Xmx256m -jar /root/.halo/halo-1.2.1.jar >> /root/.halo/halo.log 2>&1 &
      echo "Success!"
    fi
  ;;

  stop)
    echo "Stopping halo..."
    if [ $num -ge 1 ];then
      kill -9 $pid
      echo "Success!"
    else
      echo "Halo may be not started. Please check!"
    fi
  ;;

  #reload)
  #  echo "Reloading nginx daemon..."
  #  $DAEMON -s reload && echo "SUCCESS"
  #;;

  restart)
    echo "Restarting halo..."
    if [ $num -ge 1 ];then
      kill -9 $pid
    fi
    sleep 2
    nohup $JAVA_BIN/java $JAVA_OPTS -Xms256m -Xmx256m -jar /root/.halo/halo-1.2.1.jar >> /root/.halo/halo.log 2>&1 &
    echo "Success!"
  ;;

  status)
    # echo "$(ps aux | grep -c -e 'nginx:\s\(master\|worker\)\sprocess')"
    # echo "$(ps aux | grep -e 'nginx:\s\(master\|worker\)\sprocess')"

    # if [ $(ps aux | grep -c -e 'nginx:\s\(master\|worker\)\sprocess') -ge 2 ];then
    #   echo "nginx daemon is running..."
    # elif [ $(ps aux | grep -c -e 'nginx:\s\(master\|worker\)\sprocess') -eq 0 ];then
    #   echo "nginx daemon is dead..."
    # fi

    if [ $num -ge 1 ];then
      echo "Halo is running! PID: $pid !"
    else
      echo Halo is dead!
    fi
  ;;

  *)
    # echo "Usage: systemctl {start|stop|restart|reload|status} nginx"
    echo "Usage: service halo {start|stop|restart|status}"
    exit 2
  ;;
esac
- 使用方法:
Usage: service halo {start|stop|restart|status} - 设置开机自动启动halo
chkconfig --add halo # 设置开机自启
chkconfig --list # 检查是否设置成功
# 如果包含以下内容,则表明设置成功
halo           	0:关	1:关	2:开	3:开	4:开	5:开	6:关
11 查看CentOS系统版本
11.1 centos7,centos8中
方法1:rpm -q centos-release
方法2:cat /etc/redhat-release
11.2 其他系统
- weblogic@tynr1618-sit:/tmp/test> cat /etc/issue
Welcome to SUSE Linux Enterprise Server 11 SP3 (x86_64) - Kernel \r (\l). - weblogic@tynr1618-sit:/tmp/test> lsb_release -a (-a可加可不加)
12 查看Linux内核版本命令(两种方法)
- cat /proc/version
[root@S-CentOS home]# cat /proc/version
Linux version 2.6.32-431.el6.x86_64 (mockbuild@c6b8.bsys.dev.centos.org) (gcc version 4.4.7 20120313 (Red Hat 4.4.7-4) (GCC) ) #1 SMP Fri Nov 22 03:15:09 UTC 2013

weblogic@tynr1618-sit:/tmp/test> cat /proc/version
Linux version 3.0.76-0.11-default (geeko@buildhost) (gcc version 4.3.4 [gcc-4_3-branch revision 152973] (SUSE Linux) ) #1 SMP Fri Jun 14 08:21:43 UTC 2013 (ccab990)
- uname -a
[root@S-CentOS home]# uname -a
Linux S-CentOS 2.6.32-431.el6.x86_64 #1 SMP Fri Nov 22 03:15:09 UTC 2013 x86_64 x86_64 x86_64 GNU/Linux

weblogic@tynr1618-sit:/tmp/test> uname -a
Linux tynr1618-sit 3.0.76-0.11-default #1 SMP Fri Jun 14 08:21:43 UTC 2013 (ccab990) x86_64 x86_64 x86_64 GNU/Linux
13 手动设置时区
13.1 centos7,centos8中
# 查看时区信息
[root@tmpt01 ~]# timedatectl
# 设置为Shanghai时区
[root@tmpt01 ~]# timedatectl set-timezone Asia/Shanghai
也可以先生成时区配置文件Asia/Shanghai,用交互式命令 tzselect 即可;再拷贝该时区文件,覆盖系统本地时区配置:
# 利用tzselect命令生成时区配置文件
[root@node03 azkaban-web-server-3.51.0]# tzselect
Please identify a location so that time zone rules can be set correctly.
Please select a continent or ocean.
3) Antarctica
4) Arctic Ocean
5) Asia
#? 5
Please select a country.
7) Brunei	24) Kuwait	41) Sri Lanka
8) Cambodia	25) Kyrgyzstan	42) Syria
9) China	26) Laos	43) Taiwan
#? 9
Please select one of the following time zone regions.
1) Beijing Time
2) Xinjiang Time
#? 1

The following information has been given:

China
Beijing Time

Therefore TZ='Asia/Shanghai' will be used.
Local time is now:	Tue Jun 25 20:24:16 CST 2019.
Universal Time is now:	Tue Jun 25 12:24:16 UTC 2019.
Is the above information OK?
1) Yes
2) No
#?Yes

# 再拷贝该时区文件,覆盖系统本地时区配置
cp /usr/share/zoneinfo/Asia/Shanghai /etc/localtime
(注:由于先前做好了时钟同步(同步阿里云的时间),所以不用担心时区问题,不需要修改时区了。)
14 安装service命令
14.1 centos7,centos8中
service命令不可用
提示:bash: service: command not found...
1、执行:yum list | grep initscripts,可查看可安装软件的yum源版本:
initscripts.x86_64 9.49.30-1.el7_2.3 updates
2、执行:yum install initscripts
15 nmcli的安装 - centos7,centos8
安装:yum -y install NetworkManager
启用:systemctl start NetworkManager.service或者service NetworkManager start
使用说明,参考链接:https://www.cnblogs.com/qianyuliang/archive/2019/09/26/11591970.html#top
16 nfs的安装和使用 - centos8
-
配置共享目录:
创建用于共享的目录:mkdir /share
设置目录权限777:chmod 777 /share
配置/share为共享目录(语法:路径 IP段(权限)):echo '/share *(rw)' > /etc/exports
重新加载nfs:systemctl reload nfs-server -
安装nfs
不一定要执行这句:yum -y update
安装:yum -y install nfs-utils
配置:vim /etc/nfs.conf
在[mountd]下方,找到port参数,解除注释,然后设置为port=892
设置开机自启,并立刻启动:systemctl enable --now rpcbind nfs-server
执行systemctl start nfs-server或systemctl start nfs-server报错:
[root@node6 /]# systemctl status nfs-server
● nfs-server.service - NFS server and services
   Loaded: loaded (/usr/lib/systemd/system/nfs-server.service; enabled; vendor preset: disabled)
  Drop-In: /run/systemd/generator/nfs-server.service.d
           └─order-with-mounts.conf
   Active: failed (Result: exit-code) since Thu 2020-02-13 22:40:33 CST; 2min 2s ago
  Process: 2322 ExecStopPost=/usr/sbin/exportfs -f (code=exited, status=0/SUCCESS)
  Process: 2321 ExecStopPost=/usr/sbin/exportfs -au (code=exited, status=0/SUCCESS)
  Process: 2301 ExecStartPre=/usr/sbin/exportfs -r (code=exited, status=1/FAILURE)
 Main PID: 1236 (code=exited, status=0/SUCCESS)
初步原因:/etc/exports中有设置共享的文件夹。
解决方法:删除/etc/exports中设置的共享文件夹,再次启动即可。
再次在/etc/exports中设置共享文件夹后,使用exportfs实用程序有选择地导出目录(无需重新启动NFS服务):
$ sudo exportfs -rav
报错:exportfs: /share does not support NFS export
原因:可能时版本不兼容。
当前是centos8版本,安装的是nfs-utils-1:2.3.3-26.el8.x86_64,在centos7中安装的nfs-utils.x86_64 1:1.3.0-0.65.el7,可以正常使用。
解决方法:更换为centos7的docker镜像。
17 centos8下安装和使用防火墙
安装dnf:
1)运行命令:yum install epel-release -y
2)运行命令:yum install dnf -y
安装firewall:sudo dnf install firewalld
查看防火墙状态:firewall-cmd --state
参考链接:https://blog.csdn.net/XXX1238XGH/article/details/103805814
18 永久设置IP别名,永久修改IP地址 - centos8
- 永久设置IP别名:
vim /etc/rc.local
# 在末尾添加如下语句,可启动后自动执行生效
ifconfig eth0:1 172.17.0.16 broadcast 172.17.255.255 netmask 255.255.0.0 up
route add -host 172.17.0.16 dev eth0:1
ifconfig eth0:2 172.17.0.122 broadcast 172.17.255.255 netmask 255.255.0.0 up
route add -host 172.17.0.122 dev eth0:2
- 永久修改IP地址:
vim /etc/rc.local
# 在末尾添加如下语句,可启动后自动执行生效
ifconfig eth0 172.17.0.11
最后千万记得赋予可执行权限:chmod +x /etc/rc.d/rc.local
19 nohup command 2>&1 &的含义
nohup:no hang up,意思是不挂断。表示永久执行命令,哪怕当前终端已经退出登录。
并且命令前面添加nohup之后,会把原来打印到屏幕上的信息都追加到nohup.out文件中。(nohup: ignoring input and appending output to `nohup.out')
&:后台执行命令。
当命令使用nohup &运行以后,标准都错误都输出到2去了,console上看不到输出的错误。
因此,2>&1,起到了一个重定向都作用,将标准错误重定向到标准输出上去,后台运行的程序就可以在屏幕上看到程序输出的错误了。
eg. nohup bin/hive --service hiveserver2 2>&1 &
20 如何去掉nohup: redirecting stderr to stdout提示
每次执行:nohup java -Xms256m -Xmx256m -jar /root/.halo/halo-1.1.1.jar > /root/.halo/halo.log &, 都会有一个提示nohup: redirecting stderr to stdout, 翻译过来就是“重定向标准错误到标准输出”。
现象是控制台输出的信息一部分输出到了我指定的文件,另一部分却输出到了nohup.out,而我是不想让它产生nohup.out文件。
解决方法: “&” 改成 “2>&1 &”。
即nohup java -Xms256m -Xmx256m -jar /root/.halo/halo-1.1.1.jar > /root/.halo/halo.log 2>&1 &
2> 表示把标准错误(stderr)重定向,标准输出(stdout)是1。
尖括号后面可以跟文件名,或者是&1, &2,分别表示重定向到标准输出和标准错误。
eg. 2>&1 ; 1>&2 ; 2>stderr.log ; 1>stdout.log
扩展:
- 在 shell 程式中,最常使用的 FD (file descriptor 文件描述符) 大概有三个, 分别是: 0 表示标准输入(stdin),一般是键盘录入;1 表示标准输出(stdout),一般是屏幕;2 表示标准错误(stderr)。
java -jar ***.jar >/dev/null 2>&1,这个的含义是:将标准错误重定向到标准输出。这里标准输出已经重定向到了 /dev/null。那么标准错误也会输出到/dev/null。
21 /dev/null 和 /dev/zero的区别
- /dev/null:表示 的是一个黑洞,通常用于丢弃不需要的数据输出, 或者用于输入流的空文件。
- 将无用的输出流写入到黑洞丢弃。
curl -Iwww.baidu.com 2>/dev/null | head -l 错误信息定位到黑洞 - 清空文件:cat /dev/null > /home/omc/h.txt
- 在书写定时任务时,规范的写法就是将所有定时任务脚本结尾加上>/dev/null 2>&1,让所有的输出流(包括错误的和正确的)都定向到空设备丢弃。
00 01 * * * /bin/sh/server/scripts/mysqlbak.sh >/dev/null 2>&1
- 将无用的输出流写入到黑洞丢弃。
- /dev/zero:当我们使用或者读取他的时候,她是会提供无限连续不断的空的数据流
- 覆盖其他的文件信息
- 产生指定大小的空文件,如交换文件,模拟虚拟文件系统
参考链接:https://www.cnblogs.com/ftl1012/p/9249279.html
22 查看当前登录用户名
who查看当前登录的所有用户who am i查看当前登录用户,只显示自己的用户名,su命令 切换用户后,该命令的结果不变whoami查看当前登录用户,只显示自己的用户名,su命令 切换用户后,该命令的结果也跟着变化last所有用户的所有的登录日志lastlog系统所有用户的最近登录的时间
23 文件/目录常用命令

23.1 文件操作
创建文件:
touch itcast
echo ‘sldkjf’ > itcast3
vi vim itcast2 --> i a o 进入编辑模式
保存文本文件: :wq :q :q!
在vi/vim打开的文本文件内查找文本: /HADOOP 查找下一个 按n / N
23.2 目录操作
创建目录: mkdir itcast4
删除目录:rm itcast4 如果其下有多个子目录的情况: rm –rf itcast4
rmdir itcast5 从一个目录中删除一个或多个子目录项
修改目录名称:mv itcast4 itcast444
23.3 查看文件内容

cat filename
head -n 2 itcast6 查看大文件,查看该文件的头2行. equals head -2 itcast6
tail -100 itcast6 查看该文件的末尾100行
tail -f itcast6 监视该文件的末尾10行(默认)
tail -100f itcast6 查看大文件,监视该文件的末尾100行(不写数字的话,默认10行),不断刷新。
23.4 文件搜索
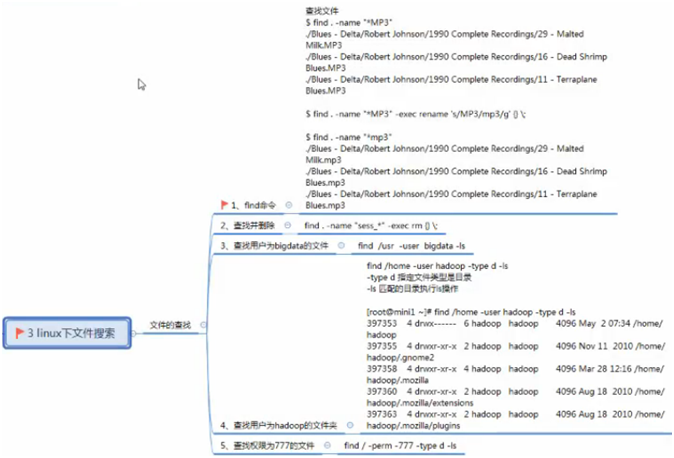
find . -type f -name 'itcast' -size +100M 查找itcast开头的文件
find . -type d -name 'itcast' -exec rm -rf {} ; 查找并删除itcast开头的目录
find /home -user root -type f -ls 查找所有者为hadoop,且类型为文件的文件,并列举出来
find / -perm 777 -type l -ls 查找权限为777,且类型为链接的文件,并列举出来
注意:find命令不能搜索文件内部的文本!
23.5 文本处理

grep root /etc/passwd > itcast7.txt # 搜索所有包含root文本的行,并放到itcast7.txt文件中(如不存在则创建)
grep ^mail /etc/passwd grep支持正则表达式,查找passwd文件中,以mail开头的行
grep -n haha test* #搜索搜索以test开头的文件的内容中,包含字符串haha的行,并加上行号打印出来
find . -type d | grep vmware-tools-distrib/lib/ic # 查询find结果中所有包含vmware-tools-distrib/lib/ic # 字符串的结果行
find . -type f | xargs grep mail # 查找当前目录下的所有文件中,包含文本mail的文件
ps -ef | grep sshd 查找指定 ssh 服务进程
ps -ef | grep sshd | grep -v grep 查找指定服务进程,排除 gerp 本身
ps -ef | grep sshd –c 查找指定进程个数
cat a.txt | grep -f b.txt 从文件中读取关键词进行搜索
输出 a.txt 文件中含有从 b.txt 文件中读取出的关键词的内容行
cat a.txt | grep –nf b.txt 从文件中读取关键词进行搜索,显示行号
grep -n 'hello' a.txt 从文件中查找关键词,并显示行号
cat test.txt |grep ^u 找出以 u 开头的行内容
cat test.txt |grep [u] 输出非 u 开头的行内容
cat test.txt |grep hat$ 输出以 hat 结尾的行内容
cat test.txt |grep -E "ed|at" 显示包含 ed 或者 at 字符的内容行
练习:通过xargs杀死某一批进程: 方法一、传统方法kill -9 pid ?
以下内容了解即可,不常用到:
locate:很快速的搜寻档案系统内是否某些字符串开头的文件
updatedb
locate /etc/sh
locate pwd
whereis 查找可执行文件、源代码文件(即命令)
which:查找系统环境变量中的可执行命令。(范围比whereis狭窄,只在path环境变量中查找)
23.6 文本传输

scp -r node01:/export/servers/cmds 将node01服务器上的cmds文件夹,递归拷贝到本地的当前目录。
23.7 备份压缩
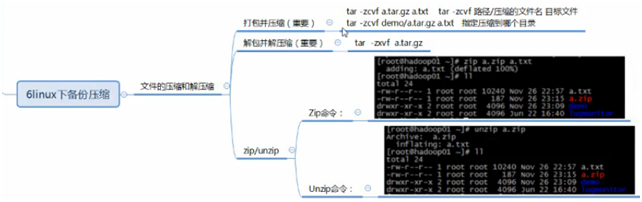
压缩文件
tar -zcvf 打包压缩文件名.tar.gz 被压缩的文件/目录
解压缩文件(记忆敲门: 至孝潍坊)
tar -zxvf 打包文件.tar.gz
解压缩到指定路径
tar -zxvf 打包文件.tar.gz -C 目录路径
-z 用gzip格式来压缩/解压缩,后缀名为.tar.gz
-f 压缩/解压缩的文件名 所以其后一定要跟一个压缩文件名称
命令 英文 含义
-z gzip 使用gzip压缩和解压缩,后缀名为.tar.gz
-j bzip2 使用bzip2压缩和解压缩,后缀名为.tar.bz2
-c create 生成档案文件, 创建打包文件
-v verbosely(啰嗦的) 像 唐僧 一样报告进度
-f file 指定档案的文件名称, f后面一定是 .tar 文件, 所以必须放到左后
-x extract (提取) 解包
-C (大写C) directory (目录) 默认保存到当前目录, 通过-C 更改解压目录, 注意: 解压目录必须存在
eg1. tar -zxvf test.tar.gz -C tes2/ # 解压缩到指定目录
eg2. zip -q -r data.zip /home/data # 将/home/data 这个目录下的所有文件打包压缩为当前目录下的data.zip
eg3. unzip test.zip -d /tmp # 将压缩文件text.zip在指定目录/tmp下解压缩
24 su与sudo
su user1 切换成账户user1,需要输入密码(除了root切换到普通或虚拟用户不需要)。且,切换成功后,切换前的用户依然保持登录状态。
sudo vim /etc/profile 使普通用户临时具有root账户的权限。只需输入自己账户的密码即可。前提:该用户必须在/etc/sudoers 文件中有配置项。
命令visudo: hadoop ALL=(ALL) ALL
eg. hadoop node-23=(allen) /bin/kill 让 hadoop 用户在 node-23 主机上以 allen 的身份执行 kill 命令.
25 权限管理
chown -R hadoop:hadoop abc.txt
chmod 777 abc.txt
chmod -R 777 /user/test/
26 系统服务管理(CentOS 6.9)
service [ iptables | sshd ... ] [ start | stop | restart | status ]
service --status-all  # 查看指定的后台服务进程的状态
chkconfig iptables [ on | off ]  # 设置防火墙开机自启/禁用
27 定时任务(CentOS 6.9)
yum install crontabs
crontab [ -u witt ] -e -l -r
service crond reload # 重新载入配置
chkconfig crond --list ## 查看 crontab 服务是否已设置为开机启动

eg. 配置虚拟机时钟同步
*/1 * * * * /usr/sbin/ntpdate ntp4.aliyun.com
(注:分(1~59) 时(0~23) 日(1~31) 月(1~12) 周(0~6, 0表示星期天) 命令)
28 lrzsz命令
yum -y install lrzsz # 安装linux上传下载文件的软件
当通过ssh远程登录到系统时,可以直接从windows系统拖动文件到linux系统的远程登录界面上。也可通过输入命令rz(上传文件到linux),sz(从linux下载文件)。
29 用户管理
添加用户:useradd hadoop
设置密码:passwd hadoop
普通用户创建后,都会在/home/下创建一个文件夹,root特殊,其家目录有一个自己独立的目录/root/
30 cd - :cd 减号,切换到上一个所在目录中
31 tree {目录}
以树状图列出目录中的内容。
tree # default directory is the current directory
tree /root # specify the directory
tree -d # show only directories
tree -L num 目录 # 显示几层目录
yum -y install tree # 安装 tree组件
yum -y remove tree # 卸载 tree组件
32 && 和 ||
命令1 && 命令2 : 如果 命令1执行成功了, 才执行 命令2
命令1 || 命令2 : 如果 命令1 执行失败了, 才执行 命令2
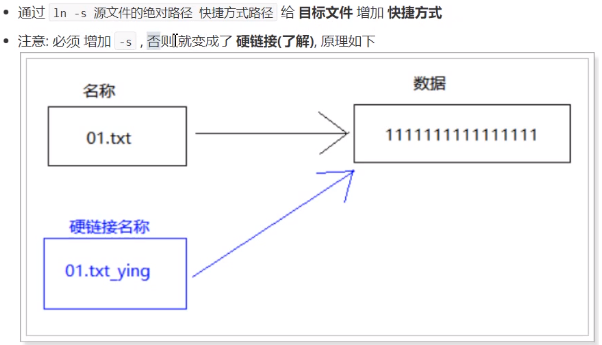
33 创建软链接(快捷方式)

语法:ln -s 目标文件绝对路径 快捷方式路径
ln -s /export/a/b/c/d/e/f/g sec_abcde # 创建软链接
cd /export/a/b/c/d/e/f/g # 进入某个目录下
cd sec_abcde/ # 和上一个命令 进入同一个目录下, ll命令显示的内容和上一个命令相同
34 清理内存和Cache
An inode in your context is a data structure that represents a file. A dentries is a data structure that represents a directory. 在这个上下文中的inode是表示文件的数据结构,而dentries是表示目录的数据结构。
These structures could be used to build a memory cache that represents the file structure on a disk. To get a directly listing, the OS could go to the dentries–if the directory is there–list its contents (a series of inodes). If not there, go to the disk and read it into memory so that it can be used again. 这些结构可用于构建表示磁盘上的文件结构的内存高速缓存。为了直接获得列表,操作系统可以去dentries那里(如果目录在那里的话)列出其内容(一系列inode)。如果没有,则会去磁盘上将其读入内存,以便它可以再次使用。
The page cache could contain any memory mappings to blocks on disk. That could conceivably be buffered I/O, memory mapped files, paged areas of executables–anything that the OS could hold in memory from a file. 页面缓存(page cache)可以包含磁盘块的任何内存映射。这可以是缓冲I/O,内存映射文件,可执行文件的分页区域——操作系统可以从文件保存在内存中的任何内容。
如何释放pagecache/dentries/inodes:
To free pagecache:
# echo 1 > /proc/sys/vm/drop_caches
To free dentries and inodes:
# echo 2 > /proc/sys/vm/drop_caches
To free pagecache, dentries and inodes:
# echo 3 > /proc/sys/vm/drop_caches
小结:一般是执行2-4次 sync命令,再执行 echo 3 > /proc/sys/vm/drop_caches 。
注:/proc/sys/vm/drop_caches,该文件每次重启,内容都会重置为0
35 进程前后台转换的操作
command & //将进程放在后台执行
ctrl-z //暂停当前进程 并放入后台
jobs //查看当前后台任务
bg //将任务转为后台执行
fg //将任务调回前台
kill //杀掉任务
如果我们在终端中直接运行一GUI程序,一般情况下,终端就会被当前进程占用了。如果我们想把它放到后台运行有两种方法:
- command & 在运行的命令后加一个&号,就会后台运行命令。
- ctrl-z 在终端中按ctrl-z 会将当前任务暂停并转入后台; 利用jobs命令可以查看当前后台的任务; 如果在jobs命令后增加 -l 参数 那么就会显示详细信息。
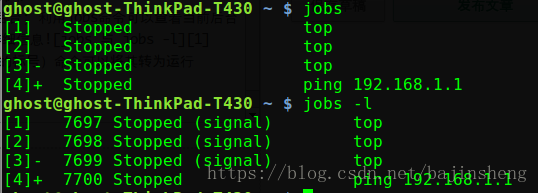
jobs 和 jobs -l 区别:
可以发现终止的进程状态为Stopped 通过bg %i (i为进程的标号)命令可以将其转为运行。
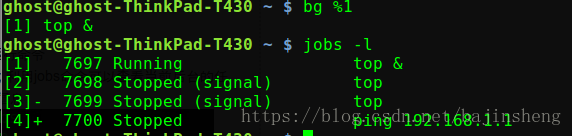
bg将停止转换成运行。
如果想要将任务切换回前台,可以利用fg %i命令。
如果想要结束任务,可以利用kill %i命令。
36 查看CPU温度
先检查是否安装了lm_sensors:$ rpm -q lm_sensors
如果没有安装,就先安装sensors: $ sudo yum install -y lm_sensors
检测传感器: $ sudo sh -c "yes|sensors-detect" 或者 sensors-detect --auto(该命令执行的非常快,不知道到底有没有检测)
如果以上步骤没有问题,执行下面的命令就可以查看CPU的温度了: $ sensors
查看结果如下:
[root@lenovo develop]# sensors
coretemp-isa-0000
Adapter: ISA adapter
Core 0:       +40.0°C  (high = +76.0°C, crit = +100.0°C)
Core 1:       +33.0°C  (high = +76.0°C, crit = +100.0°C)

it8718-isa-0a10
Adapter: ISA adapter
in0:          +1.10 V  (min =  +0.03 V, max =  +0.02 V)  ALARM
in1:          +2.16 V  (min =  +0.00 V, max =  +4.08 V)
in2:          +2.16 V  (min =  +0.00 V, max =  +4.08 V)
+5V:          +2.96 V  (min =  +0.00 V, max =  +4.08 V)
in4:          +2.16 V  (min =  +0.00 V, max =  +4.08 V)
in5:          +0.06 V  (min =  +0.00 V, max =  +4.08 V)
in6:          +0.10 V  (min =  +0.00 V, max =  +4.08 V)
5VSB:         +2.99 V  (min =  +0.00 V, max =  +4.08 V)
Vbat:         +3.26 V
fan1:        1454 RPM  (min =    0 RPM)
fan2:           0 RPM  (min =    0 RPM)
fan3:           0 RPM  (min =    0 RPM)
temp1:        -78.0°C  (low  = +127.0°C, high = +127.0°C)  sensor = thermal diode
temp2:        +42.0°C  (low  = +127.0°C, high = +127.0°C)  sensor = thermistor
temp3:        -60.0°C  (low  = +127.0°C, high = +127.0°C)  sensor = Intel PECI
cpu0_vid:    +1.544 V
intrusion0:  ALARM
reference: https://blog.csdn.net/prophet10086/java/article/details/76263263
37 centos7 永久修改主机名如果要修改静态主机名,修改/etc/hostname
如果要修改静态主机名,修改/etc/hostname
修改好了之后,要重启一下服务器。输入 reboot
如果是centos7,可以仅仅重启服务:systemctl restart systemd-hostnamed
查看主机名命令 : hostname 或 cat /etc/hostname
38 centos7.7部署memcached
1.1 自动安装
Ubuntu/Debian:sudo apt-get install memcached
Redhat/Fedora/Centos:yum install memcached
1.2 源代码安装
# 安装依赖包
yum -y install gcc libevent-devel
下载,编译和安装memcached
wget -c http://www.memcached.org/files/memcached-1.4.33.tar.gz
tar -zxvf memcached-1.4.33.tar.gz
cd memcached-1.4.33
./configure && make && make install
# 添加到系统服务,并配置开机自启
cd scripts
cp memcached-init /etc/init.d/memcached
chkconfig --add memcached # 实测 这里没有安装service服务也没关系,也能开机自启
mkdir -p /usr/share/memcached/scripts
# 在memcached服务脚本中还调用了start-memcached脚本,需要复制该脚本文件到指定路径
cp start-memcached /usr/share/memcached/scripts/
cd ~
# 为start-memcached脚本中指定的路径创建链接
ln -s /usr/local/bin/memcached /usr/bin/memcached

# 目前memcached还无法启动,它里面的脚本还依赖于perl和start-stop-daemon,
# 其中start-stop-daemon是Debian系列发行版Linux系统中提供的命令,
# Centos系统需要单独下载安装才可以使用,具体操作如下
yum -y install gcc-c++ wget perl xz ncurses-devel

# dpkg_1.17.10.tar.xz, dpkg_1.18.25.tar.xz, dpkg_1.19.7.tar.xz都编译或安装失败
wget -c http://ftp2.cn.debian.org/debian/pool/main/d/dpkg/dpkg_1.17.27.tar.xz
tar -xvf  dpkg_1.17.27.tar.xz
cd dpkg-1.17.27
# 单独编译start-stop-daemon
./configure --without-libselinux && make
# 将编译后的start-stop-daemon程序复制到/usr/local/sbin/目录中使用
cp utils/start-stop-daemon /usr/local/sbin/

# 创建memcached配置文件
vim /etc/memcached.conf
# 添加以下配置
-m 512 # 分配的内存大小,单位是MB,默认是64MB
-p 11211 # 配置监听的TCP端口,默认为11211
-u nobody # 配置memcached工作用户
-c 1024 # 配置最高并发连接数,默认为1024
-t 16 # 配置使用的线程数,默认为4
# 上述配置中的选项可通过/usr/local/bin/memcached -h命令查看详细说明,
# 根据服务器的硬件能力合理配置即可。

# 启动memcached
service memcached start
# 配置防火墙
iptables -I INPUT -p tcp --dport 11211 -j ACCEPT
service iptables save
39 centos7将docker配置成开机启动
docker 服务器开机自启动:
- systemctl is-enabled docker.service 检查服务是否开机启动
- systemctl enable docker.service 将服务配置成开机启动
- systemctl start docker.service 启动服务
systemctl 相关其他命令:
systemctl disable docker.service 禁止开机启动
systemctl stop docker.service 停止
systemctl restart docker.service 重启
容器开机启动:
创建容器时候指定restart参数:
docker run -it -p 6379:6379 --restart=always --name redis -d redis
对已经创建的容器用docker update 更新:
docker update --restart=always xxx
--restart具体参数值详细信息 :
no - 容器退出时,不重启容器
on-failure - 只有在非0状态退出时才从新启动容器
always - 无论退出状态是如何,都重启容器
40 linux(centos6.9)下使用yum安装mysql,及启动MySQL等
查看系统自带的mysql版本: rpm -qa | grep mysql
卸载mysql: rpm -e mysql-libs-5.1.73-8.el6_8.x86_64 --nodeps
-
安装mysql 服务器端:
yum -y install mysql-server mysql-devel -
安装mysql客户端:
yum install mysql -
启动mysql服务:
service mysqld start或者/etc/init.d/mysqld start
停止:
service mysqld stop
重启:
service mysqld restart
4. 创建root管理员:
mysqladmin -u root password root
5.登陆
mysql -uroot -proot
6.root权限
GRANT ALL PRIVILEGES ON *.* TO root@"%" IDENTIFIED BY "root";
flush privileges;
设置mysql的开机启动:
chkconfig --add mysqld
chkconfig mysqld on
41 ssh命令
-
dos环境下的命令行窗口中好像没有ssh命令。(新版windows中好像也集成了)
-
linux的终端中,可以运行ssh命令,具体语法如下:
NAME
	ssh - connects to a host using the SSH protocol.

SYNOPSYS
	ssh [-pa ][-a ][-A ][-i user_key ][-J jump_host ][user:pass@]host[ port][;host[ port]]
		jump_host: [user:pass@]host[:port][,[user:pass@]host[:port]]

OPTIONS
	-pa    Use Password authentication. Ignore other auth parameters(-A -i).
	-a     Do not use Xagent for user authentication.
	-A     Use Xagent for user authentication.
	-i user_key     User key authentication.
	-J jump_host    Use jump host proxy.*
	user   Indicates the user's login name.
	pass   If pass is definded, use password authentication.
	host   Indicates the name, alias, or Internet address of the
	       remote host.
	port   Indicates a port number (address of an application).
	       If the port is not specified, the default ssh port
	       (22) is used.
eg1. ssh hostname1
eg2. ssh 10.1.1.3 9902