第一步:配置数据库 ,固定创建三张表 ,OAuth2 框架需要默认使用这三张表

我使用的时Mysql,工具为navcat
CREATE TABLE `oauth_access_token` (
  `token_id` varchar(256) DEFAULT NULL,
  `token` blob,
  `authentication_id` varchar(250) NOT NULL,
  `user_name` varchar(256) DEFAULT NULL,
  `client_id` varchar(256) DEFAULT NULL,
  `authentication` blob,
  `refresh_token` varchar(256) DEFAULT NULL,
  PRIMARY KEY (`authentication_id`)
) ENGINE=InnoDB DEFAULT CHARSET=utf8;
----------
CREATE TABLE `oauth_client_details` (
  `client_id` varchar(250) NOT NULL,
  `resource_ids` varchar(256) DEFAULT NULL,
  `client_secret` varchar(256) DEFAULT NULL,
  `scope` varchar(256) DEFAULT NULL,
  `authorized_grant_types` varchar(256) DEFAULT NULL,
  `web_server_redirect_uri` varchar(256) DEFAULT NULL,
  `authorities` varchar(256) DEFAULT NULL,
  `access_token_validity` int(11) DEFAULT NULL,
  `refresh_token_validity` int(11) DEFAULT NULL,
  `additional_information` varchar(4096) DEFAULT NULL,
  `autoapprove` varchar(256) DEFAULT NULL,
  PRIMARY KEY (`client_id`)
) ENGINE=InnoDB DEFAULT CHARSET=utf8;
----------
CREATE TABLE `oauth_refresh_token` (
  `token_id` varchar(256) DEFAULT NULL,
  `token` blob,
  `authentication` blob
) ENGINE=InnoDB DEFAULT CHARSET=utf8;
第二步:IDEA+maven+springboot 集成OAuth2
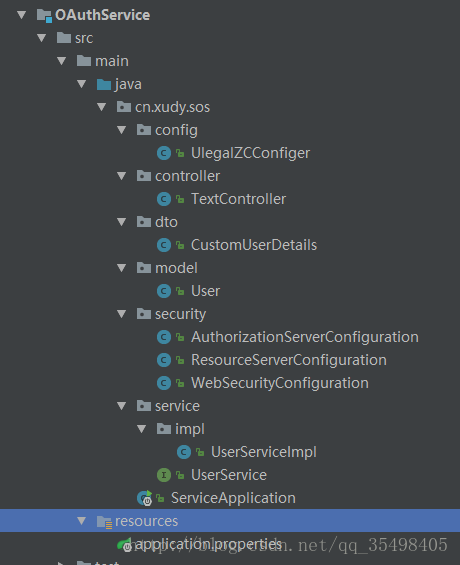
这是服务器工程目录
1.pom中配置
<?xml version="1.0" encoding="UTF-8"?>
<project xmlns="http://maven.apache.org/POM/4.0.0"
         xmlns:xsi="http://www.w3.org/2001/XMLSchema-instance"
         xsi:schemaLocation="http://maven.apache.org/POM/4.0.0 http://maven.apache.org/xsd/maven-4.0.0.xsd">
    <parent>
        <artifactId>OauthText</artifactId>
        <groupId>OauthText</groupId>
        <version>1.0-SNAPSHOT</version>
    </parent>
    <modelVersion>4.0.0</modelVersion>

    <artifactId>OAuthService</artifactId>
    <build>
        <plugins>
            <plugin>
                <groupId>org.apache.maven.plugins</groupId>
                <artifactId>maven-compiler-plugin</artifactId>
                <configuration>
                    <source>1.7</source>
                    <target>1.7</target>
                </configuration>
            </plugin>
        </plugins>
    </build>
    <dependencies>
          <!-- Spring Security Oauth2 -->
          <dependency>
              <groupId>org.springframework.security.oauth</groupId>
              <artifactId>spring-security-oauth2</artifactId>
          </dependency>

      </dependencies>

</project>
2.进行AuthorizationServerConfiguration.java 进行基本配置
@Configuration
@EnableAuthorizationServer
public class AuthorizationServerConfiguration extends AuthorizationServerConfigurerAdapter {

    @Autowired
    private DataSource dataSource;

    @Bean // 声明TokenStore实现
    public TokenStore tokenStore() {
        return new JdbcTokenStore(dataSource);
    }

    @Bean // 声明 ClientDetails实现
    public ClientDetailsService clientDetails() {
        return new JdbcClientDetailsService(dataSource);
    }

    @Autowired
    private TokenStore tokenStore;

    @Autowired
    private AuthenticationManager authenticationManager;

    @Autowired
    private UserService userService;

    @Override
    public void configure(ClientDetailsServiceConfigurer clients) throws Exception {
        clients
            .jdbc(dataSource);
    }

    @Override // 配置框架应用上述实现
    public void configure(AuthorizationServerEndpointsConfigurer endpoints) throws Exception {
        endpoints.authenticationManager(authenticationManager);
        endpoints.tokenStore(tokenStore());
        endpoints.userDetailsService(userService);
//         配置TokenServices参数
        DefaultTokenServices tokenServices = new DefaultTokenServices();
        tokenServices.setTokenStore(endpoints.getTokenStore());
        tokenServices.setSupportRefreshToken(true);
        tokenServices.setClientDetailsService(endpoints.getClientDetailsService());
        tokenServices.setTokenEnhancer(endpoints.getTokenEnhancer());
        tokenServices.setAccessTokenValiditySeconds( (int) TimeUnit.DAYS.toSeconds(1)); // 1天
        endpoints.tokenServices(tokenServices);
    }

    @Bean
    @Primary
    public DefaultTokenServices tokenServices() {
        DefaultTokenServices tokenServices = new DefaultTokenServices();
        tokenServices.setSupportRefreshToken(true); // support refresh token
        tokenServices.setTokenStore(tokenStore); // use jdbc token store
        return tokenServices;
    }
3.ResourceServerConfiguration.java 进行配置
@Configuration
@EnableResourceServer
public class ResourceServerConfiguration extends ResourceServerConfigurerAdapter {

    @Override
    public void configure(HttpSecurity http) throws Exception {
        http.authorizeRequests().antMatchers("/**").authenticated()
                .anyRequest().authenticated();
    }

}
4.WebSecurityConfiguration.java 进行配置
@Configuration
public class WebSecurityConfiguration extends GlobalAuthenticationConfigurerAdapter {

    private final UserService userService;

    @Autowired
    public WebSecurityConfiguration(UserService userService) {
        this.userService = userService;
    }

    @Override
    public void init(AuthenticationManagerBuilder auth) throws Exception {
        auth.userDetailsService(userService);

    }

}
5.进行自定义拦截配置
在service接口中

service 简单实现代码
@Service
public class UserServiceImpl implements UserService {
    @Override
    public UserDetails loadUserByUsername(String username) throws UsernameNotFoundException {
        System.out.println("===================获取到token已进入自定义验证:"+username);
        // 可以进行数据库请求,这里进行模拟
              User user = new User();
              user.setUsername("110");
              user.setPassword("110119");
        if (user == null) {
            System.out.println("==================="+username);
            throw new UsernameNotFoundException("Could not find the user '" + username + "'");
        }
        return new CustomUserDetails(user, true, true, true, true, null);
    }
}
6.CustomUserDetails OAuth2 提供方法进行配置
public class CustomUserDetails extends User implements UserDetails {

    private static final long serialVersionUID = 1702923242319850756L;

    private final boolean enabled;
    private final boolean accountNonExpired;
    private final boolean credentialsNonExpired;
    private final boolean accountNonLocked;
    private final Set<GrantedAuthority> authorities;

    public CustomUserDetails(User user, boolean enabled, boolean accountNonExpired, boolean credentialsNonExpired, boolean accountNonLocked, Collection<? extends GrantedAuthority> authorities) {
        if (user != null
                && !StringUtils.isBlank(user.getUsername())
                && !StringUtils.isBlank(user.getPassword())) {
            setUsername(user.getUsername());
            setPassword(user.getPassword());
            this.enabled = enabled;
            this.accountNonExpired = accountNonExpired;
            this.credentialsNonExpired = credentialsNonExpired;
            this.accountNonLocked = accountNonLocked;
            this.authorities = Collections.unmodifiableSet(new HashSet<>(CollectionUtils.emptyIfNull(authorities)));
        } else {
            throw new IllegalArgumentException("Cannot pass null or empty values to constructor");
        }
    }

    public static long getSerialVersionUID() {
        return serialVersionUID;
    }

    @Override
    public boolean isEnabled() {
        return enabled;
    }

    @Override
    public boolean isAccountNonExpired() {
        return accountNonExpired;
    }

    @Override
    public boolean isCredentialsNonExpired() {
        return credentialsNonExpired;
    }

    @Override
    public boolean isAccountNonLocked() {
        return accountNonLocked;
    }

    @Override
    public Set<GrantedAuthority> getAuthorities() {
        return authorities;
    }
}
这是Controller 配置只要访问log 就会被OAuth2 进行拦截验证
@RestController
@RequestMapping("/")
public class TextController {

    @PostMapping(value = "/log")
    public String  saveCuringEvidence(@RequestBody User user){
        System.out.println("---------------------user:"+user.getUsername());
        return user.getUsername();
    }

}
第三部:好了接下来进行postmain工具 模拟进行请求 url为你的域名+/oauth/token 获取token
1.首先配置客户端密码
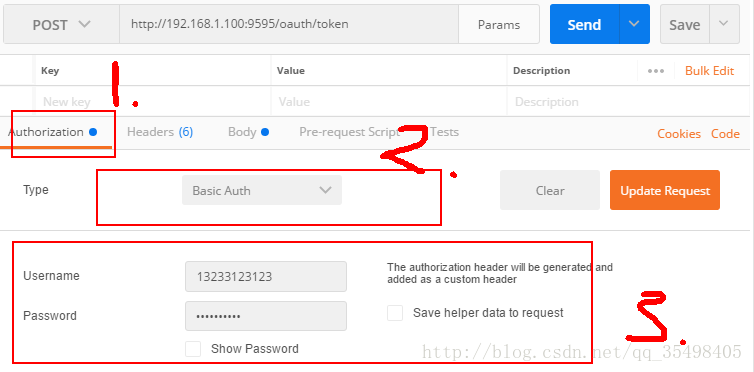
2.而username和password 需要在刚刚建立的数据库进行自定义配置

3.模仿form表单进行配置

4.上面的账户和密码是自定义验证时需要的信息要和service里的账户和密码一致
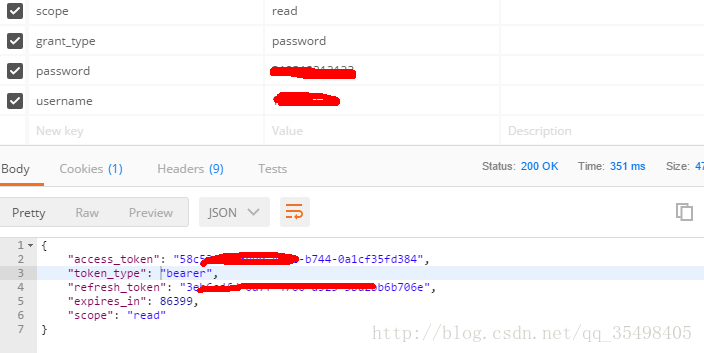
成功之后
获取的access_token,复制下来
5.模仿客户端根据token请求数据
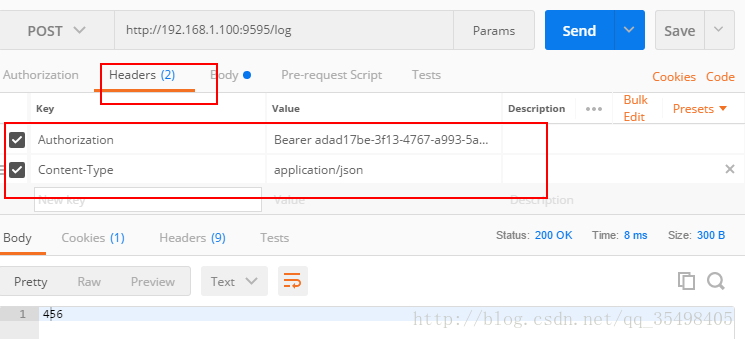
成功请求到数据 收工。。。。
OAuth2.0 配套客户端实现 :http://www.cnblogs.com/memoryXudy/p/7805217.html
源码:https://gitee.com/xdymemory00/Security-OAuth2-MiMaMoShi.git