一、hashlib
Python的hashlib提供了常见的摘要算法,如MD5,SHA1等等。
什么是摘要算法呢?摘要算法又称哈希算法、散列算法。它通过一个函数,把任意长度的数据转换为一个长度固定的数据串(通常用16进制的字符串表示)。
摘要算法就是通过摘要函数f()对任意长度的数据data计算出固定长度的摘要digest,目的是为了发现原始数据是否被人篡改过。
摘要算法之所以能指出数据是否被篡改过,就是因为摘要函数是一个单向函数,计算f(data)很容易,但通过digest反推data却非常困难。而且,对原始数据做一个bit的修改,都会导致计算出的摘要完全不同。
我们以常见的摘要算法MD5为例,计算出一个字符串的MD5值:
import hashlib
md5_obj =hashlib.md5() #md5算法的对象
res = md5_obj.hexdigest() #获取摘要之后的结果
print(res,type(res))
# 输出结果:
# d41d8cd98f00b204e9800998ecf8427e <class 'str'>
user =input('user>>>')
passwd = input('password>>>')
md5_obj=hashlib.md5()
md5_obj.update(passwd.encode('utf-8'))
passwd =md5.obj.hexdigest()
if user =='alex' and passwd =='aee949757a2e698417463d47acac93df':
    print('登录成功!')
md5_obj =hashlib.sha1()#实例化
#md5算法的对象
md5_obj.update(b'alex3714')#使用sha1 摘要算法对‘alex3714进行摘要’
res = md5_obj.hexdigest()#获取摘要后的结果
print(res,type(res))
# 输出结果为:8a003668a9c990f15148f9e4046e1410781533b6 <class 'str'>
#相同的字符串使用相同的算法, 在任何时候
#等等的结果都是一致的.
一.1 加盐操作
#全世界的md5算法都是一样的.

# 全世界的md5算法都是一样的
# 123456  111111
md5_obj = hashlib.md5()
# md5算法的对象
md5_obj.update(b'123456')  # 使用md5摘要算法对'alex3714'进行摘要
res = md5_obj.hexdigest()   # 获取摘要之后的结果
print(res,type(res))  #aee949757a2e698417463d47acac93df    32位
# 123456 e10adc3949ba59abbe56e057f20f883e
# 撞库

#加盐
md5_obj = hashlib.md5('盐'.encode('utf-8'))
#md5算法的对象
md5_obj.update(b'alex3714')#使用md5 摘要算法对‘alex3714’进行摘要
res = md5_obj.hexdigest() #获取摘要后的结果
print(res,type(res))
# 打印结果 :0e249b9c16ea1d840ce700587cada978 <class 'str'>
动态加盐
username ='alex'
md5_obj = hashlib.md5(username.encode('utf-8')+'盐'.encode('utf-8'))
md5_obj.update(b'alex3714')
res =md5_obj.hexdigest()
print(res)
# 打印结果 :a106943dd5c1d5caf59bc80c05295ad6
校验文件一致性
#校验文件一致性
with open('userinfo','rb') as f :
    md5_obj =hashlib.md5()
    md5_obj.update(f.read())
    res = md5_obj.hexdigest()
    print(res)
    #结果:84b2fe284833ac7903a7ac865e6c27a9

with open('userinfo','rb')as f:
    md5_obj =hashlib.md5()
    for line in f:
        md5_obj.update(line) #update 操作可以在hexdigest之前执行多次
       #分次对一个长字符串进行摘要
    res = md5_obj.hexdigest() #结果是对一个厂字符串摘要的摘要结果.
    print(res)
    # 输出结果 :84b2fe284833ac7903a7ac865e6c27a9
拼接校验
# md5_obj = hashlib.md5()
# md5_obj.update(b'aaabbb')
# res = md5_obj.hexdigest()
# print(res)  #6547436690a26a399603a7096e876a2d
#
# md5_obj = hashlib.md5()
# md5_obj.update(b'aa')
# md5_obj.update(b'abbb')
# res = md5_obj.hexdigest()
# print(res)  #6547436690a26a399603a7096e876a2d
二、configparse
该模块适用于配置文件的格式与windows ini文件类似,可以包含一个或多个节(section),每个节可以有多个参数(键=值)。
# .py  里面的所有值 都不需要进行转换或者处理 直接当做变量使用
       #通用性不高
# 文本格式 key = value
        # 都要进行文件处理 _ 通用
# ini
# [北京校区]     # section
# 课程 = python,linux   # option
# python讲师 = egon,yuanhao,nezha,boss_gold
# linux讲师 = 李导,何首乌
# [上海校区]
# 课程 = go,linux
# python讲师 = egon
# linux讲师 = 李导,何首乌
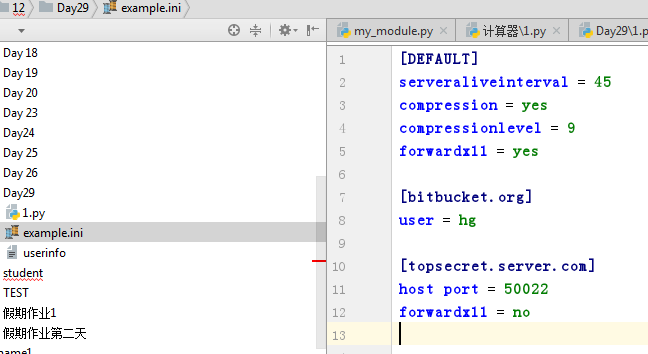
import configparser
config =configparser.ConfigParser()
#confi 是一个操作配置文件的对象
config['DEFAULT'] ={'ServerAliveInterval': '45',
                    'Compression':'yes',
                    'CompressionLevel':'9',
                    'ForwardX11':'yes'
                    }
config['bitbucket.org'] = {'User':'hg'}
config['topsecret.server.com'] ={'Host Port': '50022',
                                 'ForwardX11':'no'
                                 }
with open('example.ini','w')as configfile:
    config.write(configfile)
结果为
configparese的操作方法
import configparser
config = configparser.ConfigParser()
config.read(('example.ini'))
print(config.sections())
# 打印结果 ['bitbucket.org', 'topsecret.server.com']

print('bytebong.com' in config)
#打印结果 False
print('bitbucket.org' in config)
#打印结果 True
print( config[ 'DEFAULT']['Compression']) #获取 setion里 option的值 yes
print(config['topsecret.server.com']['ForwardX11'])#获取 setion里option的值NO

print(config['bitbucket.org'])#<Section: bitbucket.org>

for key in config['bitbucket.org']:
    print(key)
# 注意, 有default 会默认default的键
# user
# serveraliveinterval
# compression
# compressionlevel
# forwardx11

print(config.options('bitbucket.org'))
#打印结果 ['user', 'serveraliveinterval', 'compression', 'compressionlevel', 'forwardx11']
#同for循环,找到‘bitbucket.org'下所有键.
print(config.items('bitbucket.org'))
#找到 ’bitbucket.org'下所有键值对
# [('serveraliveinterval', '45'), ('compression', 'yes'), ('compressionlevel', '9'), ('forwardx11', 'yes'), ('user', 'hg')]
print(config.get('bitbucket.org','compression'))
#结果 yes
# get方法section下的key对应的value
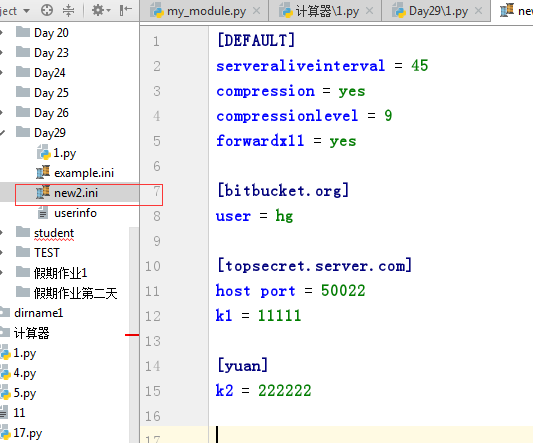
增删改查
# 增删改操作
import configparser
config = configparser.ConfigParser()
config.read('example.ini')
config.add_section('yuan')
config.remove_option('topsecret.server.com','forwardx11')
config.set('topsecret.server.com','k1','11111')
config.set('yuan','k2','222222')
config.write(open('new2.ini','w'))
三 、logging

操作日志的模块
什么叫日志
  #给用户看的
  用户的重要行为
    登录 涉及隐私
    账单 资金
  #给开发和运维和测试人员看的
    自测 logging.debug(‘一些中间结果’)
    测试 1+++++1
    运维
  #记录
    打印在屏幕上
    写入文件里
  #logging 的优势
    格式更加规范
    等级更加鲜明


 3.1 简单的配置方法
import  logging
logging.basicConfig(level=logging.ERROR,
                    format='%(asctime)s %(filename)s[line:%(lineno)d] %(levelname)s %(message)s',
                    datefmt ='%a , %d %b %Y %H %M : %S',
                    filename ='test.log',
                    filemode ='a')
logging.debug('debug message')#调试
logging.info('info message')#信息
logging.warning("warning message")#警告
logging.error('error message') #错误
logging.critical('critical message') #严重错误
结果
Wed, 14 Mar 2018 17:18:17 1.py[line:23] ERROR error message
Wed, 14 Mar 2018 17:18:17 1.py[line:24] CRITICAL critical message
Wed , 14 Mar 2018 17 20 : 22 1.py[line:10] ERROR error message
Wed , 14 Mar 2018 17 20 : 22 1.py[line:11] CRITICAL critical message
Wed , 14 Mar 2018 17 20 : 22 1.py[line:23] ERROR error message
Wed , 14 Mar 2018 17 20 : 22 1.py[line:24] CRITICAL critical message
#使用logger对象的用法
import  logging
#首先创造一个logger对象
logger =logging.getLogger()
#创建一个格式.
fmt =logging.Formatter('%(asctime)s - %(name)s - %(levelname)s - %(message)s')

#创建一个 文件句柄 控制向那个文件中输出什么格式.
fh =logging.FileHandler('test3.log',encoding='utf-8')
fh.setFormatter(fmt)
#创建一个屏幕句柄 控制向屏幕输出 用什么格式
sh =logging.StreamHandler()
sh.setFormatter(fmt)

#将logger对象和文件句柄,屏幕句柄绑在一起.
logger.addHandler(fh)
logger.addHandler(sh)
logger.setLevel(logging.DEBUG)#首先必须要整体对logger进行设置
sh.setLevel(logging.INFO)
fh.setLevel(logging.WARNING)
logger.debug('logger debug message')
logger.info('logger info message')
logger.warning('logger warning message')
logger.error('logger error message')
logger.critical('logger critical message')
输出结果
2018-03-14 18:47:13,752 - root - INFO - logger info message
2018-03-14 18:47:13,752 - root - WARNING - logger warning message
2018-03-14 18:47:13,752 - root - ERROR - logger error message
2018-03-14 18:47:13,752 - root - CRITICAL - logger critical message