zoukankan      html  css  js  c++  java
  • html-webpack-plugin插件 根据模板生成多页面

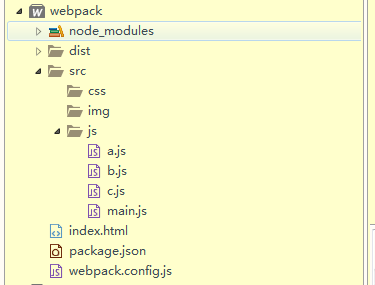
    1、项目目录结构为:

    2、webpack.config.js配置文件为:

    var htmlWebpackPlugin = require('html-webpack-plugin');
    module.exports = {
        //打包入口
        entry: {
            main: './src/js/main.js',
            a: './src/js/a.js',
            b: './src/js/b.js',
            c: './src/js/c.js'
        },
        //打包后的文件
        output: {
            //不加__dirname 会报错
            path: __dirname + '/dist',
            //注意:使用[name]确保每个文件名都不重复
            filename: 'js/[name]-[chunkhash].js',
            //线上地址配置
            publicPath:'http://cdn.com/'
        },
        plugins: [
            new htmlWebpackPlugin({
                template: 'index.html',
                filename: 'a.html',
                title: 'this is a.html',
                //增加指定的chunks
                chunks:['main','a']
            }),
            new htmlWebpackPlugin({
                template: 'index.html',
                filename: 'b.html',
                title: 'this is b.html',
                //增加指定的chunks
                chunks:['main','b']
            }),
            new htmlWebpackPlugin({
                template: 'index.html',
                filename: 'c.html',
                title: 'this is c.html',
                //增加指定的chunks
                chunks:['main','c']
            })
        ]
    }

    3、执行命令:

    npm run webpack

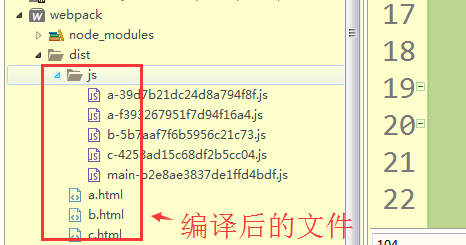
    4.编译:
  • 相关阅读:
    HTTP
    HTTP
    Tomcat
    Tomcat
    时下流行的9种恶意软件,你都了解吗?
    MYSQL中表级锁、行级锁、页级锁介绍
    MYSQL中表级锁、行级锁、页级锁介绍
    MYSQL存储引擎笔记
    MYSQL存储引擎笔记
    Shell脚本案例:批量新增用户
  • 原文地址:https://www.cnblogs.com/mengfangui/p/7514270.html
Copyright © 2011-2022 走看看