MYSQL主从复制原理
MySQL主从同步一共需要三个线程的操作,主MySQL有一个IO线程,从MySQL有一个IO线程和一个SQL线程, MySQL主从是实现MySQL高可用、数据备份、读写分离架构的一种最常见的解决方案,在绝大部分公司都有使用,要实现MySQL主从复制,必须要在Master打开binary log(bin-log)功能,因为整个MySQL的复制过程实际就是Slave从Master端获取响应的二进制日志,然后在Slave端顺序的执行日志中所记录的各种操作,二进制日志中几乎记录了出select以外的所有针对数据库的sql操作语句,具体的复制过程如下:
1.1.1:Slave端的IO线程连接上Master,并向Master请求指定日志文件的指定位置(新部署的Master和Slave从最开始的日志)之后的日志。
1.1.2:Master接收到来自Slave的IO线程请求,负责IO复制的IO线程根据Slave的请求信息读取相应的日志内容,然后将本地读取的bin-log的文件名、位置及指定位置之后的内容一起返回给Slave的IO线程处理。
1.1.3:Slave的IO线程将接收到的信息依次添加到Slave端的relay-log文件的最末端,并将读取到的Master端的bin-log的文件名和位置记录到Master-info文件中,以便在下一次读取的时候能够清楚的告诉Master“我需要从哪个bin-log的哪个位置开始往后的日志内容请发给我”。
1.1.4:Slave的sql线程检查到relay-log中新增了内容后,会马上将relay-log中的内容解析为在Master端真实执行时候的可执行命令,并顺序执行,从而保证对Slave的MySQL进行响应的增加或删除等操作,最终实现和Master数据保持一致。
配置MYSQL主从同步
Master:192.168.10.201
Slave:192.168.10.202
[root@linux-host1 src]# cat /etc/redhat-release
CentOS Linux release 7.2.1511 (Core)
1、两台服务器分别安装MySQL,提前准备好安装包和my.conf文件,两台机器上使用以下脚本自动安装:
[root@linux-host1 src]# vim mysql-install.sh

#!/bin/bash
DIR=`pwd`
NAME="mysql-5.6.36-linux-glibc2.5-x86_64.tar.gz"
FULL_NAME=${DIR}/${NAME}
DATA_DIR="/data/mysql"

yum install vim gcc gcc-c++ wget autoconf  net-tools lrzsz iotop lsof iotop bash-completion -y
yum install curl policycoreutils openssh-server openssh-clients postfix -y

if [ -f ${FULL_NAME} ];then
    echo "安装文件存在"
else
    echo "安装文件不存在"
    exit 3
fi
if [ -h /usr/local/mysql ];then
    echo "Mysql 已经安装"
    exit 3
else
    tar xvf ${FULL_NAME}   -C /usr/local/src
    ln -sv /usr/local/src/mysql-5.6.36-linux-glibc2.5-x86_64  /usr/local/mysql
    if id  mysql;then
        echo "mysql 用户已经存在,跳过创建用户过程"
    fi
        useradd  mysql  -s /sbin/nologin
    if  id  mysql;then
        chown  -R mysql.mysql  /usr/local/mysql/* -R
        if [ ! -d  /data/mysql ];then
            mkdir -pv /var/lib/mysql && chwn mysql.mysql /var/lib/mysql -R
            mkdir -pv /data/mysql/{data,logs} && touch  /data/mysql/logs/error.log && chown  -R mysql.mysql  /data   -R
            /usr/local/mysql/scripts/mysql_install_db  --user=mysql --datadir=/data/mysql/data  --basedir=/usr/local/mysql/
            cp  /usr/local/src/mysql-5.6.36-linux-glibc2.5-x86_64/support-files/mysql.server /etc/init.d/mysqld
            chmod a+x /etc/init.d/mysqld
            cp ${DIR}/my.cnf   /etc/my.cnf
            ln -sv /usr/local/mysql/bin/mysql  /usr/bin/mysql
            /etc/init.d/mysqld start
        else
            echo "MySQL数据目录已经存在,"
                        exit 3
        fi
    fi
fi
2、分别更改Master和Slave的my.conf文件,主要将server-id改为不一样,Slave可以不用开log-bin=mysql-bin注释掉即可,修改完my.conf文件重启两台机器的mysql服务:
[root@linux-host1 src]# vim /usr/local/src/my.cnf
[client]
port            = 3306
socket          = /data/mysql/data/mysql.sock
#default-character-set=utf8
[mysqld]
#skip-grant-tables
sync_binlog=0
innodb_flush_log_at_trx_commit=0
default-time-zone = '+8:00'
local-infile=0
skip-name-resolve
skip-external-locking
back_log = 300
max_connections = 1000
max_allowed_packet = 32M
binlog_cache_size = 1M
max_heap_table_size = 64M
sort_buffer_size = 2M
query_cache_type=0
join_buffer_size = 2M
thread_cache = 8
ft_min_word_len = 4
thread_stack = 192K
tmp_table_size = 64M
port            = 3306
socket          = /data/mysql/data/mysql.sock
skip-external-locking
key_buffer_size = 16M
table_open_cache = 400
net_buffer_length = 8K
read_buffer_size = 256K
read_rnd_buffer_size = 512K
myisam_sort_buffer_size = 8M
datadir=/data/mysql/data
log-bin=mysql-bin
replicate-ignore-db=test
replicate-ignore-db=performance_schema
replicate-ignore-db=information_schema
binlog-ignore-db=mysql
binlog-ignore-db=information_schema
binlog_format=row
server-id       =202
relay-log=relay-bin
relay-log-index=relay-bin
log-queries-not-using-indexes
long_query_time =1
slow_query_log=on
log_queries_not_using_indexes=off
slow_query_log_file=/data/mysql/logs/slow_query.log
log-error=/data/mysql/logs/error.log
key_buffer_size = 32M
read_buffer_size = 2M
read_rnd_buffer_size = 2M
bulk_insert_buffer_size = 64M
myisam_sort_buffer_size = 32M
myisam_max_sort_file_size = 10M
myisam_repair_threads = 1
myisam_recover
innodb_buffer_pool_size=5000M
innodb_additional_mem_pool_size=32M
innodb_data_file_path = ibdata1:10M:autoextend
innodb_file_io_threads = 4
innodb_thread_concurrency = 16
innodb_log_buffer_size = 8M
innodb_log_file_size = 128M
innodb_log_files_in_group = 3
innodb_max_dirty_pages_pct = 90
innodb_lock_wait_timeout = 120
innodb_file_per_table=1
innodb_open_files=500
character-set-server = utf8
wait_timeout=300
interactive_timeout=300
innodb_flush_method=O_DIRECT
log-bin-trust-function-creators=1
log_slave_updates = 1
relay-log = /data/mysql/logs/relay-log.log


[mysqldump]
quick
max_allowed_packet = 16M
user=root
password=root

[mysql]
no-auto-rehash
# Remove the next comment character if you are not familiar with SQL
#safe-updates
#user=root
#password=root

[myisamchk]
key_buffer_size = 20M
sort_buffer_size = 20M
read_buffer = 2M
write_buffer = 2M

[mysqlhotcopy]
interactive-timeout
[root@linux-host1 src]# service mysqld restart
Shutting down MySQL.. SUCCESS!
Starting MySQL.. SUCCESS!
3、两台数据库初始化,然后Master创建同步账号syncuser,密码123456
[root@linux-host2 src]# /usr/local/mysql/bin/mysql_secure_installation #两台数据库执行这个命令初始化,设置root密码123456
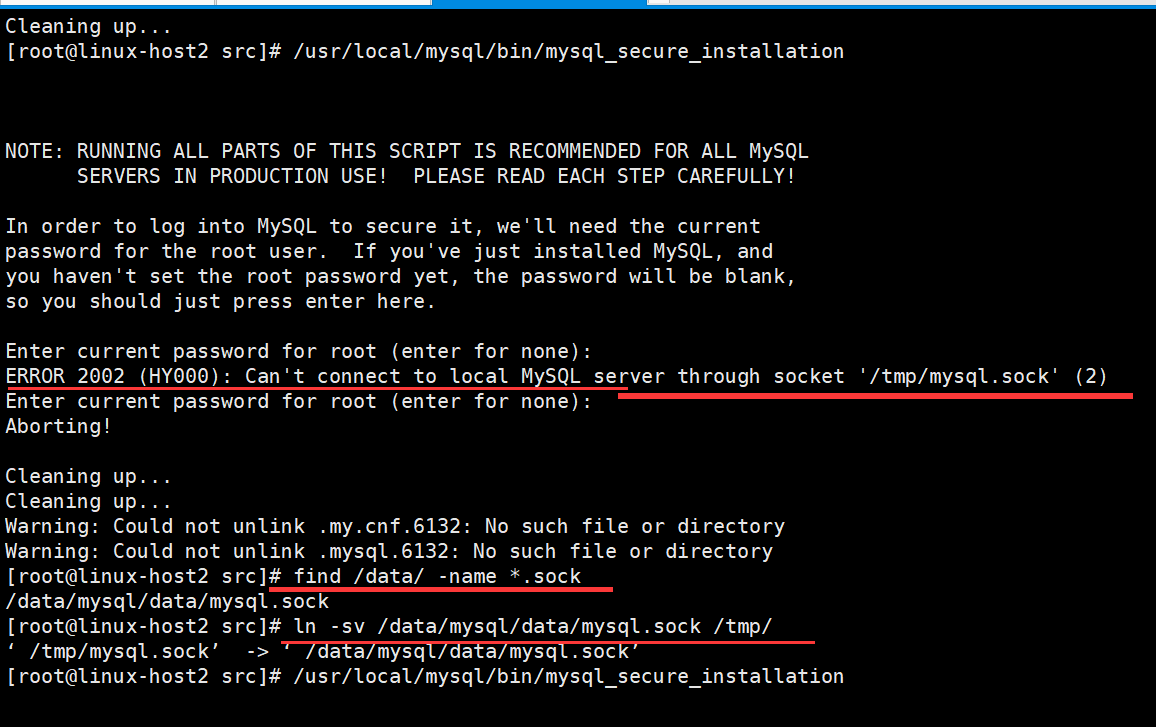
然后Master创建同步账号syncuser,密码123456
mysql> GRANT REPLICATION SLAVE,REPLICATION CLIENT ON *.* TO 'syncuser'@'192.168.10.%' IDENTIFIED BY '123456';
Query OK, 0 rows affected (0.00 sec)
4、Master导出数据、scp到Slave:
[root@linux-host1 src]# /usr/local/mysql/bin/mysqldump -uroot -p123456 --all-databases --single_transaction --flush-logs --master-data=2 --lock-tables > /opt/backup.sql
Warning: Using a password on the command line interface can be insecure.
[root@linux-host1 src]# cd /opt/
[root@linux-host1 opt]# ll
total 648
-rw-r--r-- 1 root root 655442 Mar 28 20:52 backup.sql
-rw-r--r-- 1 root root 583 Mar 12 16:27 dele.py
[root@linux-host1 opt]# scp backup.sql root@192.168.10.202:/opt/
root@192.168.10.202's password:
backup.sql 100% 640KB 33.1MB/s 00:00
注意:Slave会用到Master以下两个地方:

5、Slave将Master的sql文件导入并记录Master的日志文件名称和要同步的位置:
[root@linux-host2 src]# mysql -uroot -p123456 < /opt/backup.sql
Warning: Using a password on the command line interface can be insecure.
6、在Slave配置从Master同步并设置Slave开启 只读:
mysql> CHANGE MASTER TO MASTER_HOST='192.168.10.201',MASTER_USER='syncuser',MASTER_PASSWORD='123456',MASTER_LOG_FILE='mysql-bin.000003',MASTER_LOG_POS=120;
Query OK, 0 rows affected, 2 warnings (0.01 sec)
mysql> start slave;
Query OK, 0 rows affected (0.00 sec)
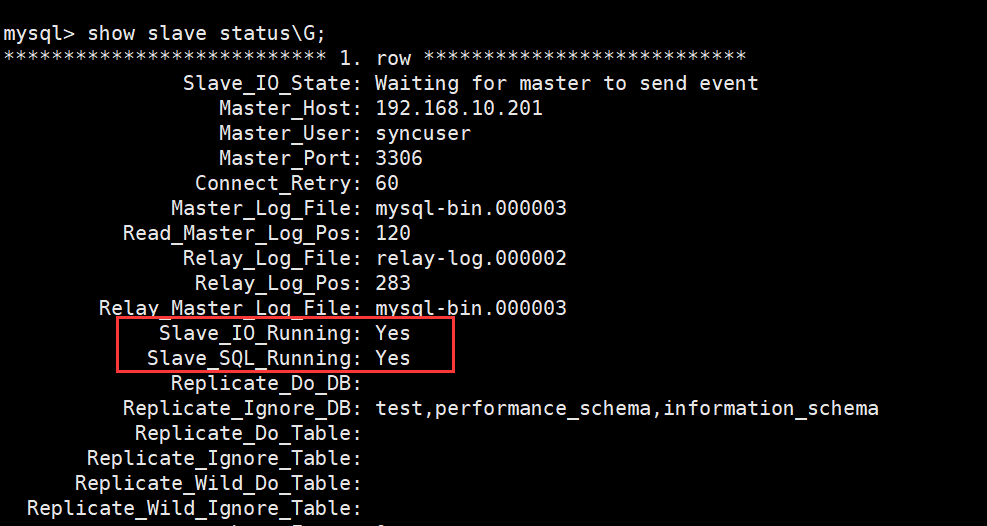
7、验证Slave的IO线程与SQL线程是OK的:
8、在Slave验证是否同步完成:在Master数据库创建一个SB的库,然后在Slave数据库查看也有一个SB的库同步成功:
Master创建SB这个库:
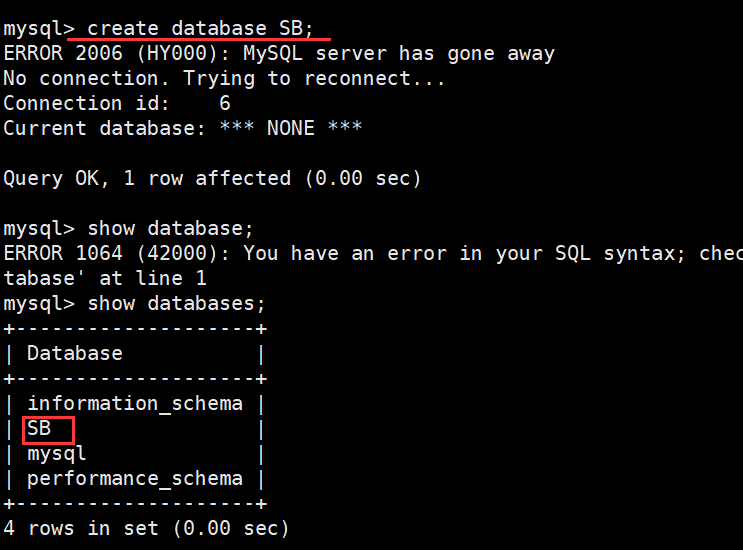
Slave数据库上查看也有SB这个库,验证MySQL主从同步成功;
