from: http://www.geeks3d.com/20101001/tutorial-gamma-correction-a-story-of-linearity/
- 1 – What is gamma correction and why is it important?
- 2 – How to achieve gamma correction?
- 3 – Downloads
- 4 – References
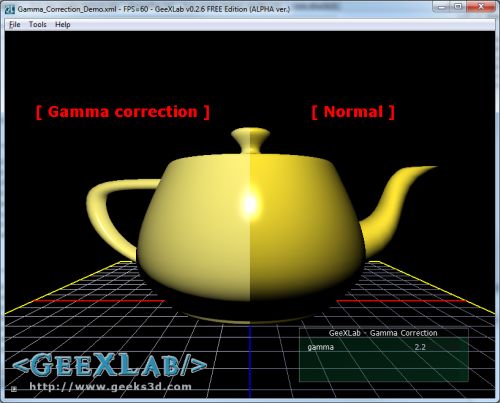
Before writing this tutorial, I didn’t think that gamma correction could affect the final image so much. The left part of the header image shows a gamma corrected rendering while the right part shows a non-gamma corrected rendering. The left part is the real rendering.
What is gamma correction and why is it important?
Gamma correction is the operation that aims to cancel the non-linearity property of a display device (CRT or LCD). There are other devices that display an image but in this article I focuse only on monitors.
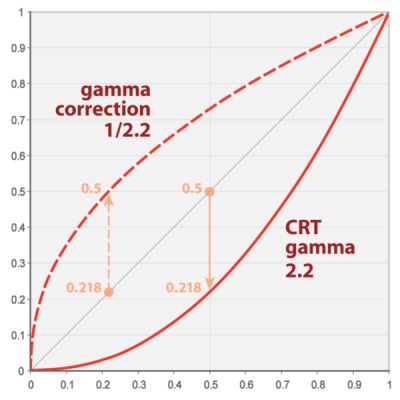
The following graph shows the non-linear response of a monitor:
(source)
A monitor has a non linear response. That means if we sum two colors, the color of the pixel displayed will not be the sum of both colors but will have a lesser value.
Here is a simple example. Let’s consider we have an Add() function that compute the sum of two channels (here the red channel). Channels values are in the range [0.0 ; 1.0]
red = Add(r1, r2)
...
red = Add(0.235, 0.156)
With a linear device, we’ll get: red = 0.391. With a monitor, we’ll get red = 0.126. Why?
Because the response of a monitor can be approximated by a power function like this:
C_out = C_in2.2
2.2 is the gamma factor of the monitor. Actually, the gamma factor is in the range of 2.0 to 2.4 depending on the monitor. Gamma correction must cancel the effect of gamma factor. This is done wit the following equation:
C_corrected= C_out1.0/2.2
Ok let’s plug some numbers in these equations:
- 0.3912.2 = 0.126
- 0.1261.0/2.2 = 0.39
- 0.3911.0/2.2 = 0.652
- 0.652 – 0.391 = 0.261
- 0.391 – 0.126 = 0.265
As you can see, if we raise the monitor response value (0.126) to the power of 1/2.2, we get the right value (0.39): we have gamma-corrected the monitor output!
Enough with the theory, let’s see how we can do this gamma correction in practice for a real time 3D application.
How to achieve gamma correction?
There are two ways to do gamma correction:
- Using the renderer. The renderer (the graphics card or GPU) is a linear device. Modern renderers have the support of gamma correction via sRGB textures and framebuffer formats. See the following OpenGL extensions for more details: GL_ARB_framebuffer_sRGB and GL_EXT_texture_sRGB. With these extensions you can get gamma corrected values for free but gamma correction factor is set to 2.2. You can’t change it.
- Using a software gamma correction. The gamma correction is applied to the final scene buffer thanks to a pixel shader and you can set the gamma correction you want.
I coded a small GeeXLab demo that shows the impact of gamma correction (or the impact of the non-linear response of the monitor as you want). You can download the demo at the end of the article.
You can also download this demo from the Shader Library.
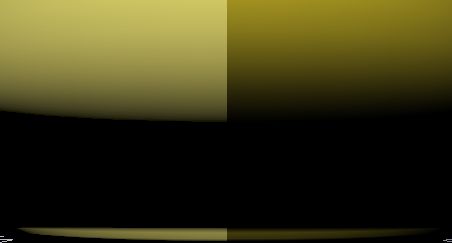
The demo is quite simple. I render a simple scene (a yellow teapot + the reference grid) into a frame buffer. The final scene image is got by applying a gamma correction shader on the scene buffer.
In this demo, the gamma correction is done with a post processing filter. Here is the GLSL shader that concretely performs the gamma correction:
[Vertex_Shader]
void main(void)
{
  gl_Position = ftransform();
  gl_TexCoord[0] = gl_MultiTexCoord0;
}

[Pixel_Shader]
uniform sampler2D sceneBuffer;
uniform float gamma;
void main(void)
{
  vec2 uv = gl_TexCoord[0].xy;
  vec3 color = texture2D(sceneBuffer, uv).rgb;
  if (uv.x<0.50)
    gl_FragColor.rgb = pow(color, vec3(1.0 / gamma));
  else
    gl_FragColor.rgb = color;
  gl_FragColor.a = 1.0;
}
The gamma factor is an uniform variable so you can change it (with the tweak bar in the GeeXlab demo) and see the impact of different values.
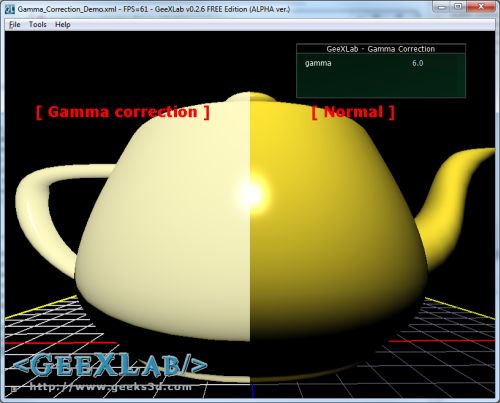
gamma correction of 6.0

gamma correction of 0.4
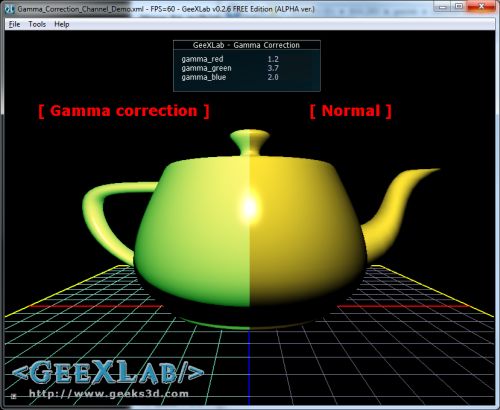
Now, if we want to be more precise, we have to apply gamma-correction to each channel (red, green and blue) separately (just drag n drop the source file Gamma_Correction_Channel_Demo_SRC.xml in GeeXLab):
[Vertex_Shader]
void main(void)
{
  gl_Position = ftransform();
  gl_TexCoord[0] = gl_MultiTexCoord0;
}

[Pixel_Shader]
uniform sampler2D sceneBuffer;
uniform vec3 gammaRGB;
void main(void)
{
  vec2 uv = gl_TexCoord[0].xy;
  vec3 color = texture2D(sceneBuffer, uv).rgb;
  if (uv.x<0.50)
    gl_FragColor.rgb = pow(color, 1.0 / gammaRGB);
  else
    gl_FragColor.rgb = color;
  gl_FragColor.a = 1.0;
}
Here is the gamma correction with GL_ARB_framebuffer_sRGB (demo Gamma_Correction_sRGB_Demo.xml):
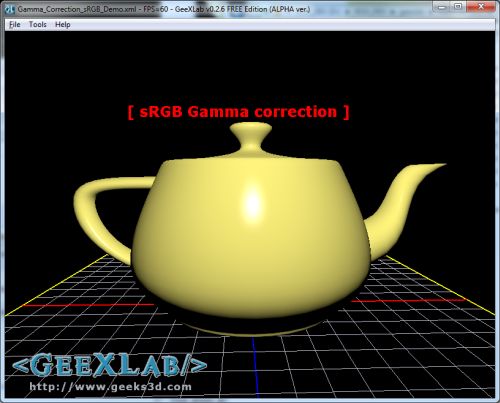
Gamma correction using GL_ARB_framebuffer_sRGB
In OpenGL, using GL_ARB_framebuffer_sRGB is really simple: once your FBO is bound, just enable the sRGB space with
glEnable(GL_FRAMEBUFFER_SRGB);
With GeeXLab, you can use sRGB space with the gamma_correction attribute of a render_texture node:
<render_texture name="sceneBuffer"
  type="FRAMEBUFFER" gamma_correction="TRUE" >
  <attach_texture_color pixel_format="RGBA_FLOAT"/>
  <attach_render_buffer type="DEPTH" pixel_format="DEPTH24"/>
</render_texture>
Hey, but I'm not a coder, is there another way to apply the gamma correction? Yes, in the control panel of display drivers. For example, in NVIDIA control panel you'll find gamma correction in the "Adjust desktop color settings" section. By default gamma is set to 1.0 (non correction):
Now if we set gamma to 2.2 we get the same rendering than in the left part of the demo.
Some video games also offer gamma correction setting.
As you can see, there is a notable difference between gamma corrected and non-gamma corrected images. Gamma correction is simple solution to improve visual quality in real time 3D apps.
The following image shows an important difference in the self-shadow boundary between gamma and non-gamma corrected images:
Downloads
You can download the demo here:

(Left-click to download...)
Just unzip the demo somewhere and load the Gamma_Correction_Demo_SRC.xml or Gamma_Correction_Channel_Demo.xml file in GeeXLab 0.2.6 or newer. You can also drop the demos in GeeXLab to execute them.