在教程二中,我们通过函数convertToString,把kernel源文件读到一个string串中,然后用函数clCreateProgramWithSource装入程序对象,再调用函数clBuildProgram编译程序对象。其实我们也可以直接调用二进制kernel文件,这样,当不想把kernel文件给别人看的时候,起到一定的保密作用。在本教程中,我们会把读入的源文件存储一个二进制文件中,并且还会建立一个计时器类,用来记录数组加法在cpu和gpu端分别执行的时间。
首先我们建立工程文件gclTutorial2,在其中增加类gclFile,该类主要用来读取文本kernel文件,或者读写二进制kernel文件。
class gclFile
{
public:
gclFile(void);
~gclFile(void);
//打开opencl kernel源文件(文本模式)
bool open(const char* fileName);
//读写二进制kernel文件
bool writeBinaryToFile(const char* fileName, const char* birary, size_t numBytes);
bool readBinaryFromFile(const char* fileName);
…
}
gclFile中三个读写kernel文件的函数代码为:
bool gclFile::writeBinaryToFile(const char* fileName, const char* birary, size_t numBytes)
{
    FILE *output = NULL;
    output = fopen(fileName, "wb");
    if(output == NULL)
        return false;

    fwrite(birary, sizeof(char), numBytes, output);
    fclose(output);

    return true;
}


bool gclFile::readBinaryFromFile(const char* fileName)
{
    FILE * input = NULL;
    size_t size = 0;
    char* binary = NULL;

    input = fopen(fileName, "rb");
    if(input == NULL)
    {
        return false;
    }

    fseek(input, 0L, SEEK_END);
    size = ftell(input);
    //指向文件起始位置
    rewind(input);
    binary = (char*)malloc(size);
    if(binary == NULL)
    {
        return false;
    }
    fread(binary, sizeof(char), size, input);
    fclose(input);
    source_.assign(binary, size);
    free(binary);

    return true;
}

bool gclFile::open(const char* fileName)   //!< file name
{
    size_t      size;
    char*       str;

    //以流方式打开文件
    std::fstream f(fileName, (std::fstream::in | std::fstream::binary));

    // 检查是否打开了文件流
    if (f.is_open())
    {
        size_t  sizeFile;
        // 得到文件size
        f.seekg(0, std::fstream::end);
        size = sizeFile = (size_t)f.tellg();
        f.seekg(0, std::fstream::beg);

        str = new char[size + 1];
        if (!str)
        {
            f.close();
            return  false;
        }

        // 读文件
        f.read(str, sizeFile);
        f.close();
        str[size] = '\0';

        source_  = str;

        delete[] str;

        return true;
    }

    return false;
}
现在,在main.cpp中,我们就可以用gclFile类的open函数来读入kernel源文件了:
//kernel文件为add.cl
gclFile kernelFile;
if(!kernelFile.open("add.cl"))
{
printf("Failed to load kernel file \n");
exit(0);
}
const char * source = kernelFile.source().c_str();
size_t sourceSize[] = {strlen(source)};
//创建程序对象
cl_program program = clCreateProgramWithSource(
context,
1,
&source,
sourceSize,
NULL);
编译好kernel后,我们可以通过下面的代码,把编译好的kernel存储在一个二进制文件addvec.bin中,在教程四中,我们将会直接装入这个二进制的kernel文件。
//存储编译好的kernel文件
char **binaries = (char **)malloc( sizeof(char *) * 1 ); //只有一个设备
size_t *binarySizes = (size_t*)malloc( sizeof(size_t) * 1 );

status = clGetProgramInfo(program,
    CL_PROGRAM_BINARY_SIZES,
    sizeof(size_t) * 1,
    binarySizes, NULL);
binaries[0] = (char *)malloc( sizeof(char) * binarySizes[0]);
status = clGetProgramInfo(program,
    CL_PROGRAM_BINARIES,
    sizeof(char *) * 1,
    binaries,
    NULL);
kernelFile.writeBinaryToFile("vecadd.bin", binaries[0],binarySizes[0]);
我们还会建立一个计时器类gclTimer,用来统计时间,这个类主要用QueryPerformanceFrequency得到时钟频率,用QueryPerformanceCounter得到流逝的ticks数,最终得到流逝的时间。函数非常简单
class gclTimer
{
public:
gclTimer(void);
~gclTimer(void);
private:
double _freq;
double _clocks;
double _start;
public:
void Start(void); // 启动计时器
void Stop(void); //停止计时器
void Reset(void); //复位计时器
double GetElapsedTime(void); //计算流逝的时间
};
下面我们在cpu端执行数组加法时,增加计时器的代码:
gclTimer clTimer;
clTimer.Reset();
clTimer.Start();
//cpu计算buf1,buf2的和
for(i = 0; i < BUFSIZE; i++)
buf[i] = buf1[i] + buf2[i];
clTimer.Stop();
printf("cpu costs time:%.6f ms \n ", clTimer.GetElapsedTime()*1000 );
同理在gpu执行kernel代码,以及copy gpu结果到cpu时候,增加计时器代码:
//执行kernel,Range用1维,work itmes size为BUFSIZE,
cl_event ev;
size_t global_work_size = BUFSIZE;

clTimer.Reset();
clTimer.Start();
clEnqueueNDRangeKernel( queue,
    kernel,
    1,
    NULL,
    &global_work_size,
    NULL, 0, NULL, &ev);
status = clFlush( queue );
waitForEventAndRelease(&ev);
 //clWaitForEvents(1, &ev);

clTimer.Stop();
printf("kernal total time:%.6f ms \n ", clTimer.GetElapsedTime()*1000 );

//数据拷回host内存
cl_float *ptr;
clTimer.Reset();
clTimer.Start();
cl_event mapevt;
ptr = (cl_float *) clEnqueueMapBuffer( queue,
    buffer,
    CL_TRUE,
    CL_MAP_READ,
    0,
    BUFSIZE * sizeof(cl_float),
    0, NULL, &mapevt, NULL );
status = clFlush( queue );
waitForEventAndRelease(&mapevt);
 //clWaitForEvents(1, &mapevt);

clTimer.Stop();
printf("copy from device to host:%.6f ms \n ", clTimer.GetElapsedTime()*1000 );
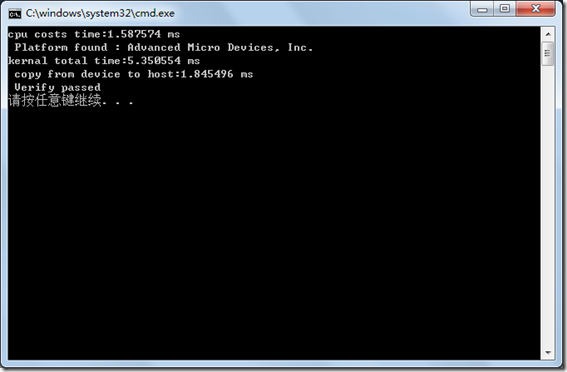
最终程序执行界面如下,在bufsize为262144时,在我的显卡上gpu还没有cpu快,在程序目录,我们可以看到也产生了vecadd.bin文件了。
完整的代码请参考:
工程文件gclTutorial2
代码下载:
