一、所需的组件
SpringBoot项目需要的POM依赖:
<dependency>
     <groupId>org.springframework.boot</groupId>
     <artifactId>spring-boot-starter-security</artifactId>
 </dependency>

<dependency>
    <groupId>org.springframework.security</groupId>
    <artifactId>spring-security-test</artifactId>
</dependency>
具体的版本号是跟随你的Boot版本走的:
<parent>
    <groupId>org.springframework.boot</groupId>
    <artifactId>spring-boot-starter-parent</artifactId>
    <version>2.3.4.RELEASE</version>
    <relativePath/> <!-- lookup parent from repository -->
</parent>
其他常规依赖:
<dependency>
    <groupId>org.springframework.boot</groupId>
    <artifactId>spring-boot-starter-thymeleaf</artifactId>
</dependency>

<dependency>
    <groupId>org.springframework.boot</groupId>
    <artifactId>spring-boot-starter-web</artifactId>
</dependency>

<dependency>
    <groupId>org.springframework.boot</groupId>
    <artifactId>spring-boot-devtools</artifactId>
    <scope>runtime</scope>
    <optional>true</optional>
</dependency>

<dependency>
    <groupId>org.springframework.boot</groupId>
    <artifactId>spring-boot-configuration-processor</artifactId>
    <optional>true</optional>
</dependency>

<dependency>
    <groupId>org.projectlombok</groupId>
    <artifactId>lombok</artifactId>
    <optional>true</optional>
</dependency>

<dependency>
    <groupId>org.springframework.boot</groupId>
    <artifactId>spring-boot-starter-test</artifactId>
    <scope>test</scope>
    <exclusions>
        <exclusion>
            <groupId>org.junit.vintage</groupId>
            <artifactId>junit-vintage-engine</artifactId>
        </exclusion>
    </exclusions>
</dependency>
二、上手入门
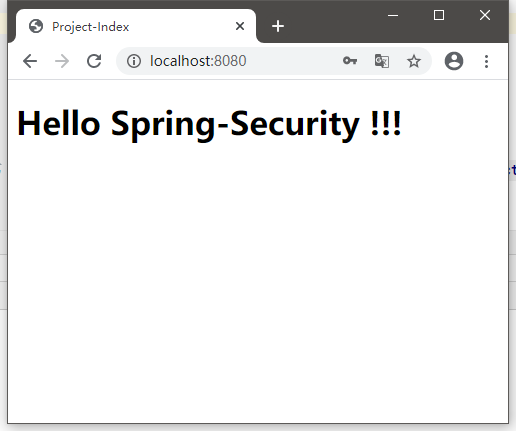
在static目录下编写一个首页:
<!DOCTYPE html>
<html lang="en">
<head>
    <meta charset="UTF-8">
    <title>Project-Index</title>
</head>
<body>
    <h1>Hello Spring-Security !!!</h1>
</body>
</html>
启动项目访问项目地址:
http://locahost:8080
会发现被重定向到这个地址,并且要求登陆账号
http://localhost:8080/login
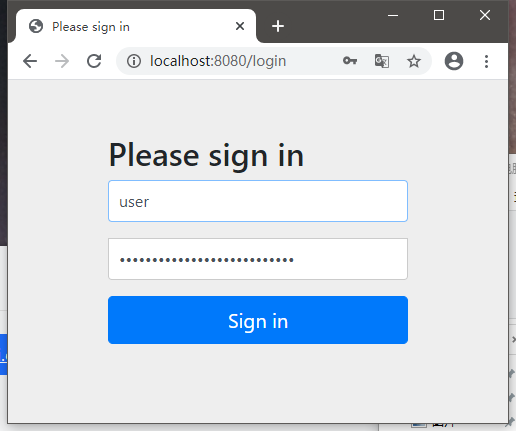
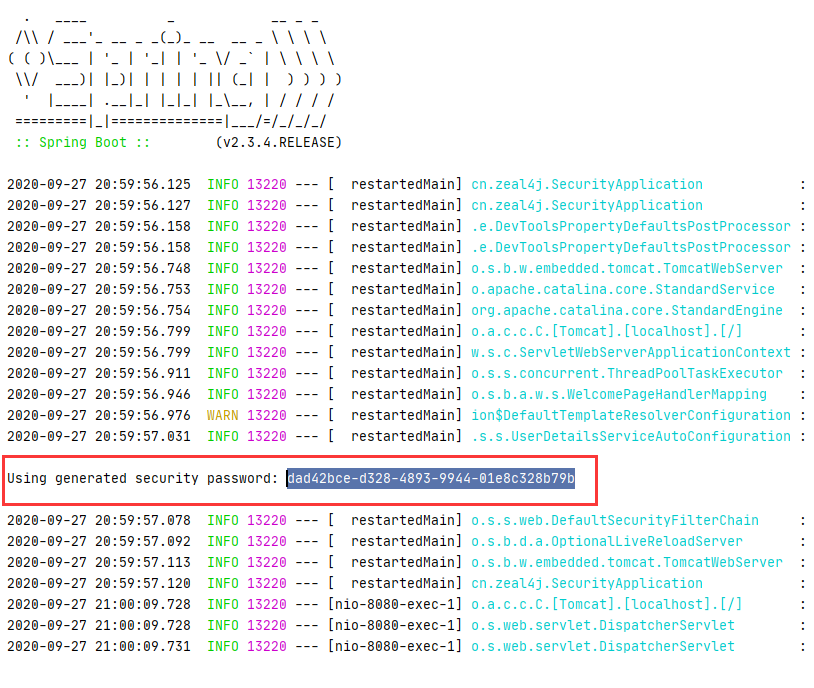
Spring-Security默认的用户是user,但是密码是由组件Spring-Security-Test随机生成的
在控制台输出可以找到:
登陆成功之后,才会跳转到页面中来:
参考地址:
https://www.bilibili.com/video/BV12D4y1U7D8?p=3
三、UserDetailService接口分析
package org.springframework.security.core.userdetails;
public interface UserDetailsService {
    UserDetails loadUserByUsername(String var1) throws UsernameNotFoundException;
}
只有一个接口方法,通过用户名加载账号信息
注意,返回的是一个UserDetails类型对象,账号细节实例
再来看UserDetails接口:
package org.springframework.security.core.userdetails;

import java.io.Serializable;
import java.util.Collection;
import org.springframework.security.core.GrantedAuthority;

public interface UserDetails extends Serializable {
    Collection<? extends GrantedAuthority> getAuthorities();

    String getPassword();

    String getUsername();

    boolean isAccountNonExpired();

    boolean isAccountNonLocked();

    boolean isCredentialsNonExpired();

    boolean isEnabled();
}
该类型也是一个接口,不过多出了其他一些方法:
1、Collection<? extends GrantedAuthority> getAuthorities();
获取账户对应的所有权限的集合对象

2、String getPassword();
获取密码

3、String getUsername();
获取用户名

4、boolean isAccountNonExpired();
账户是否过期,过期的账户不可以被认证

5、boolean isAccountNonLocked();
账户状态是否为锁定,锁定的账户不可以被认证

6、boolean isCredentialsNonExpired();
凭证是否过期,凭证即密码

7、boolean isEnabled();
账户状态是否为可用
相比于Shiro来说,UserDetailsService更像Shiro的Realm
而这个UserDetails对象在ShIro中是需要我们自己来实现的,例如之前的项目中的ActivateUser。
注意上面权限集合类型,官方文档特别注释该方法返回不可以为NULL。
当然,Security也提供了对应的一些实现类:

四、密码加密 PasswordEncoder接口
package org.springframework.security.crypto.password;

public interface PasswordEncoder {
    String encode(CharSequence var1);

    boolean matches(CharSequence var1, String var2);

    default boolean upgradeEncoding(String encodedPassword) {
        return false;
    }
}
API说明:
1、String encode(CharSequence var1);
设置密码加密的方法,加密逻辑自行实现

2、matches(CharSequence var1, String var2);
匹配判断,var1 是原始密码,var2 是加密的密码
匹配逻辑自行实现

3、upgradeEncoding(String encodedPassword) {
判断是否能够二次加密密码,一般不使用,且默认false
该接口下的实现类:

官方推荐的实现类使用这个:
org.springframework.security.crypto.bcrypt.BCryptPasswordEncoder
API测试:
package cn.zeal4j;

import org.junit.jupiter.api.Test;
import org.springframework.boot.test.context.SpringBootTest;
import org.springframework.security.crypto.bcrypt.BCryptPasswordEncoder;
import org.springframework.security.crypto.password.PasswordEncoder;

@SpringBootTest
class SecurityApplicationTests {

    @Test
    void contextLoads() {
        cryptTest();
    }

    private static void cryptTest() {
        final String PASSWORD = "123456";
        PasswordEncoder passwordEncoder = new BCryptPasswordEncoder();
        String encode = passwordEncoder.encode(PASSWORD);
        System.out.println(encode);

        boolean matches = passwordEncoder.matches(PASSWORD, encode);
        System.out.println(matches);
    }

}
结果:
$2a$10$NNySuHkEHtzLHodCivAFN.FvakFpR6/tSpkgzDW4QPd8PMF5IBaza
true