zoukankan      html  css  js  c++  java
  • 在wepy里面使用redux

    wepy 框架本身是支持 Redux 的,我们在构建项目的时候,将 是否安装 Redux 选择 y 就好了,会自动安装依赖,运行项目后看官方给的 demo 确实是可以做到的,但是官方文档里却对这一块只字不提,经过我自己尝试了一波,这才稍微摸清了它的使用方式,赶紧拿来与你们分享~

    注意了,接下来划重点了~

    具体实现

    运行我们的项目,发现官网已经给了我们一些 Redux 的使用方法,实际上主要是放在 store文件夹下面了,我们现在来一探究竟~

    step1

    入口文件 index.js ,里面主要是 初始化 Redux , 其中 promiseMiddleware 是一个中间件,方便后面 action 做异步处理~ reducers 是一个纯函数,用于接受 Action 和当前 State作为参数,返回一个新的 State ~

    import { createStore , applyMiddleware } from 'redux'
    import promiseMiddleware from 'redux-promise'
    import reducer from './reducers'
    
    const Store = createStore(
    	reducer ,
    	applyMiddleware(promiseMiddleware)
    )
    
    export default configStore => Store


    step2

    剩下三个文件夹分别是 types reducers 和 actions ,其中 types 用于定义我们要触发的 action 的名称,也就是表示 action 的名称,这里我定义了 counter ,内容分别如下:

    counter.js

    export const INCREMENT = 'INCREMENT'
    
    export const DECREMENT = 'DECREMENT'
    
    export const ASYNC_INCREMENT = 'ASYNC_INCREMENT'


    最后通过 types 文件夹的入口文件 index.js 将他们暴露出去~

    export * from './counter'


    step3

    reducers 文件件存放我们的纯函数,用来更改我们的状态 , 他也有一个入口文件 index.js,定义如下:

    import { combineReducers } from 'redux'
        import counter from './counter'
        export default combineReducers({
        	counter 
        })


    首先将 counter 和 list 的分别引入进来,通过 redux 定义的 combineReducers 函数,将所有的 reducers 合并成一个整体,方便我们后面对其进行管理!

    那么 counter 和 list 对应的 reducer 分别是 什么样的?我们直接看代码:

    counter.js

    import { handleActions } from 'redux-actions'
        import { INCREMENT , DECREMENT , ASYNC_INCREMENT } from '../types/counter'
        
        const defaultState  = {
        	num: 0 ,
        	asyncNum: 0
        }
        
        export default handleActions({
        	[INCREMENT](state){
        		return{
        			...state,
        			num : state.num + 1
        		}
        	},
        	[DECREMENT](state){
        		return{
        			...state,
        			num : state.num - 1
        		}
        	},
        	[ASYNC_INCREMENT](state, action){
        		return {
        			...state ,
        			asyncNum : state.asyncNum + action.payload
        		}
        	}
        },defaultState)


    我们介绍一下 counter.js 里面的 reducer , 首先引入了 handleActions 方法用来创建 actions , 它将多个相关的 reducer 写在一起也是 ,方面后期维护,也方便后期通过 dispatch来调用他们更改 state 里面的状态,它主要接收两个参数,第一个参数时候个大对象,里面存放多个 reducer , 第二个参数是初始化的时候 state 的状态值,因此,我们一开始就定义了 defaultState ;

    接着,我们看看里面的 reducer , 分别定义了 INCREMENT 、 DECREMENT 和 ASYNC_INCREMENT 三个 reducer ,前两个比较简单,分别是对 state 里面的 num 值进行 加减操作 , 最后一个是通过 action.payload 的值来对 asyncNum 的值进行异步操作的,具体怎么做到的,我们一会再看~


    step4

    我们终于走到这一步了,到这里,你已经离预期不远啦,就剩一个 actions 文件件了,毫不例外,入口文件 index.js 如下:

    index.js

    export * from './counter'


    很简单,只需要将所需的 action 导出即可~

    这个里面我只定义了 counter 的 action , 也就是为了刚才异步数据 asyncNum 准备的~

    counter.js

    import { ASYNC_INCREMENT } from '../types/counter'
        import { createAction } from 'redux-actions'
        
        export const asyncInc = createAction(ASYNC_INCREMENT,()=>{
            return new Promise(resolve=>{
                setTimeout(()=>{
                    resolve(1)
                },1000)
            })
        }

    这里跟 reducer 里面的要区分,这里是可以对数据进行一系列处理的,我们通过 createAction 创建一个 action , 该方法主要有两个参数,第一个参数 type 表示 action 的类型,第二个参数 payloadCreator 是一个 function ,处理并返回需要的 payload ;如果空缺,会使用默认方法。这里我们是延迟 1s 后返回一个 1 ;

    ok,到此为止,你已经基本完成了一个 redux 的容器~

    接下来,就是展示它怎么使用的时候了~

    step5

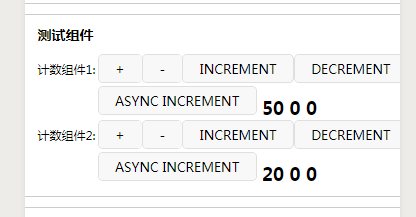
    我们看官方的demo中的count.wpy的文件,这里我把代码直接贴出来,然后慢慢来分析看看~

    代码如下:

    <style lang="less">
      .counter {
        text-align: left;
        font-size: 12px;
      }
    
      .count {
        font-size: 18px;
        font-weight: bold;
        &.red {
          color: red;
        }
        &.green {
          color: green;
        }
      }
    </style>
    <template>
      <view class="counter {{style}}">
        <button @tap="plus" size="mini"> +</button>
        <button @tap="minus" size="mini"> -</button>
        <button @tap="incNum" size="mini"> INCREMENT</button>
        <button @tap="decNum" size="mini"> DECREMENT</button>
        <button @tap="asyncInc" size="mini"> ASYNC INCREMENT</button>
        <text class="count"> {{num}}</text>
        <text class="count"> {{stateNum}}</text>
        <text class="count"> {{asyncNum}}</text>
      </view>
    </template>
    <script>
      import wepy from 'wepy'
      import {connect} from 'wepy-redux'
      import {INCREMENT, DECREMENT} from '../store/types/counter'
      import {asyncInc} from '../store/actions'
    
      @connect({
        stateNum(state) {
          return state.counter.num
        },
        asyncNum(state) {
          return state.counter.asyncNum
        }
      }, {
        incNum: INCREMENT,
        decNum: DECREMENT,
        asyncInc
      })
    
      export default class Counter extends wepy.component {
        props = {
          num: {
            type: [Number, String],
            coerce: function (v) {
              return +v
            },
            default: 50
          }
        }
    
        data = {}
        events = {
          'index-broadcast': (...args) => {
    
            let $event = args[args.length - 1];
            console.log(`${this.$name} receive ${$event.name} from ${$event.source.$name}`)
          }
        }
    
        watch = {
          num(curVal, oldVal) {
            console.log(`旧值:${oldVal},新值:${curVal}`)
          }
        }
    
        methods = {
          plus(p1, p2, event) {
            console.log("xxx", wepy.$instance.globalData.sex);
            console.log("yyy", this.$wxapp)
            this.num = this.num + 1;
            console.log(`this num is ${this.num}`)
            console.log(this.$name + ' plus tap');
            console.log(`p1 is ${p1},p2 is ${p2},ev is ${event}`);
            this.$emit('index-emit', 1, 2, 3)
          },
          minus() {
            this.num = this.num - 1
            console.log(this.$name + ' minus tap')
          }
        }
      }
    </script>


    ok~ 我们一起看看上面的代码是怎么做的~

    样式结构方面我们这里不做讨论,主要看 js 部分,其中 import { INCREMENT , DECREMENT } from '../store/types/counter' 和 import { asyncInc } from '../store/actions'分别表示从 counter 和 actions 导出所需的 action

    我们重点看看 从 wepy-redux 中 引入的 connect ,这个 connect 很关键,它是连接 组件 和 状态 的桥梁,主要用法是 @connect(states, actions) ~

    • states : 访问 state 上的值,可以是数组或者对象,如果是对象的话,则包含的是 K-V对, V 可以是函数还可以是字符串,如果是字符串的话则默认获取 state[V] , 否则的话则是使用返回值;而对于如果是数组的话(数组中的项只能为字符串),则认为是相同的 K-V 对象结构。 states 最终会附加到组件的 computed 属性值上。

  • 相关阅读:
    如何处理大数据量抽数长期无响应
    处理链报错邮件通知
    BW数据源深入研究【转自WKingChen的博客】
    BW:处理链报错解决步骤
    创建自己的Convers. Routine.
    vs2005 创建 C++ Dll项目
    C++之模板
    delphi 的 pos 函数 对中文支持不好。
    delphi中 socket 心跳包的实现
    C++ UTF8编码转换 CChineseCode
  • 原文地址:https://www.cnblogs.com/mmykdbc/p/9473633.html
Copyright © 2011-2022 走看看