本系列分为两篇:
1、【转】windows和linux中搭建python集成开发环境IDE
2、【转】linux和windows下安装python集成开发环境及其python包
3、windows和linux中搭建python集成开发环境IDE——如何设置多个python环境
参考:http://blog.csdn.net/pipisorry/article/details/39902327
一、安装Python集成开发环境IDE
参考【linux和windows中搭建python开发环境】
二、python包的安装
FOR LINUX:
和Python(x,y)不一样,在Ubuntu中需要手工安装科学计算的各个模块,下面介绍如何在linux下安装NumPy, SciPy, matplotlib, scikit-learn,NLTK,gensim,PIL,OpenCV,PyQt4, Spyder, Cython, SWIG, ETS
在Ubuntu下安装Python模块通常有3种方法:1)使用apt-get;2)使用pip命令(推荐);3)easy_instal
apt-get命令是Ubuntu自带的包管理命令,而pip和easy_instal则是专门为Python安装扩展模块的linux工具,通常pip会下载扩展模块的源代码并编译安装。
Ubuntu 12.04中缺省安装了Python2.7.3,首先通过下面的命令安装pip,pip是Python的一个安装和管理扩展库的工具。[Python的包管理工具]
sudo apt-get install python-pip
Ubuntu 14.04中缺省安装了Python3,自带pip,不用安装。
(实践证明,作者这个有误,其实并没有预装,也需要自己安装!但是有自带easy_install工具)
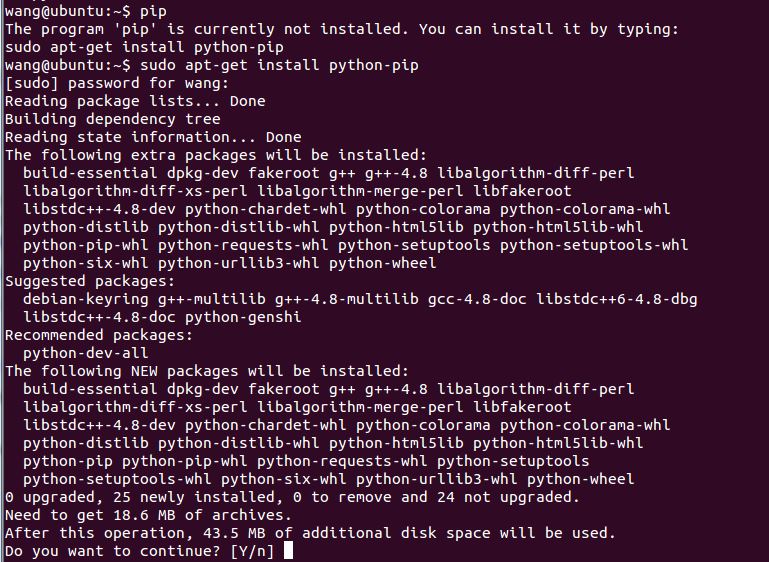
可能使用apt-get方法安装pip会出现如下问题,
$ sudo apt-get install python-pip
$ pip
Traceback (most recent call last):
  File "/usr/bin/pip", line 9, in <module>
    load_entry_point('pip==1.5.4', 'console_scripts', 'pip')()
  File "/usr/lib/python2.7/dist-packages/pkg_resources.py", line 351, in load_entry_point
    return get_distribution(dist).load_entry_point(group, name)
  File "/usr/lib/python2.7/dist-packages/pkg_resources.py", line 2363, in load_entry_point
    return ep.load()
  File "/usr/lib/python2.7/dist-packages/pkg_resources.py", line 2088, in load
    entry = __import__(self.module_name, globals(),globals(), ['__name__'])
  File "/usr/lib/python2.7/dist-packages/pip/__init__.py", line 11, in <module>
    from pip.vcs import git, mercurial, subversion, bazaar # noqa
  File "/usr/lib/python2.7/dist-packages/pip/vcs/mercurial.py", line 9, in <module>
    from pip.download import path_to_url
  File "/usr/lib/python2.7/dist-packages/pip/download.py", line 25, in <module>
    from requests.compat import IncompleteRead
ImportError: cannot import name IncompleteRead
解决1如下:
参考:【pip stops with ImportError for request-Modul】
应该是apt-get上面的库比较老,所以出现问题,可以使用easy_install升级pip版本即可解决:
$ sudo easy_install -U pip
Searching for pip
Reading https://pypi.python.org/simple/pip/
Best match: pip 1.5.6
Downloading https://pypi.python.org/packages/source/p/pip/pip-1.5.6.tar.gz#md5=01026f87978932060cc86c1dc527903e
Processing pip-1.5.6.tar.gz
Writing /tmp/easy_install-u_hfjN/pip-1.5.6/setup.cfg
Running pip-1.5.6/setup.py -q bdist_egg --dist-dir /tmp/easy_install-u_hfjN/pip-1.5.6/egg-dist-tmp-oG6xQ8
warning: no files found matching 'pip/cacert.pem'
warning: no files found matching '*.html' under directory 'docs'
warning: no previously-included files matching '*.rst' found under directory 'docs/_build'
no previously-included directories found matching 'docs/_build/_sources'
Adding pip 1.5.6 to easy-install.pth file
Installing pip script to /usr/local/bin
Installing pip2.7 script to /usr/local/bin
Installing pip2 script to /usr/local/bin

Installed /usr/local/lib/python2.7/dist-packages/pip-1.5.6-py2.7.egg
Processing dependencies for pip
Finished processing dependencies for pip
解决2如下:使用以下方法安装最新pip
参考:【Install Python packages on Ubuntu 14.04】
Of course, the starting point is to get pip installed. Official instructions are also available for installing pip. pip depends on setuptools, but we can install both using the get-pip.py script, as described at the install link. To be concrete, I did the following:
$ cd ~/Downloads
$ curl -O https://bootstrap.pypa.io/get-pip.py
$ python get-pip.py --user
If you don’t have curl installed, this can be remedied using:
$ sudo apt-get install curl
Because we have chosen local installation, the path ~/.local/bin has to be added to our path. To do that, add the following to the end of your ~/.bashrc file:
# include .local/bin for local python scripts
export PATH=~/.local/bin:$PATH
Then, source ~/.bashrc:
$ source ~/.bashrc
Try the following to see if you get similar results and to make sure the basic setup is working:
$ which pip
/home/cstrelioff/.local/bin/pip
$ pip --version
pip 1.5.6 from /home/cstrelioff/.local/lib/python2.7/site-packages (python 2.7)
Of course, your username should be in the path, but the output should look something like the above.
比较:
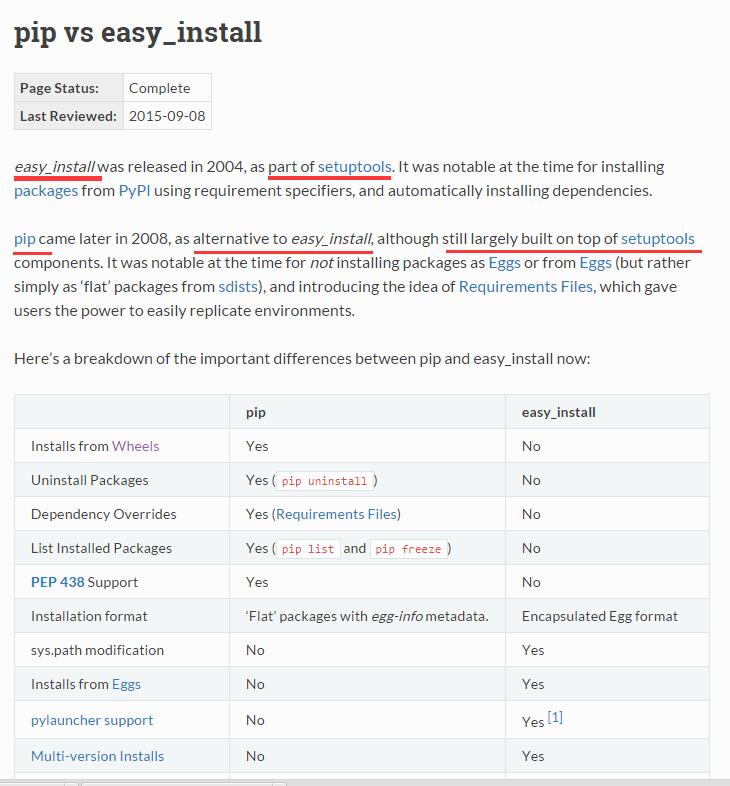
区别
pip 官網的說法,pip 改善了不少 easy_install 的缺點,如此說來 pip 應該是略勝一籌,不過它還不能夠完全取代對方,因為目前有很多套件還是得用 easy_install 安裝
详细
安裝套件:
easy_install PackageName
更新套件:
easy_install -U PackageName
移除套件:
easy_install -m PackageName
顯示說明:
easy_install --showhelp
pip (pip installs packages) 的安裝與使用
pip 的安裝方法:
easy_install pip
有趣的是,pip 可以透過 easy_install 安裝,而且也會裝到 Scripts 資料夾下。
安裝套件:
pip install PackageName
更新套件:
pip install -U PackageName
移除套件:
pip uninstall PackageName
搜尋套件:
pip search PackageName
顯示說明:
pip help
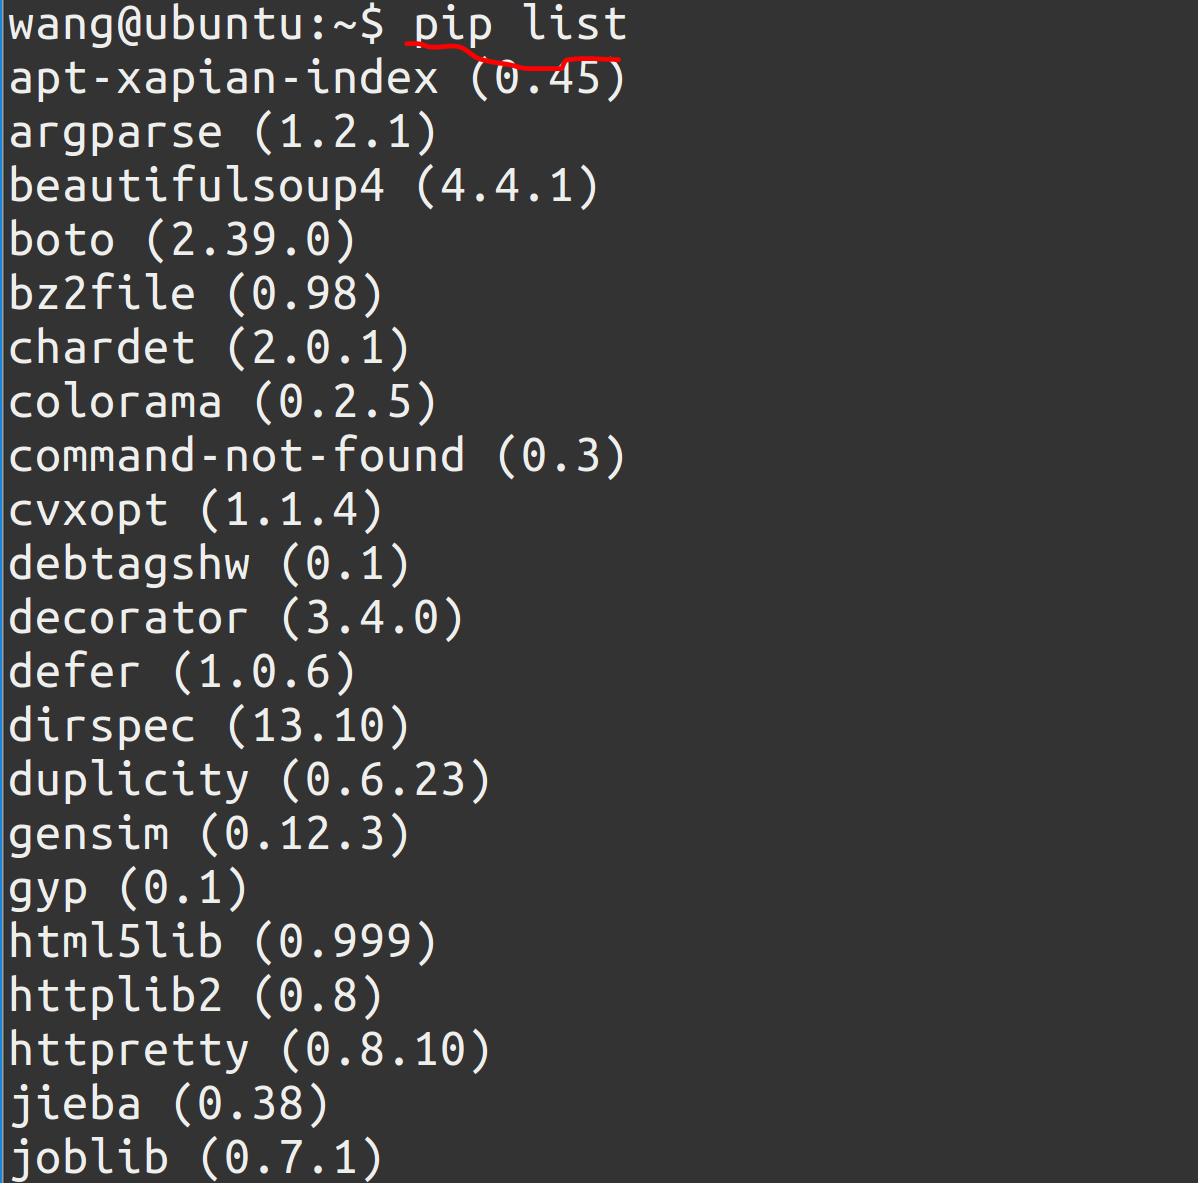
查看安装了那些python包
pip list
apt-get 与 pip 的区别?可参考:apt get install vs pip install
|
|
PyPI is the Python Package index — repository of python modules.
Some of the differences between installing python packages from
Which one should you use: Both |
|
Your main problem is to find the right package name in both cases: will give you the right name for the package you want to install using will give you the right name for the package you want to install using So, in conlusion, the correspondent of Now depends on you what you want to choose when you want to install a python package: |
Test installation测试python拓展安装包是否安装成功
运行 python
然后import ×××,没有提示错误就说明安装成功
下面在linux下安装NumPy,SciPy和matplotlib
1. 通过apt-get命令快速安装
sudo apt-get install python-numpy
sudo apt-get install python-scipy
sudo apt-get install python-matplotlib
可以在pycharm console中查看 numpy 版本和路径:
import numpy
print numpy.__version__
print numpy.__file__
2. 通过pip编译安装
可以先用apt-get命令安装所有编译所需的库:
sudo apt-get build-dep python-numpy
sudo apt-get build-dep python-scipy
然后通过pip命令安装:
sudo pip install numpy
sudo pip install scipy
通过build-dep会安装很多库,包括Python 3.2。
PyQt4和Spyder
下面的命令安装PyQt4,Qt界面设计器,PyQt4的开发工具以及文档:
sudo apt-get install python-qt4
sudo apt-get install qt4-designer
sudo apt-get install pyqt4-dev-tools
sudo apt-get install python-qt4-doc
安装完毕之后,文档位于:
/usr/share/doc/python-qt4-doc
安装好PyQt4之后通过下面的命令安装Spyder:
sudo apt-get install spyder
由于Spyder经常更新,通过下面的命令可以安装最新版:
sudo pip install spyder --upgrade
cython和SWIG
Cython和SWIG是编写Python扩展模块的工具:
sudo pip install cython
sudo apt-get install swig
输入 cython --version 和 swig -version 查看版本。
ETS
ETS是enthought公司开发的一套科学计算软件包,其中的Mayavi通过VTK实现数据的三维可视化。
首先通过下面的命令安装编译ETS所需的库:
sudo apt-get install python-dev libxtst-dev scons python-vtk pyqt4-dev-tools python2.7-wxgtk2.8 python-configobj
sudo apt-get install libgl1-mesa-dev libglu1-mesa-dev
创建ets目录,并在此目录下下载ets.py,运行ets.py可以复制最新版的ETS源程序,并安装:
mkdir ets
cd ets
wget https://github.com/enthought/ets/raw/master/ets.py
python ets.py clone
sudo python ets.py develop
#sudo python ets.py install 或者运行install安装
如果一切正常,那么输入 mayavi2 命令则会启动mayavi。
linux下安装scikit-learn
Building scikit-learn with pip
This is usually the fastest way to install or upgrade to the latest stablerelease:
pip install --user --install-option="--prefix=" -U scikit-learn
Note:
1. The --user flag ask pip to install scikit-learn in the$HOME/.localfolder therefore not requiring root permission. This flag should make pipignore any old version of scikit-learn previously installed on the system whilebenefitting from system packages for numpy and scipy. Those dependencies canbe long and complex to build correctly from source.
2. The --install-option="--prefix=" flag is only required if Python has adistutils.cfg configuration with a predefinedprefix= entry.
From source package
Download the source package from http://pypi.python.org/pypi/scikit-learn/, unpack the sources and cd into the source directory.
This packages uses distutils, which is the default way of installingpython modules. The install command is:
python setup.py install
linux下安装NLTK
- Install Setuptools: http://pypi.python.org/pypi/setuptools
- Install Pip: run sudoeasy_installpip
- Install Numpy (optional): run sudo pip install-Unumpy
- Install NLTK: run sudopipinstall-Unltk
- Test installation: run python then type importnltk
Note:Mac/Unix都通过这种方式安装nltk
[http://www.nltk.org/install.html]
linux下安装gensim
1. #pip install gensim
unzipped the source tar.gz package, you'll need to run:
#python setup.py test
#python setup.py install
Note:gensim依赖NumPy和SciPy,要先安装
linux下安装OpenCV
python-opencv:
环境
ubuntu 12.04 LTS
python 2.7.3
opencv 2.3.1-7
安装依赖
sudo apt-get install libopencv-*
sudo apt-get install python-opencv
sudo apt-get install python-numpy
【UBUNTU下安装OPENCV和测试python-opencv】
【ubuntu 下 安装 python-opencv 配置】
dpkg -L python-opencv命令查看,搜索安装到何处
root@ubuntu:~#dpkg -L python-opencv
/.
/usr
/usr/share
/usr/share/python-support
/usr/share/python-support/python-opencv.public
/usr/share/doc
/usr/share/doc/python-opencv
/usr/share/doc/python-opencv/copyright
/usr/share/pyshared
/usr/share/pyshared/cv.py
/usr/lib
/usr/lib/pyshared
/usr/lib/pyshared/python2.7
/usr/lib/pyshared/python2.7/cv2.so
/usr/share/doc/python-opencv/changelog.Debian.gz
测试opencv安装好没:
- ###################################
- # coding=utf-8
- # !/usr/bin/env python
- # __author__ = 'pipi'
- # ctime 2014.10.12
- # 测试opencv
- ###################################
- import cv
- if __name__ == '__main__':
- img = cv.LoadImageM ("faces.jpg") # 打开图像
- cv.NamedWindow ("ShowImage") # 创建窗口
- cv.ShowImage ("ShowImage", img) # 显示图像
- cv.WaitKey (0)
python-opencv这个基本过时了,cv2是opencv自己带的python绑定,编译opencv应该就有了
python-opencv:
更新下载更新软件包列表信息
apt-get update
查询OpenCV相关软件包
$ apt-cache search opencv
libcv-dev - development files for libcv
libcv1 - computer vision library
libcvaux-dev - development files for libcvaux
libcvaux1 - computer vision extension library
libhighgui-dev - development files for libhighgui
libhighgui1 - computer vision GUI library
opencv-doc - OpenCV documentation and examples
python-opencv - Python bindings for the computer vision library
//以上内容可能是没有及时更新
//用命令行$ apt-cache search opencv在ubuntu(12.04LTS)找到的最新的opencv版本是2.1
harpia - Image Processing/Computer Vision Automatic Prgm. Tool
libcv-dev - development files for libcv
libcv2.1 - computer vision library
libcvaux-dev - development files for libcvaux
libcvaux2.1 - computer vision extension library
libhighgui-dev - development files for libhighgui
libhighgui2.1 - computer vision GUI library
opencv-doc - OpenCV documentation and examples
python-opencv - Python bindings for the computer vision library
在这里,OpenCV的库CxCore和Cv都被包含入Deb包libcv中。
安装相关软件包
如果只是用来运行OpenCV程序,仅需安装libcv1,libcvaux1,libhighgui1:
apt-get install libcv1 libcvaux1 libhighgui1
如果你要使用OpenCV来编写程序,那么还需要安装libcv-dev,libcvaux-dev,libhighgui-dev包。
apt-get install libcv-dev libcvaux-dev libhighgui-dev
文档在opencv-doc包中,python-opencv是OpenCV的Python语言包,可根据需要安装。
测试安装包
测试是否安装成功,你可以使用以下的命令行编译位于源代码包中的drawing.c例子:
g++ drawing.c `pkg-config opencv --libs --cflags opencv` -o drawing
成功编译后你应该能够可以执行./drawing看到highgui输出窗口的结果了.
c-opencv?
为了编译OpenCV需要下载cmake编译工具,和一些依赖库:
sudo python setup.py install
sudo apt-get install build-essential
sudo apt-get install cmake
sudo apt-get install cmake-gui
sudo apt-get install libavcodec-dev libavformat-dev libswscale-dev
sudo apt-get install libjpeg-dev libpng-dev libtiff-dev libjasper-dev
然后终端输入http://sourceforge.net/projects/opencvlibrary/files/latest/download?source=files下载opencv源代码
或者从 http://sourceforge.net/projects/opencvlibrary/下载最新版的OpenCV源代码,并解压。
然后创建编译用的目录release,并启动cmake-gui:
mkdir release
cmake-gui
在界面中选择OpenCV源代码的目录,和编译输出目录release,然后按Configure按钮,并根据需要设置各个编译选项,最后点Generate按钮,退出cmake-gui界面。进入编译路径,执行下面的命令:
cd release
make
sudo make install
安装完毕之后,启动IPython,并输入 import cv2 测试OpenCV是否能正常载入。在Ubuntu下貌似OpenCv不兼容使用apt-get安装numpy和scipy貌似,好像版本过低。我的解决方法是下了最新的numpy和scipy,然后自己编译安装上去的。为了安装这两个软件,我又安装了另外一大堆东西。
ps:在Ubuntu下貌似OpenCv不兼容使用apt-get安装numpy和scipy貌似,版本过低。解决方法是下载最新的numpy和scipy,然后自己编译安装上去的。为了安装这两个软件,还要安装了另外一大堆东西。
[http://blog.csdn.net/pipisorry/article/details/39902327]
for windows
windows下安装NumPy,SciPy,matplotlib,pil, gensim, django,pandas等python拓展包,直接下载exe文件或者whl文件安装(前提已安装python)
windows安装包下载[Unofficial Windows Binaries for Python Extension Packages]
whl文件的安装
1. 安装whl拓展名的包需要pip,安装pip【安装pip】(python3自带,不用安装)
2. 安装whl文件
1>打开python,在python命令行中输入(如果提示install错误,见2>)
pip install Pillow-2.7.0-cp34-none-win_amd64.whl2>直接在cmd中输入上面的安装命令
windows下安装PIL
1 win32下安装pil.whl文件
下载http://www.pythonware.com/products/pil/
2 win64下安装pil:
没有pil安装包,可用pillow(里面包含pil)替代
pip install pillow
windows下安装gensim
Note:gensim依赖NumPy和SciPy
1 pip安装:
pip install gensim #python3自带pip
2 下载原码安装:
https://pypi.python.org/pypi/gensim#downloads
unpack the source gensim-0.10.3.tar.gz and run
`D:DownloadsProgrammingPythongensim-0.10.3> python setup.py install`
[scripygensimwindows64 位 安装python 扩展包pythoncollection]
Documentation
Manual for the gensim package is available in HTML. Itcontains a walk-through of all its features and a complete reference section.It is also included in the source distribution package.
[https://pypi.python.org/pypi/gensim#downloads]
pip安装gensim时出现错误:
#【彻底解决 error: Unable to find vcvarsall.bat】
1 pip install for python 2.7:
C:Userspipippip.log:
Microsoft Visual C++ 9.0 is required (Unable to find vcvarsall.bat). Get it fromhttp://aka.ms/vcpython27
an integer is required
解释:For Windows installations:
While running setup.py for package installations, Python 2.7 searches for an installed Visual Studio 2008. You can trick Python to use a newer Visual Studio by setting the correct path inVS90COMNTOOLS environment variable before callingsetup.py.
Execute the following command based on the version of Visual Studio installed:
Visual Studio 2010 (VS10): SET VS90COMNTOOLS=%VS100COMNTOOLS%
Visual Studio 2012 (VS11): SET VS90COMNTOOLS=%VS110COMNTOOLS%
Visual Studio 2013 (VS12): SET VS90COMNTOOLS=%VS120COMNTOOLS%
【http://stackoverflow.com/questions/2817869/error-unable-to-find-vcvarsall-bat?rq=1】
Installing gensim in windows 7
2 pip install for python3.4:
TypeError: 'str' object cannot be interpreted as an integer
Unable to find vcvarsall.bat
'str' object cannot be interpreted as an integer
解决:只安装visual studio 2010中c++就ok了
Important Note:【http://stackoverflow.com/questions/2817869/error-unable-to-find-vcvarsall-bat?rq=1】
If you are using a Python version more recent than Python 2.7 (especially any Python 3.x), you most likely need a version of Visual Studio C++other than the 2008 version.
See bottom for details.
Installing Windows SDK 7.1 and then re-installing MS 2010 C++ Express Edition fixed the problem.
【https://groups.google.com/forum/#!msg/gensim/8Qe-nlBMncU/4Kl0zh4ZtuoJ】
python在windows下通过pip安装带有c扩展的包时,如果是python 2.7,需要vs2008,如果是python 3.x,需要vs2010,版本错了都不行,更别提mingw。因为c运行时不兼容的原因。
【http://www.zhihu.com/question/26857761】
3Difficulty installing Gensim using from source and pip
[http://blog.csdn.net/pipisorry/article/details/39902327]
windows下pythonQt的安装和使用
Test installation测试python拓展安装包是否安装成功
运行 python
然后import ×××,没有提示错误就说明安装成功
from:http://blog.csdn.net/pipisorry/article/details/39902327
Ubuntu-Python2.7安装 scipy,numpy,matplotlib
Mountail Lion 上的 Python 科研环境的搭建
版权声明:本文为博主http://blog.csdn.net/pipisorry原创文章,未经博主允许不得转载。