原文:http://blog.csdn.net/liuhe688/article/details/6715983
上次我向大家介绍了SQLite的基本信息和使用过程,相信朋友们对SQLite已经有所了解了,那今天呢,我就和大家分享一下在Android中如何使用SQLite。
现在的主流移动设备像Android、iPhone等都使用SQLite作为复杂数据的存储引擎,在我们为移动设备开发应用程序时,也许就要使用到SQLite来存储我们大量的数据,所以我们就需要掌握移动设备上的SQLite开发技巧。对于Android平台来说,系统内置了丰富的API来供开发人员操作SQLite,我们可以轻松的完成对数据的存取。
下面就向大家介绍一下SQLite常用的操作方法,为了方便,我将代码写在了Activity的onCreate中:
- @Override
- protected void onCreate(Bundle savedInstanceState) {
- super.onCreate(savedInstanceState);
- //打开或创建test.db数据库
- SQLiteDatabase db = openOrCreateDatabase("test.db", Context.MODE_PRIVATE, null);
- db.execSQL("DROP TABLE IF EXISTS person");
- //创建person表
- db.execSQL("CREATE TABLE person (_id INTEGER PRIMARY KEY AUTOINCREMENT, name VARCHAR, age SMALLINT)");
- Person person = new Person();
- person.name = "john";
- person.age = 30;
- //插入数据
- db.execSQL("INSERT INTO person VALUES (NULL, ?, ?)", new Object[]{person.name, person.age});
- person.name = "david";
- person.age = 33;
- //ContentValues以键值对的形式存放数据
- ContentValues cv = new ContentValues();
- cv.put("name", person.name);
- cv.put("age", person.age);
- //插入ContentValues中的数据
- db.insert("person", null, cv);
- cv = new ContentValues();
- cv.put("age", 35);
- //更新数据
- db.update("person", cv, "name = ?", new String[]{"john"});
- Cursor c = db.rawQuery("SELECT * FROM person WHERE age >= ?", new String[]{"33"});
- while (c.moveToNext()) {
- int _id = c.getInt(c.getColumnIndex("_id"));
- String name = c.getString(c.getColumnIndex("name"));
- int age = c.getInt(c.getColumnIndex("age"));
- Log.i("db", "_id=>" + _id + ", name=>" + name + ", age=>" + age);
- }
- c.close();
- //删除数据
- db.delete("person", "age < ?", new String[]{"35"});
- //关闭当前数据库
- db.close();
- //删除test.db数据库
- // deleteDatabase("test.db");
- }
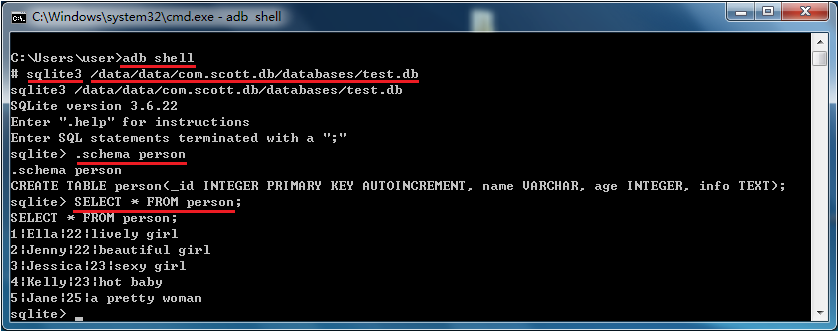
在执行完上面的代码后,系统就会在/data/data/[PACKAGE_NAME]/databases目录下生成一个“test.db”的数据库文件,如图:

上面的代码中基本上囊括了大部分的数据库操作;对于添加、更新和删除来说,我们都可以使用
- db.executeSQL(String sql);
- db.executeSQL(String sql, Object[] bindArgs);//sql语句中使用占位符,然后第二个参数是实际的参数集
除了统一的形式之外,他们还有各自的操作方法:
- db.insert(String table, String nullColumnHack, ContentValues values);
- db.update(String table, Contentvalues values, String whereClause, String whereArgs);
- db.delete(String table, String whereClause, String whereArgs);
以上三个方法的第一个参数都是表示要操作的表名;insert中的第二个参数表示如果插入的数据每一列都为空的话,需要指定此行中某一列的名称,系统将此列设置为NULL,不至于出现错误;insert中的第三个参数是ContentValues类型的变量,是键值对组成的Map,key代表列名,value代表该列要插入的值;update的第二个参数也很类似,只不过它是更新该字段key为最新的value值,第三个参数whereClause表示WHERE表达式,比如“age > ? and age < ?”等,最后的whereArgs参数是占位符的实际参数值;delete方法的参数也是一样。
下面来说说查询操作。查询操作相对于上面的几种操作要复杂些,因为我们经常要面对着各种各样的查询条件,所以系统也考虑到这种复杂性,为我们提供了较为丰富的查询形式:
- db.rawQuery(String sql, String[] selectionArgs);
- db.query(String table, String[] columns, String selection, String[] selectionArgs, String groupBy, String having, String orderBy);
- db.query(String table, String[] columns, String selection, String[] selectionArgs, String groupBy, String having, String orderBy, String limit);
- db.query(String distinct, String table, String[] columns, String selection, String[] selectionArgs, String groupBy, String having, String orderBy, String limit);
上面几种都是常用的查询方法,第一种最为简单,将所有的SQL语句都组织到一个字符串中,使用占位符代替实际参数,selectionArgs就是占位符实际参数集;下面的几种参数都很类似,columns表示要查询的列所有名称集,selection表示WHERE之后的条件语句,可以使用占位符,groupBy指定分组的列名,having指定分组条件,配合groupBy使用,orderBy指定排序的列名,limit指定分页参数,distinct可以指定“true”或“false”表示要不要过滤重复值。需要注意的是,selection、groupBy、having、orderBy、limit这几个参数中不包括“WHERE”、“GROUP BY”、“HAVING”、“ORDER BY”、“LIMIT”等SQL关键字。
最后,他们同时返回一个Cursor对象,代表数据集的游标,有点类似于JavaSE中的ResultSet。
下面是Cursor对象的常用方法:
- c.move(int offset); //以当前位置为参考,移动到指定行
- c.moveToFirst(); //移动到第一行
- c.moveToLast(); //移动到最后一行
- c.moveToPosition(int position); //移动到指定行
- c.moveToPrevious(); //移动到前一行
- c.moveToNext(); //移动到下一行
- c.isFirst(); //是否指向第一条
- c.isLast(); //是否指向最后一条
- c.isBeforeFirst(); //是否指向第一条之前
- c.isAfterLast(); //是否指向最后一条之后
- c.isNull(int columnIndex); //指定列是否为空(列基数为0)
- c.isClosed(); //游标是否已关闭
- c.getCount(); //总数据项数
- c.getPosition(); //返回当前游标所指向的行数
- c.getColumnIndex(String columnName);//返回某列名对应的列索引值
- c.getString(int columnIndex); //返回当前行指定列的值
在上面的代码示例中,已经用到了这几个常用方法中的一些,关于更多的信息,大家可以参考官方文档中的说明。
最后当我们完成了对数据库的操作后,记得调用SQLiteDatabase的close()方法释放数据库连接,否则容易出现SQLiteException。
上面就是SQLite的基本应用,但在实际开发中,为了能够更好的管理和维护数据库,我们会封装一个继承自SQLiteOpenHelper类的数据库操作类,然后以这个类为基础,再封装我们的业务逻辑方法。
下面,我们就以一个实例来讲解具体的用法,我们新建一个名为db的项目,结构如下:

其中DBHelper继承了SQLiteOpenHelper,作为维护和管理数据库的基类,DBManager是建立在DBHelper之上,封装了常用的业务方法,Person是我们的person表对应的JavaBean,MainActivity就是我们显示的界面。
下面我们先来看一下DBHelper:
- package com.scott.db;
- import android.content.Context;
- import android.database.sqlite.SQLiteDatabase;
- import android.database.sqlite.SQLiteOpenHelper;
- public class DBHelper extends SQLiteOpenHelper {
- private static final String DATABASE_NAME = "test.db";
- private static final int DATABASE_VERSION = 1;
- public DBHelper(Context context) {
- //CursorFactory设置为null,使用默认值
- super(context, DATABASE_NAME, null, DATABASE_VERSION);
- }
- //数据库第一次被创建时onCreate会被调用
- @Override
- public void onCreate(SQLiteDatabase db) {
- db.execSQL("CREATE TABLE IF NOT EXISTS person" +
- "(_id INTEGER PRIMARY KEY AUTOINCREMENT, name VARCHAR, age INTEGER, info TEXT)");
- }
- //如果DATABASE_VERSION值被改为2,系统发现现有数据库版本不同,即会调用onUpgrade
- @Override
- public void onUpgrade(SQLiteDatabase db, int oldVersion, int newVersion) {
- db.execSQL("ALTER TABLE person ADD COLUMN other STRING");
- }
- }
正如上面所述,数据库第一次创建时onCreate方法会被调用,我们可以执行创建表的语句,当系统发现版本变化之后,会调用onUpgrade方法,我们可以执行修改表结构等语句。
为了方便我们面向对象的使用数据,我们建一个Person类,对应person表中的字段,如下:
- package com.scott.db;
- public class Person {
- public int _id;
- public String name;
- public int age;
- public String info;
- public Person() {
- }
- public Person(String name, int age, String info) {
- this.name = name;
- this.age = age;
- this.info = info;
- }
- }
然后,我们需要一个DBManager,来封装我们所有的业务方法,代码如下:
- package com.scott.db;
- import java.util.ArrayList;
- import java.util.List;
- import android.content.ContentValues;
- import android.content.Context;
- import android.database.Cursor;
- import android.database.sqlite.SQLiteDatabase;
- public class DBManager {
- private DBHelper helper;
- private SQLiteDatabase db;
- public DBManager(Context context) {
- helper = new DBHelper(context);
- //因为getWritableDatabase内部调用了mContext.openOrCreateDatabase(mName, 0, mFactory);
- //所以要确保context已初始化,我们可以把实例化DBManager的步骤放在Activity的onCreate里
- db = helper.getWritableDatabase();
- }
- /**
- * add persons
- * @param persons
- */
- public void add(List<Person> persons) {
- db.beginTransaction(); //开始事务
- try {
- for (Person person : persons) {
- db.execSQL("INSERT INTO person VALUES(null, ?, ?, ?)", new Object[]{person.name, person.age, person.info});
- }
- db.setTransactionSuccessful(); //设置事务成功完成
- } finally {
- db.endTransaction(); //结束事务
- }
- }
- /**
- * update person's age
- * @param person
- */
- public void updateAge(Person person) {
- ContentValues cv = new ContentValues();
- cv.put("age", person.age);
- db.update("person", cv, "name = ?", new String[]{person.name});
- }
- /**
- * delete old person
- * @param person
- */
- public void deleteOldPerson(Person person) {
- db.delete("person", "age >= ?", new String[]{String.valueOf(person.age)});
- }
- /**
- * query all persons, return list
- * @return List<Person>
- */
- public List<Person> query() {
- ArrayList<Person> persons = new ArrayList<Person>();
- Cursor c = queryTheCursor();
- while (c.moveToNext()) {
- Person person = new Person();
- person._id = c.getInt(c.getColumnIndex("_id"));
- person.name = c.getString(c.getColumnIndex("name"));
- person.age = c.getInt(c.getColumnIndex("age"));
- person.info = c.getString(c.getColumnIndex("info"));
- persons.add(person);
- }
- c.close();
- return persons;
- }
- /**
- * query all persons, return cursor
- * @return Cursor
- */
- public Cursor queryTheCursor() {
- Cursor c = db.rawQuery("SELECT * FROM person", null);
- return c;
- }
- /**
- * close database
- */
- public void closeDB() {
- db.close();
- }
- }
我们在DBManager构造方法中实例化DBHelper并获取一个SQLiteDatabase对象,作为整个应用的数据库实例;在添加多个Person信息时,我们采用了事务处理,确保数据完整性;最后我们提供了一个closeDB方法,释放数据库资源,这一个步骤在我们整个应用关闭时执行,这个环节容易被忘记,所以朋友们要注意。
我们获取数据库实例时使用了getWritableDatabase()方法,也许朋友们会有疑问,在getWritableDatabase()和getReadableDatabase()中,你为什么选择前者作为整个应用的数据库实例呢?在这里我想和大家着重分析一下这一点。
我们来看一下SQLiteOpenHelper中的getReadableDatabase()方法:
- public synchronized SQLiteDatabase getReadableDatabase() {
- if (mDatabase != null && mDatabase.isOpen()) {
- // 如果发现mDatabase不为空并且已经打开则直接返回
- return mDatabase;
- }
- if (mIsInitializing) {
- // 如果正在初始化则抛出异常
- throw new IllegalStateException("getReadableDatabase called recursively");
- }
- // 开始实例化数据库mDatabase
- try {
- // 注意这里是调用了getWritableDatabase()方法
- return getWritableDatabase();
- } catch (SQLiteException e) {
- if (mName == null)
- throw e; // Can't open a temp database read-only!
- Log.e(TAG, "Couldn't open " + mName + " for writing (will try read-only):", e);
- }
- // 如果无法以可读写模式打开数据库 则以只读方式打开
- SQLiteDatabase db = null;
- try {
- mIsInitializing = true;
- String path = mContext.getDatabasePath(mName).getPath();// 获取数据库路径
- // 以只读方式打开数据库
- db = SQLiteDatabase.openDatabase(path, mFactory, SQLiteDatabase.OPEN_READONLY);
- if (db.getVersion() != mNewVersion) {
- throw new SQLiteException("Can't upgrade read-only database from version " + db.getVersion() + " to "
- + mNewVersion + ": " + path);
- }
- onOpen(db);
- Log.w(TAG, "Opened " + mName + " in read-only mode");
- mDatabase = db;// 为mDatabase指定新打开的数据库
- return mDatabase;// 返回打开的数据库
- } finally {
- mIsInitializing = false;
- if (db != null && db != mDatabase)
- db.close();
- }
- }
在getReadableDatabase()方法中,首先判断是否已存在数据库实例并且是打开状态,如果是,则直接返回该实例,否则试图获取一个可读写模式的数据库实例,如果遇到磁盘空间已满等情况获取失败的话,再以只读模式打开数据库,获取数据库实例并返回,然后为mDatabase赋值为最新打开的数据库实例。既然有可能调用到getWritableDatabase()方法,我们就要看一下了:
- public synchronized SQLiteDatabase getWritableDatabase() {
- if (mDatabase != null && mDatabase.isOpen() && !mDatabase.isReadOnly()) {
- // 如果mDatabase不为空已打开并且不是只读模式 则返回该实例
- return mDatabase;
- }
- if (mIsInitializing) {
- throw new IllegalStateException("getWritableDatabase called recursively");
- }
- // If we have a read-only database open, someone could be using it
- // (though they shouldn't), which would cause a lock to be held on
- // the file, and our attempts to open the database read-write would
- // fail waiting for the file lock. To prevent that, we acquire the
- // lock on the read-only database, which shuts out other users.
- boolean success = false;
- SQLiteDatabase db = null;
- // 如果mDatabase不为空则加锁 阻止其他的操作
- if (mDatabase != null)
- mDatabase.lock();
- try {
- mIsInitializing = true;
- if (mName == null) {
- db = SQLiteDatabase.create(null);
- } else {
- // 打开或创建数据库
- db = mContext.openOrCreateDatabase(mName, 0, mFactory);
- }
- // 获取数据库版本(如果刚创建的数据库,版本为0)
- int version = db.getVersion();
- // 比较版本(我们代码中的版本mNewVersion为1)
- if (version != mNewVersion) {
- db.beginTransaction();// 开始事务
- try {
- if (version == 0) {
- // 执行我们的onCreate方法
- onCreate(db);
- } else {
- // 如果我们应用升级了mNewVersion为2,而原版本为1则执行onUpgrade方法
- onUpgrade(db, version, mNewVersion);
- }
- db.setVersion(mNewVersion);// 设置最新版本
- db.setTransactionSuccessful();// 设置事务成功
- } finally {
- db.endTransaction();// 结束事务
- }
- }
- onOpen(db);
- success = true;
- return db;// 返回可读写模式的数据库实例
- } finally {
- mIsInitializing = false;
- if (success) {
- // 打开成功
- if (mDatabase != null) {
- // 如果mDatabase有值则先关闭
- try {
- mDatabase.close();
- } catch (Exception e) {
- }
- mDatabase.unlock();// 解锁
- }
- mDatabase = db;// 赋值给mDatabase
- } else {
- // 打开失败的情况:解锁、关闭
- if (mDatabase != null)
- mDatabase.unlock();
- if (db != null)
- db.close();
- }
- }
- }
大家可以看到,几个关键步骤是,首先判断mDatabase如果不为空已打开并不是只读模式则直接返回,否则如果mDatabase不为空则加锁,然后开始打开或创建数据库,比较版本,根据版本号来调用相应的方法,为数据库设置新版本号,最后释放旧的不为空的mDatabase并解锁,把新打开的数据库实例赋予mDatabase,并返回最新实例。
看完上面的过程之后,大家或许就清楚了许多,如果不是在遇到磁盘空间已满等情况,getReadableDatabase()一般都会返回和getWritableDatabase()一样的数据库实例,所以我们在DBManager构造方法中使用getWritableDatabase()获取整个应用所使用的数据库实例是可行的。当然如果你真的担心这种情况会发生,那么你可以先用getWritableDatabase()获取数据实例,如果遇到异常,再试图用getReadableDatabase()获取实例,当然这个时候你获取的实例只能读不能写了。
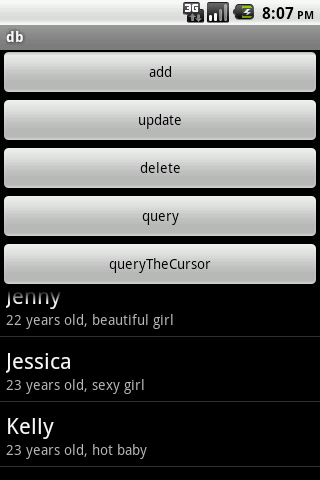
最后,让我们看一下如何使用这些数据操作方法来显示数据,下面是MainActivity.java的布局文件和代码:
- <?xml version="1.0" encoding="utf-8"?>
- <LinearLayout xmlns:android="http://schemas.android.com/apk/res/android"
- android:orientation="vertical"
- android:layout_width="fill_parent"
- android:layout_height="fill_parent">
- <Button
- android:layout_width="fill_parent"
- android:layout_height="wrap_content"
- android:text="add"
- android:onClick="add"/>
- <Button
- android:layout_width="fill_parent"
- android:layout_height="wrap_content"
- android:text="update"
- android:onClick="update"/>
- <Button
- android:layout_width="fill_parent"
- android:layout_height="wrap_content"
- android:text="delete"
- android:onClick="delete"/>
- <Button
- android:layout_width="fill_parent"
- android:layout_height="wrap_content"
- android:text="query"
- android:onClick="query"/>
- <Button
- android:layout_width="fill_parent"
- android:layout_height="wrap_content"
- android:text="queryTheCursor"
- android:onClick="queryTheCursor"/>
- <ListView
- android:id="@+id/listView"
- android:layout_width="fill_parent"
- android:layout_height="wrap_content"/>
- </LinearLayout>
- package com.scott.db;
- import java.util.ArrayList;
- import java.util.HashMap;
- import java.util.List;
- import java.util.Map;
- import android.app.Activity;
- import android.database.Cursor;
- import android.database.CursorWrapper;
- import android.os.Bundle;
- import android.view.View;
- import android.widget.ListView;
- import android.widget.SimpleAdapter;
- import android.widget.SimpleCursorAdapter;
- public class MainActivity extends Activity {
- private DBManager mgr;
- private ListView listView;
- @Override
- public void onCreate(Bundle savedInstanceState) {
- super.onCreate(savedInstanceState);
- setContentView(R.layout.main);
- listView = (ListView) findViewById(R.id.listView);
- //初始化DBManager
- mgr = new DBManager(this);
- }
- @Override
- protected void onDestroy() {
- super.onDestroy();
- //应用的最后一个Activity关闭时应释放DB
- mgr.closeDB();
- }
- public void add(View view) {
- ArrayList<Person> persons = new ArrayList<Person>();
- Person person1 = new Person("Ella", 22, "lively girl");
- Person person2 = new Person("Jenny", 22, "beautiful girl");
- Person person3 = new Person("Jessica", 23, "sexy girl");
- Person person4 = new Person("Kelly", 23, "hot baby");
- Person person5 = new Person("Jane", 25, "a pretty woman");
- persons.add(person1);
- persons.add(person2);
- persons.add(person3);
- persons.add(person4);
- persons.add(person5);
- mgr.add(persons);
- }
- public void update(View view) {
- Person person = new Person();
- person.name = "Jane";
- person.age = 30;
- mgr.updateAge(person);
- }
- public void delete(View view) {
- Person person = new Person();
- person.age = 30;
- mgr.deleteOldPerson(person);
- }
- public void query(View view) {
- List<Person> persons = mgr.query();
- ArrayList<Map<String, String>> list = new ArrayList<Map<String, String>>();
- for (Person person : persons) {
- HashMap<String, String> map = new HashMap<String, String>();
- map.put("name", person.name);
- map.put("info", person.age + " years old, " + person.info);
- list.add(map);
- }
- SimpleAdapter adapter = new SimpleAdapter(this, list, android.R.layout.simple_list_item_2,
- new String[]{"name", "info"}, new int[]{android.R.id.text1, android.R.id.text2});
- listView.setAdapter(adapter);
- }
- public void queryTheCursor(View view) {
- Cursor c = mgr.queryTheCursor();
- startManagingCursor(c); //托付给activity根据自己的生命周期去管理Cursor的生命周期
- CursorWrapper cursorWrapper = new CursorWrapper(c) {
- @Override
- public String getString(int columnIndex) {
- //将简介前加上年龄
- if (getColumnName(columnIndex).equals("info")) {
- int age = getInt(getColumnIndex("age"));
- return age + " years old, " + super.getString(columnIndex);
- }
- return super.getString(columnIndex);
- }
- };
- //确保查询结果中有"_id"列
- SimpleCursorAdapter adapter = new SimpleCursorAdapter(this, android.R.layout.simple_list_item_2,
- cursorWrapper, new String[]{"name", "info"}, new int[]{android.R.id.text1, android.R.id.text2});
- ListView listView = (ListView) findViewById(R.id.listView);
- listView.setAdapter(adapter);
- }
- }
这里需要注意的是SimpleCursorAdapter的应用,当我们使用这个适配器时,我们必须先得到一个Cursor对象,这里面有几个问题:如何管理Cursor的生命周期,如果包装Cursor,Cursor结果集都需要注意什么。
如果手动去管理Cursor的话会非常的麻烦,还有一定的风险,处理不当的话运行期间就会出现异常,幸好Activity为我们提供了startManagingCursor(Cursor cursor)方法,它会根据Activity的生命周期去管理当前的Cursor对象,下面是该方法的说明:
- /**
- * This method allows the activity to take care of managing the given
- * {@link Cursor}'s lifecycle for you based on the activity's lifecycle.
- * That is, when the activity is stopped it will automatically call
- * {@link Cursor#deactivate} on the given Cursor, and when it is later restarted
- * it will call {@link Cursor#requery} for you. When the activity is
- * destroyed, all managed Cursors will be closed automatically.
- *
- * @param c The Cursor to be managed.
- *
- * @see #managedQuery(android.net.Uri , String[], String, String[], String)
- * @see #stopManagingCursor
- */
文中提到,startManagingCursor方法会根据Activity的生命周期去管理当前的Cursor对象的生命周期,就是说当Activity停止时他会自动调用Cursor的deactivate方法,禁用游标,当Activity重新回到屏幕时它会调用Cursor的requery方法再次查询,当Activity摧毁时,被管理的Cursor都会自动关闭释放。
如何包装Cursor:我们会使用到CursorWrapper对象去包装我们的Cursor对象,实现我们需要的数据转换工作,这个CursorWrapper实际上是实现了Cursor接口。我们查询获取到的Cursor其实是Cursor的引用,而系统实际返回给我们的必然是Cursor接口的一个实现类的对象实例,我们用CursorWrapper包装这个实例,然后再使用SimpleCursorAdapter将结果显示到列表上。
Cursor结果集需要注意些什么:一个最需要注意的是,在我们的结果集中必须要包含一个“_id”的列,否则SimpleCursorAdapter就会翻脸不认人,为什么一定要这样呢?因为这源于SQLite的规范,主键以“_id”为标准。解决办法有三:第一,建表时根据规范去做;第二,查询时用别名,例如:SELECT id AS _id FROM person;第三,在CursorWrapper里做文章:
- CursorWrapper cursorWrapper = new CursorWrapper(c) {
- @Override
- public int getColumnIndexOrThrow(String columnName) throws IllegalArgumentException {
- if (columnName.equals("_id")) {
- return super.getColumnIndex("id");
- }
- return super.getColumnIndexOrThrow(columnName);
- }
- };
如果试图从CursorWrapper里获取“_id”对应的列索引,我们就返回查询结果里“id”对应的列索引即可。
最后我们来看一下结果如何: