在实际预测的过程中,主要包括两个部分:
- 输入图像的标准化处理
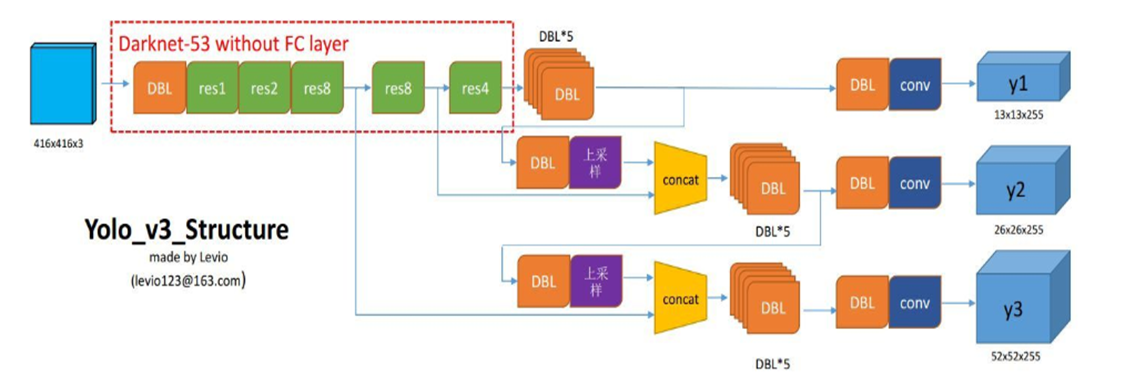
- 从模型输出的y1,y2,y3中进行分类和定位
虽然会先生成yolo的对象,即预测评估的运算过程。
输入图像的处理
1 def detect_img(yolo):
2     path = "VOCdevkit/VOC2007/SegmentationClass/*.jpg"
3     outdir = "./VOCdevkit/VOC2007/SegmentationObject"
4     for jpgfile in glob.glob(path):
5         img = Image.open(jpgfile)
6         img = yolo.detect_image(img)   # (731*575)
7         img.save(os.path.join(outdir, os.path.basename(jpgfile)))
8     yolo.close_session()
在代码的第6行yolo.detect_image(img)中对输入的图像进行处理。
1 def detect_image(self, image):
A. 要获得图像数据image_data:
- 判断设置的输入尺寸是不是能够整除32的,
- 将输入的图片等比缩放至设定的model_image_size的大小中(此处为416*416)
-- letterbox_image()中, 过程与y_true的等比缩放的过程相同(详见:https://www.cnblogs.com/monologuesmw/p/12794278.html),放在灰片上也会使图像放置在正中央的位置, 只不过此时没有标定框的事宜。
1 if self.model_image_size != (None, None):   # 判断是否设定图像输入模型的尺寸范围
2     assert self.model_image_size[0] % 32 == 0, 'Multiples of 32 required'    # 这个是关于模型设定的尺寸的大小是否符合规范,
3     assert self.model_image_size[1] % 32 == 0, 'Multiples of 32 required'    # 而不是图像的大小(对图像没有要求)
4     boxed_image = letterbox_image(image, tuple(reversed(self.model_image_size)))    # 把输入图像缩放至规定的方位内
5 else:
6     new_image_size = (image.width - (image.width % 32),
7                       image.height - (image.height % 32))
8     boxed_image = letterbox_image(image, new_image_size)
9 image_data = np.array(boxed_image, dtype='float32')
B. 图像数据归一化,并将其维度调整至运算过程中可用的维度
扩展数组的形状,在第0维的位置多1维。 即 416*416*3--》1*416*416*3
#通过上述的扩展转换,使得输入的尺寸符合网络输入格式 [batch_size, width, high, channels]
1 image_data /= 255.  # 归一化了
2 image_data = np.expand_dims(image_data, 0)  # Add batch dimension.
C. 通过喂数据,获得边框、类别信息
该部分的主干在于yolo初始化的generate过程,这个时候返回的检测每个物体的图像仅有一个。(即已经经过了nms等过滤系统)
1 out_boxes, out_scores, out_classes = self.sess.run(
2     [self.boxes, self.scores, self.classes],
3     feed_dict={
4         self.yolo_model.input: image_data,     # 图像的数据
5         self.input_image_shape: [image.size[1], image.size[0]],    # 原始图像的宽高
6         K.learning_phase(): 0    # 学习模式, 0: 测试模型, 1: 训练模型
7     })     # 该部分的目的在于求解generate的过程,
D. 将获得的边框,类别、类别概率信息绘制在原图上
- 进行字体、厚度的设置
1 font = ImageFont.truetype(font='font/FiraMono-Medium.otf',
2             size=np.floor(3e-2 * image.size[1] + 0.5).astype('int32'))   # 字体
3 thickness = (image.size[0] + image.size[1]) // 300  # 厚度
- 按照输出的类别进行循环,并进行绘制
1 for i, c in reversed(list(enumerate(out_classes))):
获得框、类等信息
1 predicted_class = self.class_names[c]  # 预测的类别
2 box = out_boxes[i]   # 框信息
3 score = out_scores[i]   # 框的得分(IOU)
获取预测边框的尺寸
1 top, left, bottom, right = box
2 top = max(0, np.floor(top + 0.5).astype('int32'))
3 left = max(0, np.floor(left + 0.5).astype('int32'))
4 bottom = min(image.size[1], np.floor(bottom + 0.5).astype('int32'))
5 right = min(image.size[0], np.floor(right + 0.5).astype('int32'))
上、左会+0.5 并且向下取整;
下、右会+0.5 并且向下取整,再和原图的宽高对比取最小
1 print(label, (left, top), (right, bottom)) # 边框坐标

根据预测框的位置,调整文本的位置label_size--》[110, 20]
1 if top - label_size[1] >= 0:   # 101-20>=0
2     text_origin = np.array([left, top - label_size[1]])  #
3 else:
4     text_origin = np.array([left, top + 1])
绘制
1 for i in range(thickness):
2     draw.rectangle(
3         [left + i, top + i, right - i, bottom - i],
4         outline=self.colors[c])
5 draw.rectangle(
6     [tuple(text_origin), tuple(text_origin + label_size)],
7     fill=self.colors[c])
8 draw.text(text_origin, label, fill=(0, 0, 0), font=font)
2. 模型预测
始于YOLO()类的初始化。
1 detect_img(YOLO())
关于模型的预测,全系于代码第8行的generate中。
1 def __init__(self, **kwargs):
2     self.__dict__.update(self._defaults)  # set up default values
3     self.__dict__.update(kwargs)   # and update with user overrides
4     self.class_names = self._get_class()   # 通过路径获取class_names的值
5     self.anchors = self._get_anchors()   # 获取边界的宽高, 并将原始数据转化为两列
6     self.sess = K.get_session()
7     self.boxes, self.scores, self.classes = self.generate()
generate内部包含处理的函数如下思维导图所示:
- yolo_head: 将模型最后一层的输出转化为中心点坐标、宽、高、框置信度、类别概率。即那些公式的计算。
- yolo_correct_boxes: 转换成真实图像上的坐标
- yolo_boxes_and_scores:中除了包含两个函数以外,还会进行框的得分的计算:
框的得分=框的置信度*类别置信度
并且返回框的信息和框的得分
- yolo_eval:中除了包含上述的函数,还会根据框的得分和阈值进行过滤,并进行NMS抑制被标定多次的框。

接下来将从最底层往顶层扒~
A. yolo_head()
1 def yolo_head(feats, anchors, num_classes, input_shape, calc_loss=False):
2     """Convert final layer features to bounding box parameters."""
获得anchors的个数,并初始化一个相关的张量
1 num_anchors = len(anchors)
2 # Reshape to batch, height, width, num_anchors, box_params.
3 anchors_tensor = K.reshape(K.constant(anchors), [1, 1, 1, num_anchors, 2])
创建网格
这个网格用于后续将偏移量转化为每个中心点的坐标。
- 会包含x轴的网格和y轴的网格 两部分
- 每部分每行都是从0到12的网格数
- 最后将其合并在一起,组成了一个13*13*1*2的矩阵
1 grid_shape = K.shape(feats)[1:3]  # height, width   获取网格的尺寸 eg:13*13
2 grid_y = K.tile(K.reshape(K.arange(0, stop=grid_shape[0]), [-1, 1, 1, 1]),
3     [1, grid_shape[1], 1, 1])   # 0~12的 从代码上看,只有grid_shape[1]能够体现reshape的这个功能 一个像素一个格子?
4 grid_x = K.tile(K.reshape(K.arange(0, stop=grid_shape[1]), [1, -1, 1, 1]),
5     [grid_shape[0], 1, 1, 1])   #  用于生成网格grid
6 grid = K.concatenate([grid_x, grid_y])
7 grid = K.cast(grid, K.dtype(feats))  #  -》(13,13,1,2)
将最后一位展开,网格info与其它分离
1 feats = K.reshape(
2     feats, [-1, grid_shape[0], grid_shape[1], num_anchors, num_classes + 5])
进行计算
- 中心点坐标
- 宽高
- 框的置信度
- 类别概率
1 box_xy = (K.sigmoid(feats[..., :2]) + grid) / K.cast(grid_shape[::-1], K.dtype(feats))
2 box_wh = K.exp(feats[..., 2:4]) * anchors_tensor / K.cast(input_shape[::-1], K.dtype(feats))
3 box_confidence = K.sigmoid(feats[..., 4:5])  # 框置信度
4 box_class_probs = K.sigmoid(feats[..., 5:])   # 类别置信度    # 可以一次性的把所有网格包含的内容都算出来
中心点的坐标是相对于网格尺寸的位置
宽高是相对于416*416尺寸的位置
B. yolo_correct_boxes()
1 def yolo_correct_boxes(box_xy, box_wh, input_shape, image_shape):
2     '''转化成真实的坐标'''
进行坐标的翻转
1 box_yx = box_xy[..., ::-1]
2  box_hw = box_wh[..., ::-1]
获得图像经过等比缩放以后的尺寸(没有灰边的)--- new_shape
1 input_shape = K.cast(input_shape, K.dtype(box_yx))
2 image_shape = K.cast(image_shape, K.dtype(box_yx))
3 new_shape = K.round(image_shape * K.min(input_shape/image_shape))
将box的中心点、宽高调整至原图尺寸
1 offset = (input_shape-new_shape)/2./input_shape
2 scale = input_shape/new_shape
3 box_yx = (box_yx - offset) * scale
4 box_hw *= scale
将中心点、宽高信息转化为四个坐标点 xmin ymin xmax ymax
1 box_mins = box_yx - (box_hw / 2.)
2 box_maxes = box_yx + (box_hw / 2.)
3 boxes =  K.concatenate([
4     box_mins[..., 0:1],  # y_min
5     box_mins[..., 1:2],  # x_min
6     box_maxes[..., 0:1],  # y_max
7     box_maxes[..., 1:2]  # x_max
8 ])# 即转化为真实坐标
9 return boxes     ---- 此处的boxes已经是原图上的了
C. yolo_boxes_and_scores()
1 def yolo_boxes_and_scores(feats, anchors, num_classes, input_shape, image_shape):
2     '''Process Conv layer output'''  处理卷积层输出的结果
执行A.和B
1 box_xy, box_wh, box_confidence, box_class_probs = yolo_head(feats,
2     anchors, num_classes, input_shape)
3 boxes = yolo_correct_boxes(box_xy, box_wh, input_shape, image_shape)
4 boxes = K.reshape(boxes, [-1, 4])
计算框的得分
框的得分=框的置信度*类别概率
1 box_scores = box_confidence * box_class_probs   # 框的得分=框的置信度*类别置信度
2 box_scores = K.reshape(box_scores, [-1, num_classes])
3 return boxes, box_scores   --- 原图上的boxes  而且是四坐标
D. yolo_eval()
1 def yolo_eval(yolo_outputs,     # 网络神经元输出的feature map(last layer)
2               anchors,
3               num_classes,
4               image_shape,
5               max_boxes=20,
6               score_threshold=.6,
7               iou_threshold=.5):
8     """Evaluate YOLO model on given input and return filtered boxes."""
相关使用的信息初始化:
1 num_layers = len(yolo_outputs)
2 anchor_mask = [[6,7,8], [3,4,5], [0,1,2]] if num_layers==3 else [[3,4,5], [1,2,3]] # default setting
3 input_shape = K.shape(yolo_outputs[0])[1:3] * 32      # 模型最后一层有三个神经元---> (32,16,8)13-26-52  (下采样的时候的尺度缩放)
4 boxes = []                                            # 每个神经元会有3个anchor_box
5 box_scores = []
input_shape 为 416*416的;
逐层获得的边框信息和框的分的信息:
1 for l in range(num_layers):
2     _boxes, _box_scores = yolo_boxes_and_scores(yolo_outputs[l],
3         anchors[anchor_mask[l]], num_classes, input_shape, image_shape)   # 处理卷积层的输出 内含yolo_head
4     boxes.append(_boxes)
5     box_scores.append(_box_scores)    #
将boxes 和 box_scores的数据展平:
1 boxes = K.concatenate(boxes, axis=0)   # 将数据展平 (?,4)---四坐标(与标定一样)
2 box_scores = K.concatenate(box_scores, axis=0)
获得了一个边界框的得分是否大于阈值的布尔向量,用于将低于阈值的边界框过滤掉
1 mask = box_scores >= score_threshold # 对三种尺度的得分进行筛选(阈值) 得到一堆符合条件的布尔值
初始化:
1 max_boxes_tensor = K.constant(max_boxes, dtype='int32')
2 boxes_ = []
3 scores_ = []
4 classes_ = []
按类进行进一步的框框筛选:
1 for c in range(num_classes):
过滤掉一些得分小于阈值的边框:
1 class_boxes = tf.boolean_mask(boxes, mask[:, c])   # 过滤掉一些得分小于阈值的边界框
2 class_box_scores = tf.boolean_mask(box_scores[:, c], mask[:, c])
进行NMS处理(处理掉标定同一物体的多个标定的框)
1 nms_index = tf.image.non_max_suppression(
2     class_boxes, class_box_scores, max_boxes_tensor, iou_threshold=iou_threshold)  # 运行非最大抑止—用于排出同一目标被标注多次的框
1 class_boxes = K.gather(class_boxes, nms_index)   # 在class_boxes中搜寻nms_index下表的向量
2 class_box_scores = K.gather(class_box_scores, nms_index)
3 classes = K.ones_like(class_box_scores, 'int32') * c
4 boxes_.append(class_boxes)
5 scores_.append(class_box_scores)
6 classes_.append(classes)
从此结束循环
1 boxes_ = K.concatenate(boxes_, axis=0)
2 scores_ = K.concatenate(scores_, axis=0)
3 classes_ = K.concatenate(classes_, axis=0)
4 return boxes_, scores_, classes_
generate中包含导入模型以及给不同的类分配一种颜色的框,然后就是yolo_eval().