// 章节 0 - introduction.js
// 你可能已经看过这张著名的 flux 的单向数据流图了。
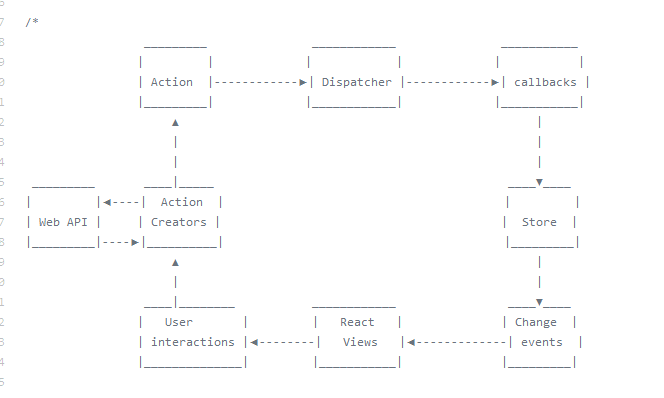
// 在这个教程里,我们会一步步地向你介绍上图里的各个概念。
// 我们会把这些概念分成单独的章节来介绍它们存在的意义和作用。
// 在最后,当我们理解了每一个概念后,我们会发现这张图真是意义深远啊!
// 在我们开始之前,我们先聊下一 flux 存在的意义以及我们为什么需要它。
// 假设我们正在构建一个网站应用,那么这个网站应用会由什么组成呢?
// 1) 模板/HTML = View
// 2) 填充视图的数据 = Model
// 3) 获取数据、将所有视图组装在一起、响应用户事件、
// 数据操作等等的逻辑 = Controller
// 这是我们熟知的非常典型的 MVC,但它和 flux 的概念其实是很像的,
// 只是在某些表述上有些小小的不同:
// - Model 看起来像 Store
// - 用户事件、数据操作以及它们的处理程序看起来像
// "action creators" -> action -> dispatcher -> callback
// - View 看起来像 React view (或者其它类似的概念)
// 所以,flux 就只是一个新名词么?不全是,但是新名词是很重要的,
// 因为通过引入这些新术语我们可以更准确地表述各种专业术语。
// 举一个例子,获取数据是一个 action,一个点击是一个 action,
// 一个 input 变化也是一个 action 等等。我们都已经习惯了从我们的应用里分发 action,
// 只是以不同的方式称呼它们。 不同于直接修改 Model 和 View,
// Flux 确保所有 action 首先通过一个 dispatcher,
// 然后再是 store,最后通知所有的 store 监听器。
// 为了弄清楚 MVC 和 flux 的不同,
// 我们举一个典型的 MVC 应用的用例:
// 一个典型的 MVC 应用的流程大致上是这样的:
// 1) 用户点击按钮 A
// 2) 点击按钮 A 的处理程序触发 Model A 的改变
// 3) Model A 的改变处理程序触发 Model B 的改变
// 4) Model B 的改变处理程序触发 View B 的改变并重新渲染自身
// 在这样的一个环境里,当应用出错的时候快速地定位 bug 来源是一件非常困难的事情。
// 这是因为每个 View 可以监视任何的 Model,
// 并且每个 Model 可以监视其它所有 Model,所以数据会从四面八方涌来,并且被许多源(view 或者 model)改变。
// 当我们用 flux 以及它的单向数据流的时候,上面的例子就会变成这样子:
// 1) 用户点击按钮 A
// 2) 点击按钮A的处理程序会触发一个被分发的 action,并改变 Store A
// 3) 因为其它的 Store 也被这个 action 通知了,所以 Store B 也会对相同的 action 做出反应
// 4) View B 因为 Store A 和 Store B 的改变而收到通知,并重新渲染
// 来看一下我们是如何避免 Store A 和 Store B 直接相关联的。
// Store 只能被 action 修改,别无他选。
// 并且当所有 Store 响应了 action 后,View 才会最终更新。由此可见,数据总是沿着一个方向进行流动:
// action -> store -> view -> action -> store -> view -> action -> ...
// 上面我们首先从 action 开始我们的用例,
// 下面让我们同样以 action 和 action creator 来开始我们的教程。
// 章节 1 - simple-action-creator.js
// 我们在前言中已经简单提到过 action,但具体什么是 action creator,它们又是如何关联到 action 的呢?
// 其实,通过几行简单的代码就可以解释清楚了!
// action creator 就是函数而已...
var actionCreator = function() {
// ...负责构建一个 action (是的,action creator 这个名字已经很明显了)并返回它
return {
type: 'AN_ACTION'
}
}
// 这就完了?是的,仅此而已。
// 然而,有一件事情需要注意,那就是 action 的格式。flux 一般约定 action 是一个拥有 type 属性的对象。
// 然后按 type 决定如何处理 action。当然,action 依旧可以拥有其他属性,你可以任意存放想要的数据。
// 在后面的章节中,我们会发现 action creator 实际上可以返回 action 以外的其他东西,比如一个函数。
// 这在处理异步时很有用(更多的内容可以查阅 dispatch-async-action.js)。
// 我们可以直接调用 action creator,如同预期的一样,我们会得到一个 action:
console.log(actionCreator())
// 输出: { type: 'AN_ACTION' }
// 好了,以上代码没有任何问题,却也毫无用处...
// 在实际的场景中,我们需要的是将 action 发送到某个地方,让关心它的人知道发生了什么,并且做出相应的处理。
// 我们将这个过程称之为“分发 action(Dispatching an action)”。
// 为了分发 action,我们需要...一个分发函数(= ̄ω ̄=)。
// 并且,为了让任何对它感兴趣的人都能感知到 action 发起,我们还需要一个注册“处理器(handlers)”的机制。
// 这些 action 的“处理器”在传统的 flux 应用中被称为 store,在下个章节中,我们会介绍它们在 Redux 中叫什么。
// 至止,我们的应用中包含了以下流程:
// ActionCreator -> Action
// 章节 2 - about-state-and-meet-redux.js
// 在实际应用中,我们不仅需要 action 告诉我们发生了什么,还要告诉我们需要随之更新数据。
// 这就让我们的应用变的棘手:
// 如何在应用程序的整个生命周期内维持所有数据?
// 如何修改这些数据?
// 如何把数据变更传播到整个应用程序?
// 于是 Redux 登场。
// Redux (https://github.com/reactjs/redux) 是一个“可预测化状态的 JavaScript 容器”。
// 我们先回顾上述提出的问题并用 Redux 的词汇表给出以下解答(部分词汇也来源于 Flux):
// 如何在应用程序的整个生命周期内维持所有数据?
// 以你想要的方式维持这些数据,例如 JavaScript 对象、数组、不可变数据,等等。
// 我们把应用程序的数据称为状态。这是有道理的,因为我们所说的数据会随着时间的推移发生变化,这其实就是应用的状态。
// 但是我们把这些状态信息转交给了 Redux(还记得么?Redux 就是一个“容纳状态的容器”)。
// 如何修改这些数据?
// 我们使用 reducer 函数修改数据(在传统的 Flux 中我们称之为 store)。
// Reducer 函数是 action 的订阅者。
// Reducer 函数只是一个纯函数,它接收应用程序的当前状态以及发生的 action,然后返回修改后的新状态(或者有人称之为归并后的状态)。
// 如何把数据变更传播到整个应用程序?
// 使用订阅者来监听状态的变更情况。
// Redux 帮你把这些连接起来。
// 总之 Redux 提供了:
// 1)存放应用程序状态的容器
// 2)一种把 action 分发到状态修改器的机制,也就是 reducer 函数
// 3)监听状态变化的机制
// 我们把 Redux 实例称为 store 并用以下方式创建:
/*
import { createStore } from 'redux'
var store = createStore()
*/
// 但是当你运行上述代码,你会发现以下异常消息:
// Error: Invariant Violation: Expected the reducer to be a function.
// 这是因为 createStore 函数必须接收一个能够修改应用状态的函数。
// 我们再试一下
import { createStore } from 'redux'
var store = createStore(() => {})
// 看上去没有问题了...
// 章节 3 - simple-reducer.js
// 现在,我们知道如何去创建一个 Redux 实例,并让它管理应用中的 state
// 下面讲一下这些 reducer 函数是如何转换 state 的。
// Reducer 与 Store 区别:
// 你可能已经注意到,在简介章节中的 Flux 图表中,有 Store,但没有
// Redux 中的 Reducer。那么,Store 与 Reducer 到底有哪些区别呢?
// 实际的区别比你想象的简单:Store 可以保存你的 data,而 Reducer 不能。
// 因此在传统的 Flux 中,Store 本身可以保存 state,但在 Redux 中,每次调用 reducer
// 时,都会传入待更新的 state。这样的话,Redux 的 store 就变成了
// “无状态的 store” 并且改了个名字叫 Reducer。
// 如上所述,在创建一个 Redux 实例前,需要给它一个 reducer 函数...
import { createStore } from 'redux'
var store_0 = createStore(() => {})
// ...所以每当一个 action 发生时,Redux 都能调用这个函数。
// 往 createStore 传 Reducer 的过程就是给 Redux 绑定 action 处理函数(也就是 Reducer)的过程。
// action 处理函数在 01_simple-action-creator.js 章节中有讨论过。
// 在 Reducer 中打印一些 log
var reducer = function (...args) {
console.log('Reducer was called with args', args)
}
var store_1 = createStore(reducer)
// 输出:Reducer was called with args [ undefined, { type: '@@redux/INIT' } ]
// 看出来了吗?我们的 reducer 被调用了,但我们并没有 dispatch 任何 action...
// 这是因为在初始化应用 state 的时候,
// Redux dispatch 了一个初始化的 action ({ type: '@@redux/INIT' })
// 在被调用时,一个 reducer 会得到这些参数:(state, action)
// 在应用初始化时,state 还没被初始化,因此它的值是 "undefined",
// 这是非常符合逻辑的
// 在处理 “init” action 之后,我们应用中的 state 又会是怎么样的呢?
// 章节 4 - get-state.js
// 如何从 Redux 实例中读取 state ?
import { createStore } from 'redux'
var reducer_0 = function (state, action) {
console.log('reducer_0 was called with state', state, 'and action', action)
}
var store_0 = createStore(reducer_0)
// 输出: reducer_0 was called with state undefined and action { type: '@@redux/INIT' }
// 为了读取 Redux 保存的 state,你可以调用 getState
console.log('store_0 state after initialization:', store_0.getState())
// 输出: store_0 state after initialization: undefined
// 都已经初始化过了,难道程序的 state 还是 undefined 的?没错,正是如此,
// 到目前为止,我们的 reducer 还什么事都没做过…… 你是否还有印象,我们在 "about-state-and-meet-redux" 那一章里是怎么描述一个 reducer 的预期行为的?
// “一个 reducer 只是一个函数,它能收到程序当前的 state 与 action,
// 然后返回一个 modify(又或者学别人一样称之为 reduce )过的新 state ”
// 我们的 reducer 目前什么都不返回,所以程序的 state 当然只能是 reducer() 返回的那个叫 “undefined” 的东西。
// 接下来,我们试着在 reducer 收到 undefined 的 state 时,给程序发一个初始状态:
var reducer_1 = function (state, action) {
console.log('reducer_1 was called with state', state, 'and action', action)
if (typeof state === 'undefined') {
return {}
}
return state;
}
var store_1 = createStore(reducer_1)
// 输出:reducer_1 was called with state undefined and action { type: '@@redux/INIT' }
console.log('store_1 state after initialization:', store_1.getState())
// 输出:store_1 state after initialization: {}
// 如我们所愿,现在 Redux 初始化以后返回的 state 变成 {} 了
//
// 感谢ES6,这个模式现在实现起来很清晰:
var reducer_2 = function (state = {}, action) {
console.log('reducer_2 was called with state', state, 'and action', action)
return state;
}
var store_2 = createStore(reducer_2)
// 输出: reducer_2 was called with state {} and action { type: '@@redux/INIT' }
console.log('store_2 state after initialization:', store_2.getState())
// 输出: store_2 state after initialization: {}
// 估计你已经发现了,我们给 reducer_2 的 state 参数传了默认值之后,
// reducer 就不会再取到 undefined 的 state 了。
// 小结一下:调用 reducer ,只是为了响应一个派发来的 action 。
// 接下来,我们在 response 里模拟一个 state 修改,其响应的 action 类型是 'SAY_SOMETIHG'
var reducer_3 = function (state = {}, action) {
console.log('reducer_3 was called with state', state, 'and action', action)
switch (action.type) {
case 'SAY_SOMETHING':
return {
...state,
message: action.value
}
default:
return state;
}
}
var store_3 = createStore(reducer_3)
// 输出: reducer_3 was called with state {} and action { type: '@@redux/INIT' }
console.log('store_3 state after initialization:', store_3.getState())
// 输出: store_3 state after initialization: {}
// 到目前为止,我们都还没有得到一个新 state, 因为我们还没有真的派发过任何 action 。
// 不过在最后一个例子里,有几个点值得注意:
//
// 0) 我假设了 action 里一定包含了一个 type 跟一个 value 。type 基本上是 flux action 已经约定俗成的,
// 而 value 属性可以是任何类型的。
// 1) 这里有个常见模式:在 reducer 里用 switch 来响应对应的 action 。
// 2) 用 switch 的时候, **永远** 不要忘记放个 “default” 来返回 “state”,否则,
// 你的 reducer 可能会返回 “undefined” (等于你的 state 就丢了)
// 3) 注意 { message: action.value } 是怎么被合并到当前 state 来形成新 state 的,
// 这全要感谢牛逼的 ES7 notation (Object Spread): { ...state, message: action.value }
// 4) 还要注意:之所以这个例子能用ES7 Object Spread notation ,是因为它只对 state 里的
// { message: action.value} 做了浅拷贝(也就是说, state 第一个层级的属性直接被 { message: action.value } 覆盖掉了 —— 与之相对,其实也有优雅的合并方式 )
// 但是如果数据结构更复杂或者是嵌套的,那处理state更新的时候,很可能还需要考虑一些完全不同的做法:
// - 可以考虑: Immutable.js (https://facebook.github.io/immutable-js/)
// - 可以考虑: Object.assign (https://developer.mozilla.org/en-US/docs/Web/JavaScript/Reference/Global_Objects/Object/assign)
// - 可以考虑: 手工合并
// - 又或者考虑用其它任何能满足需要且适合 state 结构的方法,Redux 对此是全无预设的方式的(要记得 Redux 只是个状态的容器)。
// 现在开始,我们要在 reducer 里处理 action 了,我们将会有多个 reducer 并会组合它们。
// 章节 5 - combine-reducers.js
// 我们现在来看一下什么是 reducer
var reducer_0 = function (state = {}, action) {
console.log('reducer_0 was called with state', state, 'and action', action)
switch (action.type) {
case 'SAY_SOMETHING':
return {
...state,
message: action.value
}
default:
return state;
}
}
// 在继续之前,我们先来想象一下拥有很多 action 的 reducer 长什么样子
var reducer_1 = function (state = {}, action) {
console.log('reducer_1 was called with state', state, 'and action', action)
switch (action.type) {
case 'SAY_SOMETHING':
return {
...state,
message: action.value
}
case 'DO_SOMETHING':
// ...
case 'LEARN_SOMETHING':
// ...
case 'HEAR_SOMETHING':
// ...
case 'GO_SOMEWHERE':
// ...
// etc.
default:
return state;
}
}
// 很显然,只有一个 reducer 是 hold 不住我们整个应用中所有 action 操作的(好吧,事实上它能 hold 得住,
// 但这会变得很难维护。)
// 幸运的是,Redux 不关心我们到底是只有一个 reducer ,还是有一打(12个)reducer 。
// 如果我们有多个 reducer ,Redux 能帮我们合并成一个。
// 让我们来定义 2 个 reducer
var userReducer = function (state = {}, action) {
console.log('userReducer was called with state', state, 'and action', action)
switch (action.type) {
// etc.
default:
return state;
}
}
var itemsReducer = function (state = [], action) {
console.log('itemsReducer was called with state', state, 'and action', action)
switch (action.type) {
// etc.
default:
return state;
}
}
// 我希望你特别留意赋给每个 reducer 的初始 state :
// 1. 赋给 userReducer 的初始 state 是一个空对象,即 {}
// 2. 赋给 itemsReducer 的初始 state 是一个空数组,即 []
// 赋予不同类型的值是为了说明 reducer 是可以处理任何类型的数据结构的。你完全可以选择那些符合你的需求的
// 数据结构作为 state 的值。(例如,字面量对象、数组、布尔值、字符串或其它不可变结构)
// 在这种多个 reducer 的模式下,我们可以让每个 reducer 只处理整个应用的部分 state 。
// 但我们需要知道,createStore 只接收一个 reducer 函数。
// 那么,我们怎么合并所有的 reducer? 我们又该如何告诉 Redux 每个 reducer 只处理一部分 state 呢?
// 其实这很简单。我们使用 combineReducers 辅助函数。
// combineReducers 接收一个对象并返回一个函数,当 combineReducers 被调用时,它会去调用每个
// reducer,并把返回的每一块 state 重新组合成一个大 state 对象(也就是 Redux 中的 Store)。
// 长话短说,下面演示一下如何使用多个 reducer 创建一个 Redux 实例:
import { createStore, combineReducers } from 'redux'
var reducer = combineReducers({
user: userReducer,
items: itemsReducer
})
// 输出:
// userReducer was called with state {} and action { type: '@@redux/INIT' }
// userReducer was called with state {} and action { type: '@@redux/PROBE_UNKNOWN_ACTION_9.r.k.r.i.c.n.m.i' }
// itemsReducer was called with state [] and action { type: '@@redux/INIT' }
// itemsReducer was called with state [] and action { type: '@@redux/PROBE_UNKNOWN_ACTION_4.f.i.z.l.3.7.s.y.v.i' }
var store_0 = createStore(reducer)
// 输出:
// userReducer was called with state {} and action { type: '@@redux/INIT' }
// itemsReducer was called with state [] and action { type: '@@redux/INIT' }
// 正如你从输出中看到的,每个 reducer 都被正确地调用了(但接收了个 init action @@redux/INIT )。
// 这个 action 是什么鬼?这是 combineReducers 实施的一次安全检查,用以确保 reducer 永远不会返回
// undefined。请注意,在 combineReducers 中第一次调用 init action 时,其实是随机 action 来的,
// 但它们有个共同的目的 (即是做一个安全检查)。
console.log('store_0 state after initialization:', store_0.getState())
// 输出:
// store_0 state after initialization: { user: {}, items: [] }
// 有趣的是,我们发现 Redux 正确处理了 state 的各个部分。最终的 state 完全是一个简单的对象,由
// userReducer 和 itemsReducer 返回的部分 state 共同组成。
// {
// user: {}, // {} is the slice returned by our userReducer
// items: [] // [] is the slice returned by our itemsReducer
// }
// 由于我们为每个 reducer 初始化了一个特殊的值(userReducer 的是空对象 {} ,itemsReducer 的是空数
// 组 [] ),所以在最终 Redux 的 state 中找到那些值并不是巧合。
// 现在,关于 reducer 如何工作我们已经有了清楚的理解。是时候去看看当 action 被分发(dispatch)时会对
// Redux 的 state 有什么影响。
// 章节 6 - dispatch-action.js
// 迄今为止我们的关注点都是绑定我们的 reducer,但我们还未 dispatch 任何一个 action。
// 我们将会用到上一章的 reducer ,并用它们处理一些 action:
var userReducer = function (state = {}, action) {
console.log('userReducer was called with state', state, 'and action', action)
switch (action.type) {
case 'SET_NAME':
return {
...state,
name: action.name
}
default:
return state;
}
}
var itemsReducer = function (state = [], action) {
console.log('itemsReducer was called with state', state, 'and action', action)
switch (action.type) {
case 'ADD_ITEM':
return [
...state,
action.item
]
default:
return state;
}
}
import { createStore, combineReducers } from 'redux'
var reducer = combineReducers({
user: userReducer,
items: itemsReducer
})
var store_0 = createStore(reducer)
console.log("
", '### It starts here')
console.log('store_0 state after initialization:', store_0.getState())
// 输出:
// store_0 state after initialization: { user: {}, items: [] }
// 让我们来 dispatch 我们的第一个 action... 记住在 'simple-action-creator.js' 中所提到的:
// "为了 dispatch 一个 action,我们需要一个 dispatch 函数。"
// 我们所看到的 dispatch 函数,是 Redux 提供的,并且它会将 action 传递
// 给任何一个 reducer!dispatch 函数本质上是 Redux
// 的实例的属性 "dispatch"
// dispatch 一个 action:
store_0.dispatch({
type: 'AN_ACTION'
})
// 输出:
// userReducer was called with state {} and action { type: 'AN_ACTION' }
// itemsReducer was called with state [] and action { type: 'AN_ACTION' }
// 每一个 reducer 都被调用了,但是没有一个 action type 是 reducer 需要的,
// 因此 state 是不会发生变化的:
console.log('store_0 state after action AN_ACTION:', store_0.getState())
// 输出:store_0 state after action AN_ACTION: { user: {}, items: [] }
// 但是,等一下!我们是不是可以用一个 action creator 去发送一个 action?我们确实可以
// 用一个 actionCreator,但由于它只是返回一个 action,那么就意味着它不会携带任何东西
// 到这个例子中。但为了面对未来遇到的困难,我们还是以正确的方式,
// 即以 flux 理论去做吧。让我们使用这个 action creator 发送一个我们想要的 action:
var setNameActionCreator = function (name) {
return {
type: 'SET_NAME',
name: name
}
}
store_0.dispatch(setNameActionCreator('bob'))
// 输出:
// userReducer was called with state {} and action { type: 'SET_NAME', name: 'bob' }
// itemsReducer was called with state [] and action { type: 'SET_NAME', name: 'bob' }
console.log('store_0 state after action SET_NAME:', store_0.getState())
// 输出:
// store_0 state after action SET_NAME: { user: { name: 'bob' }, items: [] }
// 我们刚刚处理了一个 action,并且它改变了应用的 state!
// 但是这似乎太简单了,并且还不足以充当一个真实的用例。例如,
// 如果我们要在 dispatch action 之前做一些异步的操作,那应该怎么做呢?
// 我们将在下一章节 "dispatch-async-action.js" 中讨论这个问题
// 至止,我们接触的应用流程是这样的:
// ActionCreator -> Action -> dispatcher -> reducer
// 章节 7 - dispatch-async-action-1.js
// 在上节教程中我们知道了如何分发 action 以及这些 action 如何通过 reducer 函数修改应用状态。
// 但是,到目前为止,我们只考虑了一种情况,同步场景下的 action,准确地说是同步 action creator,它创建同步的 action,
// 也就是当 action creator 被调用时,action 会被立即返回。
// 我们来设想一个简单的异步场景:
// 1)用户点击“Say Hi in 2 seconds”按钮
// 2)当用户点击按钮 A,我们希望经过两秒,视图显示一条消息 Hi
// 3)两秒过去之后,更新视图,显示消息 Hi
// 当然这条消息是应用的状态之一,所以我们必然将其存储于 Redux store。
// 但是我们希望的结果是,在调用 action creator 的两秒之后才把消息存入 store(因为如果立即更新状态,
// 那么就会立即触发所有监听状态变更的订阅者 —— 例如视图,导致消息早于两秒显示)。
// 如果我们按照目前调用 action creator 的方式...
import { createStore, combineReducers } from 'redux'
var reducer = combineReducers({
speaker: function (state = {}, action) {
console.log('speaker was called with state', state, 'and action', action)
switch (action.type) {
case 'SAY':
return {
...state,
message: action.message
}
default:
return state;
}
}
})
var store_0 = createStore(reducer)
var sayActionCreator = function (message) {
return {
type: 'SAY',
message
}
}
console.log(" ", 'Running our normal action creator:', " ")
console.log(new Date());
store_0.dispatch(sayActionCreator('Hi'))
console.log(new Date());
console.log('store_0 state after action SAY:', store_0.getState())
// 输出(忽略初始输出):
// Sun Aug 02 2015 01:03:05 GMT+0200 (CEST)
// speaker was called with state {} and action { type: 'SAY', message: 'Hi' }
// Sun Aug 02 2015 01:03:05 GMT+0200 (CEST)
// store_0 state after action SAY: { speaker: { message: 'Hi' } }
// ... 结果 store 被立即更新了。
// 我们希望看到的结果应该类似于下面这样的代码:
var asyncSayActionCreator_0 = function (message) {
setTimeout(function () {
return {
type: 'SAY',
message
}
}, 2000)
}
// 但是这样 action creator 返回的不是 action 而是 undefined。所以这并不是我们所期望的解决方法。
// 这里有个诀窍:不返回 action,而是返回 function。这个 function 会在合适的时机 dispatch action。但是如果我们希望
// 这个 function 能够 dispatch action,那么就需要向它传入 dispatch 函数。于是代码类似如下:
var asyncSayActionCreator_1 = function (message) {
return function (dispatch) {
setTimeout(function () {
dispatch({
type: 'SAY',
message
})
}, 2000)
}
}
// 你可能再次注意到 action creator 返回的不是 action 而是 function。
// 所以 reducer 函数很可能不知道如何处理这样的返回值,而你也并不清楚是否可行,那么让我们一起再做尝试,一探究竟。
// 章节 8 - dispatch-async-action-2.js
// 运行之前我们在 dispatch-async-action-1.js 中实现的第一个异步 action creator:
import { createStore, combineReducers } from 'redux'
var reducer = combineReducers({
speaker: function (state = {}, action) {
console.log('speaker was called with state', state, 'and action', action)
switch (action.type) {
case 'SAY':
return {
...state,
message: action.message
}
default:
return state;
}
}
})
var store_0 = createStore(reducer)
var asyncSayActionCreator_1 = function (message) {
return function (dispatch) {
setTimeout(function () {
dispatch({
type: 'SAY',
message
})
}, 2000)
}
}
console.log("
", 'Running our async action creator:', "
")
store_0.dispatch(asyncSayActionCreator_1('Hi'))
// 输出:
// ...
// /Users/classtar/Codes/redux-tutorial/node_modules/redux/node_modules/invariant/invariant.js:51
// throw error;
// ^
// Error: Invariant Violation: Actions must be plain objects. Use custom middleware for async actions.
// ...
// 我们所设计的 function 似乎没有进入 reducer 函数。但是 Redux 给出了温馨提示:使用自定义中间件(middleware)来支持异步 action。
// 看来我们的方向是正确的,可中间件(middleware)又是什么呢?
// 我向你保证 action creator asyncSayActionCreator_1 不仅没有问题,而且只要我们搞清楚 middleware 的概念并掌握它的使用方法,
// 这个异步 action creator 就会按照我们所设想的结果执行。
// 开始下节教程:09_middleware.js
// 章节 9 - middleware.js
// 在 dispatch-async-action-2.js 章节中我们抛出了“中间件”的概念。中间件似乎
// 可以帮助我们处理异步 action。但中间件到底是什么呢?
// 通常来说中间件是在某个应用中 A 和 B 部分中间的那一块,
// 中间件可以把 A 发送数据到 B 的形式从
// A -----> B
// 变成:
// A ---> middleware 1 ---> middleware 2 ---> middleware 3 --> ... ---> B
// 那么中间件在 Redux 中是如何工作的?
// 看上去 Redux 并不能自动处理 action creator 中返回的异步函数。
// 但如果在 action creator 和 reducer 之间增加一个中间件,就可以把这个函数转成
// 适合 Redux 处理的内容:
// action ---> dispatcher ---> middleware 1 ---> middleware 2 ---> reducers
// 每当一个 action(或者其他诸如异步 action creator 中的某个函数)被分发时,
// 我们的中间件就会被调用
// 并且在需要的时候协助 action creator 分发真正的 action(或者什么都不做,
// 有时我们需要这么做)
// 在 Redux 中,中间件是纯粹的函数,
// 有明确的使用方法并且严格的遵循以下格式:
/*
var anyMiddleware = function ({ dispatch, getState }) {
return function(next) {
return function (action) {
// 你的中间件业务相关代码
}
}
}
*/
// 如上所述,中间件由三个嵌套的函数构成(会依次调用):
// 1) 第一层向其余两层提供分发函数和 getState 函数
// (因为你的中间件或 action creator 可能需要从 state 中读取数据)
// 2) 第二层提供 next 函数,它允许你显式的将处理过的输入传递给下一个中间件或 Redux
// (这样 Redux 才能调用所有 reducer)。
// 3) 第三层提供从上一个中间件或从 dispatch 传递来的 action,
// 这个 action 可以调用下一个中间件(让 action 继续流动) 或者
// 以想要的方式处理 action。
// 学习过函数式编程的人可能会意识到给上述代码提供了一个机会来使用
// 柯里化(如果你不理解也没关系,跳过接下去的 10 行,不会影响你对 redux 的理解)。
// 使用柯里化,你可以简化上述函数:
/*
// "curry" may come any functional programming library (lodash, ramda, etc.)
var thunkMiddleware = curry(
({dispatch, getState}, next, action) => (
// 你的中间件业务相关代码
)
);
*/
// 我们为异步 action creator 提供的中间件叫 thunk middleware
// 它的代码在:https://github.com/gaearon/redux-thunk.
// 它看上去是这样 (为了可读性使用 ES5 语法书写该函数):
var thunkMiddleware = function ({ dispatch, getState }) {
// console.log('Enter thunkMiddleware');
return function(next) {
// console.log('Function "next" provided:', next);
return function (action) {
// console.log('Handling action:', action);
return typeof action === 'function' ?
action(dispatch, getState) :
next(action)
}
}
}
// 为了让 Redux 知道我们有一个或多个中间件,我们使用 Redux 的
// 辅助函数:applyMiddleware.
// applyMiddleware 接收所有中间件作为参数,返回一个供 Redux createStore 调用的函数。
// 当最后这个函数被调用时,它会产生一个 Store 增强器,用来将所有中间件应用到 Store 的 dispatch 上。
// (来自 https://github.com/rackt/redux/blob/v1.0.0-rc/src/utils/applyMiddleware.js)
// 下面就是如何将一个中间件应用到 Redux store:
import { createStore, combineReducers, applyMiddleware } from 'redux'
const finalCreateStore = applyMiddleware(thunkMiddleware)(createStore)
// 针对多个中间件, 使用:applyMiddleware(middleware1, middleware2, ...)(createStore)
var reducer = combineReducers({
speaker: function (state = {}, action) {
console.log('speaker was called with state', state, 'and action', action)
switch (action.type) {
case 'SAY':
return {
...state,
message: action.message
}
default:
return state
}
}
})
const store_0 = finalCreateStore(reducer)
// 输出:
// speaker was called with state {} and action { type: '@@redux/INIT' }
// speaker was called with state {} and action { type: '@@redux/PROBE_UNKNOWN_ACTION_s.b.4.z.a.x.a.j.o.r' }
// speaker was called with state {} and action { type: '@@redux/INIT' }
// 现在 store 的 middleware 已经准备好了,再来尝试分发我们的异步 action:
var asyncSayActionCreator_1 = function (message) {
return function (dispatch) {
setTimeout(function () {
console.log(new Date(), 'Dispatch action now:')
dispatch({
type: 'SAY',
message
})
}, 2000)
}
}
console.log(" ", new Date(), 'Running our async action creator:', " ")
store_0.dispatch(asyncSayActionCreator_1('Hi'))
// 输出:
// Mon Aug 03 2015 00:01:20 GMT+0200 (CEST) Running our async action creator:
// Mon Aug 03 2015 00:01:22 GMT+0200 (CEST) 'Dispatch action now:'
// speaker was called with state {} and action { type: 'SAY', message: 'Hi' }
// 当我们调用异步 action creator 两秒之后,action 成功被分发出去。
// 你可能会好奇,一个中间件如何 log 出所有已分发的 action ,
// 是这样:
function logMiddleware ({ dispatch, getState }) {
return function(next) {
return function (action) {
console.log('logMiddleware action received:', action)
return next(action)
}
}
}
// 同样的,下面是一个中间件,它会丢弃所有经过的 action(不是很实用,
// 但是如果加一些判断就能实现丢弃一些 action,放到一些 action 给下一个中间件):
function discardMiddleware ({ dispatch, getState }) {
return function(next) {
return function (action) {
console.log('discardMiddleware action received:', action)
}
}
}
// 通过使用 logMiddleware 或 discardMiddleware 试着修改上述的 finalCreateStore 调用
// 看看会发生什么...
// 比如,这样用:
// const finalCreateStore = applyMiddleware(discardMiddleware, thunkMiddleware)(createStore)
// 会让你的 action 永远无法到达 thunkMiddleware 和 reducer。
// 查看 http://rackt.org/redux/docs/introduction/Ecosystem.html 的中间件部分可以了解其他例子。
// 总结一下到目前为止我们所学的:
// 1) 我们知道怎样写 action 和 action creator
// 2) 我们知道怎样分发 action
// 3) 我们知道怎样使用中间件处理自定义 action,比如异步 action
// 对于 Flux 体系的完整闭环,我们还剩下唯一的一块就是如何订阅 state 的更新
// 并响应这些更新(比如重新渲染我们的组件)
// 所以我们怎么订阅 Redux store 的更新呢?
// 继续下一个教程: 10_state-subscriber.js
// 章节 10 - state-subscriber.js
// 我们接近完成一个完整的 Flux 闭环了,现在只差一个至关重要的环节:

// 没有它,在 store 改变时我们就不能更新我们的视图。
// 幸运的是,监视 Redux store 更新有一个很简单的办法:
/*
store.subscribe(function() {
// retrieve latest store state here
// Ex:
console.log(store.getState());
})
*/
// 是的,简单到我们都开始重新相信圣诞老人了(译者注:2333,对不起这个比喻太幽默了)
// 试一下这段代码:
import { createStore, combineReducers } from 'redux'
var itemsReducer = function (state = [], action) {
console.log('itemsReducer was called with state', state, 'and action', action)
switch (action.type) {
case 'ADD_ITEM':
return [
...state,
action.item
]
default:
return state;
}
}
var reducer = combineReducers({ items: itemsReducer })
var store_0 = createStore(reducer)
store_0.subscribe(function() {
console.log('store_0 has been updated. Latest store state:', store_0.getState());
// 在这里更新你的视图
})
var addItemActionCreator = function (item) {
return {
type: 'ADD_ITEM',
item: item
}
}
store_0.dispatch(addItemActionCreator({ id: 1234, description: 'anything' }))
// 输出:
// ...
// store_0 has been updated. Latest store state: { items: [ { id: 1234, description: 'anything' } ] }
// 我们的订阅回调成功的调用了,同时 store 现在包含了我们新增的条目。
// 理论上,到这就可以停止了。我们的 Flux loop 已经闭合,我们理解了构造 Flux 的全部概念,
// 实际上它也没那么神秘。但是老实说,还有很多要讲的,
// 为了让最后一个概念保持简单,
// 我们有意的在例子中去掉了一些东西:
// - 我们的订阅回调没有把 state 作为参数,为什么?
// - 既然我们没有接受新的 state, 我们就被限定到了只能开发这个已经完成的 store (store_0) 所以这个办法在
// 含有多个模块的应用下不可行。
// - 我们究竟是怎么更新视图的?
// - 怎么取消订阅?
// - 更通俗的讲,我们怎么把 Redux 和 React 结合到一起?
// 我们现在进入了一个“将 Redux 加入到 React” 的领域。
// 理解 Redux 可以无条件绑定到 React 上是很重要的。
// Redux 是一个“为 Javascript 应用而生的可预测的状态容器”,
// 你有很多方式去使用它,而 React 应用只不过是其中一个。
// 从这个角度看,如果没有 react-redux (https://github.com/reactjs/react-redux),我们将失去很多。
// 在 Redux 1.0.0 之前它是包含在 Redux 中的,这个库节省了我们很多时间,
// 它包含了在 React 中使用 Redux 时所有的绑定。
// 回到订阅这件事,为什么我们这个订阅函数看上去非常简单
// 而且没有提供很多特性?
// 这就是 Redux 精彩之处了! 它所有 API 都很抽象(包括订阅),
// 支持高度扩展,允许开发者造出一些疯狂的轮子
// 比如 Redux DevTools (https://github.com/gaearon/redux-devtools).
// 但是最后我们还是需要一个更好的接口订阅我们的 store 变化。这也就是 react-redux 给带给我们的:
// 一个完美填补原生 Redux 订阅机制和开发者的期待之间的空缺的 API ,
// 这样我们不再需要直接使用订阅。而只是
// 使用 “provide” 和 “connect” 绑定,不必再关心隐含在内的订阅方法。
// 所以,订阅方法依然会被我们使用,
// 只不过它通过高度整合的接口替我们处理 redux state 的连接。
// 现在我们隐藏了那些绑定,并且展示了连接你的组件和 Redux 的 state 是很轻松的一件事。
// 继续下一个教程: 11_Provider-and-connect.js
// 章节 11 - Provider-and-connect.js
// 这其实是教程的最后一章,一起聊聊如何把 Redux 和 React 绑定在一起。
// 要运行下面的示例,你需要一个浏览器。
// 本示例中的代码和注释都在 ./11_src/src/ 目录下。
// 当你读到下面这段话的时间,请运行 11_src/src/server.js。
// 开发一个 React 应用和服务器来让浏览器可以访问,我们会用到:
// - 用 node HTTP(https://nodejs.org/api/http.html) 创建一个非常简单的服务器
// - 用 Webpack 去打包我们的应用,
// - 神奇的 Webpack Dev Server (http://webpack.github.io/docs/webpack-dev-server.html)
// 作为一个专门的 node 服务器,并监听 JS 改变自动编译
// - 超棒的 React Hot Loader http://gaearon.github.io/react-hot-loader/ (Dan Abramov
// 开发的另一个很棒的项目,没错,他就是 Redux 的作者) ,提供非常棒的
// DX (开发体验) ,当我们在编辑器中修改代码时,
// 在浏览器中可以热加载来显示效果。
// 提醒一下正在使用 React 的开发者:本应用是基于 React 0.14 构建的
// 我不想在这里详细地解释如何设置 Webpack Dev Server 和 React Hot Loader,
// 因为在 React Hot Loader 的文档中已经说的很好了。
import webpackDevServer from './11_src/src/webpack-dev-server'
// 我们应用启动的主要服务器请求都是来自这个文件。
import server from './11_src/src/server'
// 如果 5050 端口号已经被占用了,那么就修改下面的端口号。
// 如果端口号是 X,那么我们可以用 X 作为服务器的端口号,用 X+1 作为 webpack-dev-server 的端口号
const port = 5050
// 启动 webpack dev server...
webpackDevServer.listen(port)
// ... 还有主应用服务器。
server.listen(port)
console.log(`Server is listening on http://127.0.0.1:${port}`)
// 转到 11_src/src/server.js...
https://github.com/react-guide/redux-tutorial-cn