今天开始介绍Raspberry Pi(简称RPi,下同)入门的一些基础知识。
第1部分: 安装RPi
1.1 从 http://www.raspberrypi.org/downloads 下载RPi 最新镜像,这里以Raspbian为例。
1.2 从 http://pan.baidu.com/share/link?shareid=95002292&uk=2419385090 安装Win32DiskImager工具,将镜像写入SD卡。
1.3 解压Step1.1下载的Raspbian镜像,打开Step1.2下载的Win32DiskImager,根据下图所示将镜像写到SD卡里。
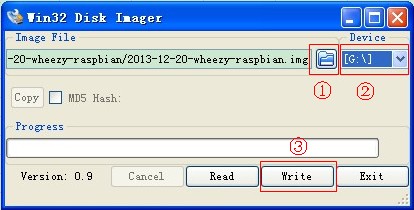
① 选择镜像路径
② 选择SD卡
③ 确认写入
1.4 将SD卡插入RPi,通过HDMI连接显示器,接入电源,RPi就开始工作了!
1.5 一大串英文开始在屏幕滚动,然觉又回到了很多年以前,当屏幕不再滚动的时候,会出现提示输入用户名(默认pi)和密码(默认pi)。
1.6 键入startx即可进入图形化界面。
现在,开始你的探索之旅吧!
如果你使用了HDMI转VGA的接口,将SD卡根目录里的config.txt的内容替换成以下代码中并保存,否则HDMI将无输出。
 1 hdmi_edid_file=1
 2
 3 # uncomment if you get no picture on HDMI for a default "safe" mode
 4 hdmi_safe=0
 5
 6 # uncomment this if your display has a black border of unused pixels visible
 7 # and your display can output without overscan
 8 disable_overscan=1
 9
10 # uncomment the following to adjust overscan. Use positive numbers if console
11 # goes off screen, and negative if there is too much border
12 #overscan_left=-30
13 #overscan_right=-30
14 #overscan_top=-30
15 #overscan_bottom=-30
16
17 # uncomment to force a console size. By default it will be display's size minus
18 # overscan.
19 #framebuffer_width=1280
20 #framebuffer_height=720
21
22 # uncomment if hdmi display is not detected and composite is being output
23 hdmi_force_hotplug=1
24
25 # uncomment to force a specific HDMI mode (this will force VGA)
26 hdmi_group=2
27 hdmi_mode=47
28
29 # uncomment to force a HDMI mode rather than DVI. This can make audio work in
30 # DMT (computer monitor) modes
31 hdmi_drive=2
32
33 # uncomment to increase signal to HDMI, if you have interference, blanking, or
34 # no display
35 config_hdmi_boost=4
36
37 # uncomment for composite PAL
38 #sdtv_mode=2
39
40 #uncomment to overclock the arm. 700 MHz is the default.
41 arm_freq=800
42
43 # for more options see http://elinux.org/RPi_config.txt
44 core_freq=250
45 sdram_freq=400
46 over_voltage=0
以上配置是给1400 × 900的显示器用,具体配置方法及参数的含义参考下面链接:
① 解决Raspberry Pi只能在默认640×480模式下显示的问题
http://www.roboby.com/raspberry-pi-640x480.html
② RPiconfig
/××××××××××××××××××××××××××× THE END ×××××××××××××××××××××××××××/