卸载mysql
一、使用以下命令查看当前安装mysql情况,查找以前是否装有mysql
|
1
|
rpm -qa|grep -i mysql |
可以看到如下图的所示:

显示之前安装了:
MySQL-client-5.5.25a-1.rhel5
MySQL-server-5.5.25a-1.rhel5
2、停止mysql服务、删除之前安装的mysql
删除命令:rpm -e –nodeps 包名
|
1
2
|
rpm -ev MySQL-client-5.5.25a-1.rhel5 rpm -ev MySQL-server-5.5.25a-1.rhel5 |
如果提示依赖包错误,则使用以下命令尝试
|
1
|
rpm -ev MySQL-client-5.5.25a-1.rhel5 --nodeps |
如果提示错误:error: %preun(xxxxxx) scriptlet failed, exit status 1
则用以下命令尝试:
|
1
|
rpm -e --noscripts MySQL-client-5.5.25a-1.rhel5 |
3、查找之前老版本mysql的目录、并且删除老版本mysql的文件和库
|
1
|
find / -name mysql |
查找结果如下:
|
1
2
3
4
5
|
find / -name mysql /var/lib/mysql/var/lib/mysql/mysql/usr/lib64/mysql |
删除对应的mysql目录
|
1
2
3
|
rm -rf /var/lib/mysqlrm -rf /var/lib/mysqlrm -rf /usr/lib64/mysql |
具体的步骤如图:查找目录并删除

注意:卸载后/etc/my.cnf不会删除,需要进行手工删除
|
1
|
rm -rf /etc/my.cnf |
4、再次查找机器是否安装mysql
|
1
|
rpm -qa|grep -i mysql |
安装mysql
检查是否安装了mysql


报错:
warning: MySQL-server-5.5.49-1.linux2.6.i386.rpm: Header V3 DSA/SHA1 Signature, key ID 5072e1f5: NOKEY
Preparing... ################################# [100%]
file /usr/share/mysql/charsets/README from install of MySQL-server-5.5.49-1.linux2.6.i386 conflicts with file from package mariadb-libs-1:5.5.52-1.el7.x86_64
file /usr/share/mysql/charsets/Index.xml from install of MySQL-server-5.5.49-1.linux2.6.i386 conflicts with file from package mariadb-libs-1:5.5.52-1.el7.x86_64
file /usr/share/mysql/charsets/armscii8.xml from install of MySQL-server-5.5.49-1.linux2.6.i386 conflicts with file from package mariadb-libs-1:5.5.52-1.el7.x86_64
file /usr/share/mysql/charsets/ascii.xml from install of MySQL-server-5.5.49-1.linux2.6.i386 conflicts with file from package mariadb-libs-1:5.5.52-1.el7.x86_64
file /usr/share/mysql/charsets/cp1250.xml from install of MySQL-server-5.5.49-1.linux2.6.i386 conflicts with file from package mariadb-libs-1:5.5.52-1.el7.x86_64
原因:这是由于yum安装了旧版本的GPG keys造成的 解决办法:后面加上 --force --nodeps 如: rpm -ivh MySQL-server-5.5.46-1.linux2.6.x86_64.rpm --force --nodeps
报错 error: Failed dependencies:
libaio.so.1 is needed by MySQL-server-5.5.49-1.linux2.6.i386
libaio.so.1(LIBAIO_0.1) is needed by MySQL-server-5.5.49-1.linux2.6.i386
libaio.so.1(LIBAIO_0.4) is needed by MySQL-server-5.5.49-1.linux2.6.i386
输入命令 : yum install libaio.so.1
报libncurses.so.5 is needed by MySQL-client-5.5.49-1.linux2.6.i386
输入命令 : yum install libncurses.so.5

启动报错 Unit not found .
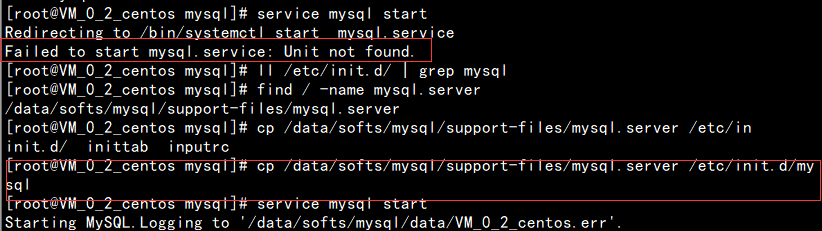
启动失败,查看日志:cat /var/lib/mysql/JD.err

初始化数据库:mysql_install_db --user=mysql
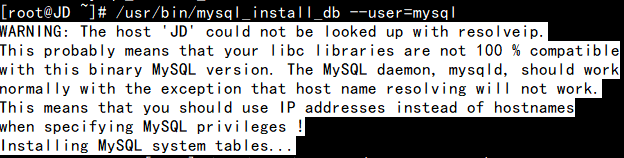
(警告:无法使用解析程序查找主机“JD”。这可能意味着您的libc库与这个二进制MySQL版本不完全兼容。MySQL守护进程mysqld应该正常工作,除非主机名解析不能工作。这意味着在指定MySQL特权时,应该使用IP地址而不是主机名!安装MySQL系统表.。)
配置hosts: vi /etc/hosts

设置密码:
use mysql;
update user set password=password('123456') where user='root';(只适用mysql5.7以下版本,5.7版本没有password字段)
mysql5.7:update mysql.user set authentication_string=password('123456') where user='root' and Host = 'localhost';
flush privileges;
设置允许远程连接:
1、新建用户远程连接mysql数据库
grant all on *.* to root@'%' identified by '123456' with grant option;
flush privileges;
允许任何ip地址(%表示允许任何ip地址)的电脑用root帐户和密码(123456)来访问这个mysql server。
注意root账户不一定要存在。
2、支持root用户允许远程连接mysql数据库
grant all privileges on *.* to 'root'@'%' identified by '123456' with grant option;
flush privileges;
启动mysql:
service mysql start;
service mysqld start;
mysql 启动失败,日志查看:
tail -f 100 /var/log/mysqld.log
(rm -rf ./* 删除当前目录所有文件;)
mysql 5.7 安装教程 :
1系统约定
安装文件下载目录:/data/software
Mysql目录安装位置:/usr/local/mysql
数据库保存位置:/data/mysql
日志保存位置:/data/log/mysql
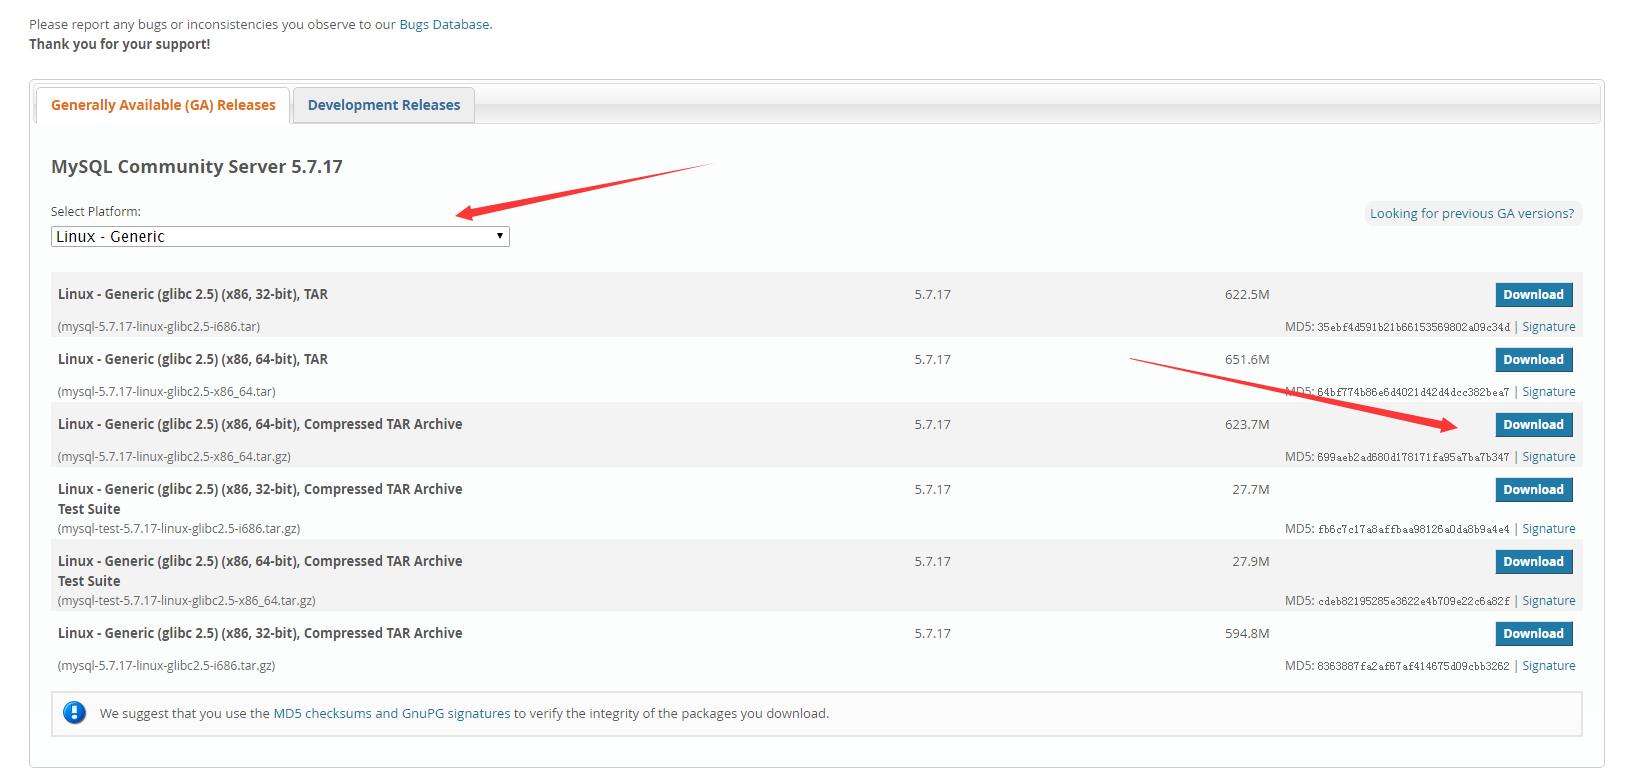
2下载mysql
在官网:http://dev.mysql.com/downloads/mysql/ 中,选择以下版本的mysql下载:
执行如下命名:
#mkdir /data/software
#cd /data/software
--下载安装包
--建议:在windows上使用迅雷下载,速度很快(我的是1M/s),然后用工具(Xftp)上传到 /data/software目录下;
#wget http://dev.mysql.com/get/Downloads/MySQL-5.7/mysql-5.7.17-linux-glibc2.5-x86_64.tar.gz
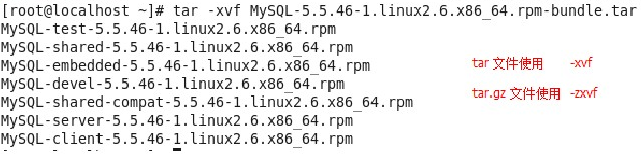
3解压压缩包到目标位置
#cd /data/software
--解压压缩包
#tar -xzvf /data/software/mysql-5.7.17-linux-glibc2.5-x86_64.tar.gz
--移动并修改文件名
#mv /data/software/mysql-5.7.17-linux-glibc2.5-x86_64 /usr/local/mysql
4创建数据仓库目录
--/data/mysql 数据仓库目录
# mkdir /data/mysql
#ls /data/

5新建mysql用户、组及目录
# ---新建一个msyql组
# useradd -r -s /sbin/nologin -g mysql mysql -d /usr/local/mysql ---新建msyql用户禁止登录shell
6改变目录属有者
#cd /usr/local/mysql
#pwd
#chown -R mysql .
#chgrp -R mysql .

#chown -R mysql /data/mysql
7配置参数
# bin/mysqld --initialize --user=mysql --basedir=/usr/local/mysql --datadir=/data/mysql

此处需要注意记录生成的临时密码,如上文结尾处的:YLi>7ecpe;YP
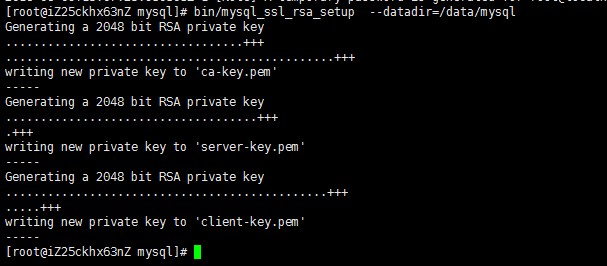
#bin/mysql_ssl_rsa_setup --datadir=/data/mysql
8修改系统配置文件
#cd /usr/local/mysql/support-files

# cp my-default.cnf /etc/my.cnf
# cp mysql.server /etc/init.d/mysql
# vim /etc/init.d/mysql
修改以下内容:

9启动mysql
# /etc/init.d/mysql start
--登陆
# mysql -hlocalhost -uroot -p
--如果出现:-bash: mysql: command not found
--就执行: # ln -s /usr/local/mysql/bin/mysql /usr/bin --没有出现就不用执行
--输入第6步生成的临时密码
--修改密码
mysql> set password=password('root');
--设置root账户的host地址(修改了才可以远程连接)
mysql>grant all privileges on *.* to 'root'@'%' identified by 'root';
mysql>flush privileges;
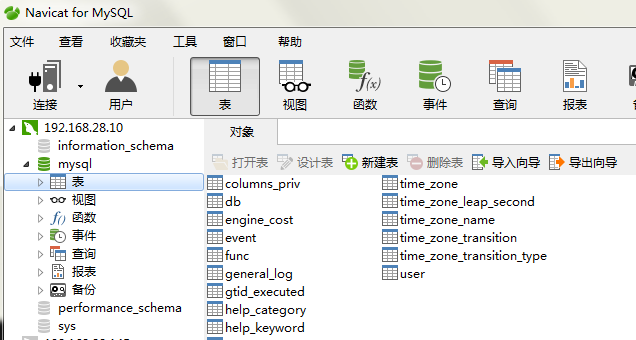
--查看表
mysql> use mysql;
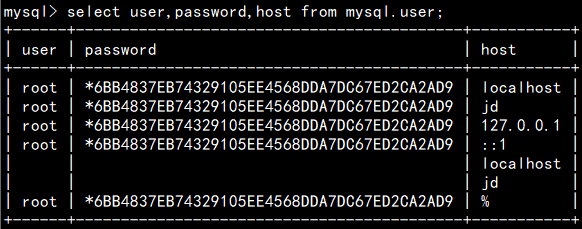
mysql> select host,user from user;
--这里就可以使用远程连接测试了;
10添加系统路径
# vim /etc/profile
添加:
export PATH=/usr/local/mysql/bin:$PATH
如下:
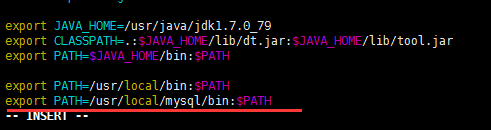
# source /etc/profile
11配置mysql自动启动
# chmod 755 /etc/init.d/mysql
# chkconfig --add mysql
# chkconfig --level 345 mysql on
以上就是linux环境Mysql 5.7.13安装教程,希望对大家的学习有所帮助。
补充:
--退出mysql命令窗口
#exit
--查看mysql状态
#service mysql status
--停止mysql
#service mysql stop
--启动mysql
#service mysql start
附my.cnf(这是一个配置mysql配置文件,暂时可以不用管,如你想钻研 你可以百度或google “mysql my.cnf 配置详情”)
/etc/my.cnf
# For advice on how to change settings please see
# http://dev.mysql.com/doc/refman/5.7/en/server-configuration-defaults.html
# *** DO NOT EDIT THIS FILE. It's a template which will be copied to the
# *** default location during install, and will be replaced if you
# *** upgrade to a newer version of MySQL.
[mysqld]
# Remove leading # and set to the amount of RAM for the most important data
# cache in MySQL. Start at 70% of total RAM for dedicated server, else 10%.
innodb_buffer_pool_size = 10G
# Remove leading # to turn on a very important data integrity option: logging
# changes to the binary log between backups.
log_bin
character-set-server=utf8
collation-server=utf8_bin
init-connect='SET NAMES utf8'
# These are commonly set, remove the # and set as required.
basedir = /usr/local/mysql
datadir = /export/mysql/var
port = 3306
server_id = 22206
socket = /export/mysql/mysql.sock
binlog_format = statement
# Remove leading # to set options mainly useful for reporting servers.
# The server defaults are faster for transactions and fast SELECTs.
# Adjust sizes as needed, experiment to find the optimal values.
join_buffer_size = 128M
sort_buffer_size = 2M
read_rnd_buffer_size = 2M
log_bin_trust_function_creators = on
sql_mode=NO_ENGINE_SUBSTITUTION,STRICT_TRANS_TABLES
lower_case_table_names=1