---恢复内容开始---
1.代码的基本使用
// 1.创建UIButton对象
    // UIButton *btn = [[UIButton alloc] init];
    // 通常情况下使用按钮都是设置custom类型
    UIButton *btn = [UIButton buttonWithType:UIButtonTypeCustom];

    // 2.设置类型
    // 注意:如果想要设置btn的类型,必须在初始化的时候设置
    // btn.buttonType = UIButtonTypeContactAdd;

    // 3.设置frame(位置和尺寸)
    btn.frame = CGRectMake(100, 100, 175, 50);

    // 4.设置背景颜色
    // btn.backgroundColor = [UIColor yellowColor];
    // btn setBackgroundColor:<#(UIColor * _Nullable)#>

    // 5.设置显示的文字
    // 注意:如果设置按钮的文字,必须告诉系统该文字在什么状态下显示
    // btn.titleLabel.text = @"普通按钮";
    [btn setTitle:@"普通按钮" forState:UIControlStateNormal];
    [btn setTitle:@"高亮按钮" forState:UIControlStateHighlighted];

    // 6.设置文字的颜色
    [btn setTitleColor:[UIColor redColor] forState:UIControlStateNormal];
    [btn setTitleColor:[UIColor blueColor] forState:UIControlStateHighlighted];

    // 7.设置按钮的图片
    // 注意:如果设置按钮的图片,必须告知系统该图片在什么状态下显示
    // btn.imageView.image = [UIImage imageNamed:@"player_btn_pause_normal"];
    [btn setImage:[UIImage imageNamed:@"player_btn_pause_normal"] forState:UIControlStateNormal];
    [btn setImage:[UIImage imageNamed:@"player_btn_pause_highlight"] forState:UIControlStateHighlighted];

    // 设置imageView的背景  设置button的背景颜色
    // btn.imageView.backgroundColor = [UIColor purpleColor];
    btn.imageView.contentMode = UIViewContentModeScaleAspectFit;

    // 8.设置背景图片
    [btn setBackgroundImage:[UIImage imageNamed:@"buttongreen"] forState:UIControlStateNormal];
    [btn setBackgroundImage:[UIImage imageNamed:@"buttongreen_highlighted"] forState:UIControlStateHighlighted];

    // 将button对象添加到控制器的View中
    [self.view addSubview:btn];


    // 重要:代码创建的按钮,监听点击
    // Target : 目标,谁想做事情.
    // action : 要执行的方法(发送消息)
    // Events : touchUpInside
    // SEL sel = ; UIButton通过代码设置监听
    [btn addTarget:self action:@selector(btn1Click:) forControlEvents:UIControlEventTouchUpInside];
}

总结:设置背景图片 设置图片
1.设置背景图片,如果图片的尺寸比按钮的尺寸要大,则图片尺寸变成Button的尺寸
2.设置button中imageView的image的时,如果图片的尺寸比按钮大,这按钮的尺寸会谁图片的尺寸而变大 在stordBoard中中测试过
跟 /* 监听的方法 - (IBAction)btnClick { self.btn.enabled = NO; } */ - (IBAction)btnClick:(UIButton *)sender { sender.enabled = NO; } - (void)btn1Click:(UIButton *)btn { NSLog(@"%@", btn); } - (void)demo { NSLog(@"%s", __func__); }
2.九宫格案例推倒出懒加载
@interface ViewController ()

// 购物车的View
@property (weak, nonatomic) IBOutlet UIView *shopCartView;

// 添加商品和移除商品的按钮
@property (weak, nonatomic) IBOutlet UIButton *removeProductBtn;
@property (weak, nonatomic) IBOutlet UIButton *addProductBtn;

// 商品的数据  定义一个数组保存数据
@property (nonatomic, strong) NSArray *products;

@end

@implementation ViewController

//- (void)loadView
//{
//
//}

- (void)viewDidLoad {
    [super viewDidLoad];

    // 加载数据
    /*
    self.products = @[ 如果放在这里加载数据的话,虽然数据只会加载一次,但是不管程序在启动的时候都会加载一次
                      @{@"icon" : @"liantiaobao", @"title" : @"链条包"},
                      @{@"icon" : @"shoutibao", @"title" : @"手提包"},
                      @{@"icon" : @"danjianbao", @"title" : @"单肩包"},
                      @{@"icon" : @"shuangjianbao", @"title" : @"双肩包"},
                      @{@"icon" : @"xiekuabao", @"title" : @"斜挎包"},
                      @{@"icon" : @"qianbao", @"title" : @"钱包"}
                      ];
     */
}

/*
- (void)viewWillAppear:(BOOL)animated
{

}

- (void)viewWillLayoutSubviews
{

}

- (void)viewDidLayoutSubviews
{

}

- (void)viewDidAppear:(BOOL)animated
{

}
 */

#pragma mark - 添加和移除商品
#pragma mark 添加商品
- (IBAction)addProduct:(UIButton *)sender {
    /********************** 1.常亮 *****************************/
    // 1.1.定义一些常亮
    CGFloat width = 70;
    CGFloat height = 100;

    // 1.2.计算常亮  九宫格的计算方式
    CGFloat hMargin = (self.shopCartView.frame.size.width - 3 * width) / 2;
    CGFloat vMargin = (self.shopCartView.frame.size.height - 2 * height) / 1;
    NSInteger index = self.shopCartView.subviews.count;
    CGFloat x = index % 3 * (hMargin + width); X方向上取余
    CGFloat y = index / 3 * (vMargin + height); Y方向上相除


    /********************** 2.添加商品的View *****************************/
    // 2.1.创建商品的View
    UIView *productView = [[UIView alloc] init];
    // 2.2.设置frame
    productView.frame = CGRectMake(x, y, width, height);
    // 2.3.添加到购物车的View中
    [self.shopCartView addSubview:productView];

    // 2.4.添加UIImageView对象用于显示商品的图片
    UIImageView *iconView = [[UIImageView alloc] init];
    iconView.frame = CGRectMake(0, 0, width, width);
    [productView addSubview:iconView];

    // 2.5.添加UILabel对象用于显示商品的名字
    UILabel *titleLabel = [[UILabel alloc] init];
    titleLabel.frame = CGRectMake(0, width, width, height - width);
    titleLabel.textAlignment = NSTextAlignmentCenter;
    [productView addSubview:titleLabel];

    // 2.6.设置展示的数据
    /*
    NSArray *products;

    if (self.products == nil) { 这种方法做到了用到时加载,并且通过判断只加载一次,但是代码阅读性非常差
// 实际开发中,不要将数据和代码混在一起
// 从资源包中加载products.plist文件
// 1.获取plist文件的路径
        products =  @[
                      @{@"icon" : @"liantiaobao", @"title" : @"链条包"},
                      @{@"icon" : @"shoutibao", @"title" : @"手提包"},
                      @{@"icon" : @"danjianbao", @"title" : @"单肩包"},
                      @{@"icon" : @"shuangjianbao", @"title" : @"双肩包"},
                      @{@"icon" : @"xiekuabao", @"title" : @"斜挎包"},
                      @{@"icon" : @"qianbao", @"title" : @"钱包"}
                      ];
    }

    self.products = products;
    */
    /*
    if (self.products == nil) {
        self.products = @[
                          @{@"icon" : @"liantiaobao", @"title" : @"链条包"},
                          @{@"icon" : @"shoutibao", @"title" : @"手提包"},
                          @{@"icon" : @"danjianbao", @"title" : @"单肩包"},
                          @{@"icon" : @"shuangjianbao", @"title" : @"双肩包"},
                          @{@"icon" : @"xiekuabao", @"title" : @"斜挎包"},
                          @{@"icon" : @"qianbao", @"title" : @"钱包"}
                          ];
    }
     */
    NSDictionary *productDict = self.products[index];
    iconView.image = [UIImage imageNamed:productDict[@"icon"]];
    titleLabel.text = productDict[@"title"];


    /********************** 3.判断按钮的状态 *****************************/
    // 3.1.判断添加商品的按钮状态 判断按钮的状态
    sender.enabled = self.shopCartView.subviews.count != 6;
    // 3.2.让移除按钮可以点击
    self.removeProductBtn.enabled = YES;
}

#pragma mark 移除商品
- (IBAction)removeProduct:(UIButton *)sender {
    // 1.取出最后一个商品,并且移除掉
    UIView *lastProduct = [self.shopCartView.subviews lastObject];
    [lastProduct removeFromSuperview];

    // 2.判断按钮的状态
    // 2.1.判断移除按钮的状态
    sender.enabled = self.shopCartView.subviews.count;
    // 2.2.判断添加按钮的状态
    self.addProductBtn.enabled = YES;
}

- (void)demo
{
    NSDictionary *productDict = self.products[2];
}

#pragma mark - 懒加载代码
/*
 懒加载的步骤
    1.定义成员变量
    2.重写get方法
    3.在get方法中判断,变量是否有值,如果没有值,则加载数据,如果有值,直接返回
 */
- (NSArray *)products
{
    if (_products == nil) {
        _products = @[
                      @{@"icon" : @"liantiaobao", @"title" : @"链条包"},
                      @{@"icon" : @"shoutibao", @"title" : @"手提包"},
                      @{@"icon" : @"danjianbao", @"title" : @"单肩包"},
                      @{@"icon" : @"shuangjianbao", @"title" : @"双肩包"},
                      @{@"icon" : @"xiekuabao", @"title" : @"斜挎包"},
                      @{@"icon" : @"qianbao", @"title" : @"钱包"}
                      ];
    }

    return _products;
}
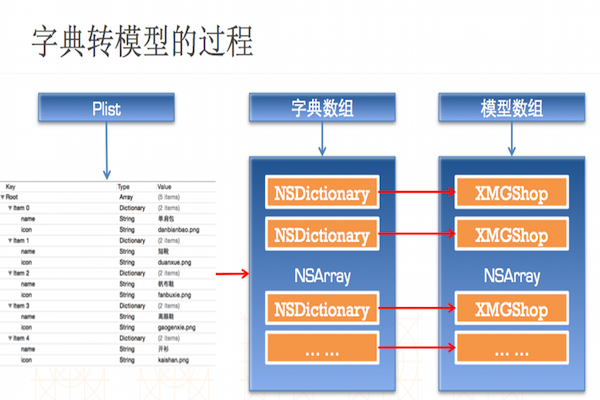
3.字典转模型(推导)
使用字典的坏处
一般情况下,设置数据和取出数据都使用“字符串类型的key”,编写这些key时,编辑器没有智能提示,需要手敲
dict[@"name"] = @"Jack";
NSString *name = dict[@"name"];
手敲字符串key,key容易写错
Key如果写错了,编译器不会有任何警告和报错,造成设错数据或者取错数据
使用模型的好处  什么是模型
所谓模型,其实就是数据模型,专门用来存放数据的对象,用它来表示数据会更加专业
模型设置数据和取出数据都是通过它的属性,属性名如果写错了,编译器会马上报错,因此,保证了数据的正确性
使用模型访问属性时,编译器会提供一系列的提示,提高编码效率
app.name = @"Jack";
NSString *name = app.name;

字典转模型的注意事项
l字典转模型的过程最好封装在模型内部
l
l模型应该提供一个可以传入字典参数的构造方法
Ø- (instancetype)initWithDict:(NSDictionary *)dict;
Ø+ (instancetype)xxxWithDict:(NSDictionary *)dict;
2。模型创建基本都是继承与NSObject的对象,定义根字典中key相同的属性
---恢复内容结束---