Activity的Context创建过程分析
android应用程序窗口在运行的过程中,需要访问一些特定的资源或者类。这些特定的资源或者类构成了Android应用程序的运行上下文环境,Android应用程序窗口可以通过一个Context接口来访问它,这个Context接口也是我们在开发应用程序时经常碰到的。在本文中,我们就将详细分析Android应用程序窗口的运行上下文环境的创建过程。
在前面Android应用程序窗口(Activity)实现框架简要介绍和学习计划一文中提到,Android应用程序窗口的运行上下文环境是通过ContextImpl类来描述的,即每一个Activity组件都关联有一个ContextImpl对象。ContextImpl类继承了Context类,它与Activity组件的关系如图1所示:
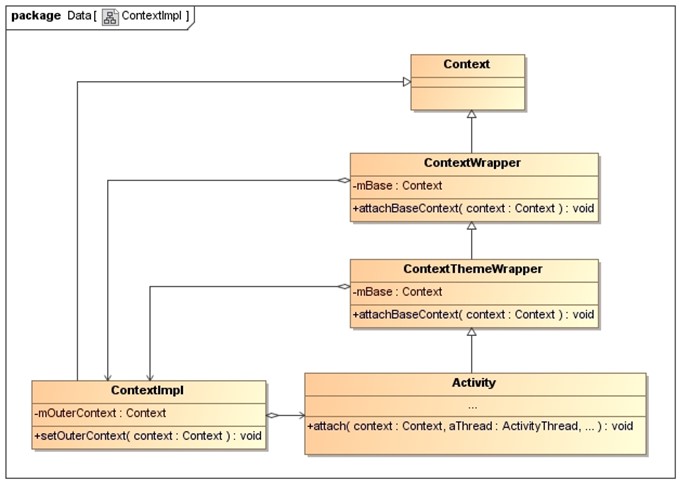
这个类图在设计模式里面就可以称为装饰模式。Activity组件通过其父类ContextThemeWrapper和ContextWrapper的成员变量mBase来引用了一个ContextImpl对象,这样,Activity组件以后就可以通过这个ContextImpl对象来执行一些具体的操作,例如,启动Service组件、注册广播接收者和启动Content Provider组件等操作。同时,ContextImpl类又通过自己的成员变量mOuterContext来引用了与它关联的一个Activity组件,这样,ContextImpl类也可以将一些操作转发给Activity组件来处理。
在前面Android应用程序启动过程源代码分析一文中,我们已经详细分析过一个Activity组件的启动过程了。在这个启动过程中,最后一步便是通过ActivityThread类的成员函数performLaunchActivity在应用程序进程中创建一个Activity实例,并且为它设置运行上下文环境,即为它创建一个ContextImpl对象。接下来,我们就从ActivityThread类的成员函数performLaunchActivity开始,分析一个Activity实例的创建过程,以便可以从中了解它的运行上下文环境的创建过程,如图2所示:
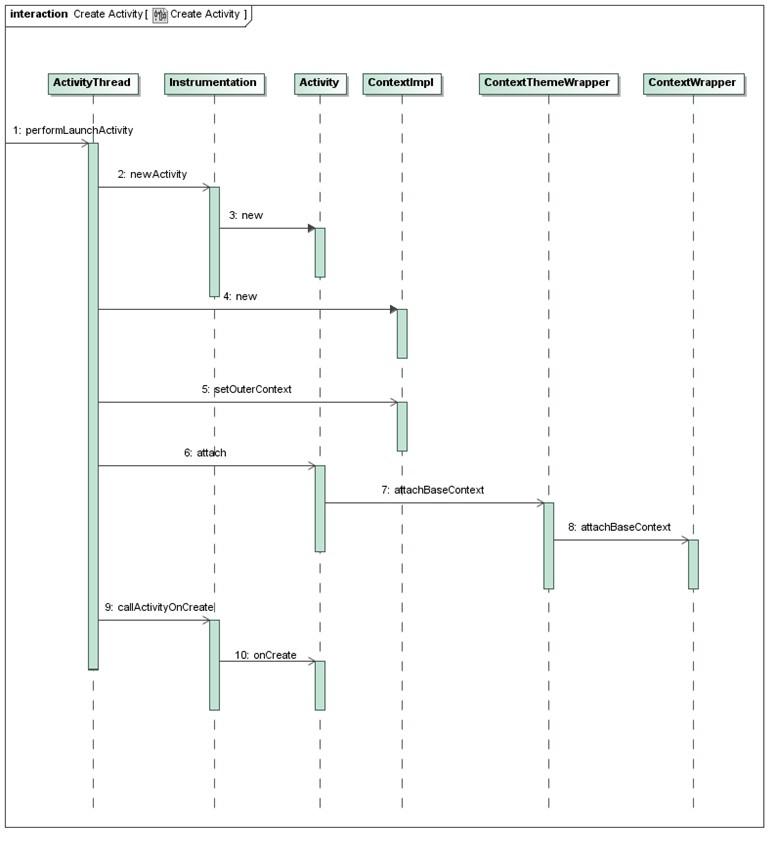
这个过程一共分为10个步骤,接下来我们就详细分析每一个步骤。
Step 1. ActivityThread.performLaunchActivity
public final class ActivityThread {
    ......
    Instrumentation mInstrumentation;
    ......
    private final Activity performLaunchActivity(ActivityClientRecord r, Intent customIntent) {
        ......
        ComponentName component = r.intent.getComponent();
        ......
        Activity activity = null;
        try {
            java.lang.ClassLoader cl = r.packageInfo.getClassLoader();
            activity = mInstrumentation.newActivity(cl, component.getClassName(), r.intent);
            ......
        } catch (Exception e) {
            ......
        }

        try {
            Application app = r.packageInfo.makeApplication(false, mInstrumentation);
            ......
            if (activity != null) {
                ContextImpl appContext = ContextImpl.createActivityContext(this, r.packageInfo, displayId, r.overrideConfig);
                ......
                appContext.setOuterContext(activity);
                ......
                Configuration config = new Configuration(mConfiguration);
                ......
                activity.attach(appContext, this, getInstrumentation(), r.token,
                        r.ident, app, r.intent, r.activityInfo, title, r.parent,
                        r.embeddedID, r.lastNonConfigurationInstance,
                        r.lastNonConfigurationChildInstances, config);
                ......
                mInstrumentation.callActivityOnCreate(activity, r.state);
                ......
            }
            ......
        } catch (SuperNotCalledException e) {
            ......
        } catch (Exception e) {
            ......
        }
        return activity;
    }
}
Step 2. Instrumentation.newActivity
class ContextImpl extends Context {
    ......

    private Context mOuterContext;
    ......

    ContextImpl() {
        // For debug only
        //++sInstanceCount;
        mOuterContext = this;
    }
    ......
}
Step 4. new ContextImpl
class ContextImpl extends Context {
    ......

    private Context mOuterContext;
    ......

    ContextImpl() {
        // For debug only
        //++sInstanceCount;
        mOuterContext = this;
    }
    ......
}
Step 5. ContextImpl.setOuterContext
class ContextImpl extends Context {
    ......

    private Context mOuterContext;
    ......

    final void setOuterContext(Context context) {
        mOuterContext = context;
    }

    ......
}
Step 6. Activity.attach
public class Activity extends ContextThemeWrapper
        implements LayoutInflater.Factory, Window.Callback, KeyEvent.Callback,
        OnCreateContextMenuListener, ComponentCallbacks {
    ......

    private Application mApplication;
    ......

    /*package*/ Configuration mCurrentConfig;
    ......

    private Window mWindow;

    private WindowManager mWindowManager;
    ......

    final void attach(Context context, ActivityThread aThread,
            Instrumentation instr, IBinder token, int ident,
            Application application, Intent intent, ActivityInfo info,
            CharSequence title, Activity parent, String id,
            Object lastNonConfigurationInstance,
            HashMap<String,Object> lastNonConfigurationChildInstances,
            Configuration config) {

        attachBaseContext(context);

        mWindow = PolicyManager.makeNewWindow(this);
        mWindow.setCallback(this);
        if (info.softInputMode != WindowManager.LayoutParams.SOFT_INPUT_STATE_UNSPECIFIED) {
            mWindow.setSoftInputMode(info.softInputMode);
        }
        ......

        mApplication = application;
        ......

        mWindow.setWindowManager(null, mToken, mComponent.flattenToString());
        ......

        mWindowManager = mWindow.getWindowManager();
        mCurrentConfig = config;
    }
    ......
}
Step 7. ContextThemeWrapper.attachBaseConext
public class ContextThemeWrapper extends ContextWrapper {
    private Context mBase;
    ......

    @Override
    protected void attachBaseContext(Context newBase) {
        super.attachBaseContext(newBase);
        mBase = newBase;
    }
    ......
}
Step 8. ContextWrapper.attachBaseConext
public class ContextWrapper extends Context {
    Context mBase;
    ......

    protected void attachBaseContext(Context base) {
        if (mBase != null) {
            throw new IllegalStateException("Base context already set");
        }
        mBase = base;
    }

    ......
}
Step 9. Instrumentation.callActivityOnCreate
public class Instrumentation {
    ......

    public void callActivityOnCreate(Activity activity, Bundle icicle) {
        ......

        activity.onCreate(icicle);

        ......
    }
    ......
}
Step 10. Activity.onCreate
public class Activity extends ContextThemeWrapper
        implements LayoutInflater.Factory,
        Window.Callback, KeyEvent.Callback,
        OnCreateContextMenuListener, ComponentCallbacks {
    ......

    boolean mCalled;
    ......

    /*package*/ boolean mVisibleFromClient = true;
    ......

    protected void onCreate(Bundle savedInstanceState) {
        mVisibleFromClient = !mWindow.getWindowStyle().getBoolean(
                com.android.internal.R.styleable.Window_windowNoDisplay, false);
        mCalled = true;
    }

    ......
}
至此,一个Activity组件的创建过程,以及它的运行上下文环境的创建过程,就分析完成了。这个过程比较简单,我们是从中获得以下三点信息:
-
一个Android应用窗口的运行上下文环境是使用一个ContextImpl对象来描述的,这个ContextImpl对象会分别保存在Activity类的父类ContextThemeWrapper和ContextWrapper的成员变量mBase中,即ContextThemeWrapper类和ContextWrapper类的成员变量mBase指向的是一个ContextImpl对象。
-
Activity组件在创建过程中,即在它的成员函数attach被调用的时候,会创建一个PhoneWindow对象,并且保存在成员变量mWindow中,用来描述一个具体的Android应用程序窗口。
-
Activity组件在创建的最后,即在它的子类所重写的成员函数onCreate中,会调用父类Activity的成员函数setContentView来创建一个Android应用程序窗口的视图。
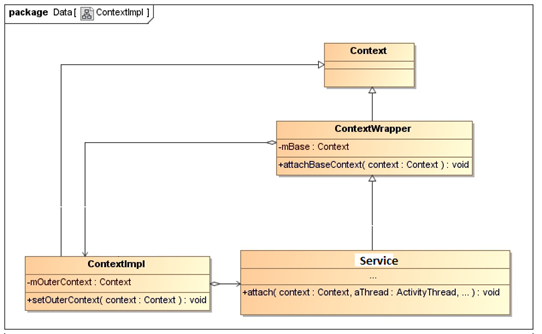
Service的Context的创建过程分析
ActivityThread.handleCreateService
private void handleCreateService(CreateServiceData data) {
    ...
    Service service = null;
    try {
        java.lang.ClassLoader cl = packageInfo.getClassLoader();
        service = (Service) cl.loadClass(data.info.name).newInstance();
    } catch (Exception e) {
        if (!mInstrumentation.onException(service, e)) {
            throw new RuntimeException(
                "Unable to instantiate service " + data.info.name
                + ": " + e.toString(), e);
        }
    }

    try {
        ContextImpl context = ContextImpl.createAppContext(this, packageInfo);
        context.setOuterContext(service);

        Application app = packageInfo.makeApplication(false, mInstrumentation);
        service.attach(context, this, data.info.name, data.token, app, ActivityManagerNative.getDefault());
        service.onCreate();
        mServices.put(data.token, service);
        try {
            ActivityManagerNative.getDefault().serviceDoneExecuting(
                    data.token, SERVICE_DONE_EXECUTING_ANON, 0, 0);
        } catch (RemoteException e) {
            // nothing to do.
        }
    } catch (Exception e) {
        if (!mInstrumentation.onException(service, e)) {
            throw new RuntimeException(
                "Unable to create service " + data.info.name
                + ": " + e.toString(), e);
        }
    }
}
Service.attatch
public final void attach(Context context, ActivityThread thread, String className, IBinder token,
        Application application, Object activityManager) {

    attachBaseContext(context);
    mThread = thread;           // NOTE:  unused - remove?
    mClassName = className;
    mToken = token;
    mApplication = application;
    mActivityManager = (IActivityManager)activityManager;
    mStartCompatibility = getApplicationInfo().targetSdkVersion < Build.VERSION_CODES.ECLAIR;
}
可以看出service和activity的context的创建过程很相似。
Application的Context的创建过程
ActivityThread.handleBindApplication
LoadedApk.makeApplication
    ContextImpl appContext = ContextImpl.createAppContext(mActivityThread, this);
    app = mActivityThread.mInstrumentation.newApplication(cl, appClass, appContext);
    appContext.setOuterContext(app);

Instrumentation.newApplication(Class<?> clazz, Context context)
    Application app = (Application)clazz.newInstance();
    app.attach(context);

Application.attach
final void attach(Context context) {
    attachBaseContext(context);
    mLoadedApk = ContextImpl.getImpl(context).mPackageInfo;
}

ContextWrapper.attachBaseContext
    protected void attachBaseContext(Context base) {
        if (mBase != null) {
            throw new IllegalStateException("Base context already set");
        }
        mBase = base;
    }