参考
https://juejin.im/post/5d95f4a4f265da5b8f10714b
MultiDex 原理
在进行源码分析之前,需要会使用才行,可以先看multidex的文档。
一般使用是调用MultiDex.install(Context context),具体下面看下MultiDex的install 方法做了什么事
public static void install(Context context) {
    Log.i("MultiDex", "Installing application");
    if (IS_VM_MULTIDEX_CAPABLE) { //5.0 以上VM基本支持多dex,啥事都不用干
        Log.i("MultiDex", "VM has multidex support, MultiDex support library is disabled.");
    } else if (VERSION.SDK_INT < 4) { //
        throw new RuntimeException("MultiDex installation failed. SDK " + VERSION.SDK_INT + " is unsupported. Min SDK version is " + 4 + ".");
    } else {
        ...
        doInstallation(context, new File(applicationInfo.sourceDir), new File(applicationInfo.dataDir), "secondary-dexes", "", true);
        ...
        Log.i("MultiDex", "install done");
    }
}
从入口的判断来看,
-
如果虚拟机本身就支持加载多个dex文件,那就啥都不用做;
-
如果是不支持加载多个dex(5.0以下是不支持的),则走到 doInstallation 方法。
继续看doInstallation 方法
private static void doInstallation(Context mainContext, File sourceApk, File dataDir, String secondaryFolderName,
String prefsKeyPrefix, boolean reinstallOnPatchRecoverableException)
throws 各种Exception ... {
    synchronized(installedApk) {
        if (!installedApk.contains(sourceApk)) {
            installedApk.add(sourceApk);
            if (VERSION.SDK_INT > 20) {
                Log.w(...);
            }

            ClassLoader loader;
            try {
                loader = mainContext.getClassLoader();
            } catch (RuntimeException var25) {
                Log.w("MultiDex", "Failure while trying to obtain Context class loader. Must be running in test mode. Skip patching.", var25);
                return;
            }

            if (loader == null) {
                Log.e("MultiDex", "Context class loader is null. Must be running in test mode. Skip patching.");
            } else {
                try {
                    clearOldDexDir(mainContext);
                } catch (Throwable var24) {
                    Log.w("MultiDex", "Something went wrong when trying to clear old MultiDex extraction, continuing without cleaning.", var24);
                }

               // 获取非主dex文件
                File dexDir = getDexDir(mainContext, dataDir, secondaryFolderName);
                MultiDexExtractor extractor = new MultiDexExtractor(sourceApk, dexDir);
                IOException closeException = null;

                try {
                    // 1. 这个load方法,第一次没有缓存,会非常耗时
                    List files = extractor.load(mainContext, prefsKeyPrefix, false);

                    try {
                        // 2. 安装dex
                        installSecondaryDexes(loader, dexDir, files);
                    } catch (IOException var26) {
                        ...
                    }
                } finally {
                    try {
                        extractor.close();
                    } catch (IOException var23) {
                        closeException = var23;
                    }
                }

                if (closeException != null) {
                    throw closeException;
                }
            }
        }
    }
}
先看注释1,MultiDexExtractor#load
List<? extends File> load(Context context, String prefsKeyPrefix, boolean forceReload) throws IOException {
    Log.i("MultiDex", "MultiDexExtractor.load(" + this.sourceApk.getPath() + ", " + forceReload + ", " + prefsKeyPrefix + ")");
    if (!this.cacheLock.isValid()) {
        throw new IllegalStateException("MultiDexExtractor was closed");
    } else {
        List files;
        if (!forceReload && !isModified(context, this.sourceApk, this.sourceCrc, prefsKeyPrefix)) {
            try {
                //读缓存的dex
                files = this.loadExistingExtractions(context, prefsKeyPrefix);
            } catch (IOException var6) {
                Log.w("MultiDex", "Failed to reload existing extracted secondary dex files, falling back to fresh extraction", var6);
                //读取缓存的dex失败,可能是损坏了,那就重新去解压apk读取,跟else代码块一样
                files = this.performExtractions();
                //保存标志位到sp,下次进来就走if了,不走else
                putStoredApkInfo(context, prefsKeyPrefix, getTimeStamp(this.sourceApk), this.sourceCrc, files);
            }
        } else {
            if (forceReload) {
                Log.i("MultiDex", "Forced extraction must be performed.");
            } else {
                Log.i("MultiDex", "Detected that extraction must be performed.");
            }
            //没有缓存,解压apk读取
            files = this.performExtractions();
            //保存dex信息到sp,下次进来就走if了,不走else
            putStoredApkInfo(context, prefsKeyPrefix, getTimeStamp(this.sourceApk), this.sourceCrc, files);
        }

        Log.i("MultiDex", "load found " + files.size() + " secondary dex files");
        return files;
    }
}
查找dex文件,有两个逻辑,有缓存就调用loadExistingExtractions方法,没有缓存或者缓存读取失败就调用performExtractions方法,然后再缓存起来。
既然用到缓存,那么performExtractions 方法想必应该是很耗时的,分析一下代码:
private List<MultiDexExtractor.ExtractedDex> performExtractions() throws IOException {
//先确定命名格式
    String extractedFilePrefix = this.sourceApk.getName() + ".classes";
    this.clearDexDir();
    List<MultiDexExtractor.ExtractedDex> files = new ArrayList();
    ZipFile apk = new ZipFile(this.sourceApk);

    try {
        int secondaryNumber = 2;
        //apk已经是改为zip格式了,解压遍历zip文件,里面是dex文件,
        //名字有规律,如classes1.dex,class2.dex
        for(ZipEntry dexFile = apk.getEntry("classes" + secondaryNumber + ".dex"); dexFile != null; dexFile = apk.getEntry("classes" + secondaryNumber + ".dex")) {
             //文件名:xxx.classes1.zip
            String fileName = extractedFilePrefix + secondaryNumber + ".zip";

            //创建这个classes1.zip文件
            MultiDexExtractor.ExtractedDex extractedFile = new MultiDexExtractor.ExtractedDex(this.dexDir, fileName);

            //classes1.zip文件添加到list
            files.add(extractedFile);
            Log.i("MultiDex", "Extraction is needed for file " + extractedFile);
            int numAttempts = 0;
            boolean isExtractionSuccessful = false;

            while(numAttempts < 3 && !isExtractionSuccessful) {
                ++numAttempts;
                //这个方法是将classes1.dex文件写到压缩文件classes1.zip里去,最多重试三次
                extract(apk, dexFile, extractedFile, extractedFilePrefix);

                ...
            }

            if (!isExtractionSuccessful) {
                throw new IOException("Could not create zip file " + extractedFile.getAbsolutePath() + " for secondary dex (" + secondaryNumber + ")");
            }

            ++secondaryNumber;
        }
    } finally {
        try {
            apk.close();
        } catch (IOException var17) {
            Log.w("MultiDex", "Failed to close resource", var17);
        }

    }

    return files;
}
这里的逻辑就是解压apk,遍历出里面的dex文件,例如class1.dex,class2.dex,然后又压缩成class1.zip,class2.zip...,然后返回zip文件列表。
思考为什么这里要压缩呢? 后面涉及到ClassLoader加载类原理的时候会分析ClassLoader支持的文件格式。
第一次加载才会执行解压和压缩过程,第二次进来读取sp中保存的dex信息,直接返回file list,所以第一次启动的时候比较耗时。
dex文件列表找到了,回到上面MultiDex#doInstallation方法的注释2,找到的dex文件列表,然后调用installSecondaryDexes方法进行安装,怎么安装呢?
private static void installSecondaryDexes(ClassLoader loader, File dexDir, List<? extends File> files)
throws 各种Exception {
    if (!files.isEmpty()) {
        if (VERSION.SDK_INT >= 19) {
            MultiDex.V19.install(loader, files, dexDir);
        } else if (VERSION.SDK_INT >= 14) {
            MultiDex.V14.install(loader, files);
        } else {
            MultiDex.V4.install(loader, files);
        }
    }
}
看SDK 19 以上的实现
private static final class V19 {
    private V19() {
    }

    static void install(ClassLoader loader, List<? extends File> additionalClassPathEntries, File optimizedDirectory) throws 各种Exception {
         //1 反射ClassLoader 的 pathList 字段
        Field pathListField = MultiDex.findField(loader, "pathList");
        Object dexPathList = pathListField.get(loader);

        ArrayList<IOException> suppressedExceptions = new ArrayList();

        // 2 扩展数组
        MultiDex.expandFieldArray(dexPathList, "dexElements", makeDexElements(dexPathList, new ArrayList(additionalClassPathEntries), optimizedDirectory, suppressedExceptions));

        ...
    }

    private static Object[] makeDexElements(Object dexPathList, ArrayList<File> files, File optimizedDirectory, ArrayList<IOException> suppressedExceptions)
throws IllegalAccessException, InvocationTargetException, NoSuchMethodException {

        Method makeDexElements = MultiDex.findMethod(dexPathList, "makeDexElements", ArrayList.class, File.class, ArrayList.class);
        return (Object[])((Object[])makeDexElements.invoke(dexPathList, files, optimizedDirectory, suppressedExceptions));
    }
}
上边方法的步骤:
-
反射ClassLoader 的 pathList 字段
-
找到pathList 字段对应的类的makeDexElements 方法
-
通过MultiDex.expandFieldArray 这个方法扩展 dexElements 数组,怎么扩展?看下代码:
private static void expandFieldArray(Object instance, String fieldName, Object[] extraElements) throws NoSuchFieldException, IllegalArgumentException, IllegalAccessException {
    Field jlrField = findField(instance, fieldName);
 //取出原来的dexElements 数组
    Object[] original = (Object[])((Object[])jlrField.get(instance));
 //新的数组
    Object[] combined = (Object[])((Object[])Array.newInstance(original.getClass().getComponentType(), original.length + extraElements.length));

//原来数组内容拷贝到新的数组
    System.arraycopy(original, 0, combined, 0, original.length);

 //dex2、dex3...拷贝到新的数组
    System.arraycopy(extraElements, 0, combined, original.length, extraElements.length);

 //将dexElements 重新赋值为新的数组
    jlrField.set(instance, combined);
}
就是创建一个新的数组,把原来数组内容(主dex)和要增加的内容(dex2、dex3...)拷贝进去,反射替换原来的dexElements为新的数组,如下图
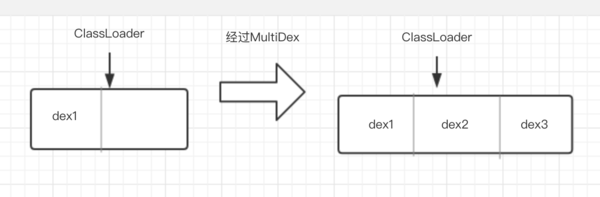
看起来有点眼熟,Tinker热修复的原理也是通过反射将修复后的dex添加到这个dex数组去,不同的是热修复是添加到数组最前面,而MultiDex是添加到数组后面。