本文目的是分解前面的代码。其实,它得逻辑很清楚,只是对于我这种只是用过 Canvas 画线(用过 Fabric.js Canvas库)的人来说,这个还是很复杂的。我研究这个背景天空也是搞了一天,下面就是只加载天空的代码及分析。
在线效果点击:http://1.codemo2.sinaapp.com/3d_demo_265line/index.html 【可以用键盘“左右”键控制】【手机浏览器触控有些异常】
原理大概就是:
1. 创建主循环
2. 主循环内重复调用绘制方法
3. 绘制方法: 针对 Player 的位置和方向,绘制背景图
其中用到了 H5 的 requestAnimationFrame(callback),bind(this, argu,...) 比较难以理解的函数。
Player 是人物,含有平面x,y位置和方向三个特性;Controls 用来响应键盘和触屏操作;Map 是背景图还有后面的墙壁;Camera 是最重要的摄像机,用来绘制我们看到的炫酷图像;GameLoop 是整个程序的入口,一直循环调用 Camera 刷新绘制图形。
一、主循环
程序入口是
var loop = new GameLoop();
loop.start(function frame(seconds){}); //将 frame(secondes) 函数赋值给 GameLoop 对象的callbackGameLoop.prototype.start = function(callback) {
this.callback = callback;
requestAnimationFrame(this.frame);
}紧接着在 loop.start() 里立即调用 requestAnimationFrame(this.frame); 通知浏览器 loop.frame 函数要播放动画。
看看 loop.frame() 里面都干了啥:
GameLoop.prototype.frame = function(time){
var seconds = (time - this.lastTime) / 1000;
this.lastTime = time;
if (seconds < 0.2) this.callback(seconds); //【this.callback在loop.start之后才被赋值为function frame(seconds){}】
requestAnimationFrame(this.frame); //调用自己,产生无限循环;requestAnimationFrame 用法类似 setTimeout()}
注意:要区分清楚 this.callback(argu) 函数和 this.frame(argu) 。
其中,this.callback(seconds); 调用 传给 loop.start() 的这个 函数:
loop.start(function frame(seconds){
player.update(controls.states, map, seconds); //更新 player 的面向、地图/背景图
camera.render(player, map); //绘制 player 和地图/背景图
});下面就是如何更新和绘制 player 和地图/背景图了。
二、Player和地图更新及绘制
player.update(controls.states, map, seconds); //更新 player 的面向、地图/背景图
player 对象去读取全局变量 controls (里面记录着用户是否点击上下左右按键或触屏事件),如果用户按了【左】键,player 的 面向就发生改变。代码:
Player.prototype.update = function(controls, map, seconds){
if (controls.left) {this.rotate(-Math.PI * seconds)};
if (controls.right) this.rotate(Math.PI * seconds);
}其中controls 监听键盘和触控事件,遇到 keydown/keyup/touchstart等事件,调用事件响应函数,将触屏事件转化为键盘值,再转化为 Player 的【左右转动和前后移动】并更新 player 的状态。(代码多且简单,此处不列)
接下来是真正的绘制背景了。 camera.render(player, map); //绘制 player 和地图/背景图
我们来看看 camera.render() 函数的实现:
function Camera(canvas, resolution , focalLength){
this.ctx = canvas.getContext('2d');
this.width = canvas.width = window.innerWidth * 0.5;
this.height = canvas.height = window.innerHeight * 0.5;
this.resolution = resolution;
this.spacing = this.width / resolution;
this.focalLength = focalLength || 0.8;
this.range = MOBILE ? 8 : 14;
this.lightRange = 5;
this.scale = (this.width + this.height) / 1200;
}Camera.prototype.render = function(player, map){
this.drawSky(player.direction, map.skybox, map.light); //player的面向,地图背景图,地图环境光
}Camera.prototype.drawSky = function(direction, sky, ambient){
var width = sky.width * (this.height / sky.height) * 2; //保持背景图宽高比的同时,将图重复左右拼接
var left = (direction / CIRCLE) * -width;
this.ctx.save();
this.ctx.drawImage(sky.image, left, 0, width, this.height); //调用 Canvas 2d 的 drawImage()
if (left < width - this.width) {
this.ctx.drawImage(sky.image, left + width, 0, width, this.height);
}
this.ctx.restore();
}这里看不懂了。。。为何 left 是个 负数?
三、背景图的拼接显示
想了三天终于想清楚了,关键点是 HTML5 Canvas 的 drawImage(img,x,y,width,height) 函数没有理解清楚。平时使用 drawImage() 时,参数均是正数,没有思考当5个参数时 x, y 为负数时的含义。x , y 的准确意义是【在画布上的 x ,y 处定位图像】。当 x, y 为负数时,即说明在画布的 -100,-100 处开始绘制原图,简单说就是,原图的左上角被隐藏了。见图1:
<img id="tulip" src="flower.jpg" width="400" height="266" />
<canvas id="myCanvas" width="800" height="300" />


var c=document.getElementById("myCanvas");
var ctx=c.getContext("2d");
var img=document.getElementById("tulip");
ctx.drawImage(img,-400,-133,800,266);  //img,x,y,width,height
//先拉伸原图,再隐藏部分区域
//结果见图1
var c=document.getElementById("myCanvas"); var ctx=c.getContext("2d"); var img=document.getElementById("tulip"); ctx.drawImage(img,0,0,800,266); //img,x,y,width,height//拉伸原图
//结果见图2var c=document.getElementById("myCanvas"); var ctx=c.getContext("2d"); var img=document.getElementById("tulip"); ctx.drawImage(img,-400,0,800,266);//绘制被拉伸2倍后图片的左半边,这时画布右半边是空白 ctx.drawImage(img,400,0,800,266);//接着绘制画布右半边,内容还是被拉伸后的图片
//画布上显示的结果就是原图的首尾(左右)连接了起来
//同理,本文的背景星空图也就是这样首尾连接起来的
//结果见图3


图1 drawImage第23参数为负隐藏部分图片 图2 drawImage的width参数为原图片两倍_自动拉伸图片 图3 使用drawImage将原图左右连接起来
回头再看看
Camera.prototype.drawSky = function(direction, sky, ambient){
var width = sky.width * (this.height / sky.height) * 2; //保持背景图宽高比的同时,将图重复左右拼接
var left = (direction / CIRCLE) * -width;
this.ctx.save();
this.ctx.drawImage(sky.image, left, 0, width, this.height); //调用 Canvas 2d 的 drawImage()
if (left < width - this.width) {
this.ctx.drawImage(sky.image, left + width, 0, width, this.height);
}
this.ctx.restore();
}其中 CIRCLE 是定义为 2*Math.PI 的常量,direction 前面也有说明 等于 (this.direction + angle + CIRCLE) % (CIRCLE); 即永远在 0 ~ 2Pi 之间,所以 (direction / CIRCLE) 也永远在 0~1 之间,于是
left = (direction / CIRCLE) * -width 也就在 (-width , 0)之间。
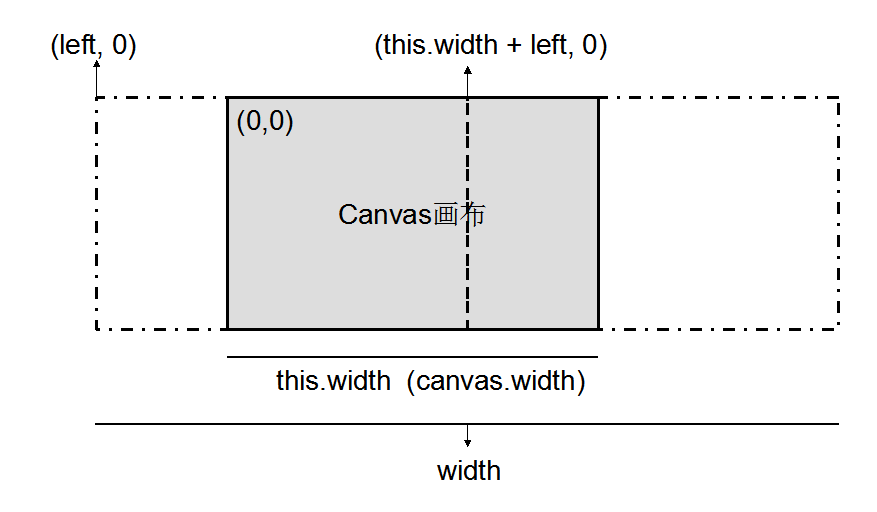
下面是我用PPT画的说明图,这就能解释为何 left 为负数,width 要用原图宽度乘以2了。

  1 <!--
  2
  3 1. draw sky
  4
  5
  6
  7
  8 -->
  9
 10 <!doctype html>
 11 <html>
 12   <head>
 13       <meta charset="utf-8">
 14     <meta name="viewport" content="width=device-width, initial-scale=1.0, maximum-scale=1.0, user-scalable=no">
 15     <title>Raycaster Demo - PlayfulJS</title>
 16   </head>
 17   <body style='background: #000; margin: 0; padding: 0;  100%; height: 100%;'>
 18     <canvas id='display' width='1' height='1' style=' 100%; height: 100%;' />
 19
 20     <script>
 21
 22     var CIRCLE = Math.PI * 2;
 23     var MOBILE = /Android|webOS|iPhone|iPad|iPod|BlackBerry/i.test(navigator.userAgent)
 24
 25     function Controls(){
 26         this.codes  = { 37: 'left', 39: 'right', 38: 'forward', 40: 'backward' };
 27         this.states = { 'left': false, 'right': false, 'forward': false, 'backward': false };
 28         document.addEventListener('keydown', this.onKey.bind(this, true), false);
 29         document.addEventListener('keyup', this.onKey.bind(this, false), false);
 30         document.addEventListener('touchstart', this.onTouch.bind(this), false);
 31         document.addEventListener('touchmove', this.onTouch.bind(this), false);
 32         document.addEventListener('toucheend', this.onTouchEnd.bind(this), false);
 33     }
 34
 35     Controls.prototype.onTouch = function(e){
 36         var t = e.touches[0];
 37         this.onTouchEnd(e);
 38         if (t.pageY < window.innerHeight * 0.5) this.onKey(true, { keyCode: 38 });
 39         else if (t.pageX < window.innerWidth * 0.5) this.onKey(true, { keyCode: 37 });
 40         else if (t.pageY > window.innerWidth * 0.5) this.onKey(true, { keyCode: 39 });
 41     }
 42
 43     Controls.prototype.onTouchEnd = function(e){
 44         this.states = { 'left': false, 'right': false, 'forward': false, 'backward': false };
 45         e.preventDefault();
 46         e.stopPropagation();
 47     }
 48
 49     Controls.prototype.onKey = function(val,e){
 50         var state = this.codes[e.keyCode];
 51         if (typeof state === 'undefined') return;
 52         this.states[state] = val;
 53         e.preventDefault && e.preventDefault();
 54         e.stopPropagation && e.stopPropagation();
 55         // console.log(e.keyCode);
 56     }
 57
 58     function Bitmap(url, width, height){
 59         this.image = new Image();
 60         this.image.src = url;
 61         this.width = width;
 62         this.height = height;
 63     }
 64     function Map(){
 65         this.skybox = new Bitmap('assets/deathvalley_panorama.jpg', 2000, 750);
 66     }
 67
 68     function Player(x, y, direction){
 69         this.x = x;
 70         this.y = y;
 71         this.direction = direction;
 72     }
 73
 74     //弧度制
 75     Player.prototype.rotate = function(angle){
 76         console.log(angle);
 77         this.direction = (this.direction + angle + CIRCLE) % (CIRCLE);
 78     }
 79
 80     Player.prototype.update = function(controls, map, seconds){
 81         if (controls.left) {this.rotate(-Math.PI * seconds)};
 82         if (controls.right) this.rotate(Math.PI * seconds);
 83         // console.log("sdf");
 84     }
 85
 86
 87
 88     //http://www.ituring.com.cn/article/50019
 89     //camera renderer scene
 90     //resolution : 分辨率
 91     function Camera(canvas, resolution , focalLength){
 92         this.ctx = canvas.getContext('2d');
 93         this.width = canvas.width = window.innerWidth * 0.5;
 94         this.height = canvas.height = window.innerHeight * 0.5;
 95         this.resolution = resolution;
 96         this.spacing = this.width / resolution;
 97         this.focalLength = focalLength || 0.8;
 98         this.range = MOBILE ? 8 : 14;
 99         this.lightRange = 5;
100         this.scale = (this.width + this.height) / 1200;
101     }
102
103     Camera.prototype.render = function(player, map){
104         this.drawSky(player.direction, map.skybox, map.light);
105     }
106
107     //ambient: environment light
108     Camera.prototype.drawSky = function(direction, sky, ambient){
109         var width = sky.width * (this.height / sky.height) * 2;
110         var left = (direction / CIRCLE) * -width;
111
112         this.ctx.save();
113         this.ctx.drawImage(sky.image, left, 0, width, this.height);
114         if (left < width - this.width) {
115           this.ctx.drawImage(sky.image, left + width, 0, width, this.height);
116         }
117         this.ctx.restore();
118     }
119
120     function GameLoop(){
121         // this.start =
122         this.lastTime = 0;        //control FPS
123         this.frame = this.frame.bind(this);
124         this.callback = function(){};        //place holder
125     }
126
127
128     //requestAnimationFrame make borswer start animate,argu is callbadk
129     GameLoop.prototype.start = function(callback) {
130         this.callback = callback;
131         requestAnimationFrame(this.frame);
132         // body...
133     }
134
135     GameLoop.prototype.frame = function(time){
136         var seconds = (time - this.lastTime) / 1000;
137         this.lastTime = time;
138         if (seconds < 0.2) this.callback(seconds);
139         requestAnimationFrame(this.frame);
140     }
141
142
143     var display = document.getElementById('display');
144     var player  = new Player(15.3, -1.2, Math.PI * 0.3);
145     var camera = new Camera(display, MOBILE ? 160 : 320, 0.8);
146     var map = new Map();
147     var controls = new Controls();
148     var loop = new GameLoop();
149
150     loop.start(function frame(seconds){
151         //update map
152         // update player
153         player.update(controls.states, map, seconds);
154         // console.log("refresh..");
155         camera.render(player, map);
156     });
157
158
159
160     </script>
161   </body>
162 </html>
参考:http://www.ituring.com.cn/article/48955# 有关3D Camera