7. cv2.putText(img, text, loc, text_font, font_scale, color, linestick)
# 参数说明:img表示输入图片,text表示需要填写的文本str格式,loc表示文本在图中的位置,font_size可以使用cv2.FONT_HERSHEY_SIMPLEX,
font_scale表示文本的规格,color表示文本颜色,linestick表示线条大小
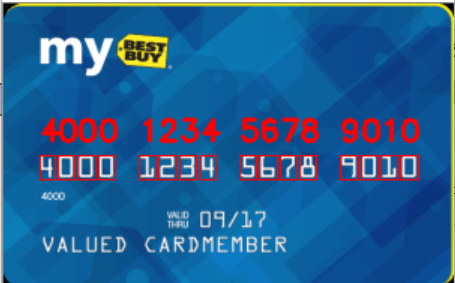
信用卡数字识别:
 信用卡
信用卡  数字模板
数字模板
涉及到的内容:主要是采用模板匹配的思想
思路:
第一部分:数字模板提取数字
第一步:读入图片
第二步:进行灰度化和二值化处理,这里的二值化使用的cv2.THRESH_BINARY_INV, 将黑色的数字转换为白色
第三步:使用cv2.findContours获得轮廓信息
第四步:对contours根据外接矩阵的x的位置,从左到右进行排序
第五步:遍历contours,使用cv2.boudingRect外接矩形获得轮廓的位置信息,提取数字轮廓的图片,与索引组成轮廓信息的字典
import cv2
import numpy as np
import my_utis

def cv_show(img, name):
    cv2.imshow(name, img)
    cv2.waitKey(0)
    cv2.destroyAllWindows()

# 第一部分:数字模板准备
# 第一步:读入图片
template = cv2.imread('images/ocr_a_reference.png')
# 第二步:进行灰度值和二值化转换
gray = cv2.cvtColor(template, cv2.COLOR_BGR2GRAY)
cv_show(gray, 'gray')
# 将黑色转换为白色,将白色转换为黑色
thresh = cv2.threshold(gray, 10, 255, cv2.THRESH_BINARY_INV)[1]
cv_show(thresh, 'thresh')

# 第三步:找出轮廓值使用cv2.findContours找出轮廓值,cv2.RETR_EXTERNAL表示图像的外轮廓
binary, contours, h = cv2.findContours(thresh, cv2.RETR_EXTERNAL, cv2.CHAIN_APPROX_SIMPLE)

# 第四步:对轮廓值进行排序, 因为contours轮廓不是按循序排列的,因此根据contours所在的位置从左到右进行排序
contours = my_utis.contours_sort(contours)

# 第五步: 遍历模板,使用cv2.boudingRect获得轮廓的位置,提取位置对应的图片,与数字结合构造成模板字典
dict_template = {}
for i, contour in enumerate(contours):
    # 画出其外接矩阵,获得其位置信息
    x, y, w, h = cv2.boundingRect(contour)
    template_img = binary[y:y+h, x:x+w]
    # 使用cv2.resize变化模板的大小
    template_img = cv2.resize(template_img, (55, 88))
    # cv_show(template_img, 'template_img')
    dict_template[i] = template_img

第二部分:对图片进行预处理,提取包含数字信息的4个轮廓的位置信息
第一步:读入图片
第二步:调用函数,扩大图片的面积,并进行灰度化
第三步:使用礼帽tophat 原始图片 - 先腐蚀后膨胀的图片,为了去除背景,使得线条更加的突出
第四步:使用sobel算子cv2.Sobel 找出图片中的边缘信息,即进行图像的梯度运算
第五步:使用闭运算 先膨胀再腐蚀, 将图片上的一些相近的数字进行相连,使得其连成一块
第六步:使用cv2.threshold 将图片进行二值化操作
第七步:再次使用闭运算对图片中的内部缺失的位置再次进行填充,使用不同的卷积核
第八步:重新计算轮廓值,遍历轮廓,根据长宽比和长宽的数值,筛选出符合条件的轮廓的locs,并对locs根据x的大小进行排序
# 第二部分:对图片进行预处理,提取包含数字信息的轮廓块

rectKernel = np.ones([3, 9])  # 构造的卷积核,用于进行闭运算,和礼帽运算
sqKernel = np.ones([6, 6])  # 构造的卷积核,用于进行闭运算

# 第一步: 读入图片
img = cv2.imread('images/cr'
                 'edit_card_01.png')
# 第二步:扩大图片的维度,进行灰度化转换
img = my_utis.resize(img, width=300)
gray = cv2.cvtColor(img, cv2.COLOR_BGR2GRAY)

print(gray.shape)
#第三步:使用礼帽操作,使得亮度更加的明显
tophat = cv2.morphologyEx(gray, cv2.MORPH_TOPHAT, rectKernel)
cv_show(tophat, 'tophat')

# 第四步:使用sobel算子获得边缘信息,ksize=-1表示sobel算子的维度为(3, 3)
sobel = cv2.Sobel(tophat, cv2.CV_64F, 1, 0, ksize=-1)

# 取绝对值操作
sobel = np.absolute(sobel)
sobel_img = 255 * (sobel - sobel.min()) / (sobel.max() - sobel.min())
sobel_img = np.uint8(sobel_img)

cv_show(sobel_img, 'sobel_img')

# 第五步:使用闭操作, 先腐蚀,再膨胀将字母进行合并
close = cv2.morphologyEx(sobel_img, cv2.MORPH_CLOSE, rectKernel)

cv_show(close, 'close')

# 第六步:进行二值化操作
binary = cv2.threshold(close, 0, 255, cv2.THRESH_BINARY|cv2.THRESH_OTSU)[1]

cv_show(binary, 'binary')

# 第七步:再使用闭操作,对内部空白区域进行填充
close2 = cv2.morphologyEx(binary, cv2.MORPH_CLOSE, sqKernel)

cv_show(close2, 'close2')

# 第八步:使用cv2.findContours进行轮廓的识别
binary, contours, h = cv2.findContours(close2, cv2.RETR_EXTERNAL, cv2.CHAIN_APPROX_SIMPLE)
locs = []
# 循环轮廓,将符合条件的contours加入
for i, contour in enumerate(contours):
    x, y, w, h = cv2.boundingRect(contour)
    acr = int(w/h)
    if acr > 2.5 and acr < 4.0:
        if (w > 40 and w<55) and (h > 10 and h < 20):
            locs.append((x, y, w, h))


# 对locs根据x从左到右进行排序
locs = sorted(locs, key=lambda x: x[0])
第三部分:遍历每个locs,提取其中的数字,与模板数字做匹配,判断数字属于模板中的哪个数字
第一步:遍历locs,使用loc中的x,y, w, h 获得信用卡中的对应图片
第二步:对图片进行二值化操作
第三步:使用cv2.findContours,找出其中的轮廓,对轮廓进行排序
第四步:循环轮廓,使用外接矩形的位置信息, x1, y1, w1, h1, 获得当前轮廓对应的数字,此时已经获得了需要预测数字的单个图片
第五步:循环数字模板,使用cv2.matchTemplate进行模板匹配,使用cv2.minMaxLoc获得最大的得分值,使用np.argmax输出可能性最大的数字
print(np.shape(locs))
# 第三部分:遍历每个locs,对其中的数字进行匹配, 判断数字属于模板中的哪个数字
predict_number = []
predict_loc = []
for i, loc in enumerate(locs):
    # 第一步:获得轮廓对应的数字块的图片
    x, y, w, h = loc
    loc_img = gray[y-5 : y+h+5, x-5: x+w+5]
    # 第二步:对数字块的图片进行二值化操作
    thresh = cv2.threshold(loc_img, 0, 255, cv2.THRESH_BINARY | cv2.THRESH_OTSU)[1]
    # 第三步:进行轮廓检测, 并对轮廓进行排序操作
    binary, contours, h = cv2.findContours(thresh, cv2.RETR_EXTERNAL, cv2.CHAIN_APPROX_SIMPLE)
    # 对轮廓检测的结果按照从左到右的顺序进行排序
    contours = my_utis.contours_sort(contours)
    # 第四步:遍历轮廓, 使用轮廓的外接矩阵获得数字图片,并使用cv2.resize改变图片的大小
    for i, contour in enumerate(contours):
        scores = []
        x1, y1, w1, h1 = cv2.boundingRect(contour)
        predict_loc.append((x1-6+x, y1-6+y, w1+2, h1+2))
        contour_img = thresh[y1:y1+h1, x1:x1+w1]
        contour_img = cv2.resize(contour_img, (55, 88))
        # cv_show(contour_img, 'contour')
        # 进行模板匹配
        # 第五步:遍历数字模板,使用matchTemplate找出与图片匹配度最高的数字
        for templates in dict_template.values():
            ret = cv2.matchTemplate(contour_img, templates, cv2.TM_CCOEFF_NORMED)


            _, score, _, _ = cv2.minMaxLoc(ret)
            scores.append(score)
        predict_number.append(str((np.argmax(scores))))
第四部分:在原始的图片进行作图操作
第一步:使用cv2.rectangle画出矩阵
第二步:使用cv2.putText加上文字信息
for i in range(len(predict_number)):
    x, y, w, h = predict_loc[i]
    # 第一步:画出矩形框
    cv2.rectangle(img, (x, y), (x+w, y+h), (0, 0, 255), 1)
    print(predict_number[i])
    # 第二步:在图片上加上文本
    cv2.putText(img, predict_number[i], (x, y-10), cv2.FONT_HERSHEY_SIMPLEX, 0.65, (0, 0, 255), 2)

cv_show(img, 'img')
 最终的效果图
import cv2
import numpy as np


def contours_sort(contours, method=0):
    if method == 0:
        contours = sorted(contours, key=lambda x:cv2.boundingRect(x)[0])
    else:
        contours = sorted(contours, key=lambda x:cv2.boundingRect(x)[0], reverse=True)

    return contours


def resize(image, width=None, height=None, inter=cv2.INTER_AREA):

    h, w = image.shape[:2]
    if width is None and height is None:
        return image
    if width is None:
        r = height / float(h)
        dim = (int(w * r), height)
    else:
        r = width / w
        dim = (width, int(r * h))
    resized = cv2.resize(image, dim, interpolation=inter)
    return resized
调用的函数my_utis.py