RabbitMQ是一个开源的,实现AMQP协议的,可复用企业消息队列系统。
类似的系统还有ActiveMQ(实现JMS)和Kafka(分布式)。RabbitMQ支持主流的操作系统,支持多种开发语言,能降低系统间访问的耦合度,便于数据同步。
RabbitMQ提供如下5种队列模型(远程调用不是消息队列)。
1.Simple
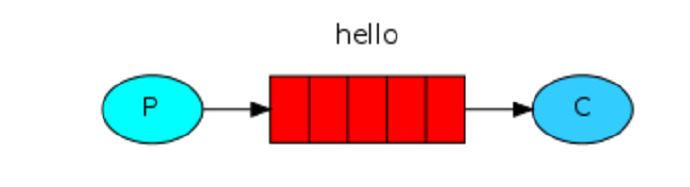
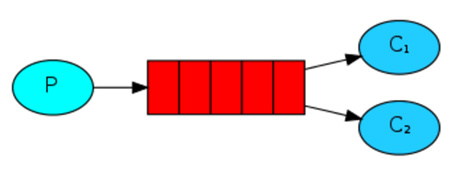
2.Work. 工作模式,一个消息只能被一个消费者获取。
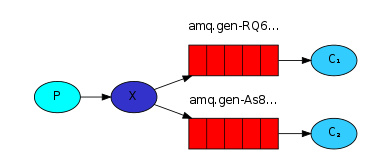
3.Publish/Subscribe. 订阅模式,消息被路由投递给多个队列,一个消息被多个消费者获取。ExchangeType为fanout。
4.Routing. 路由模式,一个消息被多个消费者获取。并且消息的目的queue可被生产者指定。ExchangeType为direct。

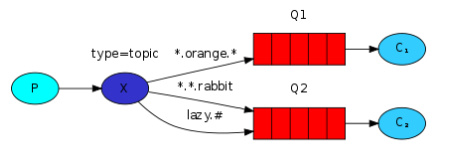
5.Topic. 通配符模式,一个消息被多个消费者获取。消息的目的queue可用BindingKey以通配符(#:一个或多个词,*:一个词)的方式指定。ExchangeType为topic。
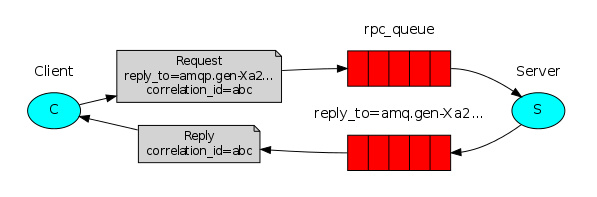
6.PRC. 远程调用
相关名词:
1. Server:RabbitMQ服务器,
2. VirtualHost:权限控制的基本单位,一个VirtualHost里面有若干Exchange和MessageQueue,以及指定被哪些user使用。
3. Connection:生产者/消费者和RabbitMQ服务器的TCP连接。
4. Channel:创建完Connection后,需创建信道才能执行AMQP命令。一个Connection可以创建多个Channel。
5. Exchange:路由。接受生产者发送的消息,并根据Binding规则将消息路由给服务器中的队列。ExchangeType有fanout、direct和topic三种,对应路由使用上述3/4/5号模型。
6. (Message)Queue:消息队列,用于存储还未被消费者消费的消息。
7. Message:由Header和Body组成。Header是生产者添加的相关属性:是否持久化、被哪个MessageQueue接收、优先级等。而Body是传输的数据。
8. Binding:消息被复制传递时,一个消费者对应一个消息队列,消费者绑定MessageQueue到Exchange,可指定多个Bindingkey。生产者在发送Message时,可以在header指定RoutingKey,Exchange匹配RoutingKey和Bindingkey将Message路由到相应的Queue。
9. Command:AMQP命令,生产者/消费者通过Command完成与RabbitMQ服务器交互。Publish:发送消息,txSelect:开启事务,txCommit:提交事务。
程序员应该用代码来表达自己的思想,下面用代码展示以上五种模式:
首先创建工厂类,获取Connection
public class ConnectionUtil {

    public static Connection getConnection() throws Exception {
        //connection工厂
        ConnectionFactory factory = new ConnectionFactory();

        factory.setHost("localhost");
        factory.setPort(5672);
        factory.setUsername("zx");
        factory.setPassword("zx");
        factory.setVirtualHost("/zx");

        // 通过工厂获取连接
        Connection connection = factory.newConnection();
        return connection;
    }
}
1.Simple
生产者
public class Send {

    private final static String QUEUE_NAME = "queue_simple";

    public static void main(String[] argv) throws Exception {
        // 获取连接
        Connection connection = ConnectionUtil.getConnection();
        // 创建通道
        Channel channel = connection.createChannel();

        // 声明队列 (不存在则创建)
        channel.queueDeclare(QUEUE_NAME, false, false, false, null);

        // 发送消息
        String message = "Hello World";
        channel.basicPublish("", QUEUE_NAME, null, message.getBytes());

        // 关闭通道和连接
        channel.close();
        connection.close();
    }
}
消费者
public class Recv {

    private final static String QUEUE_NAME = "queue_simple";

    public static void main(String[] argv) throws Exception {

        // 获取连接
        Connection connection = ConnectionUtil.getConnection();
        // 创建通道
        Channel channel = connection.createChannel();

        // 声明队列
        channel.queueDeclare(QUEUE_NAME, false, false, false, null);

        // 定义队列的消费者
        QueueingConsumer consumer = new QueueingConsumer(channel);
        // 监听队列
        channel.basicConsume(QUEUE_NAME, true, consumer);  //true 自动确认消息, 下有详解

        // 获取消息
        while (true) {
            QueueingConsumer.Delivery delivery = consumer.nextDelivery(); //阻塞或轮询
            String message = new String(delivery.getBody());
            System.out.println("获取:" + message);
        }
    }
}
2.Work
生产者
public class Send {

    private final static String QUEUE_NAME = "queue_work";

    public static void main(String[] argv) throws Exception {
        Connection connection = ConnectionUtil.getConnection();
        Channel channel = connection.createChannel();

        // 声明队列
        channel.queueDeclare(QUEUE_NAME, false, false, false, null);

        for (int i = 0; i < 50; i++) {
            String message = "" + i;
            channel.basicPublish("", QUEUE_NAME, null, message.getBytes());

            Thread.sleep(i * 10);
        }

        channel.close();
        connection.close();
    }
}
消费者1
public class Recv1 {

    private final static String QUEUE_NAME = "queue_work";

    public static void main(String[] argv) throws Exception {

        Connection connection = ConnectionUtil.getConnection();
        Channel channel = connection.createChannel();
        channel.queueDeclare(QUEUE_NAME, false, false, false, null);

        // 开启Qos, 同一时刻服务器只发送一条消息. 可以尝试注释该行, 会发现消息会被平均分配给两个消费者
        channel.basicQos(1);

        QueueingConsumer consumer = new QueueingConsumer(channel);
        channel.basicConsume(QUEUE_NAME, false, consumer);
        while (true) {
            QueueingConsumer.Delivery delivery = consumer.nextDelivery();
            String message = new String(delivery.getBody());
            System.out.println("获取:" + message);
            // 模拟handling
            Thread.sleep(100);
            // 手动确认消息接收. 在basicConsume方法中, true为自动, false为手动
            /* 消息确认方式:
             * 1. 自动确认. 只要消息从队列中移除, 服务端认为消息被成功消费
             * 2. 手动确认. 消费者获取消息后, 服务器将该消息标记为不可用, 并等待反馈. 如果消费者一直不反馈, 则该消息将一直处于不可用状态
             */
            channel.basicAck(delivery.getEnvelope().getDeliveryTag(), false);
        }
    }
}
消费者2
public class Recv2 {

    private final static String QUEUE_NAME = "queue_work";

    public static void main(String[] argv) throws Exception {

        Connection connection = ConnectionUtil.getConnection();
        Channel channel = connection.createChannel();

        channel.queueDeclare(QUEUE_NAME, false, false, false, null);

        channel.basicQos(1);

        QueueingConsumer consumer = new QueueingConsumer(channel);
        channel.basicConsume(QUEUE_NAME, false, consumer);
        while (true) {
            QueueingConsumer.Delivery delivery = consumer.nextDelivery();
            String message = new String(delivery.getBody());
            System.out.println(" [x] Received '" + message + "'");
            // 模拟handling
            Thread.sleep(200);
            // ACK
            channel.basicAck(delivery.getEnvelope().getDeliveryTag(), false);
        }
    }
}
3.Publish/Subscribe
生产者
public class Send {

    private final static String EXCHANGE_NAME = "exchange_fanout";

    public static void main(String[] argv) throws Exception {
        Connection connection = ConnectionUtil.getConnection();
        Channel channel = connection.createChannel();

        // 声明exchange
        channel.exchangeDeclare(EXCHANGE_NAME, "fanout");

        // 消息内容
        String message = "Hello world";
        // 与前面不同, 生产者将消息发送给exchange, 而非队列. 若发消息时还没消费者绑定queue与该exchange, 消息将丢失
        channel.basicPublish(EXCHANGE_NAME, "", null, message.getBytes());
        channel.close();
        connection.close();
    }
}
消费者1
public class Recv1 {

    private final static String QUEUE_NAME = "queue_fanout_1";
    private final static String EXCHANGE_NAME = "exchange_fanout";

    public static void main(String[] argv) throws Exception {

        Connection connection = ConnectionUtil.getConnection();
        Channel channel = connection.createChannel();
        channel.queueDeclare(QUEUE_NAME, false, false, false, null);

        // 绑定队列到交换机. 绑定也可在rabbitMQ的管理界面进行
        channel.queueBind(QUEUE_NAME, EXCHANGE_NAME, "");

        channel.basicQos(1);
        QueueingConsumer consumer = new QueueingConsumer(channel);
        channel.basicConsume(QUEUE_NAME, false, consumer);

        while (true) {
            QueueingConsumer.Delivery delivery = consumer.nextDelivery();
            String message = new String(delivery.getBody());
            System.out.println("获取:" + message);
            Thread.sleep(100);
            channel.basicAck(delivery.getEnvelope().getDeliveryTag(), false);
        }
    }
}
消费者2
public class Recv2 {

    private final static String QUEUE_NAME = "queue_fanout_2";
    private final static String EXCHANGE_NAME = "exchange_fanout";

    public static void main(String[] argv) throws Exception {

        Connection connection = ConnectionUtil.getConnection();
        Channel channel = connection.createChannel();
        channel.queueDeclare(QUEUE_NAME, false, false, false, null);

        // 绑定队列到交换机
        channel.queueBind(QUEUE_NAME, EXCHANGE_NAME, "");

        channel.basicQos(1);
        QueueingConsumer consumer = new QueueingConsumer(channel);
        channel.basicConsume(QUEUE_NAME, false, consumer);

        while (true) {
            QueueingConsumer.Delivery delivery = consumer.nextDelivery();
            String message = new String(delivery.getBody());
            System.out.println("获取:" + message);
            Thread.sleep(200);
            channel.basicAck(delivery.getEnvelope().getDeliveryTag(), false);
        }
    }
}
4.Routing
生产者
public class Send {

    private final static String EXCHANGE_NAME = "exchange_direct";

    public static void main(String[] argv) throws Exception {
        Connection connection = ConnectionUtil.getConnection();
        Channel channel = connection.createChannel();

        // 声明exchange
        channel.exchangeDeclare(EXCHANGE_NAME, "direct");

        String message = "Hello world";
        // 发送消息, RoutingKey为 insert
        channel.basicPublish(EXCHANGE_NAME, "insert", null, message.getBytes());

        channel.close();
        connection.close();
    }
}
消费者1
public class Recv1 {

    private final static String QUEUE_NAME = "queue_direct_1";
    private final static String EXCHANGE_NAME = "exchange_direct";

    public static void main(String[] argv) throws Exception {

        Connection connection = ConnectionUtil.getConnection();
        Channel channel = connection.createChannel();
        channel.queueDeclare(QUEUE_NAME, false, false, false, null);
        // 绑定队列到交换机, BindingKey为 delete update
        channel.queueBind(QUEUE_NAME, EXCHANGE_NAME, "update");
        channel.queueBind(QUEUE_NAME, EXCHANGE_NAME, "delete");

        channel.basicQos(1);
        QueueingConsumer consumer = new QueueingConsumer(channel);
        channel.basicConsume(QUEUE_NAME, false, consumer);

        while (true) {
            QueueingConsumer.Delivery delivery = consumer.nextDelivery();
            String message = new String(delivery.getBody());
            System.out.println("获取:" + message);
            Thread.sleep(100);
            channel.basicAck(delivery.getEnvelope().getDeliveryTag(), false);
        }
    }
}
消费者2
public class Recv2 {

    private final static String QUEUE_NAME = "queue_direct_2";
    private final static String EXCHANGE_NAME = "exchange_direct";

    public static void main(String[] argv) throws Exception {

        Connection connection = ConnectionUtil.getConnection();
        Channel channel = connection.createChannel();
        channel.queueDeclare(QUEUE_NAME, false, false, false, null);

        // 绑定队列到交换机, BindingKey为 insert delete update
        channel.queueBind(QUEUE_NAME, EXCHANGE_NAME, "insert");
        channel.queueBind(QUEUE_NAME, EXCHANGE_NAME, "update");
        channel.queueBind(QUEUE_NAME, EXCHANGE_NAME, "delete");

        channel.basicQos(1);
        QueueingConsumer consumer = new QueueingConsumer(channel);
        channel.basicConsume(QUEUE_NAME, false, consumer);

        while (true) {
            QueueingConsumer.Delivery delivery = consumer.nextDelivery();
            String message = new String(delivery.getBody());
            System.out.println("获取:" + message);
            Thread.sleep(200);
            channel.basicAck(delivery.getEnvelope().getDeliveryTag(), false);
        }
    }
}
5.Topic
生产者
public class Send {

    private final static String EXCHANGE_NAME = "exchange_topic";

    public static void main(String[] argv) throws Exception {
        Connection connection = ConnectionUtil.getConnection();
        Channel channel = connection.createChannel();

        // 声明exchange
        channel.exchangeDeclare(EXCHANGE_NAME, "topic");

        String message = "Hello world";
        // 发送消息, 指定RoutingKey
        channel.basicPublish(EXCHANGE_NAME, "item.delete", null, message.getBytes());

        channel.close();
        connection.close();
    }
}
消费者1
public class Recv1 {

    private final static String QUEUE_NAME = "queue_topic_1";
    private final static String EXCHANGE_NAME = "exchange_topic";

    public static void main(String[] argv) throws Exception {

        Connection connection = ConnectionUtil.getConnection();
        Channel channel = connection.createChannel();
        channel.queueDeclare(QUEUE_NAME, false, false, false, null);

        // 绑定队列到交换机
        channel.queueBind(QUEUE_NAME, EXCHANGE_NAME, "item.update");
        channel.queueBind(QUEUE_NAME, EXCHANGE_NAME, "item.delete");

        channel.basicQos(1);
        QueueingConsumer consumer = new QueueingConsumer(channel);
        channel.basicConsume(QUEUE_NAME, false, consumer);

        while (true) {
            QueueingConsumer.Delivery delivery = consumer.nextDelivery();
            String message = new String(delivery.getBody());
            System.out.println("获取:" + message);
            Thread.sleep(100);
            channel.basicAck(delivery.getEnvelope().getDeliveryTag(), false);
        }
    }
}
消费者2
public class Recv2 {

    private final static String QUEUE_NAME = "queue_topic_2";

    private final static String EXCHANGE_NAME = "exchange_topic";

    public static void main(String[] argv) throws Exception {

        Connection connection = ConnectionUtil.getConnection();
        Channel channel = connection.createChannel();
        channel.queueDeclare(QUEUE_NAME, false, false, false, null);

        // 绑定队列到交换机. 通配符!
        channel.queueBind(QUEUE_NAME, EXCHANGE_NAME, "item.#");

        channel.basicQos(1);
        QueueingConsumer consumer = new QueueingConsumer(channel);
        channel.basicConsume(QUEUE_NAME, false, consumer);

        while (true) {
            QueueingConsumer.Delivery delivery = consumer.nextDelivery();
            String message = new String(delivery.getBody());
            System.out.println("获取:'" + message);
            Thread.sleep(200);
            channel.basicAck(delivery.getEnvelope().getDeliveryTag(), false);
        }
    }
}
可以看出,上面调用的关系比较复杂。
幸运的是,Spring提供了对rabbitMQ的封装,将复杂的关系设置整合到配置文件中。
依赖于两个组件,抽象层spring-amqp和实现层spring-rabbit。
于是代码简化为:
生产者
public class Send {

    public static void main(String[] args) throws InterruptedException {
        AbstractApplicationContext ctx = new ClassPathXmlApplicationContext("classpath:spring/rabbitmq-context.xml");

        //拿模板的bean
        RabbitTemplate template = ctx.getBean(RabbitTemplate.class);
        //发消息
        String msg = "Hello world";
        template.convertAndSend(msg);   //该函数还能指定routing-key

        Thread.sleep(1000);
        ctx.close();
    }
}
消费者
public class Recv {
    public void listen(String msg) {
        System.out.println("获取" + msg);
    }
}
非常漂亮的封装。配置文件如下
<beans xmlns="http://www.springframework.org/schema/beans"
    xmlns:xsi="http://www.w3.org/2001/XMLSchema-instance" xmlns:rabbit="http://www.springframework.org/schema/rabbit"
    xsi:schemaLocation="http://www.springframework.org/schema/rabbit
    http://www.springframework.org/schema/rabbit/spring-rabbit-1.4.xsd
    http://www.springframework.org/schema/beans
    http://www.springframework.org/schema/beans/spring-beans-4.1.xsd">

    <!-- connection工厂 -->
    <rabbit:connection-factory id="connectionFactory"
        host="127.0.0.1" port="5672" username="zx" password="zx"
        virtual-host="/zx" />

    <!-- MQ的管理,包括队列、交换器等 -->
    <rabbit:admin connection-factory="connectionFactory" />

    <!-- 声明队列 (auto表示需要时创建)-->
    <rabbit:queue name="myQueue" auto-declare="true"/>

    <!-- 声明fanout类型的exchange (auto表示需要时创建) -->
    <rabbit:fanout-exchange name ="fanoutExchange" auto-declare="true" durable="true" >  <!-- durable是否持久化, 安全性还是性能的权衡 -->
        <!-- 注意, 在生产者/消费者 分离的系统中, exchange和queue也分离, 绑定应该交给运维在rabbit管理界面进行, 而不是配置下面的bindings属性 -->
        <!-- 小细节, rabbit管理界面绑定时界面属性中binding key被写成了routing key? -->
        <rabbit:bindings>
            <rabbit:binding queue="myQueue"/>  <!-- 还能指定通过pattern属性指定bindingType -->
        </rabbit:bindings>
    </rabbit:fanout-exchange>

    <!-- 定义Rabbit模板的bean,指定 exchange或queue -->
    <rabbit:template id="amqpTemplate" connection-factory="connectionFactory" exchange="fanoutExchange" />  <!-- 还能指定routing-key属性 -->

    <bean id="recv" class="com.zx.rabbitmq.spring.Recv" />
    <!-- 设置消费者要监听的队列, 并指定有消息时执行的方法 -->
    <rabbit:listener-container connection-factory="connectionFactory">
        <rabbit:listener ref="recv" method="listen" queue-names="myQueue" />
    </rabbit:listener-container>

</beans>