说明
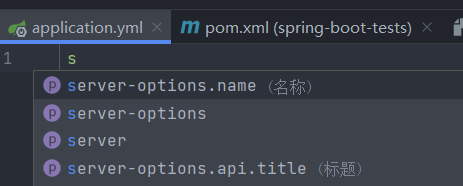
spring-boot-configuration-processor 包的作用是自动生成 META-INF/spring-configuration-metadata.json 文件,而这个 json 文件可以为我们在配置 application.yml 文件时提供智能提示、自动补全、注释、跳转到 java 代码(ctrl+鼠标左键)的功能。
这样一来,在开发过程中就会避免写错配置项的问题,也可以增加编码流畅感
完美集成步骤
-
在 pom.xml 的 dependencies 节点中加入
spring-boot-configuration-processor包的 maven 依赖<dependency> <groupId>org.springframework.boot</groupId> <artifactId>spring-boot-configuration-processor</artifactId> <optional>true</optional> <version>2.5.2</version> </dependency> -
检查有没有在 pom.xml 中配置
build/plugins/[artifactId=maven-compiler-plugin]/configuration/annotationProcessorPaths
如果没有配置,可以跳到第 3 点了
如果配置了,那么一定要在annotationProcessorPaths加入spring-boot-configuration-processor包的path节点,如下:<path> <groupId>org.springframework.boot</groupId> <artifactId>spring-boot-configuration-processor</artifactId> <version>2.5.2</version> </path>注意
version和dependencies节点中的一致,可以在properties节点中声明该包的版本号,然后在以上两个地方引用声明的变量 -
编写自己的 XXProperty,如下:
package com.example.springboottests; import lombok.Getter; import lombok.Setter; import org.springframework.boot.context.properties.ConfigurationProperties; import org.springframework.boot.context.properties.NestedConfigurationProperty; import org.springframework.stereotype.Component; @Getter @Setter @Component @ConfigurationProperties(prefix = "server-options") public class ServerProperty { /** * 名称 */ private String name; /** * 其他配置 */ @NestedConfigurationProperty private ServerOtherProperty api; @Getter @Setter public static class ServerOtherProperty { /** * 标题 */ private String title; } } -
完毕,现在可以去
resources/application.yml查看效果了
必读的注意事项
- 每次修改
ServerProperty中的内容时,必须要 rebuild 项目,因为他是通过编译帮助我们自动生成META-INF/spring-configuration-metadata.json文件,所以如果不 rebuild,json 文件内容就不会变。 - 如果不生效,可以自己看下是不是修改了 pom.xml 但没有点击右上角的刷新按钮,或者删除
target目录再 build 试试