关于Atlas的详细介绍请访问:https://github.com/Qihoo360/Atlas/blob/master/README_ZH.md
为什么要使用Atlas?应用程序直连数据库不好吗?还要在前面加上一层代理,会不会降低应用的读写性能?会不会增加维护管理的成本?我想这是每个使用atlas之前的疑问。
1、为什么要使用Atlas?
我们使用atlas,主要使用它的读写分离和从库负载均衡功能。因为咱们这读业务远远多于写,故采用读写分离的架构再合适不过了。之前实现读写分离,一般都是通过应用程序实现的,这样大大增加了开发的难度。而使用atlas,可以将应用和数据库分离开来,程序员专注业务逻辑开发即可,数据库对于应用完全透明。另外,才用读写分离,还可以增加冗余,增加了机器的处理能力,对于读操作为主的应用,使用读写分离可以确保写的服务器压力更小。
2、应用程序直连数据库不好吗?还要在前面加上一层代理,会不会降低应用的读写性能?
这里有人专门的测试过,请参考:https://github.com/Qihoo360/Atlas/wiki/Atlas%E7%9A%84%E6%80%A7%E8%83%BD%E6%B5%8B%E8%AF%95
下面通过实验介绍Atlas的部署实现读写分离和从库负载均衡功能。
一、Atlas安装
【环境说明】:
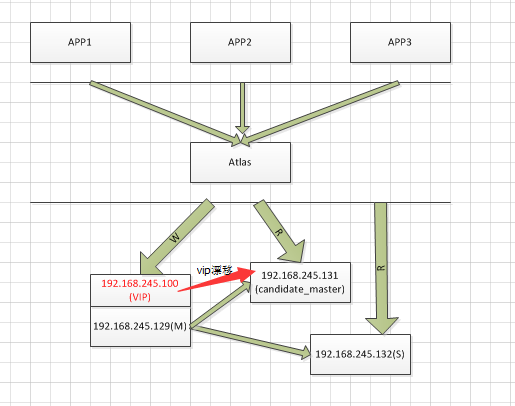
默认三台机器上都已安装mysql5.6,且主从复制已经配置完成。
角色                     主机名      ip地址            功能
主库                     node1     192.168.245.129    (w/r)
candidate_master        node2     192.168.245.131     (r)
从库                     node3     192.168.245.132     (r)
atlas                   monitor   192.168.245.133     读写分离
 vip: 192.168.245.100
1、这里采用官方推荐的rpm安装方式,比较简单,下载rpm包:https://github.com/Qihoo360/Atlas/releases
[root@monitor software]# yum install Atlas-2.2.1.el6.x86_64.rpm
安装的目录在:/usr/local/mysql-proxy
注意事项:
(1).Atlas只能安装运行在64位的系统上。
(2).Centos 5.X安装 Atlas-XX.el5.x86_64.rpm,Centos 6.X安装Atlas-XX.el6.x86_64.rpm。
(3).后端mysql版本应大于5.1,建议使用Mysql 5.6
2、配置Atlas
Atlas运行需要依赖一个配置文件(test.cnf)。在运行Atlas之前,需要对该文件进行配置。Atlas的安装目录是/usr/local /mysql-proxy,进入安装目录下的conf目录,可以看到已经有一个名为test.cnf的默认配置文件,我们只需要修改里面的某些配置项,不 需要从头写一个配置文件。
[mysql-proxy]

#带#号的为非必需的配置项目

#管理接口的用户名
admin-username = user

#管理接口的密码
admin-password = pwd

#Atlas后端连接的MySQL主库的IP和端口,可设置多项,用逗号分隔
proxy-backend-addresses = 127.0.0.1:3306

#Atlas后端连接的MySQL从库的IP和端口,@后面的数字代表权重,用来作负载均衡,若省略则默认为1,可设置多项,用逗号分隔
#proxy-read-only-backend-addresses = 127.0.0.1:3305@1

#用户名与其对应的加密过的MySQL密码,密码使用PREFIX/bin目录下的加密程序encrypt加密,下行的user1和user2为示例,将其替换为你的MySQL的用户名和加密密码!
pwds = user1:+jKsgB3YAG8=, user2:GS+tr4TPgqc=

#设置Atlas的运行方式,设为true时为守护进程方式,设为false时为前台方式,一般开发调试时设为false,线上运行时设为true,true后面不能有空格。
daemon = true

#设置Atlas的运行方式,设为true时Atlas会启动两个进程,一个为monitor,一个为worker,monitor在worker意外退出后会自动将其重启,设为false时只有worker,没有monitor,一般开发调试时设为false,线上运行时设为true,true后面不能有空格。
keepalive = true

#工作线程数,对Atlas的性能有很大影响,如果追求Atlas处理SQL请求时的QPS,将event-threads值设置为CPU个数的2-4倍。如果追求Atlas处理SQL请求的完成时间,将event-threads值设置为CPU个数即可。
event-threads = 8

#日志级别,分为message、warning、critical、error、debug五个级别
log-level = message

#日志存放的路径
log-path = /usr/local/mysql-proxy/log

#SQL日志的开关,可设置为OFF、ON、REALTIME,OFF代表不记录SQL日志,ON代表记录SQL日志,REALTIME代表记录SQL日志且实时写入磁盘,默认为OFF
#sql-log = OFF

#慢日志输出设置。当设置了该参数时,则日志只输出执行时间超过sql-log-slow(单位:ms)的日志记录。不设置该参数则输出全部日志。
#sql-log-slow = 10

#实例名称,用于同一台机器上多个Atlas实例间的区分
#instance = test

#Atlas监听的工作接口IP和端口
proxy-address = 0.0.0.0:1234

#Atlas监听的管理接口IP和端口
admin-address = 0.0.0.0:2345

#分表设置,此例中person为库名,mt为表名,id为分表字段,3为子表数量,可设置多项,以逗号分隔,若不分表则不需要设置该项
#tables = person.mt.id.3

#默认字符集,设置该项后客户端不再需要执行SET NAMES语句
#charset = utf8

#允许连接Atlas的客户端的IP,可以是精确IP,也可以是IP段,以逗号分隔,若不设置该项则允许所有IP连接,否则只允许列表中的IP连接
#client-ips = 127.0.0.1, 192.168.1

#Atlas前面挂接的LVS的物理网卡的IP(注意不是虚IP),若有LVS且设置了client-ips则此项必须设置,否则可以不设置
#lvs-ips = 192.168.1.1
注意事项:
(1)pwds参数加密密码获取:
[root@monitor bin]# cd /usr/local/mysql-proxy/bin
[root@monitor bin]# ./encrypt root
DAJnl8cVzy8=
(2)event-threads设置:
如果追求Atlas处理SQL请求时的QPS,将event-threads值设置为CPU个数的2-4倍。如果追求Atlas处理SQL请求的完成时间,将event-threads值设置为CPU个数即可。
(3)Atlas的工作端口
proxy-address项配置,例如proxy-address = 0.0.0.0:1234代表客户端应该使用1234这个端口连接Atlas来发送SQL请求。
(4)Atlas的管理端口
admin-address项配置,例如admin-address = 0.0.0.0:2345代表DBA应该使用2345这个端口连接Atlas来执行运维管理操作。
(5)管理接口的用户名和密码
admin-username项和admin-password项设置,这两项是用来进入Atlas的管理界面的,与后端连接的MySQL没有关系,所以可以任意设置,不需要MySQL在配置上做任何改动。
二、Atlas启动
进入/usr/local/mysql-proxy/bin目录,执行下面的命令启动、重启或停止Atlas。
(1) ./mysql-proxyd test start,启动Atlas。
(2) ./mysql-proxyd test restart,重启Atlas。
(3) ./mysql-proxyd test stop,停止Atlas。
[root@monitor bin]# ./mysql-proxyd test start
#查看是否启动
[root@monitor bin]# ps -ef | grep mysql-proxy
root     13451     1  0 01:39 ?        00:00:00 /usr/local/mysql-proxy/bin/mysql-proxy --defaults-file=/usr/local/mysql-proxy/conf/test.cnf
root     13452 13451  0 01:39 ?        00:00:00 /usr/local/mysql-proxy/bin/mysql-proxy --defaults-file=/usr/local/mysql-proxy/conf/test.cnf
这时,atlas已经启动成功了,先尝试在atlas本机上连接,作为应用程序可以连接上了。
[root@monitor conf]# /data/mysql/bin/mysql -uroot -proot -h 192.168.245.133 -P1234 -c
Warning: Using a password on the command line interface can be insecure.
Welcome to the MySQL monitor.  Commands end with ; or g.
Your MySQL connection id is 5
Server version: 5.0.81-log MySQL Community Server (GPL)

Copyright (c) 2000, 2014, Oracle and/or its affiliates. All rights reserved.

Oracle is a registered trademark of Oracle Corporation and/or its
affiliates. Other names may be trademarks of their respective
owners.

Type 'help;' or 'h' for help. Type 'c' to clear the current input statement.

mysql>
dba管理用户这样连接:
[root@monitor bin]# /data/mysql/bin/mysql -uadmin -padmin -h 127.0.0.1 -P2345
在远程机器上(内网的同一网段中)用SQLyog客户端进行连接,报错连接不上:ERROR 2003 (HY000): Can't connect to MySQL server on '192.168.245.133' (113)
用户名和密码都是对的,在安装atlas的本机上可以连接上atlas,可是换到别的机器上就不行了,那只能是端口问题了,是否防火墙阻止了呢?于是在别的机器上测试133机器的1234端口,果然是端口不通:
[root@node3 mysql]# ssh -v -p 1234 root@192.168.245.133
OpenSSH_5.3p1, OpenSSL 1.0.1e-fips 11 Feb 2013
debug1: Reading configuration data /etc/ssh/ssh_config
debug1: Applying options for *
debug1: Connecting to 192.168.245.133 [192.168.245.133] port 1234.
debug1: connect to address 192.168.245.133 port 1234: No route to host
ssh: connect to host 192.168.245.133 port 1234: No route to host
接下来就好办了,在atlas机器上执行:iptables -F ,然后就通了,再次通过sqlyog连接,解决问题。
[root@node3 mysql]# ssh -v -p 1234 root@192.168.245.133
OpenSSH_5.3p1, OpenSSL 1.0.1e-fips 11 Feb 2013
debug1: Reading configuration data /etc/ssh/ssh_config
debug1: Applying options for *
debug1: Connecting to 192.168.245.133 [192.168.245.133] port 1234.
debug1: Connection established.
三、测试读写分离
1、停止主从复制:为了看清inset操作到底是分配到主库还是从库上
mysql> stop slave;
Query OK, 0 rows affected (0.07 sec)
2、连接atlas并测试
(1)测试insert操作:
[root@monitor log]# /data/mysql/bin/mysql -uroot -proot -h 192.168.245.133 -P 1234
Warning: Using a password on the command line interface can be insecure.
Welcome to the MySQL monitor.  Commands end with ; or g.
Your MySQL connection id is 1
Server version: 5.0.81-log MySQL Community Server (GPL)

Copyright (c) 2000, 2014, Oracle and/or its affiliates. All rights reserved.

Oracle is a registered trademark of Oracle Corporation and/or its
affiliates. Other names may be trademarks of their respective
owners.

Type 'help;' or 'h' for help. Type 'c' to clear the current input statement.

mysql> insert into backup.test(id) values(3);  #测试插入操作
Query OK, 1 row affected (0.02 sec)
然后到主库上查看:
#这是没插入之前的数据
(product)root@192.168.245.129 [(none)]> select * from backup.test;
+----+
| id |
+----+
|  1 |
|  2 |
|  4 |
|  5 |
+----+
4 rows in set (0.10 sec)
#插入后,有数据了!神奇吧
(product)root@192.168.245.129 [(none)]> select * from backup.test;
+----+
| id |
+----+
|  1 |
|  2 |
|  3 |
|  4 |
|  5 |
+----+
5 rows in set (0.00 sec)
从库上的数据依然没变,说明写操作只分配到主库上:
(product)root@127.0.0.1 [backup]> select * from test;
+----+
| id |
+----+
|  1 |
|  2 |
|  4 |
|  5 |
+----+
4 rows in set (0.00 sec)
(2)测试select操作:为了效果,保持主库数据和从库数据的不一致,如下:
#主库129上的数据:
(product)root@192.168.245.129 [(none)]> select * from a.a1;
+----+------+
| id | name |
+----+------+
|  1 | a    |
|  2 | b    |
+----+------+
2 rows in set (0.00 sec)
#从库上的数据:
(product)root@127.0.0.1 [a]> select * from a.a1;
+----+------+
| id | name |
+----+------+
|  3 | c    |
|  4 | d    |
+----+------+
2 rows in set (0.00 sec)
#在atlas中发送select请求,数据如下:
mysql> select * from a.a1;
+----+------+
| id | name |
+----+------+
|  3 | c    |
|  4 | d    |
+----+------+
2 rows in set (0.02 sec)
有时主从有延时,可以通过/*master*/将select强制发送到主库,由于mysql命令行默认是过滤掉注释的,需要在连接mysql命令行时指定-c参数:
#mysql -c参数介绍
-c, --comments      Preserve comments. Send comments to the server. The
                      default is --skip-comments (discard comments), enable
                      with --comments.
#连接mysql
[root@monitor bin]# /data/mysql/bin/mysql -uroot -proot -h 127.0.0.1 -P1234 -c
mysql> /*master*/select * from a.a1;
+----+------+
| id | name |
+----+------+
|  1 | test |
|  2 | b    |
+----+------+
2 rows in set (0.02 sec)

#查看后台日志,已经发向主库了
[11/18/2015 21:31:15] C:127.0.0.1:48380 S:192.168.245.100:3306 OK 15.525 "/*master*/ select * from a.a1"
(3)过滤update和delete不带where子句:
mysql> update a.a1 set name='test';
ERROR 1105 (07000): Proxy Warning - Syntax Forbidden
mysql> update a.a1 set name='test' where id=1;
Query OK, 1 row affected (0.02 sec)
Rows matched: 1  Changed: 1  Warnings: 0

#后台日志显示:[11/18/2015 21:16:15] C:127.0.0.1:47135 S:192.168.245.100:3306 OK 21.627 "update a.a1 set name='test' where id=1"
(4)特殊sql语句测试:
- select ....for update形式:
[11/18/2015 22:47:02] C:192.168.245.1:65459 S:192.168.245.131:3306 OK 9.374 "select * from a.`a1` for update"
从执行日志可以发现,这类语句是发向从库上的。不能保证锁定master,所以此写法谨慎使用。
- 存储过程测试:
我们知道,一个存储过程可能很复杂,里面可能有各种sql语句,那么这些语句atlas是怎么处理的呢?我们先来创建一个简单的存储过程,里面有delete,select,insert等操作:
DELIMITER $$
CREATE PROCEDURE a.p_test()
BEGIN
  DECLARE cc INT DEFAULT 0;

  SELECT COUNT(*) INTO cc FROM a.a2;
  IF cc > 0 THEN
    DELETE FROM a.a2;
  END IF;
  INSERT INTO a.a2(id,NAME) VALUES(1,'a'),(2,'b'),(3,'c');
END$$
DELIMITER ;
查看后台日志,创建存储过程是发向主库(192.168.245.100)的,我想这个大家都没有疑问:
[11/18/2015 23:00:21] C:192.168.245.1:65459 S:192.168.245.100:3306 OK 23.551 "create procedure a.p_test()
begin
  DECLARE cc INT DEFAULT 0;
  select count(*) into cc from a.a2;
  if cc > 0 then
    delete from a.a2;
  end if;
  insert into a.a2(id,name) values(1,'a'),(2,'b'),(3,'c');
END"
关键时刻到来了,那么执行存储过程呢?这个时候别忘了开启主从复制,让从库上也有这个存储过程。执行日志如下:
[11/18/2015 23:07:48] C:192.168.245.1:65459 S:192.168.245.100:3306 OK 30.336 "call a.p_test()"
【结论】现在知道了吧,在处理存储过程,无论里面是否select等,统统的都在主库上面执行。
- 参数调整语句:
对于一些调整参数的语句如set read-only=1;show variables like ...这类语句都是发往从库上执行的,所以对于这类语句强烈建议连接到真正的库上执行。
[11/18/2015 22:45:12] C:192.168.245.1:65459 S:192.168.245.131:3306 OK 5.872 "SHOW VARIABLES LIKE 'profiling'"
[11/18/2015 22:45:12] C:192.168.245.1:65459 S:192.168.245.131:3306 OK 26.542 "SET PROFILING = 1"
[11/18/2015 22:45:12] C:192.168.245.1:65459 S:192.168.245.131:3306 OK 2.113 "SET profiling_history_size = 0"
[11/18/2015 22:45:12] C:192.168.245.1:65459 S:192.168.245.131:3306 OK 0.833 "SET profiling_history_size = 15"
[11/18/2015 22:45:12] C:192.168.245.1:65459 S:192.168.245.131:3306 OK 8.288 "SHOW STATUS"
[11/18/2015 22:45:12] C:192.168.245.1:65459 S:192.168.245.131:3306 OK 3.652 "SHOW STATUS"
- DDL语句:
使用Alter语句操作数据库的时候,每次操作的都是master.可以通过atlas的接口发布DDL语句。
四、Atlas结合MHA测试
由于我们数据库架构是主从复制+MHA实现主库的高可用。如果主库挂了,这时atlas怎么处理呢?经过详细的测试,大致处理步骤如下:
【说明】
1、主库上绑定vip,在atlas配置文件中主库设置为vip地址,这样无论主库怎么切换,最终的vip不会改变。atlas永远把vip对应的服务器当作主库。
2、由于备用主库原来是从库,即在atlas配置文件中是作为从库的,故当接管为主库时,这时该库既可以写入也可以读。故需要手工移除从库的读功能。(到管理界面,remove backend idx)
3、如果需要修复原主库,那么原主库作为新主库的从库存在。可以手工加入atlas中(add slave ip:port)
【结论】:可以很好的支持MHA切换,但是需要注意以上第2点内容。