SpringTestConfiguration
1.加入jar 包spring-test-4.3.9.RELEASE.jar
2.写基本的Component
注意级联状态下 需要给需要调用的属性加入getter方法

 1 package com.myth.spring.annotion.component;
 2
 3 import org.springframework.stereotype.Component;
 4
 5 @Component
 6 public class Person {
 7     private String name = "Sally";
 8     private int age = 26;
 9     private Car car ;
10
11     public void travel(Car car) {
12         System.out.println(name + " go to travel by "+car.getCarName() + " when at "+age );
13     }
14 }

 1 package com.myth.spring.annotion.component;
 2
 3 import org.springframework.beans.factory.annotation.Autowired;
 4 import org.springframework.stereotype.Component;
 5
 6 @Component
 7 public class Car {
 8     private String carName = "Q5";
 9
10     private String carBrand = "Audi";
11
12     private int carPrice = 1000000;
13
14     public void run() {
15         System.out.println("The car :"+carName+"'s brand is "+carBrand+" and the price is "+carPrice);
16     }
17
18     //若级联的类需要调用类的方法时 需要加入get 方法
19     @Autowired
20     public String getCarName() {
21         return carName;
22     }
23 }
3.加入 ComponentScan的配置 basePackages 可以扫描多个包
1 package com.myth.spring.annotion.configuration;
2
3 import org.springframework.context.annotation.ComponentScan;
4 import org.springframework.context.annotation.Configuration;
5 //加入Configuration
6 @Configuration
//加入ComponentScan并配置basepackage
7 @ComponentScan(basePackages="com.myth.spring.annotion")
8 public class TravelConfiguration {
9 }

并且可以使用excludeFilters 来排除不需要的组件
4.加入SpringTest的框架
1) 写入@RunWith(SpringJUnit4ClassRunner.class) 由SpringJunit4ClassRunner 来替我们创建容器
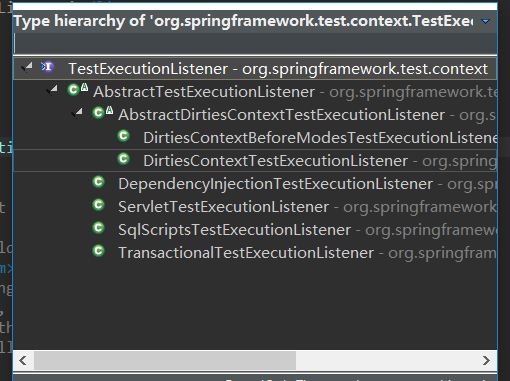
首先Junit 会根据我们的SpringJUnit4ClassRunner.class 找到 TestContext 然后创建 TestContextManager 然后将TestExecutionListenner 加入到 容器中
而下面有个AbstractTestExecutionListener 可以创建我们所需要的Listenner 可以在下面的代码中看到创建Listenner

- TestContext:它封装了运行测试用例的上下文;
- TestContextManager:它是进入 Spring TestContext 框架的程序主入口,它管理着一个 TestContext 实例,并在适合的执行点上向所有注册在 TestContextManager 中的 TestExecutionListener 监听器发布事件:比如测试用例实例的准备,测试方法执行前后方法的调用等。
- TestExecutionListener:该接口负责响应 TestContextManager 发布的事件。


protected void dirtyContext(TestContext testContext, HierarchyMode hierarchyMode) {
        testContext.markApplicationContextDirty(hierarchyMode);
        testContext.setAttribute(DependencyInjectionTestExecutionListener.REINJECT_DEPENDENCIES_ATTRIBUTE, Boolean.TRUE);
    }
2) 写入@ContextConfiguration(classes=TravelConfiguration.class) 来识别配置的类
3) 用autowired 来表示自动装箱机制。
TestTravel
 1 package com.myth.spring.annotion.test;
 2
 3 import static org.junit.Assert.assertNotNull;
 4
 5 import org.junit.Test;
 6 import org.junit.runner.RunWith;
 7 import org.springframework.beans.factory.annotation.Autowired;
 8 import org.springframework.test.context.ContextConfiguration;
 9 import org.springframework.test.context.junit4.SpringJUnit4ClassRunner;
10
11 import com.myth.spring.annotion.component.Car;
12 import com.myth.spring.annotion.component.Person;
13 import com.myth.spring.annotion.configuration.TravelConfiguration;
14 @RunWith(SpringJUnit4ClassRunner.class)
15 @ContextConfiguration(classes=TravelConfiguration.class)
16 public class TestTravel {
17     @Autowired
18     private Person person;
19     @Autowired
20     private Car car;
21
22
23     @Test
24     public void test() {
25         person.travel(car);
26     }
27
28 }
