前言
有很多网站不登录的话,是无法访问到里面的页面的,这就需要先登录了
实现场景:先登录(只登录一次),然后访问页面->我的地盘页->产品页->项目页
官方案例
下面是一个简单的locustfile.py的简单示例:
from locust import HttpLocust, TaskSet
def login(l):

l.client.post("/login", {"username":"ellen_key", "password":"education"})
def logout(l):

l.client.post("/logout", {"username":"ellen_key", "password":"education"})
def index(l):

l.client.get("/")
def profile(l):

l.client.get("/profile")
class UserBehavior(TaskSet):

tasks = {index: 2, profile: 1}
<span class="hljs-function"><span class="hljs-keyword">def</span> <span class="hljs-title">on_start</span><span class="hljs-params">(<span class="hljs-keyword">self</span>)</span></span>:
    login(<span class="hljs-keyword">self</span>)

<span class="hljs-function"><span class="hljs-keyword">def</span> <span class="hljs-title">on_stop</span><span class="hljs-params">(<span class="hljs-keyword">self</span>)</span></span>:
    logout(<span class="hljs-keyword">self</span>)

class WebsiteUser(HttpLocust):

task_set = UserBehavior

min_wait = 5000

max_wait = 9000
这里我们定义了许多Locust任务,它们是带有一个参数(Locust类实例)的普通Python callables 。这些任务收集在tasks属性的TaskSet类下 。然后我们有一个代表用户的 类,我们在其中定义模拟用户在执行任务之间应该等待多长时间,以及哪个 类应该定义用户的“行为”。 类可以继承HttpLocust、TaskSet、TaskSet
HttpLocust类从继承 Locust的类,并把它添加一个客户端属性,它是的一个实例 HttpSession,可用于使HTTP请求。
另一种我们可以声明任务的方法,通常是更方便,就是使用 @task装饰器。以下代码与上述代码相同:
from locust import HttpLocust, TaskSet, task
class UserBehavior(TaskSet):

def on_start(self):

""" on_start is called when a Locust start before any task is scheduled """

self.login()
<span class="hljs-function"><span class="hljs-keyword">def</span> <span class="hljs-title">on_stop</span><span class="hljs-params">(self)</span>:</span>
    <span class="hljs-string">""" on_stop is called when the TaskSet is stopping """</span>
    self.logout()

<span class="hljs-function"><span class="hljs-keyword">def</span> <span class="hljs-title">login</span><span class="hljs-params">(self)</span>:</span>
    self.client.post(<span class="hljs-string">"/login"</span>, {<span class="hljs-string">"username"</span>:<span class="hljs-string">"ellen_key"</span>, <span class="hljs-string">"password"</span>:<span class="hljs-string">"education"</span>})

<span class="hljs-function"><span class="hljs-keyword">def</span> <span class="hljs-title">logout</span><span class="hljs-params">(self)</span>:</span>
    self.client.post(<span class="hljs-string">"/logout"</span>, {<span class="hljs-string">"username"</span>:<span class="hljs-string">"ellen_key"</span>, <span class="hljs-string">"password"</span>:<span class="hljs-string">"education"</span>})

    @task(2)

def index(self):

self.client.get("/")
    @task(1)

def profile(self):

self.client.get("/profile")
class WebsiteUser(HttpLocust):

task_set = UserBehavior

min_wait = 5000

max_wait = 9000
在Locust类(以及HttpLocust 因为它是一个子类),也可以让一个在指定最小和最大等待时间毫秒,每个模拟用户之间的任务执行(min_wait和MAX_WAIT)以及其他用户的行为。默认情况下,时间是在min_wait和max_wait之间统一随机选择的,但是可以通过将wait_function设置为任意函数来使用任何用户定义的时间分布。例如,对于指数分布的等待时间平均为1秒:
import random

class WebsiteUser(HttpLocust):
    task_set = UserBehaviour
    wait_function = lambda self: random.expovariate(1)*1000
项目实例
上面的官方案例只是一些伪代码,不能在真实的环境中跑起来,接下来把上面的理论执行用到真实的项目环境中
http协议是无状态的,所以登录请求和登录后的请求它是独立的,但是登录后的请求需要依赖先登录拿到cookies,才能保持登录状态,这个在之前python接口自动化里面可以用session来解决
s = requests.session()
HttpLocust类从继承 Locust的类,并把它添加一个客户端属性,它是的一个实例 HttpSession,可用于使HTTP请求,这就相当于它自动使用了session机制,类似于client = requests.session()
所以后面的请求,直接拿client.get()、client.post()请求就可以了
# 保存为locustfile.py
# coding=utf-8
from locust import HttpLocust, TaskSet, task
'''

实现场景:先登录(只登录一次),然后访问->我的地盘页->产品页->项目页

访问我的地盘页面权重为2,产品页和项目页权重各为1

*作者:上海-悠悠 QQ群:588402570

'''
class UserBehavior(TaskSet):

'''蝗虫行为类'''

def _login(self):

'''登录方法'''

# host = 'http://192.168.x.xx:80'  # 禅道的服务器地

loginUrl ="/zentao/user-login.html/"

h = {

"User-Agent": "Mozilla/5.0 (Windows NT 10.0; WOW64; rv:44.0) Gecko/20100101 Firefox/44.0",

"Content-Type": "application/x-www-form-urlencoded",

}

body = {"account": "yoyo",  # 你自己的账号

"password": "******",    # 你自己的密码

"keepLogin[]": "on",

"referer": "/zentao/my/"

}

r = self.client.post(loginUrl, data=body, headers=h)

print(r.text)

assert "parent.location='/zentao/index.html'" in r.text
<span class="hljs-function"><span class="hljs-keyword">def</span> <span class="hljs-title">on_start</span><span class="hljs-params">(self)</span>:</span>
    <span class="hljs-string">'''任务开始准备工作:只登录一次'''</span>
    self._login()

<span class="hljs-comment"># 任务1-我的地盘</span>

    @task(2)

def zentao_my(self):

print("---访问页面-我的地盘---")

r = self.client.get("/zentao/my/")

assert "我的地盘" in r.text
<span class="hljs-comment"># 任务2-产品页</span>

    @task(1)

def zentao_product(self):

print("---访问页面-产品页---")

r = self.client.get("/zentao/product-browse.html/")

assert "需求列表" in r.text
<span class="hljs-comment"># 任务3-项目</span>

    @task(1)

def zentao_prject(self):

print("---访问页面-项目---")

r = self.client.get("/zentao/project/")

assert "项目首页" in r.text
class WebsiteUser(HttpLocust):

task_set = UserBehavior

min_wait = 1000

max_wait = 1000
if name == "main":

import os

os.system("locust -f locustfile.py --host=http://192.168.x.xx:80")
设置1个虚拟用户,每秒启动1个服务,点start后运行结果
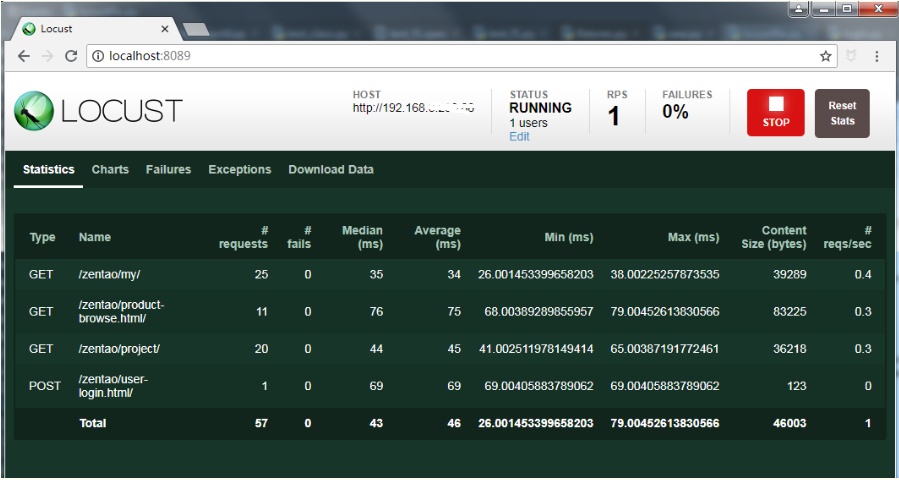
从结果可以看到登录的请求只访问了一次,然后是“我的地盘”页面的次数差不多是产品页、项目页请求次数的2倍(这个只是概率上讲是2倍,不完全等于2倍)
定义on_start()相当于用例的准备操作,当然还有on_stop用于数据清理操作
*征得博主同意转发,转发链接https://www.cnblogs.com/yoyoketang/p/9642242.html