1,capfd/capfdbinary/capsys/capsysbinary
对标准输出和错误输出进行捕获,转化为text或者b字节
2, caplog
动态设置日志的级别,和获取日志的输出内容
caplog.text
caplog.set_level
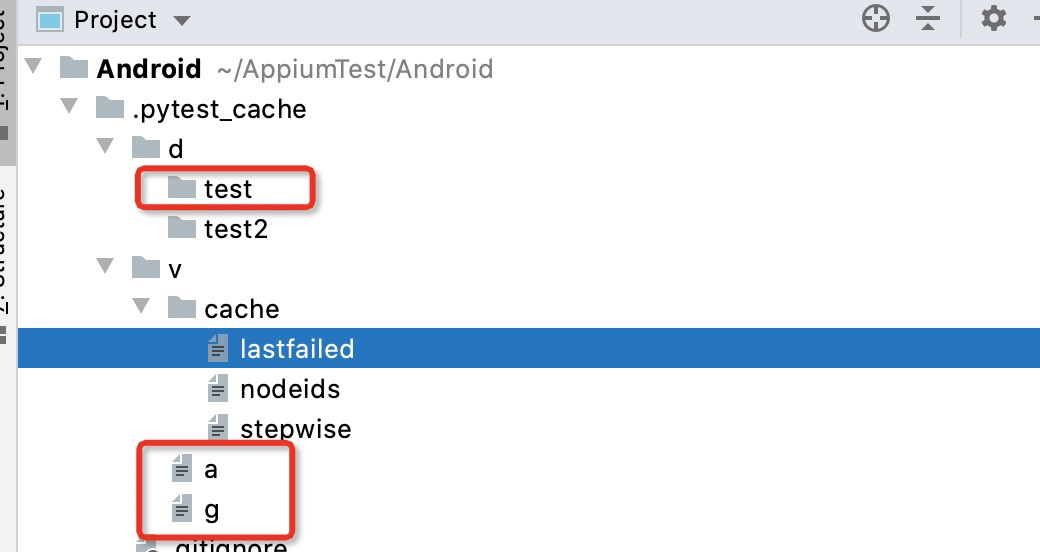
3,cache. (可以用来做用例之间的数据关联)
对.pytest_cache进行操作,可以创建文件,创建变量,访问这里的变量,可以用来存储某个测试方法的一些信息,来给其他方法/py文件使用。
def test_01(self, caplog, cache):
    a=cache.makedir('test2')  # 创建一个文件夹
    print(a)
    cache.set('g', 12312312)  #创建一个变量,变量名称和默认值
    cache.get('g', 444444)    # 读取这个变量,2个参数分别为变量名称和默认值,
                  # 当访问的变量没有赋值的时候,会返回后面的默认值
    assert 1 == 2
首先需要知道python中的doctest(也就是文档测试)
写在函数或方法的注释中的测试用例,格式为,(注意>>>后面要有一个空格)
    def test_01(self):
        """
        >>> 110+11
        120

        :param doctest_namespace:
        :return:
        """
        assert 1==2
pytest 也支持这一种测试用例,
1,写在test*.txt格式的文件中,pytest会自动发现其中的doctest测试用例,并执行(这个txt的文件要放在指定测试文件夹目录下,或他的下级目录下)
2,写在函数注释中的doctest测试用例,pytest发现他们需要添加参数 --doctest-modules,来获取所有py文件中函数注释中的doctest测试用例(注意是所有py文件中的doctest测试用例都会被执行,不只是test开头都py文件)
doctest_namespace这个fixture,是为了在doctest测试用例中用到一些变量的时候,可以用这fixture来给doctest的空间中添加一些可以用的变量,可以直接写在coftest文件中
# coftest.py

import pytest
import math

@pytest.fixture(autouse=True)
def add_um(doctest_namespace):
    doctest_namespace['um'] = math
test01.txt文件中可以直接使用um变量
hello this is a doctest
>>> x = 4
>>> um.e
3
5, monkeypatch,,,(类似于mock???mock是啥?)
临时修改/删除指定对象的属性,字典/环境变量/sys.path的值都可以修改
场景1:我们不想因为有问题的接口,导致我们的测试运行不下去,并且我们知道这个接口的返回值,可以使用monkeypatch,临时修改request的get方法返回值,直接返回我们想要的值。当测试功能或固定装置完成后,所有修改都将被撤消。
方法有
monkeypatch.setattr(obj, name, value, raising=True)
monkeypatch.delattr(obj, name, raising=True)
monkeypatch.setitem(mapping, name, value)
monkeypatch.delitem(obj, name, raising=True)
monkeypatch.setenv(name, value, prepend=False)
monkeypatch.delenv(name, raising=True)
monkeypatch.syspath_prepend(path)
monkeypatch.chdir(path)
import logging
import requests


def request_get(url):

    return requests.get(url)

class TestLoginSuccess:

    def kk(self, url):
        return '1234'

    def test_01(self, monkeypatch):
        monkeypatch.setattr(requests, 'get', self.kk)  # 这里暂时修改了requests.get方法
     assert request_get('www.baidu.com') == '1234'

  #01运行完后request.get方法自动还原
    def test_02(self):
        logging.info(request_get('http://www.baidu.com'))
        assert 1==2
6,pytestconfig
访问pytest中的配置信息
    def test_01(self, pytestconfig):
        logging.info(pytestconfig.option)  # 显示所有的配置信息的值
        logging.info(pytestconfig.getoption('file_or_dir'))  # 获取指定配置信息的值

        assert 1==2
7, record_property/ (可能在和Jenkins结合的时候有用)record_testsuite_property
给相应的测试用例,在xml测试报告中添加一些属性,添加的属性会在测试报告中展示,,
    def test_01(self, record_property):
        record_property("222",3)
<testcase classname="app.login.case.test_login_success.TestLoginSuccess" file="app/login/case/test_login_success.py" line="13" name="test_01" time="0.001">
<properties>
<property name="222" value="3"/>  # 会在测试用例的标签下添加一个property标签,并且name=设置的key,value=设置的value
</properties> <failure message="assert 1 == 2">self = <app.login.case.test_login_success.TestLoginSuccess object at 0x108a9c1c0> record_property = <function record_property.
8,recwarn
存储该fixture范围内,运行过程中出现的警告,返回的是一个RecordedWarning的类(3.1后改为命名元祖了)
有方法list,pop,clear
 def test_01(self, recwarn):
        warnings.warn("222")
        # 通过recwarn.list把所有出现的警告存储在一个列表中
        logging.info(recwarn.list[0].message)
9,request
第一种:是获取运行中的各种各样的信息,也可以获取配置信息(类似pytestconfig)
有很多方法,具体方法内容看request
request.model的方法,,,配合getattr方法,获取model中的部分变量的值
# content of conftest.py
import pytest
import smtplib


@pytest.fixture(scope="module")
def smtp_connection(request):
    server = getattr(request.module, "smtpserver", "smtp.gmail.com")  # 在model中获取smtpserver属性的值,没有的话默认smtp.gmail.com
    smtp_connection = smtplib.SMTP(server, 587, timeout=5)
    yield smtp_connection
    print("finalizing {} ({})".format(smtp_connection, server))
    smtp_connection.close()
# content of test_anothersmtp.py

smtpserver = "mail.python.org"  # will be read by smtp fixture


def test_showhelo(smtp_connection):
    assert 0, smtp_connection.helo()
request的其他方法
    def test_01(self, request):

        logging.info(request.config.getoption('file_or_dir'))
        logging.info(request.cls)
        logging.info(request.fixturenames)
第二种:当函数或者夹具被参数化的时候,需要用request.param来获取参数的信息(不被参数化是没有param的属性)
@pytest.fixture(scope="function")
def name(request):
    username = request.param
    return username

_data = ["test1", "test2"]
@pytest.mark.parametrize('name', _data, indirect=True)
def test_login(name):
    ''''''
    a = name
    logging.info("名称是:%s" % a)
@pytest.fixture(scope="function",params=["2015","1883"])
def testdata(request):
    return request.param

def test_2(testdata):
    '''登录用例'''
    a = testdata
    logging.info("名称为:%s" % a)
    assert a != ""
10. tmp_path/tmpdir
创建一个临时路径/临时目录,(最多会有3个,超过3个第一个会被删掉),,(同样可以用做用例直接数据的传递)
    def test_01(self, tmp_path):
        path = tmp_path/"test222"
        path.mkdir()
        logging.info(path)

    def test_02(self, tmpdir):
        p = tmpdir.mkdir("sub").join("hello.txt")
        p.write("content")
        assert p.read() == "content"
        assert len(tmpdir.listdir()) == 1
        assert 0
11.testdir
对插件进行测试。或者对pytest本身进行测试
对于测试插件特别有用。它与`tmpdir`固定装置类似,但是提供了有助于测试pytest本身的方法。
It is particularly useful for testing plugins. It is similar to the `tmpdir` fixture
but provides methods which aid in testing pytest itself.