准备工作:
1、java运行环境;
2、Mysql安装配置;
3、Tomcat安装配置;
4、Maven;
5、IDEA;
6、IDEA创建号一个web app项目。
Maven配置文件导包:
<?xml version="1.0" encoding="UTF-8"?>

<project xmlns="http://maven.apache.org/POM/4.0.0" xmlns:xsi="http://www.w3.org/2001/XMLSchema-instance"
  xsi:schemaLocation="http://maven.apache.org/POM/4.0.0 http://maven.apache.org/xsd/maven-4.0.0.xsd">
  <modelVersion>4.0.0</modelVersion>

  <groupId>com.myzheng</groupId>
  <artifactId>ssh</artifactId>
  <version>1.0-SNAPSHOT</version>
  <packaging>war</packaging>

  <name>ssh Maven Webapp</name>
  <!-- FIXME change it to the project's website -->
  <url>http://www.example.com</url>
  <!-- 以上是固定搭配-->

  <!-- 配置包的版本信息都统一放入此处,方便以后管理-->
  <properties>
    <springVersion>4.3.1.RELEASE</springVersion>
    <hibernateVersion>4.3.5.Final</hibernateVersion>
    <jstlVersion>1.2</jstlVersion>
    <taglibVersion>1.1.2</taglibVersion>
    <servletVersion>3.0-alpha-1</servletVersion>
    <jsonVersion>1.9.13</jsonVersion>
    <jacksonVersion>2.5.0</jacksonVersion>
    <mysqlVersion>5.7.23</mysqlVersion>
    <c3p0Version>0.9.1.2</c3p0Version>
    <log4jVersion>1.2.17</log4jVersion>
    <fileuploadVersion>1.3.1</fileuploadVersion>
    <lombokVersion>1.16.10</lombokVersion>

    <project.build.sourceEncoding>UTF-8</project.build.sourceEncoding>
    <maven.compiler.source>1.7</maven.compiler.source>
    <maven.compiler.target>1.7</maven.compiler.target>
  </properties>

  <dependencies>

      <!--单元测试-->
    <dependency>
      <groupId>junit</groupId>
      <artifactId>junit</artifactId>
      <version>4.11</version>
      <scope>test</scope>
    </dependency>

    <!-- spring-->
    <!-- 下面四个:beanscorecontextorm是spring框架的组件依赖 -->
    <dependency>
      <groupId>org.springframework</groupId>
      <artifactId>spring-beans</artifactId>
      <version>${springVersion}</version>  <!-- 统一管理版本,真jr机智 -->
    </dependency>

    <dependency>
      <groupId>org.springframework</groupId>
      <artifactId>spring-core</artifactId>
      <version>${springVersion}</version>
    </dependency>

    <dependency>
      <groupId>org.springframework</groupId>
      <artifactId>spring-context</artifactId>
      <version>${springVersion}</version>
    </dependency>

    <dependency>
      <groupId>org.springframework</groupId>
      <artifactId>spring-orm</artifactId>
      <version>${springVersion}</version>
    </dependency>

    <!-- spring web + spring MVC-->
    <dependency>
      <groupId>org.springframework</groupId>
      <artifactId>spring-web</artifactId>
      <version>${springVersion}</version>
    </dependency>
    <dependency>
      <groupId>org.springframework</groupId>
      <artifactId>spring-webmvc</artifactId>
      <version>${springVersion}</version>
    </dependency>

    <!-- hibernate配置-->
    <dependency>
      <groupId>org.hibernate</groupId>
      <artifactId>hibernate-core</artifactId>
      <version>${hibernateVersion}</version>
    </dependency>

    <!-- hibernate 缓存, 视情况添加-->
    <!-- <dependency>
      <groupId>org.hibernate</groupId>
      <artifactId>hibernate-ehcache</artifactId>
      <version>${hibernateVersion}</version>
    </dependency> -->

    <!-- jsp页面使用的jstl支持-->
    <dependency>
      <groupId>jstl</groupId>
      <artifactId>jstl</artifactId>
      <version>${jstlVersion}</version>
    </dependency>
    <dependency>
      <groupId>taglibs</groupId>
      <artifactId>standard</artifactId>
      <version>${taglibVersion}</version>
    </dependency>
    <dependency>
      <groupId>javax.servlet</groupId>
      <artifactId>servlet-api</artifactId>
      <version>${servletVersion}</version>
      <scope>provided</scope>
    </dependency>

    <!-- DataBase数据库连接 mysql包-->
    <dependency>
      <groupId>mysql</groupId>
      <artifactId>mysql-connector-java</artifactId>
      <version>${mysqlVersion}</version>
    </dependency>

    <!-- 数据库连接池-->  <!-- 数据库连接池是什么鬼,mark等会百度 -->
    <dependency>
      <groupId>c3p0</groupId>
      <artifactId>c3p0</artifactId>
      <version>${c3p0Version}</version>
    </dependency>

    <!-- json数据 使springMVC可以返回json值 ,视情况添加-->
    <dependency>
      <groupId>org.codehaus.jackson</groupId>
      <artifactId>jackson-mapper-asl</artifactId>
      <version>${jsonVersion}</version>
    </dependency>

    <!-- Jackson可以轻松的将Java对象转换成json对象和xml文档,同样也可以将json、xml转换成Java对象-->
    <dependency>
      <groupId>com.fasterxml.jackson.core</groupId>
      <artifactId>jackson-core</artifactId>
      <version>${jacksonVersion}</version>
    </dependency>
    <dependency>
      <groupId>com.fasterxml.jackson.core</groupId>
      <artifactId>jackson-annotations</artifactId>
      <version>${jacksonVersion}</version>
    </dependency>

    <dependency>
      <groupId>com.fasterxml.jackson.core</groupId>
      <artifactId>jackson-databind</artifactId>
      <version>${jacksonVersion}</version>
    </dependency>

    <!-- log4j配置, 视情况添加-->  <!-- 这也是什么鬼,mark等下百度 -->
    <dependency>
      <groupId>log4j</groupId>
      <artifactId>log4j</artifactId>
      <version>${log4jVersion}</version>
    </dependency>

    <!--文件 上传-->
    <dependency>
      <groupId>commons-fileupload</groupId>
      <artifactId>commons-fileupload</artifactId>
      <version>${fileuploadVersion}</version>
    </dependency>

    <!-- lombok插件导包,不知道是干什么的插件???-->
      <dependency>
        <groupId>org.projectlombok</groupId>
        <artifactId>lombok</artifactId>
        <version>${lombokVersion}</version>
        <scope>provided</scope>
      </dependency>


  </dependencies>

  <build>

    <finalName>ssh</finalName>

    <pluginManagement><!-- lock down plugins versions to avoid using Maven defaults (may be moved to parent pom) -->
      <plugins>
        <plugin>
          <artifactId>maven-clean-plugin</artifactId>
          <version>3.1.0</version>
        </plugin>
        <!-- see http://maven.apache.org/ref/current/maven-core/default-bindings.html#Plugin_bindings_for_war_packaging -->
        <plugin>
          <artifactId>maven-resources-plugin</artifactId>
          <version>3.0.2</version>
        </plugin>
        <plugin>
          <artifactId>maven-compiler-plugin</artifactId>
          <version>3.8.0</version>
        </plugin>
        <plugin>
          <artifactId>maven-surefire-plugin</artifactId>
          <version>2.22.1</version>
        </plugin>
        <plugin>
          <artifactId>maven-war-plugin</artifactId>
          <version>3.2.2</version>
        </plugin>
        <plugin>
          <artifactId>maven-install-plugin</artifactId>
          <version>2.5.2</version>
        </plugin>
        <plugin>
          <artifactId>maven-deploy-plugin</artifactId>
          <version>2.8.2</version>
        </plugin>
      </plugins>
    </pluginManagement>

  </build>

</project>
配置后运行maven,自动从中央仓库下载jar包。
Spring MVC配置:
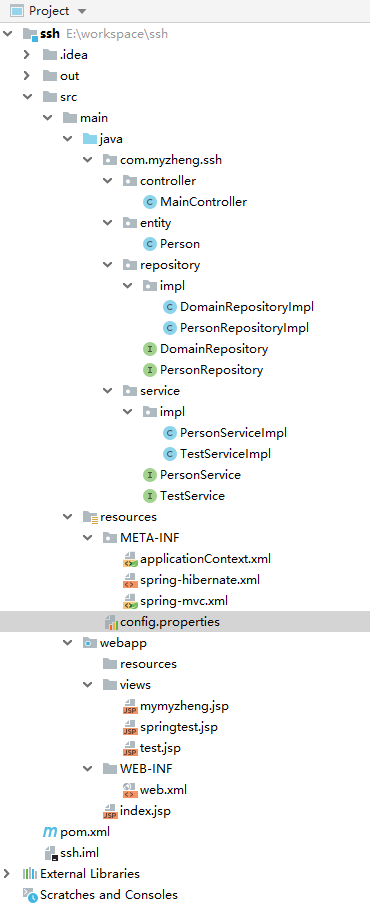
就是新建Controller、Entity、Service等等。目录结构如下:

springMVC的配置:resources/META-INF/spring-mvc.xml
<?xml version="1.0" encoding="UTF-8"?>
<beans xmlns="http://www.springframework.org/schema/beans"
       xmlns:xsi="http://www.w3.org/2001/XMLSchema-instance"
       xmlns:context="http://www.springframework.org/schema/context"
       xmlns:mvc="http://www.springframework.org/schema/mvc"
       xsi:schemaLocation="http://www.springframework.org/schema/beans
            http://www.springframework.org/schema/beans/spring-beans-4.1.xsd
            http://www.springframework.org/schema/context
            http://www.springframework.org/schema/context/spring-context-4.1.xsd
            http://www.springframework.org/schema/mvc
            http://www.springframework.org/schema/mvc/spring-mvc-4.1.xsd">
            <!-- 也是spring-mvc.xml的固定搭配 -->

       <!-- 启动注解驱动的spring MVC功能,注册请求url和注解POJO类方法的映射-->
       <mvc:annotation-driven />
     <context:component-scan base-package="com.myzheng.ssh" /> <!-- 这里需要注意修改base-package -->
    <!-- 对模型视图名称的解析,在请求时模型视图名称添加前后缀 -->
    <bean id="viewResolver" class="org.springframework.web.servlet.view.InternalResourceViewResolver">
        <property name="viewClass" value="org.springframework.web.servlet.view.JstlView" />
        <property name="prefix" value="views/" />      <!-- 前缀 -->
        <property name="suffix" value=".jsp" />   <!-- 后缀 -->
    </bean>

    <!--这里是对静态资源的映射-->
    <mvc:resources mapping="/js/**" location="/resources/js/" />
    <mvc:resources mapping="/css/**" location="/resources/css/" />
    <mvc:resources mapping="/img/**" location="/resources/img/" />


</beans>
修改web.xml配置文件,完善SpringMVC的配置:
<?xml version="1.0" encoding="UTF-8"?>
<web-app xmlns="http://xmlns.jcp.org/xml/ns/javaee"
         xmlns:xsi="http://www.w3.org/2001/XMLSchema-instance"
         xsi:schemaLocation="http://xmlns.jcp.org/xml/ns/javaee http://xmlns.jcp.org/xml/ns/javaee/web-app_4_0.xsd"
         version="4.0">

 <!-- 地址为http://localhost:8080/  显示的默认网页-->
        <welcome-file-list>
          <welcome-file>/index.jsp</welcome-file>
        </welcome-file-list>

        <!-- spring MVC config start-->
        <servlet>
            <servlet-name>spring</servlet-name>
            <servlet-class>org.springframework.web.servlet.DispatcherServlet</servlet-class>
            <init-param>
              <param-name>contextConfigLocation</param-name>
              <!-- 此处指向的的是SpringMVC的配置文件 -->
              <param-value>classpath:META-INF/spring-mvc.xml</param-value>
            </init-param>
            <!--配置容器在启动的时候就加载这个servlet并实例化-->
            <load-on-startup>1</load-on-startup>
        </servlet>

        <servlet-mapping>
            <servlet-name>spring</servlet-name>
            <url-pattern>/</url-pattern>
        </servlet-mapping>
        <!-- spring MVC config end-->

</web-app>
controller层新建MainController:
package com.myzheng.ssh.controller;

import com.myzheng.ssh.service.TestService;
import org.springframework.beans.factory.annotation.Autowired;
import org.springframework.stereotype.Controller;
import org.springframework.web.bind.annotation.RequestMapping;
import org.springframework.web.bind.annotation.RequestMethod;

/**
 * Created by myzheng
 * on 2019/1/30 15:13
 */
@Controller
public class MainController {
    @Autowired   //不知道这个注解是干嘛的,等会查
    private TestService testService;

    @RequestMapping(value = "test",method = RequestMethod.GET)
    public String test(){
        //        实际返回的是views/test.jsp ,spring-mvc.xml中配置过前后缀
        return "test";
    }

    @RequestMapping(value = "springtest",method = RequestMethod.GET)
    public String SpringTest(){
        return testService.test();
    }

    @RequestMapping(value = "myzheng",method = RequestMethod.GET)
    public String AnotherTest(){
        return testService.anothertest();
    }
}
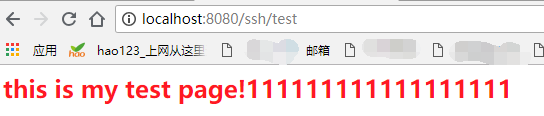
test.jsp网页如下:
<%@ page contentType="text/html;charset=UTF-8" language="java" %>
<html>
<head>
    <title>这是个test page!</title>
</head>
<body>

    <h2 style="color: #ff1824;">this is my test page!</h2>

</body>

</html>
重启tomcat服务器,浏览localhost:8080/ssh/test,结果如图所示:
SpringMVC+Spring整合:
配置applicationContext.xml这个Spring的配置文件如下:
<beans xmlns="http://www.springframework.org/schema/beans"
       xmlns:xsi="http://www.w3.org/2001/XMLSchema-instance"
       xmlns:context="http://www.springframework.org/schema/context"
       xmlns:mvc="http://www.springframework.org/schema/mvc"
       xsi:schemaLocation="http://www.springframework.org/schema/beans
        http://www.springframework.org/schema/beans/spring-beans-4.1.xsd
        http://www.springframework.org/schema/context
        http://www.springframework.org/schema/context/spring-context-4.1.xsd
        http://www.springframework.org/schema/mvc
        http://www.springframework.org/schema/mvc/spring-mvc-4.1.xsd">

    <!-- 自动扫描 -->
    <context:component-scan base-package="com.myzheng.ssh">
        <!-- 扫描时跳过 @Controller 注解的JAVA类(控制器) -->
        <context:exclude-filter type="annotation" expression="org.springframework.stereotype.Controller"/>
    </context:component-scan>

</beans>
完善web.xml配置文件如下,引入Spring配置文件,Spring的监听器 以及 字符集过滤:
<?xml version="1.0" encoding="UTF-8"?>
<web-app xmlns="http://xmlns.jcp.org/xml/ns/javaee"
         xmlns:xsi="http://www.w3.org/2001/XMLSchema-instance"
         xsi:schemaLocation="http://xmlns.jcp.org/xml/ns/javaee http://xmlns.jcp.org/xml/ns/javaee/web-app_4_0.xsd"
         version="4.0">

  <!-- 地址为http://localhost:8080/  显示的默认网页-->
  <welcome-file-list>
    <welcome-file>/index.jsp</welcome-file>
  </welcome-file-list>

  <!--加载Spring的配置文件到上下文中去-->
  <context-param>
    <param-name>contextConfigLocation</param-name>
    <param-value>
        classpath:/META-INF/spring-hibernate.xml
    </param-value>
  </context-param>

  <!-- spring MVC config start-->
  <servlet>
    <servlet-name>spring</servlet-name>
    <servlet-class>org.springframework.web.servlet.DispatcherServlet</servlet-class>
    <init-param>
      <param-name>contextConfigLocation</param-name>
      <!-- 此处指向的的是SpringMVC的配置文件 -->
      <param-value>classpath:/META-INF/spring-mvc.xml</param-value>
    </init-param>
    <!--配置容器在启动的时候就加载这个servlet并实例化-->
    <load-on-startup>1</load-on-startup>
  </servlet>

  <servlet-mapping>
    <servlet-name>spring</servlet-name>
    <url-pattern>/</url-pattern>
  </servlet-mapping>
  <!-- spring MVC config end-->

  <!-- Spring监听器 -->
  <listener>
    <listener-class>org.springframework.web.context.ContextLoaderListener</listener-class>
  </listener>

  <!--  字符集过滤  -->
  <filter>
    <filter-name>encodingFilter</filter-name>
    <filter-class>org.springframework.web.filter.CharacterEncodingFilter</filter-class>
    <init-param>
      <param-name>encoding</param-name>
      <param-value>UTF-8</param-value>
    </init-param>
    <init-param>
      <param-name>forceEncoding</param-name>
      <param-value>true</param-value>
    </init-param>
  </filter>
  <filter-mapping>
    <filter-name>encodingFilter</filter-name>
    <url-pattern>/*</url-pattern>
  </filter-mapping>
  <!--web.xml配置文件中更改了三处:引入Spring配置文件 Spring的监听器  以及 字符集过滤-->

</web-app>
此时,Spring+SpringMVC配置完成,开始测试步骤:
TestServceImpl实现Service接口并实现test()方法,代码如下:
package com.myzheng.ssh.service.serviceimpl;

import com.myzheng.ssh.service.TestService;
import org.springframework.stereotype.Service;

/*
 *Created by myzheng
 * On 2019/1/30 15:40
 */
@Service
public class TestServiceImpl implements TestService {
    public String test(){
        return "springtest";
    }

    public String anothertest(){
        return "mymyzheng";
    }
}
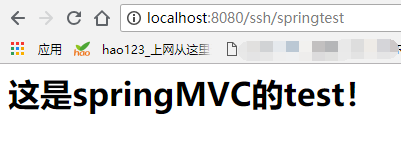
成功返回,说明spring+springnvc配置成功。
Spring+SpringMVC+hibernate整合:
先搭建包含hibernate的结构图:
先编写config.properties这个配置文件,这个配置文件存放的是hibernate的一些配置:
#database connection config
jdbc.driver=com.mysql.jdbc.Driver
jdbc.url=jdbc:mysql://127.0.0.1:3306/ssh?useUnicode=true&characterEncoding=utf-8&useSSL=false
jdbc.username=root
jdbc.password=root

#hibernate config
hibernate.dialect=org.hibernate.dialect.MySQLDialect
hibernate.show_sql=true
hibernate.format_sql=true
hibernate.hbm2ddl.auto=update
下面配置hibernate,为了方便,就直接写进applicationContext.xml里面。配置后的applicationContext.xml(spring-hibernate.xml)如下:
<beans xmlns="http://www.springframework.org/schema/beans"
       xmlns:xsi="http://www.w3.org/2001/XMLSchema-instance"
       xmlns:context="http://www.springframework.org/schema/context"
       xmlns:mvc="http://www.springframework.org/schema/mvc"
       xsi:schemaLocation="http://www.springframework.org/schema/beans
        http://www.springframework.org/schema/beans/spring-beans-4.1.xsd
        http://www.springframework.org/schema/context
        http://www.springframework.org/schema/context/spring-context-4.1.xsd
        http://www.springframework.org/schema/mvc
        http://www.springframework.org/schema/mvc/spring-mvc-4.1.xsd">

    <!--********************************************配置Spring***************************************-->
    <!-- 自动扫描 -->
    <context:component-scan base-package="com.myzheng.ssh">
        <!-- 扫描时跳过 @Controller 注解的JAVA类(控制器) -->
        <context:exclude-filter type="annotation" expression="org.springframework.stereotype.Controller"/>
    </context:component-scan>

    <!--********************************************配置hibernate********************************************-->

    <!--扫描配置文件(这里指向的是之前配置的那个config.properties)-->
    <context:property-placeholder location="classpath:/config.properties" />

    <!--配置数据源-->
    <bean id="dataSource" class="com.mchange.v2.c3p0.ComboPooledDataSource" destroy-method="close">
        <property name="driverClass" value="${jdbc.driver}" />  <!--数据库连接驱动-->
        <property name="jdbcUrl" value="${jdbc.url}" />     <!--数据库地址-->
        <property name="user" value="${jdbc.username}" />   <!--用户名-->
        <property name="password" value="${jdbc.password}" />   <!--密码-->
        <property name="maxPoolSize" value="40" />      <!--最大连接数-->
        <property name="minPoolSize" value="1" />       <!--最小连接数-->
        <property name="initialPoolSize" value="10" />      <!--初始化连接池内的数据库连接-->
        <property name="maxIdleTime" value="20" />  <!--最大空闲时间-->
    </bean>

    <!--配置session工厂-->
    <bean id="sessionFactory" class="org.springframework.orm.hibernate4.LocalSessionFactoryBean">
        <property name="dataSource" ref="dataSource" />
        <property name="packagesToScan" value="com.myzheng.ssh.entity" />
        <property name="hibernateProperties">
            <props>
                <prop key="hibernate.hbm2ddl.auto">${hibernate.hbm2ddl.auto}</prop> <!--hibernate根据实体自动生成数据库表-->
                <prop key="hibernate.dialect">${hibernate.dialect}</prop>   <!--指定数据库方言-->
                <prop key="hibernate.show_sql">${hibernate.show_sql}</prop>     <!--在控制台显示执行的数据库操作语句-->
                <prop key="hibernate.format_sql">${hibernate.format_sql}</prop>     <!--在控制台显示执行的数据哭操作语句(格式)-->
            </props>
        </property>
    </bean>

    <!-- 事物管理器配置  -->
    <bean id="transactionManager" class="org.springframework.orm.hibernate4.HibernateTransactionManager">
        <property name="sessionFactory" ref="sessionFactory" />
    </bean>

</beans>
配置完成。开始测试。
写实体类(entity):
package com.myzheng.ssh.entity;

/*
 *Created by myzheng
 * On 2019/1/31 11:27
 */

import com.sun.javafx.beans.IDProperty;
import lombok.Data;

import javax.persistence.*;

//这里用了一个@Data注解,此注解会自动生成get方法,set方法,toString方法等一系列方法,功能十分强大,不过需要安装插件以及导包, 有兴趣的可以百度下
//       当然,你也可以手动编写get/set/构造方法。

@Data
@Entity
@Table(name = "Person")
public class Person {
    @Id
    @GeneratedValue
    private Long id;

    @Column(name = "created")
    private Long created = System.currentTimeMillis();

    @Column(name = "username")
    private String username;

    @Column(name = "address")
    private String address;

    @Column(name = "phone")
    private String phone;

    @Column(name = "sex")
    private String sex;

}
使用了@Data注解,自动生成get()、set()、toString()方法。
数据库访问层(repository):
package com.myzheng.ssh.repository;


import java.io.Serializable;
import java.util.List;

/*
 *Creted by myzheng
 * On 2019/1/31 14:20
 */
public interface DomainRepository<T,PK> extends Serializable {
    T load(PK id);     //

    T get(PK id);         //通过id获得person

    List<T> findAll();

    void persist(T entity);

    PK save(T entity);

    void saveOrUpdate(T entity);

    void delete(PK id);

    void flush();
}
package com.myzheng.ssh.repository;


import com.myzheng.ssh.entity.Person;

/*
 *Created by myzheng
 * On 2019/1/31 14:52
 */
public interface PersonRepository extends DomainRepository<Person,Long> {
}
package com.myzheng.ssh.repository.impl;

import com.myzheng.ssh.entity.Person;
import com.myzheng.ssh.repository.PersonRepository;
import org.hibernate.Session;
import org.hibernate.SessionFactory;
import org.springframework.beans.factory.annotation.Autowired;

import java.util.List;

/*
 *Created by myzheng
 * On 2019/1/31 16:15
 */
public class PersonRepositoryImpl implements PersonRepository {
    @Autowired
    private SessionFactory sessionFactory;

    private Session getCurrentSession(){   //获得一个session对象
        return this.sessionFactory.openSession();
    }

    public Person load(Long id) {
        return (Person)getCurrentSession().load(Person.class,id);
    }

    public Person get(Long id){
        return (Person)getCurrentSession().get(Person.class,id);
    }

    public List<Person> findAll(){
        return null;
    }

    public void persist(Person entity) {
        getCurrentSession().persist(entity);
    }

    public Long save(Person entity) {
        return (Long)getCurrentSession().save(entity);
    }

    public void saveOrUpdate(Person entity) {
        getCurrentSession().saveOrUpdate(entity);
    }

    public void delete(Long id) {
        Person person = load(id);
        getCurrentSession().delete(person);
    }

    public void flush() {
        getCurrentSession().flush();
    }
}
repository里写了几个比较通用的接口,其他接口都继承此接口,再编写实体类。
注意:这里写的session产生是调用的SessionFactory的openSession()这个方法。之前使用getCurrentSession()一直报错,后来百度了一下才知道,hibernate3版本可以使用getCurrentSession()来创建session,而hibernate4版本则不行。
服务层(service):
package com.myzheng.ssh.service;

import com.myzheng.ssh.entity.Person;
/*
 * Created by myzheng
 * On 2019/2/1 9:52
 */
public interface PersonService {
    Long savePerson();
}
package com.myzheng.ssh.service.impl;


import com.myzheng.ssh.entity.Person;
import com.myzheng.ssh.repository.PersonRepository;
import com.myzheng.ssh.service.PersonService;
import org.springframework.beans.factory.annotation.Autowired;

/*
 * Created by myzheng
 * On 2019/2/1 9:54
 */
public class PersonServiceImpl implements PersonService {
    @Autowired
    private PersonRepository personRepository;

    public Long savePerson(){
        Person person = new Person();
        person.setUsername("*******");
        person.setPhone("1302399****");
        person.setAddress("wuhan");
        person.setSex("man");
        return personRepository.save(person);
    }
}
控制层(controller):
package com.myzheng.ssh.controller;

import com.myzheng.ssh.entity.Person;
import com.myzheng.ssh.service.PersonService;
import com.myzheng.ssh.service.TestService;
import org.springframework.beans.factory.annotation.Autowired;
import org.springframework.stereotype.Controller;
import org.springframework.web.bind.annotation.RequestMapping;
import org.springframework.web.bind.annotation.RequestMethod;
import org.springframework.web.bind.annotation.ResponseBody;

/**
 * Created by myzheng
 * on 2019/1/30 15:13
 */
@Controller
public class MainController {
    @Autowired   //不知道这个注解是干嘛的,等会查
    private TestService testService;

    @Autowired
    private PersonService personService;

    @RequestMapping(value = "test",method = RequestMethod.GET)
    public String test(){
        //        实际返回的是views/test.jsp ,spring-mvc.xml中配置过前后缀
        return "test";
    }

    @RequestMapping(value = "springtest",method = RequestMethod.GET)
    public String SpringTest(){
        return testService.test();
    }

    @RequestMapping(value = "myzheng",method = RequestMethod.GET)
    public String AnotherTest(){
        return testService.anothertest();
    }

    @RequestMapping(value = "saveperson",method = RequestMethod.GET)
    @ResponseBody
    public String savePerson(){
        personService.savePerson();
        return "success!";
    }
}

大功告成!第一个SSH框架搭建成功。再看下数据库。
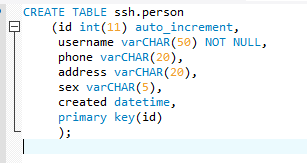

成功。结束。