0.简介
整个 Abp 框架由各个模块组成,基本上可以看做一个程序集一个模块,不排除一个程序集有多个模块的可能性。可以看看他官方的这些扩展库:
可以看到每个项目文件下面都会有一个 xxxModule 的文件,这里就是存放的模块文件,一个模块拥有四个生命周期,分别为 PreInitialize()(预加载)、Initialize()(初始化)、PostInitialize(初始化完成)、Shutdown()(销毁),前三个根据我们上一篇文章的代码可以看到,他是先执行预加载方法,然后执行初始化,最后执行初始化完成方法,销毁方法则是程序退出的时候执行。
模块的主要作用就是在 Abp 框架加载的时候程序集执行初始化操作的,比如说 Abp 库自身的 AbpKernelModule 模块,里面就是各种注入基础设施,执行初始化操作。
可以看看其中代码:
public sealed class AbpKernelModule : AbpModule
{
	public override void PreInitialize()
	{
		// 注册各种过滤器与基础组件
		IocManager.AddConventionalRegistrar(new BasicConventionalRegistrar());

		IocManager.Register<IScopedIocResolver, ScopedIocResolver>(DependencyLifeStyle.Transient);
		IocManager.Register(typeof(IAmbientScopeProvider<>), typeof(DataContextAmbientScopeProvider<>), DependencyLifeStyle.Transient);

		AddAuditingSelectors();
		AddLocalizationSources();
		AddSettingProviders();
		AddUnitOfWorkFilters();
		ConfigureCaches();
		AddIgnoredTypes();
		AddMethodParameterValidators();
	}

	public override void Initialize()
	{
		// 这里是执行替换服务的 Action,Abp 允许用户在预加载操作替换基础设施的服务
		foreach (var replaceAction in ((AbpStartupConfiguration)Configuration).ServiceReplaceActions.Values)
		{
			replaceAction();
		}

		// 安装领域事件总线的基础设施
		IocManager.IocContainer.Install(new EventBusInstaller(IocManager));

		IocManager.Register(typeof(IOnlineClientManager<>), typeof(OnlineClientManager<>), DependencyLifeStyle.Singleton);

		IocManager.RegisterAssemblyByConvention(typeof(AbpKernelModule).GetAssembly(),
			new ConventionalRegistrationConfig
			{
				InstallInstallers = false
			});
	}

	public override void PostInitialize()
	{
		// 权限管理器等初始化才做
		RegisterMissingComponents();

		IocManager.Resolve<SettingDefinitionManager>().Initialize();
		IocManager.Resolve<FeatureManager>().Initialize();
		IocManager.Resolve<PermissionManager>().Initialize();
		IocManager.Resolve<LocalizationManager>().Initialize();
		IocManager.Resolve<NotificationDefinitionManager>().Initialize();
		IocManager.Resolve<NavigationManager>().Initialize();

		if (Configuration.BackgroundJobs.IsJobExecutionEnabled)
		{
			var workerManager = IocManager.Resolve<IBackgroundWorkerManager>();
			workerManager.Start();
			workerManager.Add(IocManager.Resolve<IBackgroundJobManager>());
		}
	}

	public override void Shutdown()
	{
		// 停止所有后台工作者
		if (Configuration.BackgroundJobs.IsJobExecutionEnabled)
		{
			IocManager.Resolve<IBackgroundWorkerManager>().StopAndWaitToStop();
		}
	}
}
1.模块发现与注册
1.1 发现模块
1.1.1 搜索所有定义的模块类型
我们定义好模块之后,Abp 如何发现我们的模块呢?
在最外部,我们使用 services.AddAbp<TStartModule>() 的时候,就传入了启动模块类型。
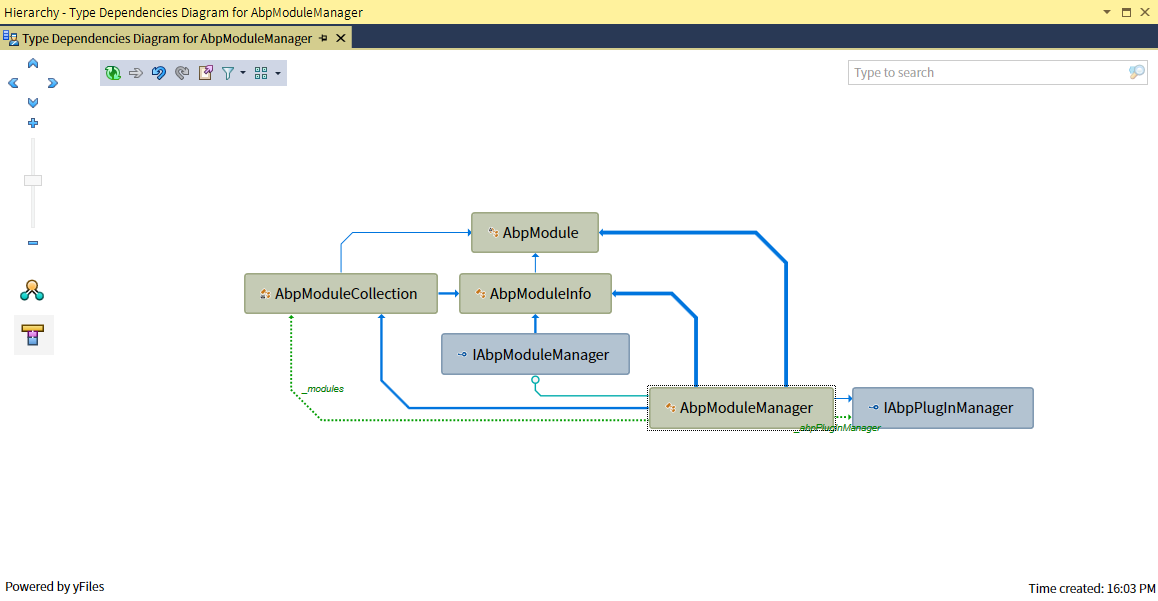
在之前 AbpBootstrapper 的 Initialize() 初始化方法当中通过调用 AbpModuleManager.Initialize(Type startupModule) 方法来初始化,在其内部可以看到:
public virtual void Initialize(Type startupModule)
{
	_modules = new AbpModuleCollection(startupModule);
	LoadAllModules();
}
这里通过传入启动模块来初始化 AboModuleCollection 类。
internal class AbpModuleCollection : List<AbpModuleInfo>
{
	public Type StartupModuleType { get; }

	public AbpModuleCollection(Type startupModuleType)
	{
		StartupModuleType = startupModuleType;
	}

	// 其他代码
}
初始化完成之后,继续调用 LoadAllModules() 方法,这里就开始加载模块了。
private void LoadAllModules()
{
	Logger.Debug("Loading Abp modules...");

	List<Type> plugInModuleTypes;
    // 发现所有 Abp 模块
	var moduleTypes = FindAllModuleTypes(out plugInModuleTypes).Distinct().ToList();

	Logger.Debug("Found " + moduleTypes.Count + " ABP modules in total.");

    // 注册 Abp 模块
	RegisterModules(moduleTypes);
    // 创建模块对应的 AbpModuleInfo 包装类
	CreateModules(moduleTypes, plugInModuleTypes);

    // 将核心模块放在第一位初始化
	_modules.EnsureKernelModuleToBeFirst();
    // 将启动模块放在最后一位进行初始化
	_modules.EnsureStartupModuleToBeLast();

    // 设置每个 ModuleInfo 的依赖关系
	SetDependencies();

	Logger.DebugFormat("{0} modules loaded.", _modules.Count);
}
继续跳转,来到内部 FindAllModuleTypes() 方法,在这个方法里面我们可以看到他调用了 AbpModule 的一个静态方法来根据其启动模块,之后通过启动模块上面的 DependsOnAttribute 特性来递归找到它所有的依赖模块。
private List<Type> FindAllModuleTypes(out List<Type> plugInModuleTypes)
{
	plugInModuleTypes = new List<Type>();

	var modules = AbpModule.FindDependedModuleTypesRecursivelyIncludingGivenModule(_modules.StartupModuleType);

    // 其他代码
	return modules;
}
找到模块之后,在 RegisterModules() 里面通过 IocManager 的注册方法,将所有模块都注入到 Ioc 容器当中,注意这里注册的所有的 Abp 模块都是单例对象。
1.1.2 包装模块信息
在 LoadAllModules() 方法里面,通过 CreateModules() 方法来包装好 ModuleInfo 类并且将其放在之前初始化完成的 AbpModuleCollection 对象 _modules 里面。
private void CreateModules(ICollection<Type> moduleTypes, List<Type> plugInModuleTypes)
{
	foreach (var moduleType in moduleTypes)
	{
        // 解析刚才在 RegisterModules 里面注册的单例模块对象
		var moduleObject = _iocManager.Resolve(moduleType) as AbpModule;
		if (moduleObject == null)
		{
			throw new AbpInitializationException("This type is not an ABP module: " + moduleType.AssemblyQualifiedName);
		}

        // 为这些模块对象初始化基础设施
		moduleObject.IocManager = _iocManager;
		moduleObject.Configuration = _iocManager.Resolve<IAbpStartupConfiguration>();

        // 包装成为 ModuleInfo
		var moduleInfo = new AbpModuleInfo(moduleType, moduleObject, plugInModuleTypes.Contains(moduleType));

		_modules.Add(moduleInfo);

		if (moduleType == _modules.StartupModuleType)
		{
			StartupModule = moduleInfo;
		}

		Logger.DebugFormat("Loaded module: " + moduleType.AssemblyQualifiedName);
	}
}
在每个 ModuleInfo 对象内部都存放有该模块的模块类型信息,以及他的单例对象实例。
1.1.3 确定基本的模块加载顺序
模块在进行加载的时候,第一个加载的模块一定是从核心模块,最后加载的模块肯定是启动模块。所以,这里的 AbpModuleCollection 提供了两个方法,一个是 EnsureKernelModuleToBeFirst() ,一个是 EnsureStartupModuleToBeLast() 。这两个方法的作用第一个就是将 AbpKernelModule 放在第一位,第二个就是将启动模块放在集合的末尾。
public static void EnsureKernelModuleToBeFirst(List<AbpModuleInfo> modules)
{
	var kernelModuleIndex = modules.FindIndex(m => m.Type == typeof(AbpKernelModule));
	if (kernelModuleIndex <= 0)
	{
		// 如果 AbpKernelModule 位于首位则不移动位置
		return;
	}

	var kernelModule = modules[kernelModuleIndex];
	modules.RemoveAt(kernelModuleIndex);
	modules.Insert(0, kernelModule);
}
public static void EnsureStartupModuleToBeLast(List<AbpModuleInfo> modules, Type startupModuleType)
{
	var startupModuleIndex = modules.FindIndex(m => m.Type == startupModuleType);
	if (startupModuleIndex >= modules.Count - 1)
	{
		// 如果启动模块位于尾部则则不移动位置
		return;
	}

	var startupModule = modules[startupModuleIndex];
	modules.RemoveAt(startupModuleIndex);
	modules.Add(startupModule);
}
1.2 依赖解析
之前这些步骤已经将我们程序所使用到的所有模块已经加载完成,并且进行了一个基本的排序操作,以确保我们的模块加载顺序没有大问题。但是仅仅这样是不够的, 我们还需要确保我们依赖的模块比被引用的模块要先加载,这个时候就需要确定每个模块的依赖关系,并且根据这个依赖关系再次进行排序。
1.2.1 设置每个模块的依赖模块
因为我们之前为每个模块包装了一个 ModuleInfo实例,在 ModuleInfo 内部还有一个属性,叫做:
/// <summary>
/// All dependent modules of this module.
/// </summary>
public List<AbpModuleInfo> Dependencies { get; }
所以,在 LoadAllModules() 方法里面还调用了一个方法,叫做 SetDependencies(),这个方法也是很简单的,遍历已经加载完成的 _modules 集合,在里面再根据 AbpModule 提供的 FindDependedModuleTypes() 方法来获取该模块的所有依赖模块类型。找到之后,在 AbpModuleInfo 集合里面查找对应的依赖模块的的 ModuleInfo 信息添加到目标模块的 Dependencies 集合内部。
private void SetDependencies()
{
	foreach (var moduleInfo in _modules)
	{
		moduleInfo.Dependencies.Clear();

		//Set dependencies for defined DependsOnAttribute attribute(s).
		foreach (var dependedModuleType in AbpModule.FindDependedModuleTypes(moduleInfo.Type))
		{
			var dependedModuleInfo = _modules.FirstOrDefault(m => m.Type == dependedModuleType);
			if (dependedModuleInfo == null)
			{
				throw new AbpInitializationException("Could not find a depended module " + dependedModuleType.AssemblyQualifiedName + " for " + moduleInfo.Type.AssemblyQualifiedName);
			}

			if ((moduleInfo.Dependencies.FirstOrDefault(dm => dm.Type == dependedModuleType) == null))
			{
				moduleInfo.Dependencies.Add(dependedModuleInfo);
			}
		}
	}
}
1.2.2 确定正确的模块加载顺序
在所有基本信息加载完成之后,Abp 并没有在 AbpModuleManager 的 Initialize() 里面来进行这个重新排序操作,而是在 StartModules() 方法里面来重新排序。
在 StartModules() 通过 AbpModuleCollection 提供的 GetSortedModuleListByDependency() 方法来根据依赖项重新进行了一次排序。
public List<AbpModuleInfo> GetSortedModuleListByDependency()
{
	var sortedModules = this.SortByDependencies(x => x.Dependencies);
	EnsureKernelModuleToBeFirst(sortedModules);
	EnsureStartupModuleToBeLast(sortedModules, StartupModuleType);
	return sortedModules;
}
这里使用的是存放在 AbpsrcAbpCollectionsExtensionsListExtensions.cs 的一个扩展方法 List<T> SortByDependencies<T>(this IEnumerable<T> source, Func<T, IEnumerable<T>> getDependencies),他是针对 List<T> 集合实现的一种拓扑排序。
排序之后的结果就是按照依赖关系来存放的一个集合,之后通过 List 的 Foreach 方法循环调用其三个生命周期方法即可。
public virtual void StartModules()
{
	var sortedModules = _modules.GetSortedModuleListByDependency();
	sortedModules.ForEach(module => module.Instance.PreInitialize());
	sortedModules.ForEach(module => module.Instance.Initialize());
	sortedModules.ForEach(module => module.Instance.PostInitialize());
}
1.2.3 扩展:拓扑排序
/// <summary>
/// Extension methods for <see cref="IList{T}"/>.
/// </summary>
public static class ListExtensions
{
	/// <summary>
	/// Sort a list by a topological sorting, which consider their  dependencies
	/// </summary>
	/// <typeparam name="T">The type of the members of values.</typeparam>
	/// <param name="source">A list of objects to sort</param>
	/// <param name="getDependencies">Function to resolve the dependencies</param>
	/// <returns></returns>
	public static List<T> SortByDependencies<T>(this IEnumerable<T> source, Func<T, IEnumerable<T>> getDependencies)
	{
		/* See: http://www.codeproject.com/Articles/869059/Topological-sorting-in-Csharp
		 *      http://en.wikipedia.org/wiki/Topological_sorting
		 */

		var sorted = new List<T>();
		var visited = new Dictionary<T, bool>();

		foreach (var item in source)
		{
			SortByDependenciesVisit(item, getDependencies, sorted, visited);
		}

		return sorted;
	}

	/// <summary>
	///
	/// </summary>
	/// <typeparam name="T">The type of the members of values.</typeparam>
	/// <param name="item">Item to resolve</param>
	/// <param name="getDependencies">Function to resolve the dependencies</param>
	/// <param name="sorted">List with the sortet items</param>
	/// <param name="visited">Dictionary with the visited items</param>
	private static void SortByDependenciesVisit<T>(T item, Func<T, IEnumerable<T>> getDependencies, List<T> sorted, Dictionary<T, bool> visited)
	{
		bool inProcess;
		var alreadyVisited = visited.TryGetValue(item, out inProcess);

		if (alreadyVisited)
		{
			if (inProcess)
			{
				throw new ArgumentException("Cyclic dependency found! Item: " + item);
			}
		}
		else
		{
			visited[item] = true;

			var dependencies = getDependencies(item);
			if (dependencies != null)
			{
				foreach (var dependency in dependencies)
				{
					SortByDependenciesVisit(dependency, getDependencies, sorted, visited);
				}
			}

			visited[item] = false;
			sorted.Add(item);
		}
	}
}
后面专门写文章讲解一下拓扑排序,这里贴上代码,后面会改为文章链接的。
贴上详解链接:
https://www.cnblogs.com/myzony/p/9201768.html
2.结语
本篇文章主要针对模块系统进行了一个较为详细地分析,后面将会讲解 Abp 依赖注入相关的代码,如果你觉得对你有用请点个赞,谢谢。