SpringBoot系列之自定义starter实践教程
Springboot是有提供了很多starter的,starter翻译过来可以理解为场景启动器,所谓场景启动器配置了自动配置等等对应业务模块的一个工程,有需要时候直接引入项目就可以,比如需要使用rabbitMQ,直接引入spring-boot-starter-activemq既可,详细介绍可以参考Springboot官方文档关于starters的介绍
查看官方文档,可以找到如下的命名规范:
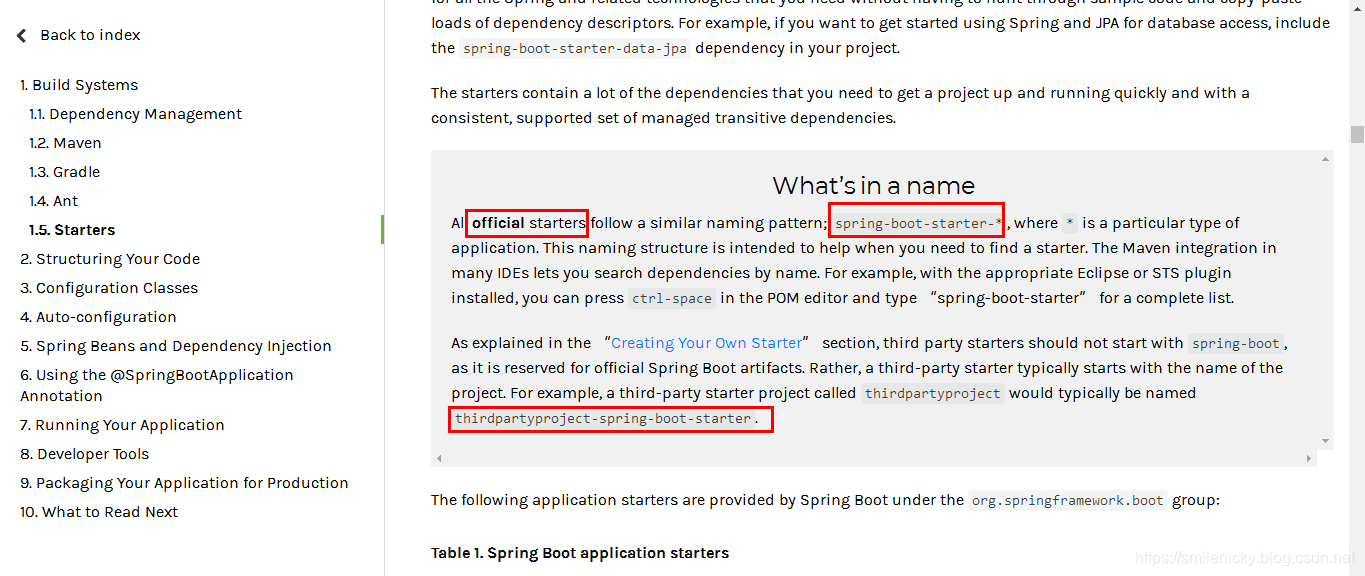
其意思是SpringBoot官方的starter命名要定义为spring-boot-starter-*,自定义或者说第三方的要命名为thirdpartyproject-spring-boot-starter
- 官方命名空间
- 前缀:“spring-boot-starter-”
- 模式:spring-boot-starter-模块名
- 举例:spring-boot-starter-web、spring-boot-starter-actuator、spring-boot-starter-jdbc
- 自定义命名空间
- 后缀:“-spring-boot-starter”
- 模式:模块-spring-boot-starter
- 举例:mybatis-spring-boot-starter
ok,SpringBoot是可以自定义一些starter来使用的,可以用于方便项目开发,本博客以例子的方式介绍:
新建一个没有过多依赖的SpringBoot工程,spring-boot-starter必须引入,其它的可以Junit可以去掉,application类等等都不用,建议先新建一个Empty project,再引入对应配置的方式进行工程创建
pom.xml参考:
<?xml version="1.0" encoding="UTF-8"?>
<project xmlns="http://maven.apache.org/POM/4.0.0" xmlns:xsi="http://www.w3.org/2001/XMLSchema-instance"
         xsi:schemaLocation="http://maven.apache.org/POM/4.0.0 https://maven.apache.org/xsd/maven-4.0.0.xsd">
    <modelVersion>4.0.0</modelVersion>
    <parent>
        <groupId>org.springframework.boot</groupId>
        <artifactId>spring-boot-starter-parent</artifactId>
        <version>2.2.1.RELEASE</version>
        <relativePath/> <!-- lookup parent from repository -->
    </parent>
    <groupId>com.example.springboot</groupId>
    <artifactId>custom-spring-boot-starter-autoconfigurer</artifactId>
    <version>0.0.1-SNAPSHOT</version>
    <name>custom-spring-boot-starter-autoconfigurer</name>
    <description>Demo project for Spring Boot</description>

    <properties>
        <java.version>1.8</java.version>
    </properties>

    <dependencies>
        <dependency>
            <groupId>org.springframework.boot</groupId>
            <artifactId>spring-boot-starter</artifactId>
        </dependency>

    </dependencies>


</project>
模仿其它starter,新建Properties配置类
package com.example.springboot.starter;

import org.springframework.boot.context.properties.ConfigurationProperties;


@ConfigurationProperties(prefix = "custom.hello")
public class HelloProperties {
    private String prefix;
    private String suffix;

    public String getPrefix() {
        return prefix;
    }

    public void setPrefix(String prefix) {
        this.prefix = prefix;
    }

    public String getSuffix() {
        return suffix;
    }

    public void setSuffix(String suffix) {
        this.suffix = suffix;
    }
}
编写业务测试类:
package com.example.springboot.starter.service;

import com.example.springboot.starter.HelloProperties;

public class HelloService {

    HelloProperties helloProperties;

    public HelloProperties getHelloProperties() {
        return helloProperties;
    }

    public void setHelloProperties(HelloProperties helloProperties) {
        this.helloProperties = helloProperties;
    }

    public String sayHello(String name){
        return helloProperties.getPrefix()+"-"+name+helloProperties.getSuffix();
    }
}
编写自定义的自动配置类:
package com.example.springboot.starter;

import com.example.springboot.starter.service.HelloService;
import org.springframework.beans.factory.annotation.Autowired;
import org.springframework.boot.autoconfigure.condition.ConditionalOnWebApplication;
import org.springframework.boot.context.properties.EnableConfigurationProperties;
import org.springframework.context.annotation.Bean;
import org.springframework.context.annotation.Configuration;


/**
 * <pre>
 *  自定义的自动配置类
 * </pre>
 *
 * <pre>
 * @author nicky.ma
 * 修改记录
 *    修改后版本:     修改人:  修改日期: 2020/01/02 14:31  修改内容:
 * </pre>
 */
@Configuration
@ConditionalOnWebApplication
@EnableConfigurationProperties(HelloProperties.class)
public class HelloServiceAutoConfiguration {

    @Autowired
    HelloProperties helloProperties;

    @Bean
    public HelloService helloService(){
        HelloService helloService = new HelloService();
        helloService.setHelloProperties(helloProperties);
        return helloService;
    }
}
必须新建META-INF/spring.factories,然后加入如下配置,自动配置类才可以被扫描到,具体原因可以参考我之前的源码学习笔记:Springboot源码学习专栏
org.springframework.boot.autoconfigure.EnableAutoConfiguration=
  com.example.springboot.starter.HelloServiceAutoConfiguration
example比较简单,starter就创建好了,接着需要新建一个web工程来实践,如图maven配置,引入custom-spring-boot-starter-autoconfigurer依赖
<dependencies>
		<dependency>
			<groupId>org.springframework.boot</groupId>
			<artifactId>spring-boot-starter-web</artifactId>
		</dependency>

		<dependency>
			<groupId>com.example.springboot</groupId>
			<artifactId>custom-spring-boot-starter-autoconfigurer</artifactId>
			<version>0.0.1-SNAPSHOT</version>
		</dependency>

	</dependencies>
新建一个接口测试一下即可:
@Autowired
    HelloService helloService;

@GetMapping(value = {"/sayHello/{name}"})
    @ResponseBody
    public String sayHello(@PathVariable("name")String name){
        return helloService.sayHello(name);
    }
运行项目后,返回链接即可:http://localhost:8082/web/sayHello/testname
例子代码下载:github下载链接