上次实现了用户注册,这次来实现用户登录,用到IAuthenticationManager的SignOut、SignIn方法和基于声明的标识。最后修改用户注册代码实现注册成功后直接登录。
目录:
ASP.NET MVC5 网站开发实践(一) - 框架(续) 模型、数据存储、业务逻辑
ASP.NET MVC5 网站开发实践(二) - 用户部分(1)用户注册
一、创建ClaimsIdentity
ClaimsIdentity(委托基于声明的标识)是在ASP.NET Identity身份认证系统的登录时要用到,我们在UserService中来生成它。
1、打开IBLL项目InterfaceUserService接口,添加接口方法ClaimsIdentity CreateIdentity(User user, string authenticationType);
2、打开BLL项目的UserService类,添加CreateIdentity方法的实现代码
public ClaimsIdentity CreateIdentity(User user, string authenticationType)
        {
            ClaimsIdentity _identity = new ClaimsIdentity(DefaultAuthenticationTypes.ApplicationCookie);
            _identity.AddClaim(new Claim(ClaimTypes.Name, user.UserName));
            _identity.AddClaim(new Claim(ClaimTypes.NameIdentifier, user.UserID.ToString()));
            _identity.AddClaim(new Claim("http://schemas.microsoft.com/accesscontrolservice/2010/07/claims/identityprovider", "ASP.NET Identity"));
            _identity.AddClaim(new Claim("DisplayName", user.DisplayName));
            return _identity;
        }
二、获取AuthenticationManager(认证管理器)
打开Ninesky.Web项目 Member区域的UserController,添加AuthenticationManager属性,在HttpContext.GetOwinContext()中获取这个属性。
#region 属性
        private IAuthenticationManager AuthenticationManager { get { return HttpContext.GetOwinContext().Authentication; } }
        #endregion
三、创建登录视图模型
Member区域的模型文件夹添加视图模型
using System.ComponentModel.DataAnnotations;

namespace Ninesky.Web.Areas.Member.Models
{
    /// <summary>
    /// 登录模型
    /// <remarks>
    /// 创建:2014.02.16
    /// </remarks>
    /// </summary>
    public class LoginViewModel
    {
        /// <summary>
        /// 用户名
        /// </summary>
        [Required(ErrorMessage = "必填")]
        [StringLength(20, MinimumLength = 4, ErrorMessage = "{2}到{1}个字符")]
        [Display(Name = "用户名")]
        public string UserName { get; set; }

        /// <summary>
        /// 密码
        /// </summary>
        [Required(ErrorMessage = "必填")]
        [Display(Name = "密码")]
        [StringLength(20, MinimumLength = 6, ErrorMessage = "{2}到{1}个字符")]
        [DataType(DataType.Password)]
        public string Password { get; set; }

        /// <summary>
        /// 记住我
        /// </summary>
        [Display(Name = "记住我")]
        public bool RememberMe { get; set; }
    }
}
四、创建登录页面
在UserCcontroller中添加(string returnUrl) action
/// <summary>
        /// 用户登录
        /// </summary>
        /// <param name="returnUrl">返回Url</param>
        /// <returns></returns>
        public ActionResult Login(string returnUrl)
        {
            return View();
        }
右键添加强类型视图,模型为LoginViewModel
@model Ninesky.Web.Areas.Member.Models.LoginViewModel

@{
    ViewBag.Title = "会员登录";
}

@using (Html.BeginForm())
{
    @Html.AntiForgeryToken()

    <div class="form-horizontal">
        <h4>会员登录</h4>
        <hr />
        @Html.ValidationSummary(true)

        <div class="form-group">
            @Html.LabelFor(model => model.UserName, new { @class = "control-label col-md-2" })
            <div class="col-md-10">
                @Html.EditorFor(model => model.UserName)
                @Html.ValidationMessageFor(model => model.UserName)
            </div>
        </div>

        <div class="form-group">
            @Html.LabelFor(model => model.Password, new { @class = "control-label col-md-2" })
            <div class="col-md-10">
                @Html.EditorFor(model => model.Password)
                @Html.ValidationMessageFor(model => model.Password)
            </div>
        </div>

        <div class="form-group">
            @Html.LabelFor(model => model.RememberMe, new { @class = "control-label col-md-2" })
            <div class="col-md-10">
                @Html.EditorFor(model => model.RememberMe)
                @Html.ValidationMessageFor(model => model.RememberMe)
            </div>
        </div>

        <div class="form-group">
            <div class="col-md-offset-2 col-md-10">
                <input type="submit" value="登录" class="btn btn-default" />
            </div>
        </div>
    </div>
}

@section Scripts {
    @Scripts.Render("~/bundles/jqueryval")
}
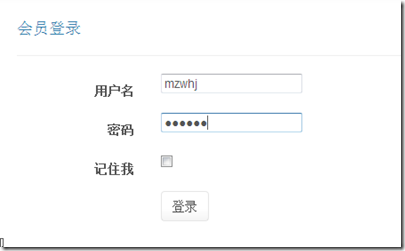
效果
五、创建用户登录处理action
在UserCcontroller中添加 httppost类型的 Login action中先用ModelState.IsValid看模型验证是否通过,没通过直接返回,通过则检查用户密码是否正确。用户名密码正确用CreateIdentity方法创建标识,然后用SignOut方法清空Cookies,然后用SignIn登录。
[ValidateAntiForgeryToken]
        [HttpPost]
        public ActionResult Login(LoginViewModel loginViewModel)
        {
            if(ModelState.IsValid)
            {
                var _user = userService.Find(loginViewModel.UserName);
                if (_user == null) ModelState.AddModelError("UserName", "用户名不存在");
                else if (_user.Password == Common.Security.Sha256(loginViewModel.Password))
                {
                    var _identity = userService.CreateIdentity(_user, DefaultAuthenticationTypes.ApplicationCookie);
                    AuthenticationManager.SignOut(DefaultAuthenticationTypes.ApplicationCookie);
                    AuthenticationManager.SignIn(new AuthenticationProperties() { IsPersistent = loginViewModel.RememberMe }, _identity);
                    return RedirectToAction("Index", "Home");
                }
                else ModelState.AddModelError("Password", "密码错误");
            }
            return View();
        }
六、修改用户注册代码
让用户注册成功后直接登录
七、注销
在UserCcontroller中添加在Logout action
/// <summary>
        /// 登出
        /// </summary>
        /// <returns></returns>
        public ActionResult Logout()
        {
            AuthenticationManager.SignOut(DefaultAuthenticationTypes.ApplicationCookie);
            return Redirect(Url.Content("~/"));
        }
八、总结
主要是用到了ClaimsIdentity(基于声明的标识)、AuthenticationManager的SignOut、SignIn方法。
代码 Ninesky二.2.rar:http://pan.baidu.com/s/1jGI9e66

